1
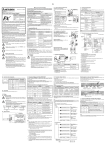
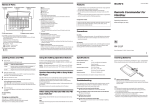
WS 9006 instruction manual
User Manual
1. Features
1.1 Rain Gauge
-
Current, 1 Hr, 24 Hrs and Total Rainfall Level checking
-
Daily, Weekly and Monthly Rainfall History Checking
in Bar Chart Format
-
“Since” Function for Checking the Exact Total Rainfall
-
Rain Sensor with Alarm
1.2 Time
-
Time Display with Date
1.3 Temperature
-
Indoor & Outdoor Temperature
-
Maximum and Minimum temperature
-
Temperature Alert Function
2. Main Unit Appearance
Part A- LCD
A1 : Temperature
A4 : Rain Alert
A2 : Trend Indicator
A5 : Rain Gauge Bar Chart
A3 : Time
Part B- Button
B1 : “▲/HISTORY” button
B5 : “ALERT” button
B2 : “RAIN/SETTING” button
B6 : “MAX/MIN” button
B3 : “SEARCH / IN/OUT TEMP” button
B4 : “▼/SINCE” button
B7 : “RESET” button
Part C- Structure
C1 : Wall Mount Hole
C2: Battery Cover
3. Rain Sensor
D1: Battery Cover
C3: Stand
4. Getting Started:
4.1 Main Unit
Open battery Cover (C1)
Insert 3 x AA size batteries observing polarity [“ +” and “ –“ marks]
Replace battery compartment cover. The product briefly shows all the display
segment
4.2 Rain Sensor
Battery compartment of rain sensor is locating on the bottom of unit (D1), unscrews
the batteries cover to open.
Insert 2 x AAA batteries observing polarity [ “+” and “–“ marks]
5. Installation
5.1 Main Unit
The main unit can be placed onto any flat surface (C3), or wall mounted by the hanging
hole (C1) at the back of the unit.
5.2 Rain sensor
The rain sensor should be placed onto outdoor flat surface..
Note:
Transmissions between receiver and transmitter can reach up to 30m in open
area.
Open Area: there are no interfering obstacles such as buildings, trees, vehicles,
high voltage lines, etc.
6. Manual Time Setting
Hold “SETTING” (B2) button for 3 seconds to enter time setting mode.
Press “▲” (B1) or “▼” (B4) button to adjust the setting and press “SETTING” button
(B2) to confirm each setting.
(By keeping the “▲” (B1) or “▼” (B4) button pressed, could accelerate the process
and reach the desired value more quickly)
The setting sequence is shown as follow: 12/24 Format, Hour, Minute, Year, Month/
Day Sequence, Month, Day, MM/Inch, C/F, and Rain Alert On/Off.
Note: All Setting modes will automatically exit in 15 seconds without any adjustment
7. Rain Gauge
7.1 Reception of outdoor transmitter
The main unit automatically starts receiving transmission from outdoor rain sensor
after time setting. The symbol
flashes when the signal is received successfully.
After batteries inserted, the rain sensor automatically transmits temperature signal
to the main unit.
If main unit failed to receive transmission from outdoor rain sensor after the
batteries inserted (“- - . –”display on the LCD), hold “SEARCH” button (B3) on the
main unit for 3 seconds to receive transmission manually.
7.2 Rain Sensor Alarm
In time setting mode, select the rain alert on/off.
Symbol
appear on the display if rain alert function is activated
When raining, the alarm signal will sound for around 2 minutes; symbol
will
flash on the display. Press any button to stop the alarm.
7.3
The symbol stop flashing 30 minutes after the rain has finished.
Rain Gauge Display
Press “RAIN” (B2) button to view different display. The sequence is shown as follow:
TIME → Day/Month
→ Total rainfall status(TOTAL) → Last 1 hour rainfall status (1H)
→ Last 24hours rainfall status (24H)
→ Current rainfall status (
)
Total rainfall mode: Show the rainfall from the unit started up until you clear to zero
or reset.
When display “RAINFALL TOTAL”, hold “RAIN” (B2) button for 3 seconds to reset the
record to zero.
1 hour rainfall (1H) mode: Show the total rainfall of last hour and will update the
status for every 10 minutes.
The last 24 hour rainfall: Showed the total rainfall of last 24 hours and will update
the status for every hour.
Current rainfall: Showed the current rainfall status and will update automatically. If
there’s no rain in past 30 minutes, the counter will reset to zero.
SINCE mode: Press “SINCE” (B4) button to roll SINCE time, day and year for
checking the since time of each rainfall mode
7.4 Bar Graph Indication and History (Daily, Weekly and Monthly Rainfall)
Press “HISTORY” (B1) button to select daily, weekly and monthly rainfall trend.
Hold “HISTORY” (B1) button for 3 seconds to view current data (today, this week or
this month), then press “HISTORY” (B1) button again to view the history data (past
1-6 days, weeks or months) stored in memory.
Hold “HISTORY” (B1) button and “SINCE”(B4) button at the same time for 3 seconds
to reset the memory.
8. Temperature
8.1 Indoor/Outdoor Temperature
Press “IN/OUT TEMP” (B3) button to select to view Indoor OR Outdoor temperature
display.
8.2 Maximum / Minimum Temperature
Press “MAX/MIN” button (B6) to show the maximum recorded Indoor /Outdoor
Temperature. “MAX” is shown on the LCD
Press “MAX/MIN” button (B6) again to show the minimum recorded Indoor/Outdoor
Temperature. “MIN” is shown on the LCD.
Hold “MAX/MIN” button (B6) for 3 seconds to clear the recorded maximum and
minimum reading.
8.3 Outdoor Temperature Trend
The trend pointer (A2) displayed on the LCD indicates the trend of the outdoor
temperature.
Indicating the outdoor
Indicating the outdoor
Indicating the outdoor
temp. is rising
temp. is steady
temp. is falling
8.4 Temperature Alert Function:
Hold “ALERT” button (B5) for 3 seconds to enter Temperature Alert setting,
Temperature’s digits flash.
Press “▲” (B1) or “▼” (B4) button to select Indoor or Outdoor temperature alert.
Press “ALERT” button (B5) to confirm the setting.
Press “▲” (B1) or “▼” (B4) button to set the upper” ” and lower “
temperature. Press “ALERT “button (B5) to confirm the setting.
” limit of the
Press “ALERT” button (B5) to set the Temperature Alert function ON or OFF (“
”
appears on the LCD if this function is activate).
9. Low batteries indication:
The low battery icon “
”will appear when outdoor rain sensor is in low battery
status. The batteries should be replaced.
10. Precautions
Use a pin to press the reset button (B7) if the Unit does not work properly.
All Setting Modes will automatically exit in 15 seconds without any adjustment.
The clock loses its time information when the battery is removed.
Avoid placing the clock near interference sources/metal frames such as computer or TV sets.
Do not expose it to direct sunlight, heavy heat, cold, high humidity or wet areas
Never clean the device using abrasive or corrosive materials or products. Abrasive cleaning
agents may scratch plastic parts and corrode electronic circuits
11. Specifications
Indoor Data:
Temperature range:
-10°C to +50°C [+14 to +122°F]
Temperature Units
°C or °F [switchable]
Outdoor Data:
Transmission distance: (open
30m @ 433MHz
area)
Temperature range:
-50 to 70°C [-58 to +158°F]
Rainfall Quantity
0 ~ 9999 mm (0 ~ 999.9 inch)
Main Unit Dimensions:
W95 x h122 x d25 mm
Rain Sensor Dimensions:
W132 x h160 x d132 mm
Battery Requirements:
Base Station [indoor]:
3 x AA batteries
Sensors [outdoor]:
2 x AA batteries