1
Right choice for ultimate yield
LSIS strives to maximize customers' profit in gratitude of choosing us for your
partner.
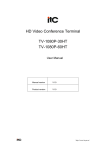
SV-iE5 User Manual
0.1~0.4kW (200V)
z Read
this manual carefully before
installing, wiring, operating, servicing
or inspecting this equipment.
z Keep
this manual within easy reach
for quick reference.
Instructions
Thank you for purchasing LS Variable Frequency Drives!
SAFETY INSTRUCTIONS
Safety instructions are prepared to use the product safely and correctly by preventing any accident or risk beforehand, so
they should be always kept.
z In this manual, safety instructions are divided into two classes; each has the following meaning.
WARNING
Improper operation may result in serious personal injury or death
CAUTION
Improper operation may result in slight to medium personal injury or property damage
z Throughout this manual, we use the following two illustrations to make you aware of safety considerations.
identifies potential hazards under certain conditions.
identifies shock hazards under certain conditions.
z After reading this manual, keep it handy for any user to quickly refer to
z Read this manual carefully to user SV-iE5 Series Inverter’s functions appropriately and safely.
Warning
z Do not remove the cover while the power is applied or the unit is in operation.
Or, it may cause electric shock.
z Do not run the inverter with the front cover removed.
Or, it may cause an electric shock due to high voltage terminals or charged capacitor exposure.
z Do not remove the cover except for periodic inspections or wiring, even if the input power is not applied.
Or, it may cause an electric shock due to charged capacitor exposure even if the power is cut off.
z Wiring and periodic inspections should be performed at least 10 minutes after disconnecting the input power and
after checking the DC link voltage is discharged with a meter(below DC 30V).
Or, it may cause an electric shock (below DC 30V)
z Operate the switches with dry hands.
Or, it may cause an electric shock.
z Do not use the cable when its insulating tube is damaged.
Or, it may cause an electric shock.
z Do not subject the cables to any heavy load stressful to them.
Or, it may cause an electric shock due to damaged cable.
1
Instructions
Caution
z Install the inverter on a non-flammable surface.
Or, it may cause a fire if being installed on or closely to a flammable material.
z Disconnect the input power if the inverter gets damaged.
Or, it may result in a secondary accident and fire.
z After the input power is applied or removed, the inverter will remain hot for a couple of minutes.
Otherwise, you get bodily injuries such as skin-burn or damage.
z Do not apply power to a damaged inverter or an inverter with parts missing even if the installation is complete.
Or, it may cause an electric shock.
z Do not allow screw, metal chips, water drops, oil or other impurities into the inverter.
Or, it may cause a fire.
Operating Precautions
(1) Transport and installation
z Carry it correctly according to the specified weight.
z Do not stack the inverter boxes higher than recommended.
z Install according to instruction specified in this manual.
z Do not open the cover during transport.
z Do not place any heavy load on the inverter.
z Check whether the inverter mounting direction is correct.
z Do not drop the inverter, or subject it to impact.
z Follow your national electrical code for grounding(200V).
z As soon as detaching PCB(Printed Circuit Board) for installation or repair, make sure to place it on conductor.
Otherwise, it may cause destruction due to static electricity.
z Use the inverter under the following environmental conditions.
Environment
2
Ambient temperature
- 10 ~ 40 ℃ (non-freezing)
Relative humidity
90% RH or less (non-condensing)
Storage temperature
- 20 ~ 65 ℃
Service condition
Free of any corrosive gas, combustible gas, oil mist or dust
Altitude, vibration
Max. 1,000m above the sea level · 5.9m/sec²(=0.6g) or less
Instructions
(2) Wiring
z Do not connect a power factor correction capacitor, surge suppressor, or RFI filter to the output of the inverter.
z The connection orientation of the output cables should be in good order of U, V, W.
z Incorrect terminal wiring could result in the equipment damage.
z Reversing the polarity (+/-) of the terminals could damage the inverter.
z The only authorized and skilled person should perform wiring and inspections.
z Always install the inverter before wiring.
(3) Trial run
z Check all parameters during operation. Changing parameter values might be required depending on the load.
z Always apply permissible range of voltage to the each terminal as indicated in this manual. Otherwise, it could lead
to inverter damage.
(4) Operation precautions
z Note that if the Auto restart function is selected, you must stay away from the equipment as a motor will restart
suddenly after an alarm stop.
z The Stop key on the keypad is activated only when the setting has been made. Prepare an emergency stop switch
separately.
z If any fault is reset with the reference signal present, a sudden start will automatically occur. Check that the
reference signal is turned off in advance. Otherwise an accident could occur.
z Do not modify or alter the inverter without permission.
z Do not use a magnetic contactor on the inverter input for frequent starting/stopping of the inverter.
z Use a noise filter to reduce the effect of electromagnetic interference. Otherwise nearby electronic equipment may
be affected.
z In case of input voltage unbalance, install AC reactor. Power Factor capacitors and generators may become
overheated and damaged due to potential high frequency noise transmitted from inverter.
z Before operating unit and prior to user programming, reset user parameters to default settings.
z Inverter can easily be set to high-speed operations, Verify capability of motor or machinery prior to operating unit.
z Stopping torque is not produced when using the DC-Break function. Install separate equipment when stopping
torque is needed.
(5) Fault prevention precautions
z Provide a safety backup such as an emergency brake which will prevent the machine and equipment from
hazardous conditions if the inverter fails.
(6) Maintenance, inspection and parts replacement
z Do not conduct a megger (insulation resistance) test on the control circuit of the inverter.
z Refer to Chapter 13 for periodic inspection (parts replacement).
3
Instructions
(7) Disposal
z Dispose of the inverter as treating industrial waste.
(8) General instructions
z Many of the diagrams and drawings in this instruction manual show the inverter without a circuit breaker, a cover or
partially open. Never run the inverter like this. Always place the cover with circuit breakers and follow this instruction
manual when operating the inverter.
4
Instructions
User’s Manual
z The purpose of this manual is to provide the user with the necessary information to install, program, start up and
maintain the SV-iE5 series inverter.
z To assure successful installation and operation of the SV-iE5 series inverter, the material presented must be
thoroughly read and understood before proceeding
z This manual contains...
Ch.
Title
Description
1
Basic information Provides general information and precautions for safe use of the inverter.
& Precautions
2
Installation
Provides instructions on how to install the SV-iE5 inverter.
3
Wiring
Provide the information on how to wire the input power and signal terminal
strip
4
Peripheral
Describes how to connect the optional peripheral devices to the inverter.
5
Loader
Illustrates keypad features and display.
6
Basic Operation
Provides instructions for quick start of the inverter.
7
Function List
Summarized table of functions.
8
Control
Block Shows control flow to help users easily understand operation mode.
Diagram
9
Basic Functions
Provides information on basic functions such as frequency setup and
operation commands.
10
Advanced
Indicates advanced functions used for system application.
Functions
11
Monitoring
Gives information on the operating status and fault information.
12
Protective
Outlines protective functions of the motor and the inverter.
Functions
13
Troubleshooting
Provides information on potential troubles or abnormal situations.
& Maintenance
14
COM Options
Gives information on the inverter mounting with communication options.
15
Specifications
Gives information on Input/Output rating, control type and more details of
the SV-iE5 inverter.
5
Contents
Contents
1. Basic Information & Precaution ................................................................................................................................ 1-1
2.
3.
4.
5.
6.
1.1
Important precautions ............................................................................................................................... 1-1
1.2
Parts’ Names & Details ............................................................................................................................. 1-2
1.3
Assembling & Disassembling.................................................................................................................... 1-3
Installation................................................................................................................................................................. 2-1
2.1
Installation precautions ............................................................................................................................. 2-1
2.2
Dimensions................................................................................................................................................ 2-4
Wiring ........................................................................................................................................................................ 3-1
3.1
Control Terminal Wiring Diagram.............................................................................................................. 3-1
3.2
Power Terminal Wiring Diagram ............................................................................................................... 3-1
3.3
Grounding Specification ............................................................................................................................ 3-2
3.4
Control Terminal Wiring Specification ....................................................................................................... 3-3
3.5
PNP/NPN Modes Switch........................................................................................................................... 3-4
Peripheral.................................................................................................................................................................. 4-1
4.1
Configuration of Peripherals ..................................................................................................................... 4-1
4.2
Recommended MCCB and Magnetic Contactor ...................................................................................... 4-2
4.3
Recommended Reactors .......................................................................................................................... 4-2
Loader ....................................................................................................................................................................... 5-1
5.1
Configuration ............................................................................................................................................. 5-1
5.2
Alpha-numeric view on the LED ............................................................................................................... 5-2
5.3
Moving to other groups ............................................................................................................................. 5-3
5.4
How to move among codes in a group ..................................................................................................... 5-4
5.5
How to set parameters .............................................................................................................................. 5-7
5.6
Monitoring Operation Status ..................................................................................................................... 5-9
Basic Operation ........................................................................................................................................................ 6-1
6.1
Frequency Setting and Basic Operation................................................................................................... 6-1
7.
Function List.............................................................................................................................................................. 7-1
8.
Control Block Diagram............................................................................................................................................ 8-15
9.
6
8.1
Control Flow ............................................................................................................................................ 8-15
8.2
Frequency Setting & Drive Mode Setting ............................................................................................... 8-15
8.3
Frequency Setting, Drive Acc./Dec. Setting and V/F Voltage Control.................................................... 8-16
Basic Functions......................................................................................................................................................... 9-1
9.1
Frequency Setting ..................................................................................................................................... 9-1
9.2
Multi-Step Frequency Setting.................................................................................................................... 9-4
9.3
Operating command setting method......................................................................................................... 9-5
9.4
Accel/Decel time and pattern setting ........................................................................................................ 9-8
Contents
9.5
V/F Control ...............................................................................................................................................9-11
9.6
Stop method select.................................................................................................................................. 9-14
9.7
Frequency limit........................................................................................................................................ 9-15
10. Advanced Functions ............................................................................................................................................... 10-1
10.1
DC Brake................................................................................................................................................. 10-1
10.2
Jog operation........................................................................................................................................... 10-3
10.3
UP – DOWN operation............................................................................................................................ 10-4
10.4
3-Wire operation...................................................................................................................................... 10-5
10.5
Dwell operation ....................................................................................................................................... 10-5
10.6
Slip Compensation Control ..................................................................................................................... 10-6
10.7
PI Control ................................................................................................................................................ 10-8
10.8
Speed search operation ........................................................................................................................ 10-10
10.9
Auto Restart Operation ......................................................................................................................... 10-12
10.10
Operation Sound Select (carrier frequency change)............................................................................ 10-13
10.11
Parameter initialize/Lock....................................................................................................................... 10-13
11. Monitoring ................................................................................................................................................................11-1
11.1
Operating Status Monitoring ....................................................................................................................11-1
11.2
Monitoring I/O Terminal ............................................................................................................................11-3
11.3
Monitoring Fault Condition .......................................................................................................................11-3
11.4
Analogue output .......................................................................................................................................11-5
11.5
Multi-function output terminal and Relay .................................................................................................11-6
12. Protective Function ................................................................................................................................................. 12-1
12.1
Overload Trip........................................................................................................................................... 12-1
12.2
Stall prevention........................................................................................................................................ 12-1
12.3
User’s fault detection .............................................................................................................................. 12-2
12.4
External trip signal................................................................................................................................... 12-3
12.5
Frequency command loss....................................................................................................................... 12-4
12.6
Inverter overload ..................................................................................................................................... 12-5
13. Troubleshooting and Maintenance ......................................................................................................................... 13-1
13.1
Protective Functions................................................................................................................................ 13-1
13.2
Fault Remedy .......................................................................................................................................... 13-3
13.3
Precautions for maintenance .................................................................................................................. 13-5
13.4
Checklist.................................................................................................................................................. 13-5
13.5
Parts Replacement.................................................................................................................................. 13-5
14. COM Option (RS-485) ............................................................................................................................................ 14-1
14.1
Introduction.............................................................................................................................................. 14-1
14.2
Specifications .......................................................................................................................................... 14-1
14.3
Installation ............................................................................................................................................... 14-2
7
Contents
14.4
Inverter functional code setting............................................................................................................... 14-3
14.5
Operation................................................................................................................................................. 14-4
14.6
COM Protocol(ModBus-RTU) ................................................................................................................. 14-4
14.7
Communication Protocol (LS BUS) ........................................................................................................ 14-5
14.8
Parameter code list ................................................................................................................................. 14-9
14.9
Troubleshooting..................................................................................................................................... 14-15
14.10
ASCII Code List..................................................................................................................................... 14-16
15. Specifications .......................................................................................................................................................... 15-1
15.1
Technical data ......................................................................................................................................... 15-1
DECLARATION OF CONFORMITY ............................................................................................................................. 15-1
8
Chapter 1. Basic Information & Precaution
1. Basic Information & Precaution
1.1 Important precautions
Unpacking
& Unpack the package and check the inverter type, output ratings on the nameplate and
Inspection
whether the inverter is intact. In addition, inspect the inverter for any damage that may
have occurred during shipping.
Inverter type
Rated Input spec.
Rated output spec.
Inverter capacity
Barcode and serial number
Manufacturer and
manufacturing country
SV
004
iE5
Motor rating
Series name
001
0.1 [kW]
002
0.2 [kW]
004
0.4 [kW]
Extra
-
small
commercial
inverter
1
C
Input power
RS-485 option
1
2
Single
phase
200V
3
200V
Phases
C
No option
-
No option
z Accessories
If you have found any discrepancy, damage, etc., contact your dealer or sales
representative (refer to the rear cover page of this manual).
Preparations
instruments
of Instruments and parts to be prepared depend on how the inverter is operated. Prepare
and optional (additional) equipments and parts as necessary.
parts required for
operation
Installation
To operate the inverter with high performance for a long time, install the inverter
considering a proper place and the correct direction with proper clearances.
Wiring
Connect the power supply, motor and operation signals (control signals) to the terminal
block. Note that incorrect connection may damage the inverter and peripheral devices.
1-1
Chapter 1. Basic Information & Precaution
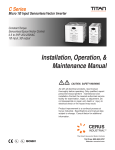
1.2 Parts’ Names & Details
z Appearance
Variable
Status
LED
resistance
for
frequency setting
display
RUN button
Front cover:
Removed when wiring and
Cover screws
installing
Inverter nameplate:
Indicating the capacity and
rating of the inverter
z Inside view with front cover removed
Refer to 1.3 for details when remove front cover.
COM part: built in for COM
Power input
type product
NPN, PNP Select switch
Analogue input select switch
Control signal terminal
Versatile relay output terminal
DC power (upper)
Inverter ground terminal
Motor output (lower)
1-2
Chapter 1. Basic Information & Precaution
1.3 Assembling & Disassembling
z To remove the front cover, press both indented sides of the cover lightly and pull it up.
Remove the screw
for wiring
Press the indented
sides to remove the
cover.
z The front cover is completely removed if lifting it up and removing the fixed part. Wiring and installation is
available only with the cover removed.
After the cover
removed, the
terminal wiring is
possible.
Caution
For the control terminal, use the cables presented in this manual. Using a thicker one than
the reference type may interfere with assembling or subject the cable sheath to damage.
1-3
Chapter 2. Installation
2. Installation
2.1 Installation precautions
CAUTION
z Handle the inverter with care to prevent the plastic components damaged.
z Avoid installing the inverter in a place where vibration from bogie or press exists.
z Install in a location where ambient air temperature is within the permissible range (-10 ~ 40°C).
z Maximum Surrounding Air Temperature of 40 °C (UL508C)
5cm
5cm
5cm
< Ambient air Temp Checking Location >
z The inverter will be very hot during operation. Install it on a flame-retardant surface.
z Inverter is a heating source, so the installation place needs enough space for proper heat dissipation
z In case installed in a panel without ventilating opening, secure space as presented in Figure 1.
z If the inverters are installed in a row, make sure to leave space between and among them as seen in Figure 2.
Note that side space may vary depending on a panel’s cooling efficiency.
17cm
5cm
20cm
20cm
5cm
17cm
[Figure 1]
[Figure 2]
z Protect from high temperature and high moisture and/or direct sunlight.
z Install the inverter inside a “totally enclosed” panel to protect against oil mist, water or dust.
2-1
Chapter 2. Installation
z When two or more inverters are installed inside a panel, the inverters and fans must be installed in proper
positions with extreme care.
z Install the inverter using screws or bolts to insure the inverter is firmly fastened.
< For installing multiple inverters in a panel >
Hot air
Caution
Arrange hot air from the inverters is discharged when installing them on a panel. ‘X’ shows
incorrect layout example.
A fan is to be installed so that the air inside the inverter is well discharged as seen in the
Caution
left figure. ‘X’ shows an example of reduced cooling effect, possibly causing the inverter to
overheat.
2-2
Chapter 2. Installation
Warning
z Follows procedure below when Install the inverter for successful operation.
Caution
iE5 has self cooling structure using air. Therefore install the inverter vertically possible to air
circulation. Malfunction or fire may be caused when installed horizontally.
z Heat protection pin of iE5 is a high heating element. Caution to contact while operate
Caution
the products.
z Since switching heat occurs when inverter output without connection motors, Do not
operate inverter independently. Skin burn or malfunction may be caused.
2-3
Chapter 2. Installation
2.2 Dimensions
W
H1
H
D
W1
Inverter
001iE5-1
002iE5-1
004iE5-1
002iE5-2
004iE5-2
W
68
68
68
68
68
68
H
128
128
128
128
128
128
D
85
85
115
85
85
115
H1
124
124
124
124
124
124
W1
64
64
64
64
64
64
φ
4.2
4.2
4.2
4.2
4.2
4.2
0.44
0.46
0.68
0.43
0.45
0.67
Weight(kg)
Note
Use M4 screw for fixing the inverter on a panel.
2-4
001iE5-2
Chapter 3. Wiring
3. Wiring
3.1 Control Terminal Wiring Diagram
Description
T/M
P1
P2
P3
G
FX : forward run
Multi
RX : reverse run
function
EST : emergency stop
Input
P5
terminal
VR
12V power(12V,100mA) for external volume
AI
Analogue frequency input(Voltage or current)
AM
Analogue output: 0 ~ 10V
CM
Input signal common
30A
Multi
function A contact output
30B
relay
output B contact output
30C
terminal
Default
P4
RST : trip reset
JOG : jog operation
A/B contact common
Power-indicative
Note
lamp
Refer to page 3-3 for the dimensions of the
control terminal
3.2 Power Terminal Wiring Diagram
0.1~0.4kW IE5 Power Terminal Spec.
R S T
220Vac
P P1 DCN
I wire thickness
16AWG, 1.25 mm2
O wire thickness
16AWG, 1.25 mm2
G wire thickness
14AWG, 1.25 mm2
I/O terminal
U V W
Terminal torque
Caution
16AWG, 1.25 mm2
/3.5 φ
3.5 lb-in
In case of single phase, the input power should be connected to R, S terminals. If connected
to T phase, the inverter does not work.
3-1
Chapter 3. Wiring
CAUTION
z Suitable For Use On A Circuit Capable of Delivering Not More Than 5000 RMS Symmetrical Amperes, 240
Volts Maximum. (UL508C)
z Use Copper Conductors Only, 75 °C only with a torque rating. (UL508C)
z Make sure the input power is off before wiring.
z When the inverter’s input power is cut off after operation, wire it after DC circuit voltage inside the inverter is
fully discharged by measuring P1 and N with a tester (voltameter). If there is no tester, wire it after the power
lamp is completely out.
z Applying input power supply to the output terminals U, V and W causes internal inverter damage.
z Use ring terminals with insulated caps when wiring the input power and motor wiring
z Do not leave wire fragments inside the inverter. it can cause faults, breakdowns and malfunctions.
z Never short P1 or P with N. Shorting terminals may cause internal inverter damage
z Do not connect static condenser, surge killer or radio noise filter to the output of the inverter. Otherwise, the
inverter’s protection function starts working or it may cause condenser or surge suppressor broken.
z The inverter is delivered that P~P1 are connected to short circuit
3.3 Grounding Specification
WARNING
z Use the Type 3 grounding method (Ground impedance: Below 100Ω).
z Use the dedicated ground terminal to ground the inverter. Do not use the screw in the case or chassis, etc for
grounding.
Note
z Grounding procedure
1) Remove the front cover.
2) Connect the Grounding wire to the ground terminal
as shown above
CAUTION
Follow the grounding specifications.
3-2
Inverter Cap.
001iE5, 002iE5,004iE5 – 1,2
Wire size
14AWG, 2mm2
Lug spec.
14AWG, 2mm2, 4φ
Grounding method
Special type 3
Chapter 3. Wiring
3.4 Control Terminal Wiring Specification
Terminal description
P1
T/M
P2
P3
P4
P5
VR
COM optional terminal
AI
S+
AM CM
Terminal description
Wire size
Torque [lb-in]
2
3.0
P1~P5
Multi-function input T/M 1-5
22 AWG,0.3 mm
VR
Power T/M for external volume resistance
22 AWG,0.3 mm2
3.0
22 AWG,0.3 mm
2
3.0
2
3.0
3.0
AI
Analogue frequency input T/M
AM
Multi-function output T/M
22 AWG,0.3 mm
CM
Common terminal
22 AWG,0.3 mm2
SRemarks
Multi-function Relay T/M Spec.
30A
T/M
30A
30B
30C
Terminal description
Multi-function relay output A contact
Multi-function relay output B contact
Common for Multi-function relays
30B
30C
Wire size
Torque[lb-in]
20 AWG,0.5 mm
2
4.5
20 AWG,0.5 mm
2
4.5
20 AWG,0.5 mm
2
4.5
Remarks
CAUTION
Tie the control wires more than 15cm away from the control terminals. Otherwise, it interferes with front cover
reinstallation.
Note
When you use external power supply (24V) for multi-function input terminal (P1~P5), terminals will be active
above 12V level. Take caution not to drop the voltage below 12V.
3-3
Chapter 3. Wiring
3.5 PNP/NPN Modes Switch
P1 P2 P3 P4 P5
CM
Internal Power
[NPN](up)
Using internal
24V
P1 P2 P3 P4 P5
CM
External power
[PNP](down)
Using external
24V
z 24 Vdc
Current input[ I ](left)
Voltage input[ V ](right)
Analogue
Analogue
current input
voltage input
1) Using external current
AI
CM
2) Using external voltage
AI
CM
3) Using variable resistor
VR AI
CM
0~20mA
0~10Vdc
Note
The setting direction of switch in the above figure
is in black.
1~10kΩ
3-4
Chapter 4. Peripheral
4. Peripheral
4.1 Configuration of Peripherals
Correct peripherals must be selected and properly connected. An incorrectly applied or installed inverter may result in
system malfunction or reduction in product life as well as component damage. You must read and understand this
manual thoroughly before proceeding.
z AC power input
Peripheral
Name
Caution
Use the power supply within the permissible range of
Input power
inverter input power rating (Refer to Page 15-1).
Select circuit breakers with care. A large inrush
MCCB or ELB
current may flow in the inverter at power on.
Install it if necessary. When installed, do not use it for
Magnetic
the purpose of starting or stopping. Otherwise, it may
contactor
cause the reduction of product life.
The reactors must be used when the power factor is
to be improved or the inverter is installed near a large
AC or DC reactors
power supply system (20times and more than its cap.
and wiring distance within 10m).
Maintain
Installation
wiring
the
ambient
temperature
within
the
and permissible range because the life is sensitive to the
temperature. Incorrect terminal wiring could result in
equipment damage.
Inverter output
Do not connect a static condenser, surge suppressor
or radio noise filter to the output side of the inverter.
4-1
Chapter 4. Peripheral
4.2 Recommended MCCB and Magnetic Contactor
Model
MCCB (LSIS)
ELB (LSIS)
MC (LSIS)
001iE5-1
5A
5A
GMC- 9
7A
002iE5-1
10A
10A
GMC-12
9A
004iE5-1
15A
15A
GMC-18
13A
3A
3A
GMC- 9
7A
002iE5-2
5A
5A
GMC- 9
7A
004iE5-2
10A
10A
GMC-12
9A
001iE5-2
ABS33b
EBS33b
4.3 Recommended Reactors
Model
AC Input fuse
AC reactor
DC reactor
001iE5-1
20A
4.2mH, 3.5A
10mH, 3A
002iE5-1
20A
4.2mH, 3.5A
10mH, 3A
004iE5-1
20A
5.1mH, 5.4A
7mH, 5A
001iE5-2
20A
4.2mH, 3.5A
10mH, 3A
002iE5-2
20A
4.2mH, 3.5A
10mH, 3A
004iE5-2
20A
4.2mH, 3.5A
7mH, 5A
4-2
Chapter 5. Loader
5. Loader
5.1 Configuration
FWD/REV LED
SET LED
RUN LED
7 Segment LED
UP, DOWN
SHFT
FUNC
RUN,STOP/RESET
Volume Resistance
Note
STOP key of the inverter iE5 also contains reset function, which is used to cancel trip. Trip may be cancelled by
using this key.
Display
Description
FWD
‘On’ during forward run
REV
‘On’ during reverse run
SET
‘On’ during parameter setting
RUN
‘On’ during inverter operation
7 Segments
Displaying operation status and parameter information
Blinks when a fault occurs
Key
Name
Description
S
Up
Scroll through codes or increase parameter value
T
Down
Scroll through codes or decrease parameter value
RUN
Run
Operation command
STOP
Stop
STOP : stop during operation, RST : reset in case of fault
FUNC
Function
Edit parameters or save edited parameter values
SHFT
Shift
Move among groups/the number of ciphers left during parameter setting
Volume resistance
Used to change driving frequency
5-1
Chapter 5. Loader
5.2 Alpha-numeric view on the LED
Refer to the below table summarizing the characters displayed on the LED.
Inverter LED
No.
Inverter LED
Eng
Inverter LED
Eng
Inverter LED
Eng
0
A
K
U
1
B
L
V
2
C
M
W
3
D
N
X
4
E
O
Y
5
F
P
Z
6
G
Q
7
H
R
8
I
S
9
J
T
Note
Inverter iE5 uses 7-segment display. Therefore, it displays numbers and alphabet as the above table. Make sure to
fully comprehend them for reading the fault messages/functional information.
Note
The 7-Segment operates in three statuses; on, off and blink. Throughout this manual, on is in black, blank is in grey
and off is not separately presented.
i.e.)
OFF ON Blink
5-2
Chapter 5. Loader
5.3 Moving to other groups
z There are two different parameter groups in SV-iE5 series as shown below.
Drive group
PG group
Type
Description
Drive group
Basic parameters necessary to
operate the inverter; target
frequency,
acceleration/deceleration
time
and etc.
PG group
Parameter group for additional
functions
Moving to the other parameter group
Note1)
SHFT
PG group
Drive group
SHFT
SHFT
SHFT
Can move between groups if pressing SHFT key in code 0 of Drive Group/PG Group as shown in the figure. If
pressing SHFT in other codes but 0, it moves to the first code of a selected group and it moves between groups
if pressing SHFT once more.
1)
Target frequency is set in the first code of Drive Group. It is delivered with 0.00 set as the default and any
differently changed driving frequency is displayed once a user changes it.
5-3
Chapter 5. Loader
5.4 How to move among codes in a group
z Moving between groups
Moving from 15 of PG Group to Drive Group
SHFT
Drive group
PG group
-. Display Code 15 of PG Group.
1
-. Press SHFT key.
-. It displays F0, the first code of PG Group.
2
-. Press SHFT key.
3
-. It displays 0.00, the first code of Drive Group.
z Code change in Drive Group
1
2
3
-. It displays 0.00, the 1st code of Drive Group.
-. Press UP(S) key.
-. It displays ACC, the 2nd code of Drive Group.
-. Press UP(S) key.
-. It displays dEC, the 3rd code of Drive Group.
-. Keep pressing UP(S) key.
-. It displays drC, the final code of Drive Group
Drive group
4
-. Press UP(S) key in the final code of Drive
Group.
5
-. It returns to the 1st code of Drive Group.
Note
For moving reversely, use DOWN(T) key.
5-4
Chapter 5. Loader
z Code jump
Moving from code 1(P 0) to the code15(P15) in PG Group
-. It displays P0, the 1st code of Drive Group.
C
N
U
F
1
-. Press FUNC key.
-. SET lamp lights up. Changeable number blinks
-. It shows moving to Code 1 is possible. Set 5 using
T
F
H
S
2
UP(S) key.
X5
-. The 1st digit is changed to 5.
-. Press SHFT key.
C
N
U
F
3
-. Blinking cursor moves and 05 is displayed.
Change it to 1 using UP(S) key.
-. It shows moving to Code 15 is possible.
4
-. Pressing FUNC key enters 15.
-. SET lamp is out.
5
-. It displays Code 15 of PG Group.
z Code change in PG Group
Moving from code 1 to code 15 in PG group
-. It displays Code 1 of PG Group.
1
-. Keep pressing UP(S) key until P 15 is
displayed.
2
-. It displays Code 15 of PG Group.
Note
Some codes will be skipped in the middle of increment (S)/decrement (T) for code change in PG Group. That is
because it is programmed that some codes are intentionally reserved for later use or the codes user does not use
are invisible. For details, refer to the table of functions in Chapter 7.
5-5
Chapter 5. Loader
z Frequency setting
When changing RUN frequency to 30.05 [Hz] in Drive Group
FUNC
X5
SHFT
X3
X3
FUNC
Drive group
1
-. It displays Target Frequency, the 1st code of Drive Group.
-. Press FUNC key.
-. SET lamp lights up.
2
-. The second decimal 0 becomes active.
-. Press the UP (S) key until 5 is displayed.
3
4
5
6
7
8
-. The second decimal is changed to 5.
-. Press SHFT key.
-. The first decimal 0 becomes active.
-. Press SHFT key twice.
-. The first digit 0 becomes active.
-. Set 3 using UP(S) key.
-. Press FUNC key.
-. 30.05 blinks quickly and it asks whether to save the value.
-. Press FUNC key.
-. SET lamp is out.
-. Blink stops and the saved target frequency are displayed.
Note
Parameter setting is disabled when pressing other Keys except Function Key(FUNC) in step 6 where 30.05 blinks
quickly.
5-6
Chapter 5. Loader
5.5 How to set parameters
z Parameter change in Drive Group
Changing acceleration duration from 5.0 to 16.0 seconds
FUNC
Drive group
FUNC
SHFT
1
2
SHFT
-. It displays the target frequency, the 1st code of Drive Group.
-. Press UP(S) key.
-. It displays ACC, the acceleration duration, the 2nd code of Drive Group.
-. Press Function(FUNC) key.
-. SET lamp lights up.
3
-. 0 in 5.0 blinks, which means that the digit may be changed.
-. Press Shift(SHFT) key.
4
5
6
-. The digit to change is moved to the first digit.
-. Press UP(S) key.
-. The digit to change is increased, being changed to 6.0.
-. Press Shift(SHFT) key.
-. The digit to change is moved the tenth digit.
-. Press UP(S) key.
-. It displays 16.0.
7
-. Press Function(FUNC) key.
-. 16.0 blinks wholly.1)
-. Press Function(FUNC) key. ACC duration of 16.0 seconds is entered.
8
1)
-. SET lamp is out
-. It displays ACC. ACC duration is changed to 16.0 seconds.
That every digit blinks quickly while modifying a parameter means asking whether to enter a modified value. At
the moment, pressing Function(FUNC) key completes the entry. To cancel it instead of entering a parameter, press
any key such as Shift(SHFT), UP(S) or DOWN(T) but Function(FUNC) key.
5-7
Chapter 5. Loader
z Parameter change in PG Group
Changing P34, Code 34 of PG Group from 0 to 1
C
N
U
F
C
N
U
F
T
F
H
S
PG group
1
-. The 1st code of PG Group is displayed.
-. Press FUNC key.
-. SET lamp lights up.
2
-. Can move to Code 1.
-. Chang it to 4 by using UP(S) key.
3
4
5
-. The first digit is changed to 4
-. Press SHFT key.
-. 0 in 04 is active.
-. Increase up to 3 by using UP(S) key.
-. Can move to Code 34
-. Press FUNC key.
-. SET lamp is out.
6
-. It means the current position is Code 34 of PG Group.
-. Press FUNC key.
-. SET lamp light up.
7
-. Code 34 is set to 0.
-. Increase it to 1 by using UP(S) key.
-. Press FUNC key.
8
-. Press FUNC key once more when 1 blinks.
-. SET lamp is out.
9
10
5-8
-. Function code change is complete.
-. Press SHFT key.
-. Moved to Code 1 of PG Group.
X3
C
N
U
F
T
F
H
S
C
N
U
F
X4
Chapter 5. Loader
5.6 Monitoring Operation Status
z Displaying Current Output
Monitoring output current in Drive Group
FUNC
FUNC
Drive group
1
2
3
4
X8
-. The target frequency, Code 1 of Drive Group is displayed
-. Press UP(S) key or DOWN(T) key until Cur is displayed.
-. Moved to a code to monitor output current.
-. Press FUNC key.
-. Present output current is 2.5[A].
-. Press FUNC key.
-. Return to the output current monitoring code.
Note
Other parameters in Drive group such as dCL (Inverter DC link voltage) or vOL (Inverter output voltage) can be
monitored via the same method.
5-9
Chapter 5. Loader
z Fault display
How to monitor fault condition in Drive Group
Accel
Overcurrent
trip
Current
Frequency
FUNC
Drive group
STOP
-. OCt appears when an Overcurrent fault occurs.
1
-. Press FUNC key.
-. Press UP(S) key or DOWN (T) key.
2
3
4
5
-. The run frequency at the time of trip is displayed.
-. Press UP(S) key.
-. The output current at the time of trip is displayed
-. Press UP(S) key.
-. Operating status is displayed. A fault occurred during acceleration
-. Press STOP key.
-. A fault condition is cleared and “nOn” is displayed.
Note
Trip occurrence is displayed in one of modes like ACC, DEC, Stp or Std. Fault causes may be expected by using
the indication.
5-10
Chapter 5. Loader
z When types of faults occur at the same time
When Overcurrent(OCt), overvoltage(Ovt) and overheat(OHt) occur simultaneously
Overheating
Overvoltage
Overcurrent
Drive
-. When various trips occur simultaneously, it shows like the figure above and it can show up to 3 trips.
Note
In case inverter trip occurs, it shows the type in the current fault status indication code. In the case, if clearing it
away by resetting or turning it off, fault info is moved to fault history(P 1) of PG Group.
However, if any, the existing fault history moves from (P 1) to (P 2) or from (P 2) to (P 3); the latest fault info is
saved in (P 1) through (P 3).
5-11
Chapter 6. Basic Operation
6. Basic Operation
6.1 Frequency Setting and Basic Operation
Note
The following parameters are set to factory defaults. Therefore, results may be different if any parameter is
changed by a user. In this case, initialize parameters(see page 10-13) back to factory defaults and follow the
instructions below.
z If setting frequency with the loader and commanding operation on the inverter’s terminal
No.
Indication
Operation & description
-. Target frequency, the first code of Drive Group when turning it on.
1
-. Press FUNC key.
-. The second decimal, 0 in 0.00 displayed blinks.
2
-. Press SHFT three times.
-. 00.00 is displayed and the very left 0 blinks.
3
-. Press UP(S) key.
-. Confirming 10.00, press FUNC key.
4
-. 10.00 blinks quickly as a whole. Press FUNC key once more.
-. Target frequency is changed to 10.00Hz.
5
-. Turn on the switch between P1(FX) and CM terminals.
-. FWD(forward run) lamp of the inverter display blinks and accelerating frequency is
displayed on the LED.
6
-. When target run frequency 10Hz is reached, 10.00 is displayed.
-. Turn off the switch between P1 (FX) and CM terminals.
-. FWD lamp begins to blink and decelerating frequency is displayed on the LED.
-. When run frequency is reached to 0Hz, RUN and FWD lamp turn off and target
7
frequency (10.00) is displayed.
Wiring diagram
Operating pattern
220 Vac
L1(R)
U
L2(S)
V
(T)
W
P
10 Hz
M
Frequency
P1
N
P1(FX)
G
CM
P1(FX)-CM
ON
OFF
6-1
Chapter 6. Basic Operation
z If setting frequency with volume resistance on the loader and commanding operation on the inverter’s terminal
No.
Indication
Operation & description
-. Target frequency, the first code of Drive Group when turning it on.
1
-. Press UP(S) key four times.
-. Moved to a code to change a frequency setting mode.
2
-. Press FUNC key.
-. The current frequency setting mode is set to 0(frequency setting using loader).
3
-. Press UP(S) key two times.
-. Check 3(frequency setting by loader’s volume resistance).
-. Press FUNC key.
4
-. 3 blinks quickly. Press FUNC key once more.
-. Frq is displayed and frequency setting mode is changed to loader volume.
-. Press SHFT moves to target frequency, the first code of Drive Group.
5
-. Turn the loader volume to MAX or MIN to set to 10.00Hz.
-. Turn on the switch between P1 (FX) and CM.
-. FWD(forward run) lamp of the inverter display blinks and accelerating frequency is
displayed on the LED.
6
-. When run frequency 10Hz is reached, the value is displayed as shown left.
-. Turn off the switch between P1 (FX) and CM terminals.
-. FWD(forward run) lamp of the inverter display blinks and decelerating frequency
displayed on the LED.
7
-. When run frequency is reached to 0Hz, Run and FWD lamp turn off and target
frequency(10.00)is displayed
Wiring diagram
Operating pattern
220 Vac
L1(R)
U
L2(S)
V
(T)
W
T
F
H
S
N
U
R
C
N
U
F
P
O
T
S
P
10 Hz
M
P1
6-2
N
P1(FX)
G
CM
Frequency
P1(FX)-CM
ON
OFF
is
Chapter 6. Basic Operation
z If setting frq with volume resistance on the loader and commanding operation with RUN key on the loader
No.
Indication
Operation & description
-. Target frequency, the first code of Drive Group when turning it on.
1
-. Press UP(S) key three times.
-. Moved to a code to change a frequency setting mode
2
-. Press FUNC key.
-. The current frequency setting mode is set to 1(terminal)
3
-. Press DOWN (T) key.
-. Operation command mode may be changed to 0(RUN key of the loader).
4
-. Press FUNC key twice.
-. It displays drv and operation command mode is changed to RUN key.
5
-. Press UP(S) key once.
-. Moved to frequency setting mode(Frq) code.
6
-. Press FUNC key.
-. Frequency setting mode is changed to 0(keypad of the loader).
7
-. Press UP(S) key two times.
-. Frequency setting mode may be changed to 3(loader’s volume resistance).
8
-. Press FUNC key twice.
-. It displays Frq and frequency setting mode is changed to loader volume.
9
-. Turn the loader volume to set to 10.00 in either Max or Min direction.
-. Press RUN key. FWD(forward run) lamp of the inverter display blinks and
accelerating frequency is displayed on the LED.
10
-. When run frequency 10Hz is reached, it is displayed as shown left.
-. Press STOP key.
-. FWD(forward run) lamp of the inverter display blinks and decelerating frequency is
displayed on the LED.
11
-. When run frequency 10Hz is reached, FWD(forward run) lamp is out and target
frequency(10.00) is displayed on the LED.
Wiring diagram
Operating pattern
220 Vac
L1(R)
U
L2(S)
V
(T)
W
10 Hz
M
Frequency
P
N
U
R
RUN
P
O
T
S
C
N
U
F
N
T
F
H
S
P1
STOP/RST
G
6-3
Chapter 7. Function List
7. Function List
z Drive Group
Display
0.0
Name
Min/Max
range
Factory
Description
defaults
Frequency
0 ~ 200
This parameter sets the operation frequency. 0.00
command
[Hz]
During stop, it displays Frequency Command;
Adj.
during
Page
run
O
9-1
During run, it shows output frequency. During
multi-step operation, it becomes frequency 0. It
cannot be set greater than Max frequency(P16).
ACC
Acc time
0 ~ 6000
During multi-acc/dec operation, this parameter 5.0
O
9-8
dEC
Dec time
[sec]
serves as acc/dec time 0.
10.0
O
9-8
drv
Drive mode
0~3
0
1
X
9-5
1
Operate with RUN/STOP key of the loader
Terminal
FX: forward run
operation
RX: reverse run
FX: Run/stop command
2
Frq
St1
St2
Frequency
0~4
communication: communication option
0
Digital
1
method
2
Multi-step
0 ~ 200
frequency 1
[Hz]
Multi-step
RX: Reverse rotation
3
setting
9-6
Set loader digital frequency 1
0
X
9-1
Set loader digital frequency 2
9-1
Terminal AI input
9-3
3
Loader volume resistance
9-2
4
communication option
Analogue
Set multi-step frequency 1
10.00
O
Set multi-step frequency 2
20.00
O
Set multi-step frequency 3
30.00
O
9-4
frequency 2
St3
Multi-step
frequency 3
7-1
Chapter 7. Function List
z Drive Group
Display
Min/Ma
Name
x range
CUr
Output current
-
rPM
No. of motor -
Description
Factory
defaults
Adj.
during
Page
run
Display output current
-
-
11-1
Display the no. of motor rotation(RPM)
-
-
11-1
Display DC voltage inside the inverter
-
-
11-1
vOL
-
11-2
-
11-4
O
9-7
rotation
dCL
Inverter
DC -
voltage
vOL
Output voltage
-
Display the inverter’s output voltage.
nOn
Fault display
-
Display the types of fault, frequency, current and operation status.
drC
7-2
Selection
of F, r
If operation command mode(drv) is set to P
motor rotation
0, select the direction of motor rotation
direction
F
Forward operation
r
Reverse operation
Chapter 7. Function List
z PG Group
Display
Min/Max
Name
range
Factory
Description
defaults
P0
Jump code
0 ~ 88
Sets the code number to jump
1
P1
Fault log 1
-
It logs the information on the types of nOn
Adj.
during
Page
run
O
5-5
-
11-4
faults, and the frequency, current and
status such as acceleration, deceleration
and stop at the time of trouble. The latest
fault is automatically recorded in log 1.
P2
Fault log 2
-
nOn
-
P3
Fault log 3
-
nOn
-
P4
Fault log removal
0~1
Remove log P1~P3.
0
O
P5
Prohibition
0
Both F/R directions available
0
X
9-7
forward/reverse
1
Forward rotation prohibited
rotation
2
Reverse rotation prohibited
0
Linear pattern operation
0
X
9-9
1
S-curve pattern operation
0
Deceleration to stop
0
X
9-14
1
DC brake to stop
2
Free run to stop
5.00
X
10-1
DC brake wait 0 ~ 60 When DC brake frequency is reached, 0.10
X
P6
Acc pattern
P7
Dec pattern
P8
Stop
of 0 ~ 2
0~1
mode 0 ~ 2
selection
P9
DC brake start 0.1 ~ 60 It sets DC brake start frequency.
1)
frequency
[Hz]
It
cannot
be
set
below
start
frequency(P18).
P10
time
[sec]
the inverter holds the output for the
setting time before starting DC brake.
P11
P12
DC brake voltage 0 ~ 200
It sets the amount of DC voltage applied 50
amount
[%]
to a motor. Motor rated current(P43).
DC brake time
0 ~ 60 It sets the time taken to apply DC current 1.0
[sec]
1)
X
X
to a motor.
Displayed only when P8 is set to 1(DC brake to stop)
7-3
Chapter 7. Function List
z PG Group
Display
P13
P14
P15
P16
Name
Min/Max
range
Description
Factory
defaults
DC brake start 0 ~ 200
It sets the amount of DC voltage before a motor 50
voltage
starts to run. Motor rated current(P43)
[%]
DC brake start 0 ~ 60 It applies the current to a motor for the set time 0.0
time
[sec]
before motor accelerates.
Jog frequency
0 ~ 200
It sets the frequency for jog operation. It can not 10.00
[Hz]
be set above the max frequency(P16).
Max
40 ~ 200
This parameter sets the upper limit frequency.
frequency
[Hz]
It is frequency reference for Accel./Decel.
Adj.
during
Page
run
X
10-2
X
O
10-3
60.00
X
9-8
X
9-11
Note
If changing the max frequency, all other
frequency parameters but P17(base frequency)
would be changed to the frequency if they are
above the new max. frequency.
P17
P18
Base
30 ~ 200
The inverter outputs its rated voltage to the 60.00
frequency
[Hz]
motor at this frequency.
Start
0.1 ~ 10
The inverter starts to output its voltage at this 0.5
frequency
[Hz]
frequency.
X
It is lower frequency limit of frequency(Hz).
P19
P20
P21
P22
7-4
Torque boost 0 ~ 1
0
Manual torque boost
selection
1
Auto torque boost
0
Forward
0 ~ 15 Torque boost amount of motor during forward 5.0
torque boost
[%]
Torque boost amount of motor during reverse 5.0
torque boost
run based on max. output voltage.
0~1
9-13
X
run, based on max. output voltage.
Reverse
V/F pattern
X
0
Linear
1
Square
0
X
X
9-11
9-12
Chapter 7. Function List
z PG Group
Display Name
P23
Min/Max
range
Factory
Description
defaults
Output
40 ~ 110
It adjusts the amount of output voltage, based on 100
voltage
[%]
the percentage of input voltage.
Adj.
during
Page
run
X
9-12
0
12-1
adjustment
P24
Overload trip 0 ~ 1
This parameter turns off the inverter output when 1
selection
motor is overloaded. Overload protection function
works if it is set to 1.
P25
Overload trip 50 ~ 200
It sets the amount of overload current, based on 180
1)
level
the percentage of Motor rated current(P43)
P26
Overload trip 0 ~ 60 It turns off the inverter output when overload trip 60
P27
[%]
time
[sec]
level current(P25) flows for overload trip time.
Stall
0~7
Sets stall prevention function
prevention
0
During
During
During
dec.
constant run
acc.
bit 2
bit 1
bit 0
0
-
-
-
1
-
-
3
2
-
3
-
3
-
3
3
4
3
-
-
5
3
-
3
6
3
3
-
7
3
3
3
Func.
select
0
0
X
12-1
X
12-1
X
10-4
-
10-4
Set
P28
Stall
30 ~ 150
It sets the amount of current to activate stall 150
prevention
[%]
prevention function, based on the percentage of
the motor rated current(P43).
level
P29
Save
0~1
It decides whether to save the specified frequency 0
up/down
during up/down operation.
frequency
If 1 is selected, the up/down frequency is saved in
P30.
P30
Save
2)
Up/Down
1),2)
-
It saves the frequency before the inverter stops or 0.00
decelerated.
Set P24 and P29 to 1 to display this parameter.
7-5
Chapter 7. Function List
z PG Group
Min/Max
Display Name
P31
range
Factory
Description
defaults
Dwell
0.1 ~ 200 When run frequency is issued, motor starts to 5.00
frequency
[Hz]
Adj.
during
Page
run
X
10-5
accelerate after dwell frequency is applied to the
motor during dwell time(P32).
It can be set within max frequency(P16) and start
frequency(P18).
P32
Dwell time
0~10
Sets the time for dwell operation.
0.0
Sets fault detection items at operator’s discretion
0
O
12-2
0
X
9-7
O
9-8
[sec]
P33
Operator’s
0~7
fault
[bit]
Func. Earth
detection
Set
0
Input phase Output
detection
detection
phase
during
(CoL)
detection
(Pot)
run(GCt)
bit2
bit1
bit0
-
-
-
1
P34
P35
On 0 ~ 1
Power
3
2
3
3
3
4
3
5
3
6
3
3
7
3
3
3
3
It is activated when drv is set to 1 or 2.
Motor starts acceleration after AC power is applied
Selection
while FX or RX terminal is ON.
Restart after 0 ~1
It is activated when drv is set to 1 or 2 (Run/Stop via 0
fault
Control terminal).
selection
Motor accelerates after the fault condition is reset
while the FX or RX terminal is ON.
7-6
3
Start
reset
X
Chapter 7. Function List
z PG Group
Display Name
P36
Min/Max
range
Description
defaults
Speed
0 ~ 15
It is active to prevent any possible fault when 0
search
[bit]
the inverter outputs its voltage to the running
selection
Adj.
during Page
run
X
10-10
motor.
Func. Power
Restart Operation Normal
after acc.
on
after
on
start
instant
fault
(P34)
power
(P35)
failure
Set
P37
Factory
bit3
bit2
bit1
bit0
0
-
-
-
-
1
-
-
-
3
2
-
-
3
3
-
-
3
3
4
-
3
-
-
5
-
3
-
3
6
-
3
3
-
7
-
3
3
3
8
3
-
-
-
9
3
-
-
3
10
3
-
3
-
11
3
-
3
3
12
3
3
-
-
13
3
3
-
3
14
3
3
3
-
15
3
3
3
3
Speed
Limits the amount of current during speed 100
Search
search operation, based on motor rated
Current
current(P43)
O
Level
7-7
Chapter 7. Function List
z PG Group
Min/Max
Display Name
P38
range
of 0 ~ 10
Number
Auto
Factory
Description
defaults
It sets the number of restart tries after a 0
fault occurs. Auto Restart is deactivated
Restart
Adj.
during Page
run
O
10-12
1)
if the fault outnumbers the restart tries.
try
This function is active when [drv] is set to
1 or 2 {Run/Stop via control terminal}.
P39
Auto
Restart 0 ~ 60 [sec]
time
P40
O
time has passed.
Motor
cap. 0.1~ 0.4
select
P41
Restart tries after auto restart waiting 1.0
Selects the capacity of a motor to use.
2)
X
It is displayed via rpm in drive group.
4
X
Enter the difference between the input
3)
X
10-6
[kW]
Number
of 2 ~ 12
motor poles
P42
Rated
slip 0 ~ 10
frequency
[Hz]
power
frequency
and
the
value
calculated by converting rpm described
in the nameplate to frequency.
P43
P44
Motor
rated 0.0~ 25.5
current
[A]
No
Enter motor rated current on the nameplate.
Load 0.0 ~ 25.5 Enter the current value detected when -
Motor Current
[A]
X
X
the motor is rotating in rated rpm after
the load connected to the motor shaft is
removed.
Enter the 50% of the rated current value
when it is difficult to measure No Load
Motor Current.
P45
Carrier
1 ~ 10
It selects the audible sound of the motor. 3
frequency
[kHz]
If the set value is higher, the inverter
select
O
sound is quieter but the noise from the
inverter and leakage current will become
greater.
1)
No auto restart in case of protection functions such as OHt, Lvt, ESt, HWt.
2)
P40 initial value is preset based on inverter rating.
3)
P42 ~ P44 values are changed based on the P40. factory defaults are set based on the inverter capacity.
7-8
10-13
Chapter 7. Function List
z PG Group
Min/Max
Display Name
P46
range
Description
Factory
defaults
0
V/F control
selection
1
Slip compensation control
10-6
2
PI control
10-8
P gain for PI 0~ 999.9
It sets the gains for the PI controller’s 300.00
controller
response characteristics.
P48
I time for PI 0.1~32.0
[%]
controller
P53
F gain for PI 0 ~ 99.99
O
Feed forward gain for PI controller.
0.00
O
[%]
It limits the amount of the output frequency 60.00
PI frequency
through the PI operation.
[Hz]
Lower limit of 0.1 ~ 200
It is settable within the range of Max 0.50
PI frequency
frequency(P16) and Start frequency(P18).
display
9-11
O
1.00
Upper limit of 0.1 ~ 200
Power
X
[sec]
controller
P52
run
0
1)
P51
during Page
Control mode 0 ~ 2
P47
P50
Adj.
[Hz]
on 0 ~ 15
It selects the parameter to be displayed first on 0
O
O
O
11-2
the display of inverter when the power is
applied.
0
Operation frequency
1
Acc. time
2
Dec. time
3
Drive mode
4
Frequency mode
5
Multi-step frequency 1
6
Multi-step frequency 2
7
Multi-step frequency 3
8
Output current(Cur)
9
Motor rpm
10
Inverter DC voltage(DCL)
11
User display select(vOL)
12
Fault display 1
13
Direction of motor rotation
14
Output current
15
Motor rpm
Displayed only when P46 is set to 2(PI control).
7-9
Chapter 7. Function List
z PG Group
Min/Max
Display Name
P54
Gain
range
for
Motor 1 ~ 1000
rpm display
[%]
Description
Factory
defaults
It can monitoring on the rpm display code of 100
Adj.
during Page
run
O
11-1
O
9-3
drive group as converting gear ratio of load
system.
P55
time 0 ~ 9999
Filter
constant
Adjusts the responsiveness of analogue 10
AI
input.
for 0 ~ 100
Sets the min value of analogue input as the 0
for
input
P56
P57
Min
input
AI(vol/cur)
[%]
percentage of the whole input.
Frequency
0 ~ 200
Frequency in case analogue input is the min 0.00
corresponding min [Hz]
O
O
value.
input for AI
P58
P59
AI max input
Frequency
0 ~ 100
Sets the max value of analogue input as the 100
[%]
percentage of the whole input.
0 ~ 200
Frequency in case analogue input is the 60.00
to [Hz]
corresponding
O
O
max. value.
AI max input
P60
time 0 ~ 9999
Filter
constant
Adjusts the responsiveness of volume input 10
for
operation.
for 0 ~ 100
Sets the min rpm of volume input as the 0
O
9-2
Volume input
P61
P62
Min
value
volume input
[%]
percentage of the whole input
Frequency
0 ~ 200
Frequency at minimum current of volume 0.00
corresponding
to [Hz]
input
of 0 ~ 100
Sets the max volume input as the 100
O
O
volume input
P63
P64
Max.
value
O
volume input
[%]
percentage of the whole input.
Frequency
0 ~ 200
Frequency at maximum volume input.
60.00
O
Criteria for Analog 0 ~ 2
0: Disabled
0
O
Input Signal loss
1: activated below half of set value.
corresponding
to [Hz]
volume input
P65
2: activated below set value.
7-10
12-4
Chapter 7. Function List
z PG Group
Min/Max
Display Name
P66
P67
Multi-function
range
input 0 ~ 24
Description
P69
P70
defaults
0
Forward run command (FX)
terminal P1 define
1
Reverse run command (RX)
Multi-function
2
EST-Emergency
input
terminal P2 define
P68
Factory
Multi-function
input
Stop
Trip
Adj.
during Page
run
0
O
9-6
: 1
O
-
2
O
-
temporary output cut-off
3
Reset when a fault occurs(RST)
terminal P3 define
4
Jog operation command (JOG)
Multi-function
5
Multi-Step freq – low
terminal P4 define
6
Multi-Step freq – high
Multi-function
7
-
8
-
9
-
10
-
11
DC brake during stop
10-1
12
-
-
13
-
-
14
-
-
15
Up-
Frequency up
16
down
Frequency down
17
3-wire operation
10-4
18
External trip: A Contact (EtA)
12-5
19
External trip: B Contact (EtB)
20
Change from PI operation to
input
input
terminal P5 define
10-3
3
O
9-5
4
O
-
10-4
-
general operation
P71
21
-
-
22
Analog Hold
9-4
23
Accel/Decel Disable
9-10
24
Up/Down Save Freq. Initialization
10-4
Input terminal status
BIT4 BIT3
BIT2
BIT1
BIT0
display
P5
P3
P2
P1
P4
-
-
11-3
7-11
Chapter 7. Function List
z PG Group
Display
P72
Min/Max
Name
Filtering
range
time 1 ~ 20
Description
defaults
If the value is set higher, the responsiveness of the 3
Adj.
during
Page
run
O
-
0
O
11-5
Based on 10V.
100
O
Used when P77 is set to 0-4.
30.00
O
Input terminal is getting slower.
constant for Multifunction
Factory
Input
terminal
P73
Analog output item 0 ~ 3
select
P74
Analog output level 10 ~ 200
adjustment
P75
Output to 10[V]
0
Output freq.
Max frequency
1
Output current
150 %
2
Output voltage
282 V
3
Inverter DC link voltage
DC 400V
[%]
Frequency detection 0 ~ 200
[Hz]
level
P76
Output item
Cannot be set higher than P16.
Frequency detection
11-7
~
10.00
O
11-9
17
O
11-7
bandwidth
P77
Multi-function
select
relay 0 ~ 17
0
FDT-1
1
FDT-2
2
FDT-3
3
FDT-4
4
FDT-5
5
-
6
Inverter Overload (IOLt)
7
Motor stall (STALL)
8
Over voltage trip (OVt)
9
Low voltage trip (LVt)
11-8
11-9
10 Inverter cooling pin Overheat (OHt)
11
Command loss
12 During Run
13 During Stop
14 During constant run
15 During speed searching
16 Wait time for run signal input
17 Fault output select
7-12
11-10
Chapter 7. Function List
z PG Group
Min/Max
Display Name
P78
range
Fault
output 0 ~ 7
select
Factory
Description
defaults
Func. Operation
Operation
the when
when setting when
[bit]
the number trip
of
Operation
Adj.
during Page
run
2
O
11-10
the
other low voltage
auto than
low trip occurs
restart
voltage trip
try(P38)
occurs
Set
bit 2
bit 1
bit 0
0
-
-
-
1
-
-
3
2
-
3
-
3
-
3
3
4
3
-
-
5
3
-
3
6
3
3
-
7
3
3
3
P79
Inverter number
1 ~ 250
Set for RS-485 communication
1
O
14-3
P80
Baud rate
0~2
Select the Baud rate of the RS-485.
2
O
14-3
It is used when freq command is given via Analog 0
O
12-4
P81
mode 0 ~ 2
Drive
0
2400 [bps]
1
4800 [bps]
2
9600 [bps]
select after loss
signal(volume/AI) or RS-485.
of
0
frequency
command
P82
before its command is lost.
Wait time after 0.1
loss
Continuous operation at the frequency
Free Run stop (Output cut-off)
2
Decel to stop
~ Time inverter determines whether there is the 1.0
of 120
frequency
1
[sec]
O
input frequency command or not. If there is no
frequency command input during this time,
inverter starts operation via the mode selected at
command
P81.
P83
Communication
2 ~ 100
When RS-485 communication, waiting time from 5
time setting
[ms]
TX to the next TX.
O
7-13
Chapter 7. Function List
z PG Group
Display Name
P84
Min/Max
range
Parity/stop bit 0 ~ 3
Description
Parameter
0~3
initialization
P86
Password
P88
parameter
0 ~ FFFF
O
Initialize the parameters set by a user to 0
X
10-13
O
10-14
O
10-15
Stop bit
0
-
1 Stop Bit
1
-
2 Stop Bit
2
Odd Parity
1 Stop Bit
3
Even Parity
1 Stop Bit
0
-
1
Initialize both groups
2
Initialize Drive Group
3
Initialize PG Group
Enter password to prohibit parameter 0
0 ~ FFFF
Prohibit
or
cancel
parameter
change 0
prohibition
P86.
communication
protocol
7-14
Parity bit
prohibition by using the password set in
Selecting
run
change. Set it as hexadecimal number
-
version
P89
during Page
0
change
Software
Adj.
factory defaults
registration
P87
defaults
Sets communication parity and stop bit.
setting
P85
Factory
UL(Unlock)
Enable parameter change
L(Lock)
Disable parameter change
Display inverter software version. Refer to -
X
manual version.
0~1
0 : Modbus RTU
1 : LSBUS
0
X
Chapter 8. Control Block Diagram
8. Control Block Diagram
8.1 Control Flow
Frequency
setting
V/F
control
Accel / Decel
Motor
PW M
Drive
mode
8.2 Frequency Setting & Drive Mode Setting
Loader
key
Frequency setting
Analog input
filter
Drive group
Analog input
scale
PG group
PG group
P55, P60
P56~P64
2
1
Frq
0
3
4
Loader volume
AI
Loader key
setting 1
Loader key
setting 2
0
1
Digital input
filter
P1
P2
2
AI analog input
3
Loader volume
resistance
4
Comm. input
P1 ~ P5
Multi-step operation
via multi-function
Step frequency
terminal
setting
PG group
PG group
P72
P66 ~ P70
Jog
operation
PG group
P66 ~ P70
Step 0
Drive group
Frq. setting
St1
St2
Up-down
operation
PG group
St3
P66 ~ P70
P3
P4
P5
4
Jog
frequency
PG group
P15
Step 1~3
Max/Min
frequency
PG group
15, 16
P16
P18
Loader key
FX/RX operation
command setting
via multi-function
terminal
Operation
command
setting
3-Wire operation
PG group
PG group
P66 ~ P70
P66 ~ P70
Drive group
17
PG group
drv
0
0,1
FX/RX operation
disable
1,2
1
2
P5
0
FX/RX run enable
Operation
command
1 Forward run disable
2 Reverse run disable
8-15
Chapter 8. Control Block Diagram
8.3 Frequency Setting, Drive Acc./Dec. Setting and V/F Voltage Control
DC brake voltage
& time
PG group
P9~P12
DC brake start frq.
Operation
command
Accel/decel
time
Drive group
Max frequency
Accel/decel
pattern
PG group
PG group
ACC
Operation
P6,P7
DEC
P16
Stop
0
linear
1
S-curve
Stop method select
PG group
P8
DC brake freq.
Voltage, time
PG group
Frequency
setting
0
DC brake
1
Free run stop
2
P9~P12
V/F pattern
PG group
P22
Dwell operation
0
Square
1
P31
PG group
P23
P17
PWM
Torque
boost select
Torque
boost value
PG group
P19
PG group
manual
0
P21
auto
1
8-16
PG group
+
PG group
P20
Base/start
frequency
P18
Linear
Dwell freq & time
P32
Output voltage
adjustment
Chapter 9. Basic Functions
9. Basic Functions
9.1 Frequency Setting
z Loader Digital Frequency Setting1
Group
Code
Parameter Name
Setting
Range
Initial
Unit
Drive Group
0.00
Frequency command
-
0 ~ 200
0.0
Hz
Frq
Frequency mode
0
0~4
0
Set Frq – [Frequency mode] to 0.
Set the desired frequency in 0.00 and press FUNC key to enter the value into memory.
The value is settable less than the max. frequency(P16).
z Loader Digital Frequency Setting2
Group
Code
Parameter Name
Setting
Range
Initial
Unit
Drive Group
0.00
Frequency command
-
0 ~ 200
0.0
Hz
Frq
Frequency mode
1
0~4
0
Set Frq – [Frequency mode] to 1.
In 0.00, frequency is changed upon pressing the Up (S)/Down (T) key. In this case, UP/Down keys serve
as volume resistance.
The value is settable less than the max. frequency(P16).
z Using Loader’s volume resistance(run in case of Frq: 3)
SV-iE5 series basically offer volume resistance on the inverter’s loader for frequency command. Through
this volume resistance, it supplies 0~5 V and enables frequency setting. At the moment, voltage input is
indicated as input value.
Loader volume is getting larger as it rotates clockwise.
Increase
Decrease
T
F
H
S
N
U
R
T
F
H
S
N
U
R
C
N
U
F
P
O
T
S
C
N
U
F
P
O
T
S
9-1
Chapter 9. Basic Functions
z Frequency setting with the loader’s volume resistance(V0)
Group
Code
Parameter Name
Setting
Range
Initial
Unit
Drive Group
0.0
Frequency Command
-
-
-
Hz
Frq
Frequency setting mode
3
0~4
0
P60
Filter time constant for V0 input
10
0 ~ 9999
10
P61
V0 input Min voltage
-
0 ~ 100
0
%
P62
Frequency corresponding to P61
-
0 ~ 200
0.00
Hz
P63
V0 input max voltage
-
0 ~ 100
100
%
P64
Frequency corresponding to P63
-
0 ~ 200
60.00
Hz
PG Group
Select 3 in Frq code of Drive group
It is possible to monitor frequency setting in Command Frequency Code(0.0) of Drive Group.
P60(Filter time constant for V0 input): Effective for eliminating noise in the frequency setting circuit.
Increase the filter time constant if steady operation cannot be performed due to noise. A larger setting
results in slower response (t gets longer).
V1 input
Set
Freq.
t
P61 ~ P64: Setting input range and corresponding frequency to -10V ~ 0V V1 input voltage.
When minimum input voltage is 20% with corresponding frequency 10Hz and Max voltage is 80% with run
freq. 50Hz, set as follow.
Setting frequency
50Hz
P64
P62
10Hz
20%
P61
9-2
80%
P63
Volume
input
Chapter 9. Basic Functions
z Frequency setting using AI(analogue input) terminal
Group
Code
Parameter Name
Setting
Range
Initial
Unit
Drive Group
0.0
Frequency Command
-
-
-
Hz
Frq
Frequency setting mode
2
0~4
0
P55
Input filter time constant for AI
10
0 ~ 9999
10
P56
Min. input for AI(V/I)
-
0 ~ 100
0
%
P57
Frequency corresponding to P56
-
0 ~ 200
0.00
Hz
P58
Max. input for AI (V/I)
-
0 ~ 100
100
%
P59
Frequency corresponding to P58
-
0 ~ 200
60.00
Hz
PG Group
Select 2 in Frq code of Drive group.
It is possible to use by inputting 0 ~ 10V in an external control or connecting variable resistance to
VR,AI,CM terminals of the inverter.
Inverter terminal may be wired as follows and see page 9-2 for the functions of P55 through P59.
Depending on AI selection switch beside the inverter’s control terminal as V, I, it is possible to select one of
voltage input and current input.
Caution
For AI selection, set it accurately according to the current input and voltage input. Incorrect setting may cause the
inverter troubled.
In the below, switch direction is colored in black.
Current Input [ I ] Lt
Voltage Input [ V ] Rt
Analogue
Analogue
current input
voltage input
2) Using Ex. voltage
1) Using CI
AI CM
AI CM
0~20mA
0~10Vdc
3) Using V.R
VR AI CM
1~10kΩ
9-3
Chapter 9. Basic Functions
z Analogue frequency command fixed
Group
Code Parameter Name
Setting
Range
Initial
Drive Group
Frq
2~3
0~4
0
PG Group
P66
~
P70
Frequency setting mode
Multi-function input terminal P1
select
0 ~ 24
-
Unit
0
~
Multi-function input terminal P5
select
22
4
If Frq code of Drive Group is 2~3, it works.
Select a terminal to use as analogue frequency command fixed signal among multi-function input
terminals(P1 ~ P5).
It works as shown in the below figure if using P5 terminal.
Setting
frequency
Frequency
P5
Operation
command
9.2 Multi-Step Frequency Setting
Group
Code
Parameter Name
Setting
Range
Initial
Unit
Drive Group
0.0
Frequency command
5.0
0 ~ 200
0.0
Hz
Frq
Frequency setting mode
0
0~4
0
-
St1
Multi-step freq.1
-
0 ~ 200
10.0
Hz
St2
Multi-step freq.2
-
20.0
St3
Multi-step freq.3
-
30.0
P68
Multi-function input terminal P3 define
5
P69
Multi-function input terminal P4 define
6
PG Group
0 ~ 24
2
-
3
-
Select a terminal to give Multi-step frequency command among P1-P5 terminals.
If terminals P3-P4 are selected, set P68-79 to 5 - 6 to give Multi-step frequency command.
Multi-step frequency 0 is settable in [Frequency mode] and [Frequency command(0.0)].
Multi-step frequency 1-3 are set at St1-St3 in Drive group.
9-4
Chapter 9. Basic Functions
If running by using multi-step high/low, it is possible to run from 0 to 3 step in 4 combinations as the below
figure.
Step 3
Step 2
Step 1
Step 0
Frequency
Time
Step 0
Step 1
Spee FX/
Step 2
Step 3
P3
P4
P1(FX)
P2(RX)
P4
P3
9
-
-
1
9
-
9
2
9
9
-
3
9
9
9
d
RX
0
9.3 Operating command setting method
z Operation by RUN key and STOP/RST key of the loader
Group
Code
Parameter Name
Setting
Range
Initial
Drive Group
drv
Drive mode
0
0~3
1
drC
Motor rotation direction select
-
F, r
F
Unit
Set drive code of Drive Group to 0.
Acceleration is started upon pressing the Run key while operating frequency is set. Motor decelerates to
stop by pressing the STOP/RST key.
Selecting rotation direction is available at drC - [Direction of motor rotation select] when operating
command is set to 0.
drC
Direction of motor F
Forward
rotation select.
Reverse
r
FX : counter clockwise
9-5
Chapter 9. Basic Functions
z Operating command via FX, RX terminal
Group
Code
Parameter Name
Setting
Range
Initial
Drive Group
drv
Drive mode
1
0~3
1
PG Group
P66
Multi-function input terminal P1 define
0
0 ~ 24
0
P67
Multi-function input terminal P2 define
1
0 ~ 24
1
Unit
Set drv code of Drive Group to 1.
Set P66 and P67 to 0 and 1 to use P1 and P2 as FX and RX terminals.
FX is forward run command and RX is reverse run command.
Motor is stopped when FX/RX terminal is ON/OFF at the same time.
Frequency
Time
FX
RX
z Operating command via FX, RX terminal 2
Group
Code
Parameter Name
Setting
Range
Initial
Drive Group
drv
Drive mode
2
0~3
1
PG Group
P66
Multi-function input terminal P1 define
0
0 ~ 24
0
P67
Multi-function input terminal P2 define
1
0 ~ 24
1
Unit
Set drv code of Drive Group to 2.
Set P66 and P67 to 0 and 1 to use P1 and P2 as FX and RX terminals.
FX: Operating command setting. Motor runs in forward direction when RX terminal is OFF.
RX: Direction of motor rotation select. Motor runs in reverse direction when RX terminal is ON.
Frequency
Time
FX
RX
9-6
Chapter 9. Basic Functions
z FX/RX Run Disable
Group
Code
Parameter Name
Setting
Range
Initial
Drive Group
drC
Direction of motor rotation select
-
F, r
F
PG Group
P5
Forward/Reverse run disable
-
0~2
0
Unit
Select the direction of motor rotation.
0: Forward and Reverse run enable
1: Forward run disable
2: Reverse run disable
z Power On Start select
Group
Code
Parameter Name
Setting
Range
Initial
Drive Group
drv
Drive mode
1, 2
0~3
1
PG Group
P34
Power on start select
1
0~1
0
Unit
Set P34 to 1
When AC input power is applied to the inverter with drv set to ON, motor starts acceleration.
It is inactive when it is operated by RUN key.
Caution
Particular attention must be directed to this function due to potential hazard as motor starts to run suddenly upon
applying AC input power.
Time
Input voltage
Time
Frequency
Operation
command
P34 = 0
P34= 1
9-7
Chapter 9. Basic Functions
z Restart after fault reset
Group
Code
Parameter Name
Setting
Range
Initial
Drive Group
drv
Drive mode
1, 2
0~3
1
PG Group
P35
Restart after fault reset selection
1
0~1
0
Unit
Set P35 code to 1
When AC input power is applied to the inverter with drv set to ON, motor starts acceleration.
It is inactive when it is operated by RUN key
Caution
Particular attention must be directed to this function due to potential hazard as motor starts to run suddenly after
the fault is cleared.
Time
Frequency
Time
Reset
Operation
command
P35 = 0
P35 = 1
9.4 Accel/Decel time and pattern setting
z Accel/Decel time setting based on Max frequency
Group
Code
Parameter Name
Setting
Range
Initial
Unit
Drive Group
ACC
Accel time
-
0 ~ 6000
5.0
Sec
dEC
Decel time
-
0 ~ 6000
10.0
Sec
P16
Max. freq.
-
0 ~ 200
60.0
Hz
PG Group
Set the desired Accel/Decel time at ACC/dEC code in Drive group.
Accel/decal time means the time accelerating/decelerating from starting frequency up to max. frequency
and it forms a pattern of accel/decel time with the max. frequency. Therefore, the slope of same accel/decel
pattern within a constant max. frequency is uniform regardless of target frequency.
9-8
Chapter 9. Basic Functions
Accel/Decel time is set based on max. frequency and 0Hz. For instance, if it is set max. frequency to 60Hz,
Accel/Decel time to 5 sec, and run frequency to 30Hz, time to reach 30Hz would be 2.5 sec.
Max.
frequency
Frequency
Time
FX
Accel. time
Decel. time
z Accel/Decel pattern setting
Group
Code
Parameter Name
Setting
Range
PG Group
P6
Accel pattern
0
Linear pattern run
P7
Decel pattern
1
S-shape pattern run
Initial
0
Accel/decel patterns may be set in P6 and P7 codes of PG Group, respectively.
Linear pattern operation: Output frequency linearly increases or decreases at uniform incremental
S-shape pattern run: Used for applications needing smoothing acceleration/deceleration such as conveyor
or elevator door.
Note
In case of S-shape pattern runs, the accel/decel time is longer than that set by a user. Use linear pattern run in
case of application needing accurate accel/decel time.
Frequency
Operation
command
Time
Accel. time
Decel. time
9-9
Chapter 9. Basic Functions
Note
If the target frequency is less than 40% of the max. frequency as below figure, it may not realize a complete sshape pattern run with the ending partially cut.
Max.
frequency
Target
frequency
Time
Frequency
z Accel/Decel Disable
Group
Code
Parameter Name
Setting
PG Group
P66
Multi-function input terminal P1 define -
~
~
P70
Multi-function input terminal P5 define
Range
Initial
0 ~ 24
0
23
Unit
4
Select one terminal among Multi-function input terminals P1-P5 to define Accel/Decel disable.
If P5 is selected, set P70 to 23 to activate this function.
Frequency
P5
Operation
command
9-10
Time
Chapter 9. Basic Functions
9.5 V/F Control
z Linear V/F pattern operation
Group
Code
Parameter Name
Setting
Range
Initial
Unit
PG Group
P17
Base frequency
-
30 ~ 200
60.0
Hz
P18
Start frequency
-
0.1 ~ 10
0.5
Hz
P22
V/F pattern
0
0~1
0
Set P22 code to 0(linear)
This pattern maintains a linear volts/frequency ratio by voltage/frequency(V/F).
Base frequency: Inverter outputs its rated voltage at this level. Enter the motor nameplate frequency.
Start frequency: Inverter starts to output its voltage at this level.
Base frequency
Start frequency
Frequency
Time
Inverter
rated voltage
Voltage
Time
Operation
command
9-11
Chapter 9. Basic Functions
z Square V/F pattern
Group
Code
Parameter Name
Setting
Range
Initial
PG Group
P22
V/F pattern
1
0~1
0
Unit
Set P22 code to 1
This pattern maintains squared volts. Appropriate applications are fans, pumps, etc
Voltage
100%
Frequency
Base frequency
In the Squared V/F pattern, to secure operation torque, it is practically realized with approximate value to
1.4 squared.
z Output voltage adjustment
Group
Code
Parameter Name
Setting
Range
Initial
Unit
PG Group
P23
Output voltage adjustment
-
40 ~ 110
100
%
This function is used to adjust the output voltage of the inverter. This is useful when you use a motor that
has a rated voltage lower than the input voltage
Voltage
100%
70%
100% set up
70% set up
Torque
boost
Frequency
Base frequency
9-12
Chapter 9. Basic Functions
z Manual torque boost
Group
Code
Parameter Name
Setting
Range
Initial
PG Group
P19
Torque boost select
0
0~1
0
P20
Torque boost in forward direction
-
0 ~ 15
5
P21
Torque boost in reverse direction
Unit
%
Set P19 code of PG Group to 0(manual torque boost).
The values of Torque boost in forward/reverse direction are set separately in P20 and P21.
Caution
If the boost value is set much higher than required, it may cause motor overheating due to over-energizing.
Voltage
100%
: Without torque
boost
FX
torque boost
Time
RX
torque boost
FX
RX
z Auto torque boost
Group
Code
Parameter Name
Setting
Range
Initial
PG Group
P19
Torque boost select
1
0~1
0
PG Group
P44
No load motor current
-
0.1 ~ 25.5
-
Unit
A
Set P19 code of PG Group to 1(auto torque boost).
Inverter automatically calculates torque boost value using motor parameters and outputs the
corresponding voltage.
9-13
Chapter 9. Basic Functions
9.6 Stop method select
z Decel to stop
Group
Code
Parameter Name
Setting
Range
Initial
PG Group
P8
Stop mode select
0
0~2
0
Unit
Set P8 code of PG Group to 0.
Motor decelerates to 0 Hz and stops during the setting time.
Frequency
Time
Operation
command
Decel. time
z DC braking to stop
Group
Code
Parameter Name
Setting
Range
Initial
PG Group
P8
Stop mode select
1
0~2
0
Unit
Select 1(DC brake to stop) in P8 code of PG Group.
Refer to page 10-1.
z Free run stop
Group
Code
Parameter Name
Setting
Range
Initial
PG Group
P8
Stop mode select
2
0~2
0
Select 2(Free run stop) in P8 code of PG Group.
When operating command is turned OFF, Output Frequency and voltage are shut down.
Frequency,
voltage
Operation
command
9-14
Time
Unit
Chapter 9. Basic Functions
9.7 Frequency limit
z Frequency limit using Max Frequency and Start Frequency
Group
Code
Parameter Name
Setting
Range
Initial
Unit
PG Group
P16
Max frequency
-
0 ~ 200
60.0
Hz
P18
Start frequency
-
0.1 ~ 10
0.5
Hz
Max Frequency: Every frequency except P17(base frequency) has upper limit of frequency parameter.
Therefore, any frequency cannot be set above the max. frequency.
Start Frequency: Every frequency has lower limit of frequency parameter.. If a frequency is set lower than
this, 0.00 is automatically set.
Max frequency is the reference frequency serving as the criteria of accel/decel time as well as upper limit.
Once max. frequency is changed, accel/decel slope may be changed accordingly.
Max
frequency
Frequency
Time
FX
Accel time
Decel time
9-15
Chapter 10. Advanced Functions
10. Advanced Functions
10.1
DC Brake
z Stopping motor by DC brake
Group
Code
Parameter Name
Setting
Range
Initial
Unit
PG Group
P8
Stop mode select
1
0~2
0
P9
DC brake start frequency
-
0 ~ 60
5.0
Hz
P10
DC brake wait time
-
0 ~ 60
0.1
sec
P11
DC brake voltage
-
0 ~ 200
50
%
P12
DC brake time
-
0 ~ 60
1.0
sec
Select 1 in P8 code(DC brake stopping) of PG Group
P 9 : The frequency at which the DC brake will become active
P10 : Inverter output will hold for this time before applying DC brake voltage.
P11 : Set this value as a percent of Motor rated current.
P12 : Sets the time for DC brake voltage to be applied to the motor.
Caution
If excessive DC Brake voltage is set or DC Brake time is set too long, it may cause motor overheating and
damage to the motor.
P10
Freuency
P12
P9
Voltage
Current
P11
Operation
command
Setting P11 or P12 to 0 will disable DC brake.
DC Brake Wait time: When load inertia is large, DC brake start frequency is high or excessive DC
voltage is allowed to motor, over current trip may occur. It can be prevented using P10 before starting DC
brake.
10-1
Chapter 10. Advanced Functions
z Starting DC brake
Group
Code
Parameter Name
Setting
Range
Initial
Unit
PG Group
P13
DC brake start voltage
-
0 ~ 200
50
%
P14
DC brake start time
-
0 ~ 60
0
sec
P13 : It sets the level as a percent of Motor rated current.
P14 : Motor accelerates after DC voltage is applied for the set time.
Caution
If excessive DC Brake voltage is set or DC Brake time is set too long, it may cause motor overheating and
damage to the motor.
Frequency
P14 t
P13
Voltage
Operation
command
Setting P13 or P14 to 0 will disable Starting DC brake.
t : After P14, the frequency starts accelerating.
z DC brake at a stop
Group
Code
Parameter Name
Setting
Range
Initial Unit
PG Group
P13
DC brake start voltage
-
0 ~ 200
50
11
0 ~ 24
2
PG Group
P68
Multi-function input terminal P3 function
select
%
P13 : It sets the level as a percent of Motor rated current.
Select a terminal to issue a command of DC brake at a stop among P1 to P5.
If P3 terminal is set for this function, set P68 to 11(DC brake at a stop).
Caution
If excessive DC Brake voltage at a stop is set or DC Brake time is set too long, it may cause motor overheating
and damage to the motor.
10-2
Chapter 10. Advanced Functions
Voltage
P13
P3
Operation
command
10.2
Jog operation
Group
Code
Parameter Name
Setting
Range
Initial
Unit
PG Group
P15
Jog frequency
-
0 ~ 200
10.0
Hz
PG Group
P68
Multi-function input terminal P3 select
4
0 ~ 24
2
Set a desirable jog frequency in P15 of PG Group.
Select a terminal from P1 – P5 to use for this setting
If P3 is set for Jog operation, set P68 to 4(Jog operation).
Jog frequency can be set within Max frequency(P16) and Start frequency(P18).
P1
FX : P66=0
P3
JOG : P68=4
CM
P15
Frequency
P3 (JOG)
Operation
command(FX)
Jog operation overrides all other operations except Dwell operation. Therefore, if Jog frequency command
is entered in the middle of Multi-Step, Up-Down or 3-wire operation, operation is executed at Jog frequency.
The above diagram shows an example when Multi-function input is set to NPN mode.
10-3
Chapter 10. Advanced Functions
10.3
UP – DOWN operation
Group
Code
Parameter Name
Setting
Range
Initial
PG Group
P66
Multi-function input terminal P1 select
0
0 ~ 24
0
P68
Multi-function input terminal P3 select
24
2
P69
Multi-function input terminal P4 select
15
3
P70
Multi-function input terminal P5 select
16
4
Unit
Select terminals for Up-Down operation from P1-P5.
If P4 and P5 are selected for Up-Down operation terminals, set P69 and P70 to 15(Frequency Up
command) and 16 (Frequency Down command), respectively.
P1
FX : P66 = 0
P3
UP : P68 = 24
P4
UP : P69 = 15
P5
DOWN : P70 = 16
CM
Frequency
P4 (UP)
P5(DOWN)
Operation
command(FX)
Up/down Save function: If P29, ‘Save up/down frequency’, is set to 1, the frequency before the inverter was
stopped or decelerated is saved in P30.
P29
P30
Save up/down frequency 0
Remove ‘save up/down frequency’
select
1
Set ‘save up/down frequency’
Save up/down frequency
Up/down frequency saved
The Up/down frequency can be initialized by setting of the multi-function input terminal as ‘Up/Down Save
Frequency Initialization’.
If ‘Up/Down Save Frequency Initialization’ signal is input while the multi-function input ‘Up’ or ‘Down’
function is applied, this signal is ignored.
Save
frequency
Output
frequency
P3(CLEAR)
P4 (UP)
Operation
command(FX)
10-4
Chapter 10. Advanced Functions
10.4
3-Wire operation
Group
Code
Parameter Name
Setting
Range
Initial
PG Group
P66
Multi-function Input terminal P1 select]
0
0 ~ 24
0
~
~
P70
Multi-function Input terminal P5 select
17
Unit
4
Select a terminal from P1-P5 for use as 3-Wire operation.
If P5 is selected, set P70 to 17(3-Wire operation).
P1
FX : P66 = 0
P2
RX : P67 = 1
P5
3-Wire : P70 = 17
CM
Frequency
t
FX
RX
P5 (3-Wire)
Input signal is latched (saved) in 3-Wire operation. Therefore, inverter can be operated by Push-button
switch.
The bandwidth of pulse (t) should not be less than 50msec.
10.5
Dwell operation
Group
Code
Parameter Name
Setting
Range
Initial
Unit
PG Group
P31
Dwell frequency
-
0 ~ 200
5.0
Hz
P32
Dwell time
-
0 ~ 10
0.0
sec
In this setting, a motor begins to accelerate after dwell operation is executed for dwell time at the specified
dwell frequency.
It is mainly used to release mechanical brake in elevators after operating at dwell frequency.
Dwell frequency: This function is used to output torque in an intended direction. It is useful in hoisting
applications to get enough torque before releasing a mechanical brake. Rated Slip frequency is calculated
by the formula shown below.
10-5
Chapter 10. Advanced Functions
⎛ rpm × P ⎞
fs = fr − ⎜
⎟
⎝ 120 ⎠
where, f s = rated slip frequency
f r = rated frequency
rpm = motor rated rpm
P = no. of motor poles
i.e.) rated frequency: 60Hz, rated rpm: 1740rpm, No. of poles: 4
⎛ 1740 × 4 ⎞
f s = 60 − ⎜
⎟ = 2 Hz
⎝ 120 ⎠
Dwell frequency
Start frequency
Dwell time
Frequency
Operation
command
10.6
Slip Compensation Control
Group
Code
Parameter Name
Setting
Range
Initial
Unit
PG Group
P40
Motor type select
-
0.1 ~ 0.4
-
P41
No. of motor poles
-
2 ~ 12
4
P42
Rated slip frequency
-
0 ~ 10
-
Hz
P43
Motor rated current
-
0.0 ~ 25.5
-
A
P44
Motor no load current
-
0.0 ~ 25.5
-
A
P46
Control mode select
1
0~2
0
Set P46 to 1(Slip compensation control).
This function enables the motor to run in constant speed by compensating inherent slip in an induction
motor.
P46: Set the motor type connected to the inverter output side.
P46
10-6
Motor type select
0.1
0.1kW
0.2
0.2kW
0.4
0.4kW
Chapter 10. Advanced Functions
P41 : Enter the pole number on the Motor nameplate.
P42 : Enter the slip frequency in accordance with the following formula and motor nameplate.
⎛ rpm × P ⎞
fs = fr − ⎜
⎟
⎝ 120 ⎠
where,
f s = rated slip frequency
f r = rated frequency
rpm = motor rated rpm
P = motor pole number
i.e.) rated freq. : 60Hz, rated rpm: 1740rpm, poles: 4
⎛ 1740× 4 ⎞
f s = 60 − ⎜
⎟ = 2Hz
⎝ 120 ⎠
Motor function codes per motor type are summarized as follows. Enter motor parameter if any change is
required.
z Factory defaults per motor type
Motor type [kW]
Rated current [A]
No load current [A]
Rated slip frequency [Hz]
0.1
0.6
0.4
2.0
0.2
1.1
0.7
2.33
0.4
1.8
1.2
3.00
P43: Enter the motor nameplate rated current.
P44: Enter the measured current when the motor is running at rated frequency after the load is removed.
Enter 50% of the rated motor current when it is difficult to measure the motor no load current.
Induction motor has a large difference between motor rated rpm and frequency(synchronous speed)
depending on load rate. Therefore, it is recommended to use slip compensation control to reduce the
difference.
Set torque boost within 2% for slip compensation operation. Excessive torque boost may cause a huge
error in slip speed because motor may get overexcitation in low speed.
RPM
Synchronous
speed
Motor rated
RPM
Slip
compensation
Load
10-7
Chapter 10. Advanced Functions
10.7
PI Control
Group
Code
Parameter Name
Setting
Range
Initial
Unit
PG Group
P46
Control mode select
2
0~3
0
-
P47
P gain for PI controller
-
0 ~ 999.9
300.0
%
P48
Differential time for PI controller(I gain)
-
0.1~ 32.0
1.0
sec
P50
Feed forward gain for PI controller
0 ~ 999.9
0
%
P51
PI output frequency upper limit
0 ~ 200
60.0
Hz
P52
PI output frequency lower limit
0 ~ 200
0.5
Hz
0 ~ 24
-
-
P66~
P70
Multi-function input terminal P1 ~ P5 define
-
20
Set P46 to 2(PI control).
Output frequency of the inverter is controlled by PI control for use as constant control of flow, pressure or
temperature.
P47: Set the percentage of output to error. If P Gain is set to 50%, 50% of the error value will be output.
Higher value can reach the target control value faster but it may cause oscillation.
P48: Set the time to output the accumulated error value. Set the time required to output 100% when the
error value is 100%. If differential time is set to 1 second and error is 100%, it outputs 100% in 1 second. If
the value is reduced, response will be faster but setting too low may lead to controller oscillation.
P50: Set the gain to add the target value to the PI controller output.
P51, P52: It limits the output of the PI controller.
P66 ~ P70: To exchange PI to normal operation, set one of P1~P5 terminal to 20 and turn ON.
10-8
Chapter 10. Advanced Functions
z PI Control block diagram
Analog
input filter
AI
Analog
input scale
PG
group
PG
group
P55,
P60
P56~
P64
Ref. freq
setting
Loader
key
Loader
volume
V1
Analog
input filter
Drive group
Analog
input scale
PG
group
PG
group
P55,
P60
P56~
P64
PI output
freq limit
Frq
0
1
2
3
PI control
-
0
Loader key
setting 1
1
Loader key
setting 2
2
Analog
input (AI)
I
3
4
PG
group
PG group
+
P51
+
P55
P47 : P gain
P48 : I time
+
PG group
Loader
volume
Comm.
input
P50
Feed forward gain
Switching from PI
operation to normal
operation
Control mode
select
PG
group
PG group
P66 ~
P70
P46
0, 1
2
Accel/Decel
P1 ~ P5
10-9
Chapter 10. Advanced Functions
10.8
Speed search operation
Group
Code
Parameter Name
Setting
Range
Initial
PG Group
P36
Speed search select
-
0 ~ 15
0
P37
Speed search current level
-
80 ~ 200
100
P77
Multi-function relay
15
0~20
17
Unit
%
Used to avoid any possible fault when the inverter outputs the voltage during operation after the load is
removed
The inverter estimates the motor rpm based on output current. Therefore, detecting exact speed is
difficult.
z The following table shows 4 types of Speed search selection.
P36
Speed
search
during P34(power during
Set
search
instant during P35(restart during
failure after fault reset)
power
on start)
search Speed
search Speed
search Speed
Speed
acceleration
restart
bit 3
bit 2
bit 1
bit 0
0
-
-
-
-
1
-
-
-
9
2
-
-
9
-
3
-
-
9
9
4
-
9
-
-
5
-
9
-
9
6
-
9
9
-
7
-
9
9
9
8
9
-
-
-
9
9
-
-
9
10
9
-
9
-
11
9
-
9
9
12
9
9
-
-
13
9
9
-
9
14
9
9
9
-
15
9
9
9
9
P37: Limits current during Speed search. Set as the percent of P43.
P77: Signal of active Speed search is given to external sequence via multi-function relay output (30AC).
10-10
Chapter 10. Advanced Functions
The followings show speed search operation during Instant Power Failure restart
Input voltage
Frequency
t1
t2
Voltage
H23
Current
Multi-function
output or relay
When the input power is cut off due to instant power failure, the inverter outputs Low voltage trip (LV)
to hold the output.
When the power is restored, the inverter outputs the frequency before the low voltage trip and the
voltage is increased due to PI control.
t1: If current is increasing over the preset level in P37, the rise in voltage will stop and the frequency
is decreased.
t2: If current lowers than the level set in P37, the increase in voltage starts again and the decrease in
frequency stops decelerating.
When the frequency and voltage are restored back to the nominal level, acceleration will continue at
the frequency before trip.
Speed search operation is suitable for loads with high inertia. Stop the motor and restart when friction in the
load is high.
SV-iE5 series keeps normal operation when power is restored in 15msec for the use of its inverter rating if
it operates within the rated output(0.1kW, 0.2kW and 0.4kW inverter types).
Inverter DC link voltage can vary depending on output load quantity. Therefore, Low Voltage trip(Lvt) may
occur when instant power failure is maintained over 15msec or output is higher than its rating.
Instant power failure specification is applied when input voltage to Inverter is 200~230V AC.
Adjust P37(speed search current level) in accordance with motor inertia to accelerate without trip by
detecting idle rotation speed quickly, when operation characteristics would be improved if accurately
entering motor no load current.
10-11
Chapter 10. Advanced Functions
10.9
Auto Restart Operation
Group
Code
Parameter Name
Setting
Range
Initial
PG Group
P38
No. of auto restart try
-
0 ~ 10
0
P39
Auto restart time
-
0 ~ 60
1.0
Unit
sec
Set the frequency of auto restart activated in P38.
Used to avoid system down, which is caused by internal protection function activated by causes
such as noise.
P38: If run command is entered after trip as inverter prevention function is active, it automatically restarts in
the time set in P39. Auto restart will become active after the P38, which is reduced by 1 when it is active. If
the trip outnumbers the preset restart try, auto restart function is deactivated. If the setting is reset via the
control terminal or the STOP key on the loader, the number of auto restart try set by user is automatically
entered.
If there is no more trip for 30 sec after Auto restart operation, it increases the preset auto restart value
reduced in the inverter.
When operation is stopped due to Low voltage {Lvt} or Emergency stop {EST}, Inverter Overheat {Oht},
and Hardware Trip {HWt}, Auto restart will be deactivated.
After the auto restart time set in P39, the motor starts acceleration automatically via speed search.
The following pattern is shown when the number of auto restart try is set to 2.
: Trip occured
Constant
run
Frequency
Voltage
Speed search
operation
Reset
P39
Operation
command
30 sec
Number of auto
restart try
10-12
2
1
2
1
0
2
Chapter 10. Advanced Functions
10.10 Operation Sound Select (carrier frequency change)
Group
Code
Parameter Name
Setting
Range
Initial
PG Group
P45
Carrier frequency select
-
0 ~ 15
3
Unit
Set the operating sound of the inverter.
Operating sound affects the following advantages/disadvantages.
P45
When setting carrier frequency Motor sound reduced
high
Inverter heat loss increased
Inverter noise increased
Inverter leakage current increased
iE5 series are designed to monitor the temperature of the inverter’s cooling coil(heat sink) in order to
automatically adjust carrier frequency in overheating condition. If it is necessary to use high carrier, select
inverter type considering ambient temperature and motor load.
10.11 Parameter initialize/Lock
z Parameter initialize
Group
Code
Parameter Name
Setting
Range
PG Group
P85
Parameter initialize
0
-
1
Groups initialize
2
Drive group initialize
3
PG group initialize
0
Select the group to be initialized and perform it in P85 code.
It displays P85 after initialization value is entered in P85 code and initialization is complete by pressing
FUNC key.
10-13
Chapter 10. Advanced Functions
z Password register
Group
Code
Parameter Name
Setting
Range
Initial
PG Group
P86
Password register
-
0 ~ FFFF
0
P87
Parameter lock
-
0 ~ FFFF
0
Unit
Register password for parameter lock (P87).
Password should be hexadecimal (0 ~ 9, A, B, C, D, E, F).
Caution
Use the registered password to cancel parameter lock again after setting parameter lock of P86 using the
registered password. Therefore, a user should memorize the registered password. If forgetting the password, you
need to get after-sales service.
Follow the steps to register password.
If password is already set, it is necessary to enter the present password instead of 0000 in step 2.
No.
Display
Description
-. Move to P86.
1
-. Pressing FUNC key shows 0000.
-. Enter the present password and press FUNC key. The factory default password
is 0000.
2
-. Press FUNC key.
-. Register new password(i.e.: A123)
3
-. If pressing FUNC key, A123 blinks.
4
-. Press FUNC key.
5
-. New password is saved.
If the present password is incorrectly entered in step 2, it may not go to step 3. Do not forget the registered
password.
10-14
Chapter 10. Advanced Functions
z Parameter lock
Group
Code
Parameter Name
Setting
Range
Initial
PG Group
P87
Parameter lock
-
0 ~ FFFF
0
P86
Password register
-
0 ~ FFFF
0
Unit
Parameter may be protected by using password.
Parameter lock is realized by using the password registered in P86.
No.
Display
Description
-. Move to P87.
1
-. Pressing FUNC key shows UL(unlock).
-. Display whether or not function code is changeable.
-. UL(unlock) shows that function code is changeable.
2
-. Press FUNC key.
-. Indicating 0000, the present password entry window is displayed.
3
-. Enter the present password(i.e.: A123).
-. Press FUNC key.
4
-. If password is correct, it is changed to L(lock); if incorrect, it shows UL(unlock)
again.
5
-. Function code is locked.
-. Press FUNC key.
-. Initial menu is displayed.
6
If the present status is ‘lock’ in step 2, it shows L(lock); to cancel it, enter the present password, changing it
to UL(unlock).
10-15
Chapter 11. Monitoring
11. Monitoring
11.1
Operating Status Monitoring
z Output current
Group
Code
Parameter Name
Setting
Drive Group
CUr
Output current
-
Range
Initial
Unit
Range
Initial
Unit
Inverter output current can be monitored in CUr code.
z Motor RPM
Group
Code
Parameter Name
Setting
Drive Group
rPM
Motor RPM
-
PG Group
P41
No. of motor poles
-
2 ~ 12
4
P46
Control mode select
-
0~2
0
P54
Gain for motor rpm display
-
1 ~ 1000
100
%
Motor rpm can be monitored in rpm code of Drive Group.
When P46 is set to 0(V/F control) or 1(PID control), the Inverter output frequency (f) is displayed in RPM
using the formula below without Motor slip considered.
⎛ 120 × f ⎞ P 54
RPM = ⎜
⎟×
⎝ P 41 ⎠ 100
P41: Enter the number of rated motor poles on the nameplate.
P54: Enter gear ratio to monitor mechanical rotation, instead of rotation of motor axis.
z Inverter DC link voltage
Group
Code
Parameter Name
Setting
Drive Group
dCL
Inverter DC link voltage
-
Range
Initial
Unit
Inverter DC link of input voltage can be monitored in dCL.
2 times (1.414) the value of input voltage is displayed while motor is at a stop. This is why it is converted
to DC voltage, the maximum of AC voltage by a rectifier.
It is the voltage between P1 on the inverter’s power terminal and N terminal.
11-1
Chapter 11. Monitoring
z User display select
Group
Code
Parameter Name
Setting
Drive Group
vOL
Output voltage display
-
Range
Initial
Unit
It displays the current inverter output voltage.
z Power on display
Group
Code
Parameter Name
Range
PG Group
P53
Power on display
0
Frequency command(0.0)
1
Accel time(ACC)
2
Decel time(DEC)
3
Drive mode(drv)
4
Frequency mode(Frq)
5
Multi-step frequency 1
6
Multi-step frequency 2
7
Multi-step frequency 3
8
Output current (CUr)
9
Motor rpm(rPM)
10
Default
Inverter DC link voltage
(dCL)
11
Output voltage (vOL)
12
Fault display 1
13
Operating display select
14
Output current
15
Motor rpm
Display the parameters set in P53 when power on.
The output current and motor rpm are displayed directly when P53 is set 14,15.
11-2
0
Chapter 11. Monitoring
11.2
Monitoring I/O Terminal
z Input terminal status monitoring
Group
Code
Parameter Name
Setting
PG Group
P71
Input terminal status display
-
Range
Initial
Unit
Initial
Unit
Current input terminal status (ON/OFF) can be monitored in P71.
The following is displayed when P1, P3, P4 are ON and P5 is OFF.
ON
OFF
P5
11.3
P4
P3
P2
P1
Monitoring Fault Condition
z Monitoring Current Fault Status
Group
Code
Parameter Name
Setting
Drive Group
nOn
Current fault display
-
Range
Fault occurred during operation is displayed in nOn
Up to 3 kinds of faults can be monitored.
This parameter gives information on fault types and the operating status at the time of the fault in good
order of fault type -> frequency -> current -> accel/decel. Refer to Page 5-10 for keypad setting.
Fault types
Frequency
Current
Accel/decel
information
Fault during accel
Fault during decel
Fault during constant run
Fault at a stop
Refer to Page 13-1 on fault types.
11-3
Chapter 11. Monitoring
z Fault history monitoring
Group
Code
Parameter Name
Setting
PG Group
P1
Fault history 1
-
P2
Fault history 2
P3
Fault history 3
P4
Reset fault history
-
Range
Initial
0~1
0
Unit
P 1 ~ P 3: Up to 3 faults information is stored.
P 4: Previous fault information stored in the code P1 thru P3 is all cleared.
When a fault occurs during operation, it can be monitored in the nOn.
When the fault condition is reset via the STOP/RST key or multi-function terminal, information displayed in
the nOn will be moved to P1. In addition, the previous fault info stored in P1 will be automatically moved to
P2. Therefore, the latest update fault info will be stored in the lowest history number.
When more than 1 fault occurred at the same time, up to 3 types of faults will be stored in one code.
SHFT
FUNC
Operating status
when a fault occurs
Fault type
FUNC
Note
Among faults displayed, ESt(emergency stop) and Lvt(low voltage trip) are not stored in fault history.
11-4
Chapter 11. Monitoring
11.4
Analogue output
Group
Code
Parameter Name
Setting
Range
Initial
PG Group
P73
Analogue output item select
-
0~3
0
-
10 ~ 200
100
P74
Analogue
output
level
adjustment
Unit
%
Output item and the level from the AM terminal are selectable and adjustable.
P73: The selected item will be output to Analog output terminal (AM).
P73
Analogue
output
item
select
Item corresponding to 10V
0
Output frequency
Max. frequency(P16)
1
Output current
150% of inverter rated current
2
Output voltage
282Vac
3
Inverter
DC
voltage
link
400Vdc
P74: If you want to use analog output value as a gauge input, the value can be adjustable according to
various gauge specifications.
0 ~ 10Vdc(50mA)
AM
CM
11-5
Chapter 11. Monitoring
11.5
Group
Multi-function output terminal and Relay
Code
Parameter
Name
Range
Default
PG
0
FDT-1
Group
1
FDT-2
2
FDT-3
3
FDT-4
4
FDT-5
5
-
6
Inverter overload(IOL)
Multi-function
7
Motor stall(STALL)
output
8
Over voltage trip(Ovt)
terminal
9
Low voltage trip(Lvt)
select
10
Inverter overheat(OHt)
11
Command loss
12
During run
13
During stop
14
During constant run
15
During speed searching
16
Wait time for run signal input
17
Fault output
P77
Type When
17
setting When the other When the low
H26(number
auto restart tries)
trip occurs
occurs
bit 2
bit 1
bit 0
0
-
-
-
relay 1
-
-
9
2
-
9
-
3
-
9
9
4
9
-
-
5
9
-
9
6
9
9
-
7
9
9
9
Set
P78
Fault
output
Select the desired item to be output.
11-6
of than low voltage voltage
trip
2
Chapter 11. Monitoring
P78: When 17(Fault display) is selected in P77, Multi-function output relay will be activated with the value
in P78.
z 0 : FDT-1
Check whether the output frequency matches the user-setting frequency.
Active condition: Absolute value (preset frequency-output frequency)<= Frequency Detection Bandwidth/ 2
Group
Code
Parameter Name
Setting
Range
Initial
Unit
PG Group
P76
Detected frequency bandwidth
-
0 ~ 200
10.0
Hz
Can not be set above max. frequency(P16).
When setting P76 to 10.0.
40Hz
20Hz
Frequency
setting
40Hz
35Hz
20Hz
15Hz
Frequency
Multi output
relay
z 1 : FDT-2
Activated when the preset frequency
Operation
command
matches frequency detection level (P75) and FDT-1 condition is met.
Active condition: (Preset frequency = FDT level) & FDT-1
Group
Code
Parameter Name
Setting
Range
Initial
Unit
PG Group
P75
Detected frequency
-
0 ~ 200
30.0
Hz
P76
Detected frequency bandwidth
-
10.0
Cannot be set above Max frequency (P16).
When setting P75 and P76 to 30.0 Hz
and 10.0 Hz, respectively
50Hz
30Hz
Frequency
setting
25Hz
Frequency
Multi output
relay
Operation
command
11-7
Chapter 11. Monitoring
z 2 : FDT-3
Activated when run frequency meets the following condition.
Active condition: Absolute value (detected frequency - run frequency) <= detected frequency Bandwidth/2
Group
Code
Parameter Name
Setting
Range
Initial
Unit
PG Group
P75
Detected frequency
-
0 ~ 200
30.0
Hz
P76
Detected frequency bandwidth
-
10.0
Can not be set above max. frequency(P16).
When setting P75 and P76 to
30.0Hz and 10.0 Hz, respectively
35Hz
30Hz
25Hz
Frequency
Multi output
relay
Operation
command
z 3 : FDT-4
Activated when run frequency meets the following condition.
Active condition
Accel time: Run Frequency >= FDT Level
Decel time: Run Frequency > (FDT Level – FDT Bandwidth/2)
Group
Code
Parameter Name
Setting
Range
Initial
Unit
PG Group
P75
Detected frequency
-
0 ~ 200
30.0
Hz
P76
Detected frequency bandwidth
-
10.0
Can not be set above max. frequency(P16).
When setting P75 and P76 to
30.0Hz and 10.0 Hz, respectively
30Hz
25Hz
Frequency
Multi output
relay
Operation
command
11-8
Chapter 11. Monitoring
z 4 : FDT-5
Activated as B contact contrast to FDT-4.
Active condition
Accel time: Run Frequency >= FDT Level
Decel time: Run Frequency > (FDT Level – FDT Bandwidth/2)
Group
Code
Parameter Name
Setting
Range
Initial
Unit
PG Group
P75
Detected frequency
-
0 ~ 200
30.0
Hz
P76
Detected frequency bandwidth
-
10.0
Can not be set above max. frequency(P16).
When setting P75 and P76 to
30.0Hz and 10.0 Hz, respectively
30Hz
25Hz
z 5 : Overload (OL)
Refer to page 12-1.
Frequency
Multi output
relay
Operation
command
z 6 : Inverter overload (IOL)
Refer to page 12-5
z 7 : Motor stall (Stall)
Refer to page 12-1
z 8 : Over voltage trip (Ovt)
Activated when over voltage trip occurs due to DC link voltage exceeded 400VDC.
z 9 : Low voltage trip (Lvt)
Activated when low voltage trip occurs due to DC link voltage under 200V.
z 10 : Inverter heatsink overheat (OHt)
Activated when the heatsink is overheated
z 11 : Command loss
Activated when analogue or RS-485 communication command are lost. Refer to page 12-4 frequency input
loss.
11-9
Chapter 11. Monitoring
z 12 : During operation
Activated when run command is input and inverter outputs its voltage.
F requency
R elay
O peration
com m and
z 13 : During stop
Activated during stop without active command
Frequency
Relay
Operation
command
z 14 : During constant run
Activated during constant speed operation
Frequency
Relay
Operation
command
z 15 : During speed searching
Refer to page 10-10
z 16 : Wait time for run signal input
This function becomes active during normal operation and that the inverter waits for active run command
from external sequence.
z 17 : Fault output
The parameter set in P78 is activated.
For example, if setting P77, P78 to 17 and 2, respectively, Multi-function output relay will become active
when trip other than “Low voltage trip” occurred.
11-10
Chapter 12. Protective Function
12. Protective Function
12.1
Overload Trip
Group
Code
Parameter Name
Setting
Range
Initial
Unit
PG Group
P24
Overload trip select
1
0~1
0
P25
Overload trip level
-
30 ~ 200
180
%
P26
Overload trip time
-
0 ~ 60
60
sec
Set P24 of PG Group to 1.
Cut the inverter’s output in case of motor overload
Cut the output if current is allowed to motor during overload trip time higher than the preset level.
12.2
Stall prevention
Group
Code
Parameter Name
Setting
Range
Initial
PG Group
P27
Stall prevention select
-
0~7
3
P28
Stall prevention level
-
30 ~ 150
150
P77
Multi-function relay select
7
0 ~ 18
17
Unit
%
During acceleration: Motor starts deceleration when current exceeding the value set in P28 flows
During constant run: Motor decelerates when current exceeding the value set in P28 flows.
During deceleration: Motor deceleration stops when inverter DC link voltage rises above a certain
voltage level.
P28: The value is set as the percent of motor rated current (P43).
P77: Inverter outputs signals of stall prevention operation to externally connected device through multifunction relay output (30AC).
P27 : Stall prevention can be set as the table below
Set
Decel
Constant
Accel
Set
Decel
Constant
Accel
0
-
-
-
4
9
-
-
1
-
-
9
5
9
-
9
2
-
9
-
6
9
9
-
3
-
9
9
7
9
9
9
12-1
Chapter 12. Protective Function
For example, set P27 to 3 to make stall prevention active during Acceleration and constant run.
When stall prevention is executed during acceleration or deceleration, Accel/Decel time may take longer
than the user-setting time.
When stall prevention is activated during constant run, t1, t2 executed in accordance with the value set in
ACC - [Accel time] and dEC - [Decel time].
i.e.) Stall prevention during operation
P28
Current
DC
voltage
Frequency
t
1
Multi output
relay
MO or relay
Acceleration
12.3
Frequency
t
2
Constant run
Deceleration
User’s fault detection
Group
Code
Parameter Name
Setting
Range
Initial
PG Group
P33
User’s fault detection
3
0~7
0
Unit
Can set the following fault detection.
Ground fault detection during operation: it stops output if excessive current of one or more outputs flows
due to ground fault and etc.
Input phase loss: Inverter output is blocked at the event of more than one phase loss among R, S and T.
Output phase loss: Inverter output is shut off at the event of more than one phase loss among U, V and W.
12-2
Chapter 12. Protective Function
Ground
fault
Display
during
operation
[GCt]
Input
Output
phase
phase
loss
loss
[COL]
[Pot]
Ground
fault
Display
during
operation
[GCt]
Input
Output
phase
phase
loss
loss
[COL]
[Pot]
0
-
-
-
4
9
-
-
1
-
-
9
5
9
-
9
2
-
9
-
6
9
9
-
3
-
9
9
7
9
9
9
Range
Initial
0 ~ 24
0
12.4
External trip signal
Group
Code
Parameter Name
Setting
PG Group
P66
Multi-function input terminal P1 define
~
~
P69
Multi-function input terminal P4 define
18
3
P70
Multi-function input terminal P5 define
19
4
Unit
Select a terminal among P1 ~ P5 to output external trip signal.
Set P69 and P70 to 18 and 19 to define P4 and P5 as External A contact and B contact.
External trip signal input A contact (N.O.): At normal status, P4 and CM terminals are open while at fault,
inverter output is shut off.
External trip signal input B contact (N.C.): At normal status, P5 and CM terminals are open while at open,
inverter output is shut off.
P1 FX : P66 = 0
P4 N.O. : P69 = 18
P5 N.C. : P70 = 19
CM
Frequency
P4(A contact)
P5(B contact)
Operation
command
12-3
Chapter 12. Protective Function
12.5
Frequency command loss
Group
Code
Parameter Name
Setting
Range
Initial
PG Group
P65
Criteria for analogue input signal
0
0~2
0
-
0~2
0
-
0.1~120
1.0
11
0 ~ 18
17
P81
P82
P77
Drive mode select after loss of
frequency command
Wait time after loss of frequency
command
Multi-function relay select
Unit
sec
Select the Drive mode when frequency reference set via analog signal or communication option is lost.
P65: Set the criteria for analog input signal loss.
P65
Criteria
for
analogue
input signal loss
0
Disabled
1
When half the value set in P56 and P61 is entered
2
When less than the value set in P56 and P61 is entered
If frequency command is set to 3(V1 of terminal) in Frq code of Drive Group and P65 is set to 1 and when
AI is less than half the value set in P56, it determines frequency command loss. At the moment, if entering
current based on the value converting 0~10V to 0~100%, it operates with the value converting 0~20mA to
0~100%.
i.e.) Voltage input: If P56 and P65 are set to 50% and 2 respectively, it operates at 5V.
Current input: If P56 and P65 are set to 50% and 1 respectively, it operates at 5mA.
P81: When the conditions set in P65 are met for the time set in P82, the inverter operates as follows.
P81
Drive mode select after
loss
of
command
frequency
0
Continuous operation with the frequency before
command loss occurs
1
Free run stop (output cut off)
2
Decel to stop
P77: Multi-function relay output (30AC) is used to output information on loss of frequency command to
external sequence.
12-4
Chapter 12. Protective Function
i.e.) when P65 is set to 2, P81 to 2, P82 to 5.0 sec and P77 to 11, respectively,
Frequency
input
5 sec
Frequency
Relay
Operation
command
12.6
Inverter overload
Group
Code
PG Group
P77
Parameter Name
Multi-function output terminal
select
Setting
Range
Initial
6
0 ~ 17
17
Unit
Inverter overload prevention function is activated when the current above inverter rated current flows. At
the moment, the operation time becomes shorter as larger output current is.
Multi-function relay (30BC) is used to output it to external device during inverter overload trip.
Inverter overload trip operates as follows. However, level and time may vary automatically in accordance
with motor type, depending on settings including carrier frequency.
Detection
time
[min]
1 min
Continuous
rating
150%
Output current
[Inverter rating]
12-5
Chapter 13. Troubleshooting and Maintenance
13. Troubleshooting and Maintenance
13.1
Protective Functions
Caution
When a fault occurs, the cause must be corrected before the fault can be cleared. If protective function keeps
active, the inverter should restart after clearing the cause(s). Or, it may lead to reduction in product life and
damage to the equipment.
z Protection of Inverter output current and input voltage
Fault display
Protective
Description
function
Overcurrent
Ground
The inverter turns off its output when the output current of the inverter flows more
than 200% of the inverter rated current
The inverter turns off its output when a ground fault occurs on the output as long as
fault current the function is active.
Ground
fault current
The inverter turns off its output when unbalanced output current occurs due to
abnormal situation such as ground fault during run and one of U,V,W gets
overcurrent.
Inverter
The inverter turns off its output when the output current of the inverter flows more
Overload
than the rated level (150% for 1 minute).
Overload
The inverter turns off its output if the output current of the inverter more than the
trip
motor rated current(P25) flows.
Inverter
The inverter turns off its output if the heat sink overheats due to a damaged cooling
overheat
fan.
Condenser
overload
Output
Phase loss
Over
voltage
Inverter output is blocked when one of 3 phases gets opened or main condenser is
outworn, resulting in excessive DC voltage variation. Detection time varies
depending on inverter output current.
The inverter turns off its output when the one or more of the output (U, V, W) phase
is open. The inverter detects the output current to check the phase loss of the
output.
The inverter turns off its output if the DC voltage of the main circuit increases higher
than 400 V when the motor decelerates. This fault can also occur due to a surge
voltage generated at the power supply system.
Low
The inverter turns off its output if the DC voltage is below 180V because of
voltage
insufficient voltage input torque.
13-1
Chapter 13. Troubleshooting and Maintenance
z Protection of abnormal internal circuit and external signal
Fault display
Protective
Description
function
Parameter
Displayed when user-setting parameters fail to be entered into memory.
save error
Displayed when an error occurs in CPU operation and internal OS program. The
Inverter
fault may not be relieved simply by STOP/RST key of the loader or reset terminal.
hardware
Retry after completely turning off the inverter and the display of the loader is fully
fault
disappeared.
Used for the emergency stop of the inverter. The inverter instantly turns off the
Instant cut
off
output when the EST terminal is turned on.
Note
The inverter starts to regular operation when turning off the EST terminal while FX
or RX terminal is ON.
When multi-function input terminal (P66~P70) is set to 18, external fault signal
External
A input: A (Normal Open Contact), the inverter turns off the output.
fault
contact
input
When multi-function input terminal (P66 ~ P70) is set to 19, external fault signal
External
B input: B (Normal Close Contact), the inverter turns off the output.
fault
contact
input
When
frequency
(RS-485) and no signal is applied, operation is done according to the method set in
command
P81.
is lost
13-2
the When inverter operation is set via Analog input (0-10V or 0-20mA input) or option
Chapter 13. Troubleshooting and Maintenance
13.2
Fault Remedy
Caution
If any trouble occurs due to overcurrent, make sure to restart after eliminating the causes because power
semiconductor element inside the inverter may be broken.
Protective function
Cause
Remedy
z Accel/Decel time is too short compared ) Increase the Accel/Decel time.
to the inertia of the load(GD2).
z Load is greater than the inverter rating. ) Replace the inverter with appropriate
z Inverter output is issued when the motor capacity.
is free running.
) Resume operation after stopping the
z Output short circuit or ground fault has motor or use P36 (Speed search).
Overcurrent
occurred.
) Check output wiring.
z Mechanical brake of the motor is ) Check the mechanical brake.
operating too fast.
z Ground fault has occurred at the output ) Check the wiring of the output terminal.
wiring of the inverter.
z The insulation of the motor is damaged ) Replace the motor.
due to heat.
Ground
fault
current
z Load is greater than the inverter rating.
) Upgrade the capacity of motor and inverter
or reduce the load weight.
Inverter overload
z Torque boost scale is set too large.
) Reduce torque boost scale.
z Cooling system has faults.
z
) Check for alien substances clogged in the
z Ambient temperature is too high.
) Keep ambient temperature under 40°C.
Overload trip
Inverter overheat
heat sink.
z 3-Phase product may have one phase ) Check whether wiring of input power or
lost.
Condenser
overload
z Internal condenser was outworn.
inter-phase voltage is abnormal.
) It’s almost time to replace or it may
happen when it is used in hot temperature for
a long while. Contact after-sales service.
13-3
Chapter 13. Troubleshooting and Maintenance
z Fault Remedy
Protective function
Cause
Remedy
z Faulty contact of magnetic switch ) Make connection of magnetic switch at
at output
z Faulty output wiring
Output Phase loss
output of the inverter securely.
) Check output wiring.
z Decel time is too short compared ) Increase the Decel time.
to the inertia of the load(GD2).
z Regenerative load is at the ) Check whether line voltage exceeds its
Over voltage
inverter output.
rating.
z Line voltage is too high.
) Check whether line voltage is below its rating.
z Line voltage is low.
z Load larger than line capacity is ) Check the incoming AC line. Adjust the line
connected to line (ex: welding capacity corresponding to the load.
machine, motor’s direct input)
Low voltage
) Change a magnetic switch.
z Faulty magnetic switch at the
input side of the inverter.
z The multi function terminals(P66 ) Eliminate the cause of fault at circuit
~ P70) set to “18 (External fault- connected to external fault terminal or cause of
External
fault
A
A)” or “19 (External trip signal external fault input.
input : fault-B)” in P66~P70 in PG
contact input
Group is ON.
External
fault
B
contact input
z No frequency command is applied ) Check the wiring of AI and frequency
to AI terminal.
reference level.
z Communication command is cuts ) In case of a program set to periodically
off
update frequency, check the communication line
or operation of master device.
) Contact your local LSIS sales representative.
) EEP message occurs when first allowing
power after upgrading software due to A/S
Parameter save error Hardware fault
13-4
service. At the moment, turn it off and retry.
Chapter 13. Troubleshooting and Maintenance
13.3
Precautions for maintenance
Warning
z Make sure to remove the input power while performing maintenance.
z Make sure to perform maintenance after checking the DC link capacitor has discharged. The bus
capacitors in the inverter main circuit can still be charged even after the power is turned off. Check the
voltage between terminal P or P1 and N using a tester before proceeding.
z SV-iE5 series inverter has ESD (Electrostatic Discharge) sensitive components. Take protective
measures against ESD before touching them for inspection or installation.
z Do not change any inner parts and connectors. Never modify the inverter.
13.4
Checklist
z Daily inspections
Proper installation environment
Cooling system fault
Unusual vibration and noise
Unusual overheating and discoloration
z Periodic inspection
Do screws and bolts become loose or rust due to the environment?
) Tighten or replace them.
Alien substances are clogged in the cooling system?
) Eliminate them by using compressed air.
Check the rotating condition of the cooling fan, the condition of capacitors and the connections with the
magnetic contactor
) Replace them if there are any abnormalities.
13.5
Parts Replacement
The inverter consists of many electronic parts such as semiconductor devices. The following parts may deteriorate
with age because of their structures or physical characteristics, leading to reduced performance or failure of the
inverter. For preventive maintenance, the parts must be changed periodically.
Part name
Change period(year)
Description
DC link condenser
4
Exchange
Control smoothing condenser
4
Exchange
Relay
-
Determined after inspection
13-5
Chapter 14. COM Option (RS-485)
14. COM Option (RS-485)
14.1
Introduction
SV-iE5 inverter can be controlled and monitored by the sequence program of the PLC or other master module. Drives
or other slave devices may be connected in a multi-drop fashion on the RS-485 network and may be monitored or
controlled by a single PLC or PC.
14.2
Specifications
z Performance Specifications
Item
Specification
COM method
RS-485
Transmission form
Bus method, Multi drop Link System
Inverter
SV-iE5 series
Converter
RS232 converter
Connectable drives
Max. 16
Transmission distance
Max. 1,200m (within 700m recommended)
z Hardware specification
Item
Specification
Installation
Use S+, S- terminals on control terminal block
Power supply
Use Insulated power from the inverter power supply
z Communication specification
Item
Specification
Communication speed
9,600/4,800/2,400 bps selectable
Control procedure
Asynchronous communication system
COM system
Half duplex system
Character system
Binary (Modbus RTU), ASCII (LSBUS)
Stop bit length
1 bit / 2bit
CRC check
2 bytes
Parity check
None
14-1
Chapter 14. COM Option (RS-485)
14.3
Installation
z Connecting the communication line
Connect(wire) to the inverter’s (S+), (S-) terminals of the control terminals as shown in the below figure. Use CM
terminal on the lower control terminal for COM signal shield ground. COM dedicated terminal is delivered with iE5
COM optional product.
S+(P) S-(N)
Use CM terminal if
using shield wiring
z PC-Inverter connection
232,485 converter
Upper controls
(PC, laptop, PLC and etc)
Note
The number of drives to be connected is up to 16 drives.
The specification of length of communication line is max. 1200m. To ensure stable communication, limit the
length below 700m.
Short both(S+, S-) of JP1 pin located on the upper PBC of control terminal COM terminal.
14-2
Chapter 14. COM Option (RS-485)
z Cable Specification
If communicating by using RS-422 or RS-485 channel, the twisted pair cable for RS-422 should be used considering
the communication distance and speed. The specifications of the recommended cable are as follows.
- Product : Low Capacitance Lan Interface Cable
- Spec. : 2P X 22AWG(D/0.254 TA)
- Manufacturer : LS cable
- Type : LIREV-AMESB
Even if using other cables but the above recommended cable, make sure to use cables conforming to the following
table.
z Characteristics
Electrical
Item
Unit
Characteristics
Test condition
characteristics
Conductor resistance
Ω/km
59 and lower
Ambient temp.
Withstand voltage(DC)
V/1min
Endurable at 500V for 1 minute
In the air
Insulation resistance
MΩ-km
1,000 and higher
Ambient temp.
Electrostatic cap
Pf/M
45 and lower
1kHz
Characteristic
Ω
120 ± 12
10MHz
Pair
2
Spec.
AWG
22
Structure
NO./mm
1/0.643
Dia.
Mm
0.643
impedance
Appearance
Conductor Core
characteristics
insulator
14.4
Thickness mm
0.59
Dia.
1.94
Mm
Inverter functional code setting
Once correctly connected, set COM parameters as follows. However, COM speed number should be set according to
the system.
z Function
Code
Function
Setting
drv
Run mode
3 (COM)
Frq
Frequency mode
4 (COM)
P 79
Inverter number
1 ~ 250 (set avoiding duplication)
P 80
COM speed
2 (9,600 bps, factory default)
P 81
Run mode when speed command is lost
0 (keep operating with the frequency set before
command is lost)
14-3
Chapter 14. COM Option (RS-485)
Code
Function
Setting
P 82
Determination time when speed command is lost
1.0 second
P 83
COM waiting time
Set the waiting time until the next TX signal output
after receiving RX signal.
P 84
Parity/STOP setting
Set COM parity/stop bit
P 89
Selecting communication protocol
0 (Modbus RTU), 1 (LSBUS)
14.5
Operation
Check whether a computer and an inverter are correctly connected.
Turn on the inverter. Do not connect any load to the inverter until it is confirmed that it would be communicated with a
computer. Run the inverter in accordance with the inverter run program.
14.6
COM Protocol(ModBus-RTU)
Use ModBus-RTU protocol, which is open protocol. It is structured that computer or other host serves as a master
while the inverter servers as a slave. The inverter, as a slave, responds to the read/write request of the master
z Supportable function codes
Function
Description
h03
Read Hold Register
h04
Read Input Register
h06
Preset Single Register
h10
Preset Multiple Register
Remarks
z Exception codes
Exception
Description
h01
ILLEGAL FUNCTION
h02
ILLEGAL DATA ADDRESS
Remarks
When using other function codes but these supported by
the inverter (h03,h04,h06,h10)
When parameter address is invalid (not exists)
If function code is h06 or h10(parameter writing command)
h03
ILLEGAL DATA VALUE
or when parameter value is not valid (reading only or
beyond the range)
h06
SLAVE DEVICE BUSY
h14
User define
Delay
1.Write Disable(Address h0004 value is 0)
2.Read Only or Not Program during Running
Note
Common S/W version is displayed in hexadecimal number while the S/W version of parameter is displayed in
decimal number.
14-4
Chapter 14. COM Option (RS-485)
14.7
Communication Protocol (LS BUS)
LS BUS protocol is dedicated communication protocol of LSIS. It is used for connecting of communication with LSIS
PLC etc.
z Basic format
Command message (Request):
ENQ
Drive No.
CMD
Data
SUM
EOT
1 byte
2 bytes
1 byte
n bytes
2 bytes
1 byte
Normal response (Acknowledge Response):
ACK
Drive No.
CMD
Data
SUM
EOT
1 byte
2 bytes
1 byte
n * 4 bytes
2 bytes
1 byte
Negative response (Negative Acknowledge Response):
NAK
Drive No.
CMD
Error code
SUM
EOT
1 byte
2 bytes
1 byte
2 bytes
2 bytes
1 byte
Description:
Request starts with “ENQ” and ends with “EOT”.
Acknowledge Response starts with “ACK” and ends with “EOT”.
Negative Acknowledge Response starts with ”NAK” and ends with “EOT”.
“Drive Number” is the number of drives and indicated in 2 bytes ASCII-HEX.
(ASCII-HEX: Hexadecimal consists of ‘0’ ~ ‘9’, ‘A’ ~ ‘F)
CMD: Capital letter
Character
ASCII-HEX
Command
‘R’
52h
Read
‘W’
57h
Write
‘X’
58h
Request for monitoring registration
‘Y’
59h
Action for monitoring registration
Data: ASCII-HEX
Ex) when data value is 3000: 3000 (dec) → ‘0’ ’B’ ’B’ ’8’h → 30h 42h 42h 38h
Error code: ASCII (20h ~ 7Fh)
Receive/Send buffer size: Receive= 39 bytes, Send=44 bytes
Monitor register buffer: 8 Word
SUM: to check the communication error
SUM= ASCII-HEX format of lower 8 bit of (Drive No. + CMD + DATA)
14-5
Chapter 14. COM Option (RS-485)
Ex) Command Message (Request) for reading one address from address “3000”
ENQ
Drive No
CMD
Address
05h
“01”
“R”
“3000”
1 byte
2 bytes
1 byte
4 bytes
Number of
SUM
EOT
“1”
“A7”
04h
1 byte
2 bytes
1 byte
address to read
SUM = ‘0’ + ‘1’ + ’R’ + ‘3’ + ‘0’ + ‘0’ + ‘0’ + ‘1’
= 30h + 31h + 52h + 33h + 30h + 30h + 30h + 31h
= 1A7h (Control values such as ENQ/ACK/NAK are excluded.)
z Detail communication protocol
1) Request for Read: Request for read successive ‘N’ numbers of WORD from address “XXXX”
ENQ
Drive No
05h
1 byte
CMD
Address
“R”
“XXXX”
1 byte
4 bytes
“01” ~
“1F”
2 bytes
Number of
SUM
EOT
“1” ~ “8” = n
“XX”
04h
1 byte
2 bytes
1 byte
address to read
Total Byte = 12
The quotation marks (“ ”) means character.
1.1) Acknowledge Response:
ACK
Drive No
CMD
Data
SUM
EOT
06h
“01” ~ “1F”
“R”
“XXXX”
“XX”
04h
1 byte
2 bytes
1 byte
N * 4 bytes
2 bytes
1 byte
Total Byte = 7 + n * 4 = Max 39
1.2) Negative Acknowledge Response:
NAK
Drive No
CMD
Error code
SUM
EOT
15h
“01” ~ “1F”
“R”
“**”
“XX”
04h
1 byte
2 bytes
1 byte
2 bytes
2 bytes
1 byte
Total Byte = 9
14-6
Chapter 14. COM Option (RS-485)
2) Request for Write:
ENQ
Drive No
CMD
Address
05h
“01”~ “1F”
“W”
“XXXX”
1 byte
2 bytes
1 byte
Number of
Data
SUM
EOT
“1” ~ “8” = n
“XXXX…”
“XX”
04h
4 bytes
1 byte
n * 4 bytes
2 bytes
1 byte
address to read
Total Byte = 12 + n * 4 = Max 44
2.1) Acknowledge response:
ACK
Drive No
CMD
Data
SUM
EOT
06h
“01” ~ “1F”
“W”
“XXXX…”
“XX”
04h
1:byte
2:bytes
1:byte
n * 4 bytes
2 bytes
1 byte
Total Byte = 7 + n * 4 = Max 39
Caution) Run command and Command frequency send the previous data to the first request of write and
then it send the owned data to the second request of write.
2.2) Negative response:
NAK
Drive No
CMD
Error code
SUM
EOT
15h
“01” ~ “1F”
“W”
“**”
“XX”
04h
1 byte
2 bytes
1 byte
2 bytes
2 bytes
1 byte
Total Byte = 9
3) Request for Monitor Register
This is useful when constant parameter monitoring and data updates are required periodically.
Request for Register of ‘n’ numbers of Address (not consecutive)
ENQ
Drive No
CMD
05h
“01” ~ “1F”
“X”
1 byte
2 bytes
1 byte
Number of
Address
SUM
EOT
1” ~ “4”= n
“XXXX…”
“XX”
04h
1 byte
n * 4 byte
2 byte
1 byte
address to read
Total Byte = 8 + n * 4 = Max 24
3.1) Acknowledge Response:
ACK
Drive No
CMD
SUM
EOT
06h
“01” ~ “1F”
“X”
“XX”
04h
1 byte
2 bytes
1 byte
2 bytes
1 byte
Total Byte = 7
14-7
Chapter 14. COM Option (RS-485)
3.2) Negative Acknowledge Response:
NAK
Drive No
CMD
Error code
SUM
EOT
15h
“01” ~ “1F”
“X”
“**”
“XX”
04h
1 byte
2 bytes
1 byte
2 bytes
2 bytes
1 byte
Total Byte = 9
4) Action Request for monitor register: Request for read of address registered by monitor register.
ENQ
Drive No
CMD
SUM
EOT
05h
“01” ~ “1F”
“Y”
“XX”
04h
1 byte
2 bytes
1 byte
2 bytes
1 byte
Total Byte = 7
4.1) Acknowledge response:
ACK
Drive No
CMD
Data
SUM
EOT
06h
“01” ~ “1F”
“Y”
“XXXX…”
“XX”
04h
1 byte
2 bytes
1 byte
n * 4 bytes
2 bytes
1 byte
Total Byte= 7 + n * 4 = Max 23
4.2) Negative response:
NAK
Drive No
CMD
Error code
SUM
EOT
15h
“01” ~ “1F”
“Y”
“**”
“XX”
04h
1 byte
2 bytes
1 byte
2 bytes
2 bytes
1 byte
Total Byte = 9
5) Error code
Error code
Description
“IF”
When master is sending codes other than Function code (R, W, X, Y).
“IA”
When parameter address does not exist
“ID”
When Data value exceeds its permissible range during ‘W’ (Write).
“WM”
“FE”
14-8
When the specific parameters cannot be written during ‘W’ (Write).
(For example, in the case of Read Only, Write disabled during Run)
When frame size of specific function is not correct and Checksum field is wrong.
Chapter 14. COM Option (RS-485)
14.8
Parameter code list
z Common area: Area accessible regardless of inverter models.
Address
h0000
Parameter
Inverter model
Scale Unit
-
-
R/W
R
Data value
0 : SV-iS3
7 : SV-iG5
1 : SV-iG
8 : SV-iC5
2 : SV-iV
9 : SV-iP5
3 : SV-iH
A : SV-iG5A
4 : SV-iS5
D : SV-iE5
5 :SV-iV5
h0001
Inverter capacity
-
-
R
FFFF:100W 0000:200W
h0002
Inverter Input Voltage -
-
R
0 : 220V class
h0003
Version
-
-
R
i.e.) Version 1.0 : h0010
h0004
Parameter Lock
-
-
R/W
h0005
Frequency Command 0.01
Hz
R/W
0001:200W
0: Lock (default)
1: Unlock
Starting freq. ~ Max. freq.
BIT 0: Stop
R/W
BIT 1: Forward Run
BIT 2: Reverse Run
W
-
BIT 3: Fault Reset (RESET)
BIT 4: Emergency Stop (EST)
BIT 5, 13~15: Not Used
BIT 6~7:
h0006
Drive mode
-
-
00: terminal
01: loader
10: Reserved
11: Com operation
BIT 8~12: frequency arrival info
R
00000: DRV-00
00001: multi-step 1
00010: multi-step 2
00011: multi-step 3
00100: UP
00101: Down
00110: Up/down zero
00111: AI input
01000: JOG /
01001~
Loader volume
10010: reserved
10011: Com operation
10100~
11111: reserved
h0007
Acc Time
0.1
sec
R/W
See Function List
h0008
Dec Time
0.1
sec
R/W
See Function List
h0008
14-9
Chapter 14. COM Option (RS-485)
Address
Parameter
Scale Unit
R/W
Data value
h0009
Output Current
0.1
A
R
See Function List.
H000A
Output Frequency
0.01
Hz
R
See Function List.
H000B
Output Voltage
0.1
V
R
See Function List.
H000C
DC Link voltage
0.1
V
R
See Function List.
H000D
-
-
-
-
Reserved
BIT 0 : Stop
BIT 1 : Forward running
BIT 2 : Reverse running
BIT 3 : Fault (Trip)
BIT 4 : Accelerating
BIT 5 : Decelerating
h000E
Status of Inverter
R
BIT 6 : speed arrival
BIT 7 : DC Braking
BIT 8 : Stopping
BIT10 : Brake Open
BIT11 : Forward run command(1)
BIT12 : Reverse run command(1)
BIT13 : REM. R/S
BIT14 : REM. Freq.
BIT 0 : OCT
BIT 1 : OVT
BIT 2 : EXT-A
BIT 3 : EST(Emergency Stop)
BIT 4 : COL
BIT 5 : GFT(Ground Fault)
BIT 6 : OHT(Over Heat)
h000F
Trip information
R
BIT 7 : GCT(Ground Current Trip)
BIT 8 : OLT(Overload trip)
BIT 9 : HW-Diag
BIT10: EXT-B
BIT11: EEP(Parameter Write Error)
BIT12: BIT13: PO(Phase Open)
BIT14 : IOLT
BIT15: LVT
14-10
Chapter 14. COM Option (RS-485)
Address
Parameter
Scale Unit
R/W
Data value
BIT 0 : P1
BIT 1 : P2
h0010
Input terminal status
R
BIT 2 : P3
BIT 3 : P4
BIT 4 : P5
R
BIT 0 ~6: Not Used
h0011
Output terminal status
h0012
-
-
-
-
Reserved
h0013
-
-
-
-
Reserved
h0014
-
-
-
-
Reserved
h0015
RPM
R
See Function List.
BIT 7 : 30AC
Note
The changed value in Common area affects the current setting but returns to the previous setting when power is
cycled or Inverter is reset. However, changing value is immediately reflected in other parameter groups even in
the case of Reset or Power On/Off.
z DRV group
Address
Code Parameter
Initial
Max.
Min.
53504
D00
Cmd. Freq
0
Max. Freq.
0
D101
53505
D01
ACC
50
60000
0
D102
53506
D02
DEC
100
60000
0
D103
53507
D03
DRV
1
3
0
D104
53508
D04
FRQ
0
4
0
D105
53509
D05
ST 1
1000
Max. Freq.
0
D106
53510
D06
ST 2
2000
Max. Freq.
0
D107
53511
D07
ST 3
3000
Max. Freq.
0
D108
53512
D08
CUR
-
255
-
D109
53513
D09
RPM
0
1800
0
D10A
53514
D10
DCL
0
65535
0
D10B
53515
D11
USR
0
1
0
D10C
53516
D12
FLT
0
1
0
D10D
53517
D13
DRC
0
1
0
16bit
10bit
D100
14-11
Chapter 14. COM Option (RS-485)
z PROGRAM group
Address
Code Parameter
Initial
Max.
Min.
53761
P1
Last Fault1
0
1
0
D202
53762
P2
Last Fault2
0
1
0
D203
53763
P3
Last Fault3
0
1
0
D204
53764
P4
Fault Clear
0
1
0
D205
53765
P5
Run Prohibit
0
2
0
D206
53766
P6
ACC Pattern
0
1
0
D207
53767
P7
DEC Pattern
0
1
0
D208
53768
P8
Stop Method
0
2
0
D209
53769
P9
DcBr freq
500
6000
startFreq
D20A
53770
P 10
DcBlk time
10
6000
0
D20B
53771
P 11
DcBr value
50
200
0
D20C
53772
P 12
DcBr time
10
600
0
D20D
53773
P 13
DcSt value
50
200
0
D20E
53774
P 14
DcSt time
0
600
0
D20F
53775
P 15
Jog Freq
1000
Max. Freq.
0
D210
53776
P 16
Max Freq
6000
12000
4000
D211
53777
P 17
Base Freq
6000
12000
3000
D212
53778
P 18
Start Freq
50
1000
10
D213
53779
P 19
Trq Boost
0
1
0
D214
53780
P 20
Fwd Boost
50
150
0
D215
53781
P 21
Rev Boost
50
150
0
D216
53782
P 22
VF Pattern
0
1
0
D217
53783
P 23
OV adj
100
110
40
D218
53784
P 24
OLT select
0
1
0
D219
53785
P 25
OLT level
180
200
50
D21A
53786
P 26
OLT time
600
600
0
D21B
53787
P 27
Stall prev.
0
7
0
D21C
53788
P 28
Stall level
150
150
30
D21D
53789
P 29
Up/Down Save select
0
1
0
D21E
53790
P 30
Up/Down Save Freq.
0
Max. Freq.
0
D21F
53791
P 31
Dwell freq
500
Max. Freq.
startFreq
D220
53792
P 32
Dwell time
0
100
0
16bit
10bit
D201
14-12
Chapter 14. COM Option (RS-485)
Address
Code Parameter
Initial
Max.
Min.
53793
P 33
Trip select
0
3
0
D222
53794
P 34
Power-on run
0
1
0
D223
53795
P 35
RST restart
0
1
0
D224
53796
P 36
Speed Search
0
50
0
D225
53797
P 37
SS Sup-Curr
100
200
80
D226
53798
P 38
Retry number
0
10
0
D227
53799
P 39
Retry delay
10
600
0
D228
53800
P 40
Motor select
0
2
0
D229
53801
P 41
Pole number
4
12
2
D22A
53802
P 42
Rated-Slip freq.
200
1000
0
D22B
53803
P 43
Rated-Curr
10
255
0
D22C
53804
P 44
Noload-Curr
5
255
0
D22D
53805
P 45
Carrier freq
30
100
10
D22E
53806
P 46
Control Mode
0
2
0
D22F
53807
P 47
PI P-gain
3000
9999
0
D230
53808
P 48
PI I-gain
100
3200
10
D232
53810
P 50
PI F-gain
0
9999
0
D233
53811
P 51
PI output freq. H limit
6000
Max. Freq.
PI output freq.L limit
D234
53812
P 52
PI output freq. L limit
50
D235
53813
P 53
PowerOn disp
0
15
0
D236
53814
P 54
Rpm disp Gain
100
1000
1
D237
53815
P 55
AI input filter cont
10
9999
0
D238
53816
P 56
AI min. Input(v/i)
0
AI max. inupt
0
D239
53817
P 57
AI min. input freq.
0
Max. Freq.
0
D23A
53818
P 58
AI max. Input(v/i)
1000
1000
AI min. input
D23B
53819
P 59
AI max. input freq.
6000
Max. Freq.
0
D23C
53820
P 60
Volume input filter cont
10
9999
0
D23D
53821
P 61
Volume min. input
0
Vol. max. input
0
D23E
53822
P 62
Volume input min. freq.
0
Max. Freq.
0
D23F
53823
P 63
Volume max. input
1000
1000
Vol. min. input
D240
53824
P 64
Volume input max. freq.
6000
Max. Freq.
0
D241
53825
P 65
Anal speed command lost criteria
0
2
0
D242
53826
P 66
P1 define
0
24
0
16bit
10bit
D221
PI output freq. H
limit
startFreq.
14-13
Chapter 14. COM Option (RS-485)
Address
Code Parameter
Initial
Max.
Min.
53827
P 67
P2 define
1
24
0
D244
53828
P 68
P3 define
2
24
0
D245
53829
P 69
P4 define
3
24
0
D246
53830
P 70
P5 define
4
24
0
D247
53831
P 71
Input T/M status disp
0
31
0
D248
53832
P 72
MF input T/M filter cont.
3
20
1
D249
53833
P 73
Anal. Output item select
0
3
0
D24A
53834
P 74
Anal. Output level adj.
100
200
10
D24B
53835
P 75
Det. Freq.
3000
Max. Freq.
0
D24C
53836
P 76
Det. Freq. bandwidth
1000
Max. Freq.
0
D24D
53837
P 77
Relay func. select
17
17
0
D24E
53838
P 78
Fault output select.
2
7
0
D24F
53839
P 79
Inv No.
1
250
1
D250
53840
P 80
Baud rate
2
2
0
D251
53841
P 81
Lost command
0
2
0
D252
53842
P 82
Determination time of freq. input lost
10
1200
1
D253
53843
P 83
COM speed set
5
100
2
D254
53844
P 84
Parity/Stop Bit set
0
3
0
D255
53845
P 85
Para Init
0
2
0
D256
53846
P 86
Password set
0
FFFF
0
D257
53847
P 87
Para. Lock
0
65535
0
D258
53848
P 88
S/W Version
1
65535
0
D259
53849
P 89
Selecting communication protocol
0
1
0
16bit
10bit
D243
14-14
Chapter 14. COM Option (RS-485)
14.9
Troubleshooting
Refer to Troubleshooting when RS -485 communication error occurs
z If communication is not connected
Check points
Corrective measures
Is the power provided to the converter?
Provide electric power to the converter.
Are the connections between converter and computer Refer to converter manual.
correct?
Does master start to communicate?
Start communication
Is baud rate of computer and inverter correctly set?
Set the correct value in accordance with“14.3
Installation”.
1)
Is the data format of user program right?
Revise User Program.
Is the connection between converter and communication Check for GF the correct wiring in accordance
card right?
1)
with“14.3 Installation”.
User program refers to the embedded program for MCU or S/W programmed by a user.
14-15
Chapter 14. COM Option (RS-485)
14.10 ASCII Code List
Character
Hex
Character
Hex
Character
Hex
Character
Hex
Character
Hex
A
41
a
61
0
30
:
3A
DLE
10
B
42
b
62
1
31
;
3B
EM
19
C
43
c
63
2
32
<
3C
ACK
06
D
44
d
64
3
33
=
3D
ENQ
05
E
45
e
65
4
34
>
3E
EOT
04
F
46
f
66
5
35
?
3F
ESC
1B
G
47
g
67
6
36
@
40
ETB
17
H
48
h
68
7
37
[
5B
ETX
03
I
49
i
69
8
38
₩
5C
FF
0C
J
4A
J
6A
9
39
]
5D
FS
1C
K
4B
k
6B
space
20
^
5E
GS
1D
L
4C
l
6C
!
21
_
5F
HT
09
M
4D
m
6D
"
22
`
60
LF
0A
N
4E
n
6E
#
23
{
7B
NAK
15
O
4F
o
6F
$
24
|
7C
NUL
00
P
50
p
70
%
25
}
7D
RS
1E
Q
51
q
71
&
26
~
7E
SI
0F
R
52
r
72
'
27
BEL
07
SO
0E
S
53
s
73
(
28
BS
08
SOH
01
T
54
t
74
)
29
CAN
18
STX
02
U
55
u
75
*
2A
CR
0D
SUB
1A
V
56
v
76
+
2B
DC1
11
SYN
16
W
57
w
77
,
2C
DC2
12
US
1F
X
58
x
78
-
2D
DC3
13
VT
0B
Y
59
y
79
.
2E
DC4
14
Z
5A
z
7A
/
2F
DEL
7F
14-16
Chapter 15. Specifications
15. Specifications
15.1
Technical data
z Input & output ratings
Type : SV xxx iE5 – x
1)
001-1
002-1
004-1
001-2
002-2
004-2
[HP]
1/8
1/4
1/2
1/8
1/4
1/2
[kW]
0.1
0.2
0.4
0.1
0.2
0.4
Capacity[kVA]
0.3
0.6
0.95
0.3
0.6
1.14
1.4
2.5
0.8
1.6
3.0
Motor
2)
Output
Current [A]
0.8
ratings
Output frequency
0 ~ 200 [Hz]
Input
ratings
Voltage [V]
3)
Voltage [V]
1phase 200 ~ 230 VAC (±10%)
Frequency
50 ~ 60 [Hz] (±5%)
Current[A]
2.0
3phase 200 ~ 230V
3.5
5.5
3phase 200~230 VAC (±10%)
1.2
2.0
3.5
z Control
Control method
Frequency setting resolution
Frequency accuracy
v/f
Digital command : 0.01Hz
Analog command : 0.1Hz (max. fre : 60Hz)
Digital command: 0.01% of Max output frequency
Analog command: 0.1% of Max output frequency
v/f pattern
Linear v/f, Squared v/f
Overload capacity
150% per min.
Torque boost
Manual/Auto torque boost
1)
Motor shows the max. capacity assuming that 4 poles standard motor is used.
2)
Ratings are based on 220V.
3)
Max. output voltage may not be over the power voltage. Output voltage may be set temporarily lower than the
power voltage.
15-1
Chapter 15. Specifications
z Operation
Operation mode
Select one of loader/terminal/COM operation(optional)
Analogue: 0 ~ 10[V], 0 ~ 20[mA], loader volume
Frequency setting
Digital: loader
Operation features
PI, up-down, 3-wire
NPN / PNP selectable(see page 3-5)
Functions: FWD/REV RUN, Emergency stop, Fault reset, Jog operation,
Multi-function terminal
Multi-step Frequency-High & Low, Frequency UP/Down, 3-wire operation,
P1, P2, P3, P4, P5
External trip A & B, PI-Inverter (v/f) operation bypass, Analog Hold,
Accel/Decel stop,
Input
Up/Down Save Freq.
Multi-function relay
Analog output
Fault output and inverter Less than (N.O., N.C.) AC250V 0.3A
status output
Less than DC 30V 1A
0 ~ 10 Vdc (less than 10mA) : frequency, current, voltage, DC voltage
selectable
z Protective function
Over Voltage, low voltage, over current, ground fault detection, inverter overload,
Trip
overload trip, inverter overheat, condenser overload, output phase loss, overload
protection, frequency command loss, hardware fault.
Alarm
Momentary power
loss
Stall prevention
Below 15 msec: Continuous operation (should be within rated input voltage, rated output
power.)
Above 15 msec: Auto restart enable
z Structure & Environment
15-2
Cooling
Natural cooling
Protection type
Open(IP 20)
Ambient temperature
-10°C ~ 40°C
Storage temperature
-20°C ~ 65°C
Ambient humidity
Less than 90% RH(no condensation)
Altitude, vibration
Below 1,000m, below 5.9m/sec2 (0.6G)
Environmental conditions
Protected from corrosive gas, combustible gas, oil mist or dust
DECLARATION OF CONFORMITY
Council Directive(s) to which conformity is declared:
2006/95/CE and 2004/108/CE
Units are certified for compliance with the following standards:
EN 61800-3:2004
EN 50178:1997
Type of Equipment:
Inverter (Power Conversion Equipment)
Model Name:
SV - iE5 Series
Trade Mark:
LS Industrial Systems Co., Ltd.
Representative:
LG International (Deutschland) GmbH
Address:
Lyoner Strasse 15,
Frankfurt am Main, 60528,
Germany
Manufacturer:
LG Industrial Systems Co., Ltd.
Address:
181, Samsung-ri, Mokchon-Eup,
Chonan, Chungnam, 330-845,
Korea
We, the undersigned, hereby declare that equipment specified above conforms to the Directives and
Standards mentioned.
Place:
Frankfurt am Main
Chonan, Chungnam,
Germany
Korea
2007/11/19
(Signature/Date)
Mr. Ik-Seong Yang / Dept. Manager
(Full name / Position)
2007/11/29
(Signature/Date)
Mr. Jin Goo Song / General Manager
(Full name / Position)
i
TECHNICAL STANDARDS APPLIED
The standards applied in order to comply with the essential requirements of the Directives 2006/95/CEE "Electrical
material intended to be used with certain limits of voltage" and 2004/108/CEE "Electromagnetic Compatibility" are the
following ones:
• EN 50178 (1997)
“Electronic equipment for use in power installations”.
•EN 61800-3/ (2004)
“Adjustable speed electrical power drive systems. Part 3: EMC product
standard including specific methods”
• EN 55011/A2 (2003)
“Industrial, scientific and medical (ISM) radio-frequency equipment.
Radio disturbances characteristics. Limits and methods of measurement”
•EN61000-4-2/A2 (2001)
“Electromagnetic compatibility (EMC). Part 4: Testing and measurement
techniques. Section 2: Electrostatic discharge immunity test.
•EN61000-4-3/A2 (2004)
“Electromagnetic compatibility (EMC). Part 4: Testing and measurement
techniques. Section 3: Radiated, radiofrequency, electromagnetic field
immunity test.
•EN61000-4-4/A2 (2002)
“Electromagnetic compatibility (EMC). Part 4: Testing and measurement
techniques. Section 4: Electrical fast transients / burst immunity test.
•EN61000-4-5/A1 (2001)
“Electromagnetic compatibility (EMC). Part 4: Testing and measurement
techniques. Section 5: Surge immunity test.
•EN61000-4-6/A1 (2001)
“Electromagnetic compatibility (EMC). Part 4: Testing and measurement
techniques. Section 6: Immunity to conducted disturbances, induced by
radio-frequency fields.
•CEI/TR 61000-2-1 (1990)
“Electromagnetic compatibility (EMC). Part 2: Environment. Environment
description for low-frequency conducted disturbances and signalling in
public low voltages supply systems”
• EN 61000-2-2 (2003)
“Electromagnetic compatibility (EMC). Part 2: Environment. Compatibility
level for low-frequency conducted disturbances and signalling in public
low voltages supply systems”
ii
EMI / RFI POWER LINE FILTERS
LS inverters, iE5 series
RFI FILTERS
THE LS RANGE OF POWER LINE FILTERS FF ( Footprint ) - FE ( Standard ) SERIES, HAVE BEEN SPECIFICALLY DESIGNED WITH HIGH
FREQUENCY LG INVERTERS.
THE USE OF LS FILTERS, WITH THE INSTALLATION ADVICE OVERLEAF HELP TO ENSURE TROUBLE FREE USE ALONG SIDE SENSITIVE
DEVICES AND COMPLIANCE TO CONDUCTED EMISSION AND IMMUNITY STANDARS TO EN 50081.
CAUTION
THE LS RANGE OF POWER LINE FILTERS FF ( Footprint ) - FE ( Standard ) SERIES, HAVE BEEN SPECIFICALLY DESIGNED WITH HIGH
FREQUENCY LG INVERTERS.
THE USE OF LS FILTERS, WITH THE INSTALLATION ADVICE OVERLEAF HELP TO ENSURE TROUBLE FREE USE ALONG SIDE SENSITIVE
DEVICES AND COMPLIANCE TO CONDUCTED EMISSION AND IMMUNITY STANDARS TO EN 50081.
RECOMMENDED INSTALLATION INSTRUCTIONS
To conform to the EMC directive, it is necessary that these instructions be followed as closely as possible. Follow the usual safety
procedures when working with electrical equipment. All electrical connections to the filter, inverter and motor must be made by a qualified
electrical technician.
1- ) Check the filter rating label to ensure that the current, voltage rating and part number are correct.
2- ) For best results the filter should be fitted as closely as possible to the incoming mains supply of the wiring enclousure, usually directly
after the enclosures circuit breaker or supply switch.
3- ) The back panel of the wiring cabinet of board should be prepared for the mounting dimensions of the filter. Care should be taken to
remove any paint etc... from the mounting holes and face area of the panel to ensure the best possible earthing of the filter.
4- ) Mount the filter securely.
5- ) Connect the mains supply to the filter terminals marked LINE, connect any earth cables to the earth stud provided. Connect the filter
terminals marked LOAD to the mains input of the inverter using short lengths of appropriate gauge cable.
6- ) Connect the motor and fit the ferrite core ( output chokes ) as close to the inverter as possible. Armoured or screened cable should be
used with the 3 phase conductors only threaded twice through the center of the ferrite core. The earth conductor should be securely
earthed at both inverter and motor ends. The screen should be connected to the enclousure body via and earthed cable gland.
7- ) Connect any control cables as instructed in the inverter instructions manual.
IT IS IMPORTANT THAT ALL LEAD LENGHTS ARE KEPT AS SHORT AS POSSIBLE AND THAT INCOMING MAINS AND OUTGOING
MOTOR CABLES ARE KEPT WELL SEPARATED.
iii
iV
WARRANTY
Maker
LS Industrial Systems Co.,Ltd
Model No.
SV-iE5
Installation(startup) date
Warranty period
Name
Customer
info
Address
Tel.
Name
Sales office
Address
Tel.
Note
This product has been manufactured through the strict QC control and inspection of LS Industrial Systems.
Warranty period is 12 months after installation or 18 months after manufactured when the installation date is
unidentified. However, the guarantee term may vary on the sales term.
z In-warranty service information
If the defective part has been identified under normal and proper use within the guarantee term, contact
your local authorized LS distributor or LS Service center.
z Out-of-warranty service information
The guarantee will not apply in the following cases.
Troubles are attributable to a user’s intentional negligence or carelessness
Damage was caused by abnormal voltage and peripheral devices’ malfunction (failure)
Damage was caused by natural disasters(earthquake, fire, flooding, lightning and etc)
When LS nameplate is not attached
Manual Revision History
No.
Revision
Changes
Version. No
Remarks
1
Sept 2006
First edition
1.10
-
2
Jan 2007
Contents revised
1.10
-
3
Apr 2007
Contents revised
1.20
-
4
Jul 2008
Contents revised
1.30
-
z Sustainable Management
LS Industrial System Co.,Ltd take the highest priority on sustainable management and
do our best to preserve the environment of the earth.
z Disposal Recommendation
LS Inverter is intended and designed to preserve the environment. To dispose of it,
iron, aluminum, copper, and synthetic resin(product cover) may be separated and
reused.
LS values every single customer.
Quality and service come first at LSIS.
Always at your service, standing for our customers.
10310000756
■ HEAD OFFICE
Yonsei Jaedan Severance Bldg. 84-11 5 ga, Namdaemun-ro,
Jung-gu Seoul 100-753, Korea
http://eng.lsis.biz
Tel. (82-2)2034-4643~4649 Fax.(82-2)2034-4879, 2034-4885
■ LS Industrial Systems Tokyo Office >> Japan
Address: 16F, Higashi-Kan, Akasaka Twin Towers 17- 22,
2-chome, Akasaka, Minato-ku, Tokyo 107-8470, Japan
Tel: 81-3-3582-9128 Fax: 81-3-3582-2667
e-mail: [email protected]
■ LS Industrial Systems Dubai Rep. Office >> UAE
Address: P.O.BOX-114216, API World Tower, 303B, Sheikh
Zayed road, Dubai, UAE.
e-mail: [email protected]
Tel: 971-4-3328289 Fax: 971-4-3329444
■ LS-VINA Industrial Systems Co., Ltd. >> Vietnam
Address: LSIS VINA Congty che tao may dien Viet-Hung
Dong Anh Hanoi, Vietnam
e-mail: [email protected]
Tel: 84-4-882-0222 Fax: 84-4-882-0220
■ LS Industrial Systems Hanoi Office >> Vietnam
Address: Room C21, 5th Floor, Horison Hotel, 40 Cat Linh,
Hanoi, Vietnam
Tel: 84-4-736-6270/1 Fax: 84-4-736-6269
■ Dalian LS Industrial Systems co., Ltd, >> China
Address: No. 15 Liaohexi 3 Road, economic and technical
development zone, Dalian, China
e-mail: [email protected]
Tel: 86-411-8273-7777 Fax: 86-411-8730-7560
■ LS Industrial Systems (Shanghai) Co., Ltd. >> China
Address: Room E-G, 12th Floor Huamin Empire Plaza,
No. 726, West Yan’an Road, Shanghai, China
Tel: 86-21-5237-9977
■ LS Industrial Systems(Wuxi) Co., Ltd. >> China
Address: 102-A National High & New Tech Industrial
Development Area, Wuxi, Jiangsu, China e-mail: [email protected]
Tel: 86-510-534-6666 Fax: 86-510-522-4078
■ LS Industrial Systems Beijing Office >> China
Address: B-tower 17th Floor, Beijing Global Trade Center building,
No. 36, BeiSanHuanDong-Lu, DongCheng-District, Beijing, China
Tel: 86-10-5825-6025
■ LS Industrial Systems Guangzhou Office >> China
Address: Room 1403, 14F, New Poly Tower, 2 Zhongshan Liu
Rad, Guangzhou, China
e-mail: [email protected]
Tel: 86-20-8326-6754 Fax: 86-20-8326-6287
■ LS Industrial Systems Chengdu Office >> China
Address: Room 2907, Zhong Yin B/D, No. 35, Renminzhong(2)Road, Chengdu, China
e-mail: [email protected]
Tel: 86-28-8612-9151 Fax: 86-28-8612-9236
■ LS Industrial Systems Qingdao Office >> China
Address: 12th Floor, Guodong building, No52 Jindun Road,
Chengdu, China
e-mail: [email protected]
Tel: 86-532-580-2539
※ LS Industrial Systems constantly endeavors to improve its product so that
Information in this manual is subject to change without notice.
ⓒ LS Industrial systems Co., Ltd 2006 All Rights Reserved.
Fax: 86-532-583-3793
SV-iE5/2008.07