1
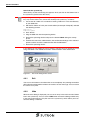
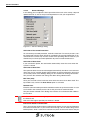
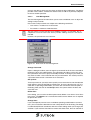
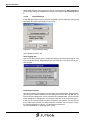
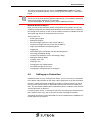
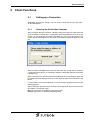
User Manual
TSDiag+
Part Number:
80860.691
Version:
5
Date:
2011-05-27
Valid for:
TSwin .net
TSDiag+ 1.5.2
TSDiag+
Version
1
2
3
4
5
Date
2006-02-13
2006-06-01
2010-09-21
2011-05-12
2011-05-27
Modifications
First edition
New Layout, product name changed
Update to TSDiag+ 1.5.0
Customizations on chapter 5
Enlarged installation for Pro Line
This manual, including all illustrations contained herein, is copyright protected. Use of this manual by any third
party in departure from the copyright provision is forbidden. No part of this manual may be reproduced, translated or electronically or photographically archived or altered without the express written consent from Sütron
electronic GmbH. Violations shall be cause for damage liability.
Sütron electronic reserves the right to make any changes that contribute to technical improvement.
Overall Table of Contents
Overall Table of Contents
1
2
Important Notes ....................................................................................................... 1-1
1.1
Symbols .................................................................................................... 1-1
1.2
Safety Notes ............................................................................................. 1-1
1.3
Intended Use............................................................................................. 1-2
1.4
Target Group............................................................................................. 1-2
General Description ................................................................................................. 2-1
2.1
3
4
Installation................................................................................................................ 3-1
3.1
Installing on a PC...................................................................................... 3-1
3.2
Installing on an Operating Device ............................................................. 3-2
3.3
Files for the PC ......................................................................................... 3-4
3.4
Files for the Operating Device .................................................................. 3-4
Server Functions...................................................................................................... 4-1
4.1
Starting the Server .................................................................................... 4-1
4.2
The Main Dialog........................................................................................ 4-1
4.2.1
Exit ....................................................................................................... 4-2
4.2.2
Hide ..................................................................................................... 4-2
4.2.3
Settings ................................................................................................ 4-3
4.2.3.1
Security Prompt ..........................................................................................................4-3
4.2.3.2
General Settings .........................................................................................................4-4
4.2.3.3
User Management ......................................................................................................4-5
4.2.3.4
Log File Settings .........................................................................................................4-6
4.3
5
Setting up a Connection............................................................................ 4-7
Client Functions ....................................................................................................... 5-1
5.1
Setting up a Connection............................................................................ 5-1
5.1.1
Selecting the Destination Computer .................................................... 5-1
5.1.2
Password Request............................................................................... 5-2
5.2
The Main Screen....................................................................................... 5-2
5.2.1
File ....................................................................................................... 5-3
5.2.2
View ..................................................................................................... 5-3
5.2.3
Tools .................................................................................................... 5-4
5.2.4
File Transfer......................................................................................... 5-4
5.3
A
General Operating Conditions .................................................................. 2-1
Canceling a Connection............................................................................ 5-5
Index ........................................................................................................................A-1
i
Overall Table of Contents
ii
Important Notes
1
Important Notes
1.1
Symbols
The symbols in this manual are used to draw your attention on notes and dangers.
This is the safety alert symbol. It is used to alert you to potential personal injury hazards. Obey all safety messages that follow this symbol to avoid possible injury or
death.
DANGER
This symbol is used to refer to instructions which, if ignored or not carefully followed,
will result in death or serious injury.
WARNING
This symbol is used to refer to instructions which, if ignored or not carefully followed,
could result in death or serious injury.
CAUTION
This symbol is used to refer to instructions which, if ignored or not carefully followed,
could result in minor or moderate injury.
NOTICE
This symbol and the accompanying text alerts the reader to a situation which may
cause damage or malfunction to the device, either hardware or software, or surrounding property.
Reference to source of information
This symbol refers to detailed sources of information on the current topic.
1.2
Safety Notes
–
Read this manual carefully before using the software. Keep this manual in a
place where it is always accessible to all users.
–
The user manual, in particular the safety notes, must be observed by all personnel working with the software and the programmed device.
–
Observe the accident prevention rules and regulations that apply to the operating
site.
–
Installation and operation must only be carried out by qualified and trained personnel.
1-1
Important Notes
1.3
–
Intended Use
The software is to be used exclusively for remote diagnostics of operating devices located in a network. Any other use is not permitted.
WARNING: Danger of life!
Do not use this software for remote operation of safety-relevant machinery or systems!
It is also not permitted to use this software for teach-in of machines and systems for
which parts of the safety chain are put out of operation!
1.4
Target Group
All configuration and programming work in connection with the automation system
must be performed by trained personnel only (e.g. qualified electricians, electrical engineers).
The configuration and programming personnel must be familiar with the safety concepts of automation technology.
1-2
General Description
2
General Description
TSDiag+ is a tool that allows you to access each Sütron operating device using the
Microsoft CE or a computer using the Windows XP operating system via the network.
Each combination consisting of operating system and client / server is possible.
The user can view the content of the display and interact with the software running
on the device, regardless of the software manufacturer. In this case, you can perform
the same actions that you can when operating the touch screen directly. You can
also use the keyboard of the accessing device - a PC or another operating device to enter data without the need for an alternative routing via the input panel of the device that you are accessing.
Additional functional enhancement is provided by the option that allows you to transfer files to any folder in the device that can be written to.
As a result, you can use TSDiag+ to transfer updated project files or drivers from one
computer to multiple operating devices or to check the current status of the application currently running.
2.1
General Operating Conditions
The software is executable on devices with Windows CE 5.0 and 6.0 operating system. The client is also available for PCs using the x86 architecture.
The TSDiag server supports a color depth of 8 and 16 bit. If necessary, reduce the
color depth of the operating device or PC.
To enable communication between client and server to be established, the server
and the client must be in the same subnet within the network.
The amount of memory required on the operating devices is very low - the server and
client have a combined memory requirement of less than 500 KB. Added to this is
the memory required by the log file. However, its size is determined by the settings.The client for the PC requires less than 50 KB on the hard disk.
2-1
General Description
2-2
Installation
3
Installation
3.1
Installing on a PC
As of TSwin .net version 4.10, the PC client is integrated into the interface and can
be started from the menu (Tools - TSDiag+).
To use the client / server without TSwin. net on a PC a installation is required. Run
the file "TSDiag+_Installer_PC.exe" to do this. After installation, appropriate entries
(Sütron -> TSDiag+) available in the Windows start menu. The link "TSDiag+ Client"
starts the client. Start the server via the link "TSDiag+ Server".
Because the program stores the connection data in a file, it is advantageous if all users that are working with TSDiag+ have write authorization for this directory.
The TSDiag server supports a color depth of 8 and 16 bit. If necessary, reduce the
color depth of the operating device or PC.
3-1
Installation
3.2
Installing on an Operating Device
First, the necessary files are transferred to the operating device. To operating devices with resolution 160 x 80 pixels a special version of the interactive installation is
available. For all other operating devices use the standard version.
For transfer and installation on the operating device, there are two possibilities:
–
FTP transfer of the installation files and install TSDiag server automatically during startup of the operating device
–
Interactive installation with a USB stick and install TSDiag server and client optionally
To update an older version of TSDiag use the interactive installation. Because an existing TSDiag version in the destination directory is not overwritten with the automatic
installation.
The TSDiag+ program versions for different target systems are in different directories:
Automatic installation (server):
Directory
Target system (resolution)
Language
AODECA-TSDIAGGER-xxxx
Slim Line (> 160 x 80 pixels)
german
AODECA-TSDIAGENG-xxxx
Slim Line (> 160 x 80 pixels)
english
AODECX-TSDIAGGER-xxxx
emPower Line
german
AODECX-TSDIAGENG-xxxx
emPower Line
english
AODECA-TSDIAGMINIGER-xxxx
Slim Line (160 x 80 pixels)
german
AODECA-TSDIAGMINIENG-xxxx
Slim Line (160 x 80 pixels)
english
AO6ECZ-TSDIAGGER-xxxx
Pro Line
german
AO6ECZ-TSDIAGENG-xxxx
Pro Line
english
1. Open your FTP program or the Windows Explorer and enter the ip address of the
operating device (example: ftp://149.208.160.232).
2. Copy the contents of the directory for your system to the ftp root directory.
3. Download an existing file "starter.bat" from the root directory on your local file
system or create a new file with this name.
The file "starter.bat" in the root directory is executed each time the operating device
starts.
4. Edit the file "starter.bat" with your favorite editor (for example "Notepad") and add
the following content:
\FlashDrv\install\TSDiag+\inst_manager.exe -install
or
\StorageCard\install\TSDiag+\inst_manager.exe -install
With the appropriate paths, different memory areas of the operating device can be
accessed. Some paths are dependent on the product line of the operating device:
USB stick: \HardDisk\
Device memory (Slim Line): \FlashDrv\
Device memory (emPower Line): \StorageCard\
Device memory (Pro Line): \FlashDrv\ or \StorageCard\ (internal/memory card)
3-2
Installation
5. Save the file.
6. Copy the file "starter.bat" with the FTP program to the root directory of the operating device.
7. Restart the operating device.
Now, it is checked at every start of the operating device automatically whether the
TSDiag server is installed. If the server does not exist it is automatically installed.
Settings of user management will remain unchanged.
Interactive Installation (Client / Server):
1. Copy the contents of the directory for your system to the root directory of your
USB stick.
2. Create the file "Admin.ini" or extend an existing "Admin.ini" in the root directory
of your USB stick.
3. Edit the file "Admin.ini" with your favorite editor (for example "Notepad") and add
the following content:
Start=\HardDisk\install\TSDiag+_Installer_CE.exe
4. Save the file.
5. Plug the USB stick into the operating device.
6. Start the operating device again and press the button Admin during the startup
phase.
7. Confirm the start of the administration with the OK button.
The installation dialog TSDiag opens. When activated the explorer, the installation
dialog may open in the background. If this were the case, first confirm any further dialogs with the OK button and close the launcher with Exit and OK. Now the installation dialog of TSDiag should be visible.
8. Press the Next button at the installation dialog.
9. Accept the license agreement by selecting the checkbox and press the Next button.
In the component selection dialog, you can:
–
Install the TSDiag+ client (provides access to other operating units with installed
TSDiag+ server)
–
Install TSDiag+ server (allows users to access this operating device with the TSDiag+ client)
–
Install TSDiag+ client and server (allows operation as a client and server)
10. Select the options you want and press the Next button.
Depending on the system you can select the target directory for installation from an
additional dialog:
11. Select the target directory you want and press the Next button.
12. To complete the installation, press the Close button.
After the installation:
After you have executed the individual steps, you can start and use TSDiag+ with the
links on the desktop. The TSDiag server is started automatically after the automatic
installation. After the interactive installation, you have to restart the server manually
with the desktop shortcut. The TSDiag server is started automatically each time you
restart the operating device. If, for any reason, the changes made in the registry are
lost, for example, if you manually delete the registry or execute an image update, you
can restart the installer at any time. The settings specified in the meantime and the
users created are saved in files in the installation directory and are thus retained if
you perform a reinstallation.
3-3
Installation
3.3
Files for the PC
The following files are created on the PC during the installation.
Table 3-1
Files (PC)
File Name
Storage Location
Time Created
TSDiag+_Client_CE.exe
Installation folder (TSDiag+)
Installation
TSDiag+ Client.lnk (link to client)
Desktop / Start menu
Installation
SRD_Connections.dat
Installation folder (TSDiag+)
First client start
TSDiag+_Server_PC.exe
Installation folder (TSDiag+)
Installation
TSDiag+_Server_Autoload_PC.exe
Installation folder (TSDiag+)
Installation
TSDiag+_Log.log
Installation folder (TSDiag+)
First server start
TSDiag+.lnk (link to server)
Desktop / Start menu
Installation
settings.dat
Installation folder (TSDiag+)
Installation
users.dat
Installation folder (TSDiag+)
Installation
All settings that can be adjusted in the TSDiag+ are saved in the file settings.dat.
This file is encrypted and is protected by a check sum. Therefore, you should not edit
the file manually. The users are stored in the file users.dat, which is also protected.
To enable you to use the same users on multiple computers or operating devices
without having to create them manually, you can copy the user file from one device
to another. The users are then available the next time you restart the TSDiag+
server.
3.4
Files for the Operating Device
The following files are installed for operating devices.
Table 3-2
Files
File Name
Storage Location
Time Created
TSDiag+_Client_CE.exe
Installation folder (TSDiag+)
Installation
TSDiag+ Client.lnk (link to client)
Installation folder (TSDiag+)
Installation
SRD_Connections.dat
Installation folder (TSDiag+)
First client start
TSDiag+_Server_CE.exe
Installation folder (TSDiag+)
Installation
TSDiag+_Server_Autoload_CE.exe
Installation folder (TSDiag+)
Installation
TSDiag+_Log.log
Installation folder (TSDiag+)
First server start
TSDiag+.lnk (link to server)
Installation folder (TSDiag+)
Installation
settings.dat
Installation folder (TSDiag+)
Installation
users.dat
Installation folder (TSDiag+)
Installation
All settings that can be adjusted in the TSDiag+ are saved in the file settings.dat.
This file is encrypted and is protected by a check sum. Therefore, you should not edit
the file manually. The users are stored in the file users.dat, which is also protected.
3-4
Installation
To enable you to use the same users on multiple computers or operating devices
without having to create them manually, you can copy the user file from one device
to another. The users are then available the next time you restart the TSDiag+
server.
3-5
Installation
3-6
Server Functions
4
Server Functions
4.1
Starting the Server
Manual Start:
You can start the server at any time either by clicking on the desktop shortcut
TSDiag+ or by directly executing the corresponding server file from the installation
directory.
Automatic Start:
The auto loader is started each time you start the system. On the one hand, this ensures that the desktop shortcut used for manual starting is available. On the other,
the system checks whether the automatic startup of the server is activated in the settings.
4.2
The Main Dialog
There are two possibilities to display the dialog for the server settings:
–
FTP transfer and run a batch file
–
Start from the system tray icon (with active system tray)
To access the server settings you transfer a batch file via FTP to the operating device:
Start with batch file
1. Open your FTP program or the Windows Explorer and enter the ip address of the
operating device (example: ftp://149.208.160.232).
2. Download an existing file "starter.bat" from the root directory on your local file
system or create a new file with this name.
3. Edit the file "project.bat" with your favorite editor (for example "Notepad") and
add the following content:
\FlashDrv\install\TSDiag+\inst_manager.exe -config
or
\StorageCard\install\TSDiag+\inst_manager.exe -config
With the appropriate paths, different memory areas of the operating device can be
accessed. Some paths are dependent on the product line of the operating device:
USB stick: \HardDisk\
Device memory (Slim Line): \FlashDrv\
Device memory (emPower Line): \StorageCard\
Device memory (Pro Line): \FlashDrv\ or \StorageCard\ (internal/memory card)
4. Save the file.
5. Copy the file "project.bat" with the FTP program to the root directory of the operating device.
6. Restart the operating device and press the Press For Setup Main Menu button
during the startup phase.
7. Press the Start Batchfile button.
4-1
Server Functions
Start from the system tray
Alternatively, are the main dialog also appears when you click on the Sütron icon in
the system tray (to the left of the clock).
Depending on the configuration of the operating device the desktop and the system
tray may not be visible. You activate the desktop and system tray as follows:
1. Create the file "Admin.ini" or extend an existing "Admin.ini" in the root directory
of your USB stick.
2. Edit the file "Admin.ini" with your favorite editor (for example "Notepad") and add
the following content:
Explorer=On
Mode=Development
3. Save the file.
4. Plug the USB stick into the operating device.
5. Restart the operating device and press the button Admin during the startup
phase.
6. Confirm the start of the administration, the confirmation dialogs of the selected
options and the end of the administration with the OK button.
7. Restart the operating device.
In this dialog you can modify the server settings, stop the server or disconnect an existing connection. The individual functions are described in more detail below.
Figure 4-1
The main dialog for the server
4.2.1
Exit
You can use this button to shut down the server completely. Any existing connection
will be disconnected and the remote user receives an error message. You can restart
the server at any time.
4.2.2
Hide
While the main dialog is displayed, you can see an entry in the task bar and a Sütron
icon in the system tray. You can use the Hide button to close the dialog and the entry
in the task bar disappears. Only the icon in the system tray, which allows you to restore the dialog, is retained.
4-2
Server Functions
4.2.3
Settings
This button brings you to a dialog in which you can adjust all the settings that influence the behavior of the server during operation. The individual sub-items are explained in more detail below.
4.2.3.1
Security Prompt
Before displaying the dialog for adjusting the settings, the system issues a security
prompt. This asks you to enter the administrator password, that is, the password of
the user Admin and is designed to secure the server against unauthorized manipulation.
The user name is case-insensitive since TSDiag+ version 1.4.
This password is initially set as 123456 after the installation, but you should change
it for security reasons.
Figure 4-2
Authentication Required dialog
The Settings dialog is only displayed after the correct password has been entered.
Figure 4-3
Settings dialog
4-3
Server Functions
4.2.3.2
General Settings
In this dialog, you can adjust the basic operational data such as the startup, stop and
update behavior as well as the password protection to suit your requirements.
Figure 4-4
General Settings dialog
Activation of Password Protection:
To activate the password protection, mark this check box. For security reasons, control commands from the client will not be accepted if the password protection is deactivated! You can then only view the screen of the operating device. However, you
should always activate password protection to prevent unauthorized access.
Activation of Auto Start:
If you activate this option, the auto loader automatically starts the server when the
system is started.
Activation of Auto Exit:
This option enables the server to be stopped automatically in order to save resources
after it has run for a specific length of time without an existing connection. Users that
are currently active in the Settings dialog are also counted as existing connections.
This prevents the software from being shut down during administration.
Idle Time (min):
Here, you can enter a time in minutes after which the server shuts down itself. The
input field is only active if the Auto Close option is activated.
Network Port:
Enter the communication port which should be used to set-up the connection. In case
of a firewall in the network you have to set this port free for communication.
The port number entered in this dialog must also be set as the destination address
for the client.
For file transmission the next higher port is used, thus this port has to be set free in
the firewall, too!
Due to this the highest possible port number is 65534.
Interval for Screen Transmission:
Here, you enter the minimum time in milliseconds that the server must wait between
two screen transmissions. If you set the value too high, this can lead to long screen
build-up times, while a value that is too low can place an excessive load on the pro4-4
Server Functions
cessor in the device, which may also have an effect on other applications. The lowest
possible value is 50 ms, however the default value of 100 ms is perfectly adequate
to ensure smooth operation.
4.2.3.3
User Management
The User Management function allows you to create and delete users or adjust the
settings and passwords.
User names and passwords are subject to the following restrictions:
–
User names = maximum of 15 characters
–
Passwords = maximum of 30 characters
The user name is case-insensitive since TSDiag+ version 1.4. Therefore, the assumption of a user file "Users.dat" from a previous TSDiag+ release is not recommended.
However, the password is case-sensitive.
Figure 4-5
Main menu of User Management
Change Password:
Opens a dialog that allows you to change the passwords for all the users created on
the device. Since only administrators are supposed to be able to access this area,
the system does not issue a query for the old password. To change a password, you
only have to select a user and enter the new password twice. For security reasons,
a password must contain a minimum of six characters.
Set up User:
To set up a new user, you only have to specify a user name that has not already been
used and then enter the desired password twice. To ensure that the new user is issued with an operating authorization, you must also activate the relevant option in
the dialog. After you click on the Set up button, the system checks the data and
saves the user.
Delete User:
In this dialog, you can select and then permanently delete a user from a list of all existing users. The Admin user is not listed here because the Admin user is required
to operate the server.
Change User:
If you subsequently want to issue or withdraw operating authorization to or from a
user, you can select the desired user from a drop-down list in this dialog. The dialog
is automatically filled in accordance with the current settings when you change your
selection. If you mark the check box or remove the check mark, the user selection is
4-5
Server Functions
deactivated until you save or reject the change. Choose either the OK or Cancel button to exit the dialog, where OK will save the last unsaved change and Cancel rejects
it.
4.2.3.4
Log File Settings
In the dialog that opens after you activate this button, you can adjust the settings and
operations that refer to the log file for the server.
Figure 4-6
Log File Settings dialog
The individual functions are:
View Logging File:
You can use this button to open a window that displays the content of the log file. You
can not edit the content. Depending on the size of the file, it may take several seconds to open.
Figure 4-7
Window for displaying the log file
Set Storage Location:
After the installation, the log file is first stored in the installation folder. To change this,
you can specify a different directory in this dialog. After you confirm with OK, the system first checks whether files can be created in the specified folder. If so, the content
of the old log file is copied to the new location to prevent any data from being lost.
If you want to save the log file to another computer in the network, you must ensure
that a folder exists and that it is released on this computer. You can access it from
the command prompt. To do this, use the following command:
net use Networkpath_to_directory virtual_name
4-6
Server Functions
The content of the directory then occurs at \network\virtual_name in the folder
structure of the operating device. You can then specify this name as a path for the
log file.
After a reboot, the shares no longer exist and need to be recreated. To set up the
shares on start-up of the operating device automatically, you can add the appropriate
command to the file "Starter.bat". For example:
„net use Networkpath_to_directory virtual_name /USER:Server\User“
Maximum Number of Entries:
Here, you can set the maximum number of log entries to be stored in the file. The
number of entries that you should specify depends on the remote access frequency,
the change to the settings as well as on the amount of memory available for the file.
The log file logs actions in conjunction with the server.
These actions are:
–
Starting the program
–
Exiting the program
–
Successful login (with user name and IP address)
–
Unsuccessful login (with user name and IP address)
–
Logins prevented from the operating device
–
Logging out
–
Disconnecting the connection from the operating device
–
Accessing the Settings dialog
–
Unsuccessful attempt to access the Settings dialog
–
Exiting the Settings dialog
–
Creating a new user
–
Deleting a user
–
Changing the user authorizations
–
Password changes for the users
–
Changing the storage location of the log file
4.3
Setting up a Connection
Provided that the server is running on the device, you can also set up a connection
to the device. No interaction on the server side is required to set up the connection.
However, another information window that enables an operator working on the device to prevent remote access is displayed before the first transfer of screen contents. This information window closes automatically after a maximum of ten seconds
and the connection is released.
If a user prevents access, a message is sent to the accessing client and the connection is broken. In this case, the server waits for other incoming connections.
A maximum of 8 clients can be connected to a server simultaneously. Additional connection requests are rejected.
4-7
Server Functions
4-8
Client Functions
5
Client Functions
5.1
Setting up a Connection
Depending on the server settings, you can set up a connection in only a few steps,
as described below.
5.1.1
Selecting the Destination Computer
After you launch the client software, a dialog asking you to enter the computer name
or the IP address is displayed. If a connection to the desired device was set up previously, you can select the data from a drop-down list. In this case, the entries in the
list are sorted chronologically so that the last connection established appears at the
top.
Figure 5-1
Dialog for selecting the destination computer
After you click on the OK button or confirm with Enter, the system tries to establish
a connection to the device. An information window is displayed while the connection
is being set up.
After a connection has successfully been established, the system displays either the
password protection dialog or the main screen displaying the screen contents of the
device.
If a connection can not be established, an error message is displayed. You have the
following options:
Yes: A dialog with potential causes of errors will be displayed. Then the system tries
to establish a connection again.
No: The system tries to establish a connection again.
Cancel: The process is aborted and TSDiag exits.
5-1
Client Functions
5.1.2
Password Request
Provided that the password protection is activated on the server, the system displays
the dialog Password Request, which requests that you enter a valid combination of
user name and password for this device.
If the client settings already contain a default user name, it is automatically entered
into the User Name input field and the cursor moves to the Password input field.
Figure 5-2
Password Request dialog
After you confirm your entries, the password is encrypted and transmitted together
with the user name to the server. The server analyzes the entries and, if the name
and password are correct, starts to transfer the screen contents.
If the user name and/or the password entered is incorrect, the server sends an error
identifier to the clients. The server issues an error message and then stops.
5.2
The Main Screen
The primary function of the main screen is to display the screen contents of the operating device.
Figure 5-3
5-2
The main screen on the client, PC version
Client Functions
In the version for the operating devices, the main screen contains scrollbars so that
devices with a relatively high resolution can also be controlled from small operating
devices.
Since the PCs generally have a higher resolution than the operating devices, the
scrollbars were omitted from the PC variant of the client.
The size of the main screen adjusts to the resolution of the device to be controlled,
taking the zoom factor into account. In the operating device clients, the maximum
size of the main screen is 80% of the display size.
5.2.1
Settings
File
This dialog allows you to save a range of client settings. These include the zoom factor after the software starts, the size and position of the main screen as well as the
status of the operation-release window.
Only those values whose check boxes are marked are saved. All other values remain
unchanged. To delete a previously saved value, mark the Default Value check box.
You can also save a default user name that is automatically entered into the user
name field in the Password Request dialog.
If the connection to the server breaks off, the client tries to connect till the period of
the connection timeout has passed.
5.2.2
View
Always on top
The option always on top causes the main client window is permanently displayed
above all other applications and therefore always remains visible. If the option is enabled, the status of the main window can not be altered by a server script.
Zoom
The zoom factor allows you to enlarge the display of the screen contents of smaller
operating devices, or reduce the size of screen contents from large devices.
The possible zoom factors are:
–
0.5x,
–
0.75x,
–
1x,
–
2x,
–
3x and
–
Auto (Screen content is automatically scaled to the size of the main window).
The size of the window is adjusted automatically when you change the setting.
Operation release
The main screen displays a small window that indicates whether you can (screen
contents green) or can not (screen contents red) currently transmit control commands to the server.
As soon as several clients have logged on to the server, but operation can only be
carried out from one location, only one user at a time will receive the enable signal.
If the client that is currently enabled does not execute an operation for a longer period
of time (approx. 15 seconds), the other clients are notified that operation is possible
again. The first client to transmit a command to the server is then enabled.
5-3
Client Functions
5.2.3
Tools
This menu provides additional functions that will considerably simplify your work with
TSDiag+ and the Sütron operating devices. These functions are:
Str + Esc Taste
Opens the Start menu on the target computer.
Alt + Tabulator Taste
Opens the task manager on the target computer.
Restart TSvisRT
This function allows you to restart the TSvisRT runtime environment. You need to do
this when you transfer new drivers or application data because they can only be detected and imported after you carry out a restart.
Quit TSvisRT
If you exit TSvisRT, it is automatically restarted within a few seconds. This function
enables you to exit TSvisRT permanently, that is, until the next time you restart the
device or until you start the TSvisLD_CE.exe loader program manually.
Restart Device
This function triggers a complete restart of the operating device. This is particularly
useful after you update the boot loader or the operating system image, to ensure that
the changes take effect.
If you restart the operating device, this can affect other devices and machines that
are communicating with it. Before carrying out a restart, you should therefore make
sure that it will not result in any undesired secondary effects!
5.2.4
File Transfer
You can use the File Transfer menu item to transfer files from the client to the server.
A dialog opens, in which you can select the file that you want to transfer. The system
then transmits the file name and the size of the file to the server. The server, in turn,
opens a window in which you can choose the directory for the file.
Since this window is also transmitted via the remote connection, there may be a
slight delay before it is displayed. In the case of small operating devices, you may
find that the OK and Cancel buttons in the selection dialogs are not visible because
they are output outside the displayable area. In this case, you can use the following
keyboard controls: Enter is equivalent to the OK button, Escape has the same effect
as clicking on the Cancel button.
After you select the target directory, the system checks whether enough memory is
available and then starts the transfer. The transfer progress is displayed in a separate window. While the file transfer is taking place, no commands are sent from the
client to the server and the screen contents are transmitted much less frequently.
This ensures that the file transfer is faster and more stable.
After the transfer is completed, the progress window closes and the transfer intervals
are set to their normal values again.
5-4
Client Functions
5.3
Canceling a Connection
To cancel the connection from the client, you only have to close the main screen. Before the application is shut down, it transmits some commands to the server to enable
the server to detect the termination of the connection more quickly.
If the connection is canceled from the server, or is interrupted as a result of a connection termination, an error message is issued and the application is then closed.
5-5
Client Functions
5-6
A Index
A
M
Activation of auto exit........................................ 4-4
Activation of auto start ...................................... 4-4
Activation of password protection ..................... 4-4
Main dialog........................................................ 4-1
Main screen (client)........................................... 5-2
C
Canceling a connection..................................... 5-5
Change password
TSDiag+.................................................... 4-5
Connection
Setting up.................................................. 5-1
D
N
Network port...................................................... 4-4
P
Password request ............................................. 5-2
Q
Quit TSvisRT..................................................... 5-4
Destination computer ........................................ 5-1
R
E
Restart operating device ................................... 5-4
Restart TSvisRT................................................ 5-4
Exit .................................................................... 4-2
S
F
Safety notes ...................................................... 1-1
Screen transmission interval ............................. 4-4
Security prompt ................................................. 4-3
Set up user........................................................ 4-5
Setting up a connection
Server ....................................................... 4-7
Settings ............................................................. 4-3
General ..................................................... 4-4
Starting the server............................................. 4-1
Starting the server automatically....................... 4-1
Starting the server manually ............................. 4-1
Symbols ............................................................ 1-1
File transfer ....................................................... 5-4
G
General conditions ............................................ 2-1
H
Hide................................................................... 4-2
I
Idle time ............................................................ 4-4
Important notes ................................................. 1-1
Intended use ..................................................... 1-2
L
Log file
Maximum number of entries ..................... 4-7
Set storage location .................................. 4-6
Settings..................................................... 4-6
View .......................................................... 4-6
T
Target directory for file transfer ......................... 5-4
Target group...................................................... 1-2
Tools ................................................................. 5-4
U
User
Change ..................................................... 4-5
Delete........................................................ 4-5
User management............................................. 4-5
Z
Zoom factor ....................................................... 5-3
A-1
Index
A-2
Sütron electronic GmbH
Kurze Straße 29
D-70794 Filderstadt
Phone: 0049 711 / 77098-0
Fax:
0049 711 / 77098-60
E-Mail: [email protected]
Internet: www.suetron.com