1
User's Manual
Twinax Interface
Intermec Corporation
Service U.S. 1-800-755-5505
6001 36th Avenue West
Service Canada 1-800-688-7043
P.O. Box 4280
Everett, Washington 98203-9280
Media Supplies U.S. 1-800-227-9947
Media Supplies Canada 1-800-268-6936
Outside U.S. and Canada: Contact your local Intermec service supplier.
The information contained herein is proprietary and is provided solely for the purpose of allowing
customers to operate and/or service Intermec manufactured equipment and is not to be released,
reproduced, or used for any other purpose without written permission of Intermec.
The word Intermec, the Intermec logo, JANUS, IRL, DURATHERM, and CrossBar are trademarks of
Intermec Corporation.
The name Centronics is wholly owned by GENICOM Corporation.
IBM is a registered trademark of International Business Machines Corporation.
Information and specifications in this manual are subject to change without notice.
Throughout this manual, trademarked names may be used. Rather than put a trademark (TM) symbol in
every occurrence of a trademarked name, we state that we are using the names only in an editorial fashion,
and to the benefit of the trademark owner, with no intention of infringement.
The software contained in your Intermec printer and the accompanying materials are copyrighted.
Unauthorized copying of the software, including software that has been modified, merged, or included
with other software, or the written materials is expressly forbidden without the prior written consent of
Intermec. All right, title, and interest in all copies of this software are and shall at all times remain the sole
and exclusive property of Intermec. Customer may be held legally responsible for any copyright
infringement that is caused or encouraged by its failure to abide by these terms.
WARRANTY INFORMATION
To receive a copy of the standard warranty provision for this product, contact your local Intermec sales
organization. In the U.S., call (800) 755-5505 and in Canada call (800) 688-7043. Otherwise, refer to the
Authorized Service Centers list that was shipped with this manual for the address and telephone number
of your Intermec sales organization.
1994 Intermec Corporation
All Rights Reserved
Table of Contents
toc
Introduction to the twinax interface 3
Twinax interface parts and function 4
Preparing the twinax interface for operation 6
Connecting the twinax interface to your system 6
Providing twinax interface cables 6
Connecting the twinax interface to your host
computer 7
Terminating the twinax cable 8
Setting up twinax communications 9
Setting the twinax address 9
Enabling IBM language translation 11
Selecting the character set 11
Understanding character set limitations 13
Status light meanings 14
Online 14
Fault 14
Testing the twinax connection 15
Host configuration 15
Downloading a data file 15
Programming for the twinax interface 16
Programming requirements 17
Configuration requirements 17
Control character format 17
Formatting label data 18
Error handling 19
Common problems when printing labels 19
Printing labels on demand from a host computer 20
Label design 20
Example print program 20
About the RPG example print program 21
RPG example print program 21
CLP program 21
Display program 22
RPG program 22
1
Table of Contents
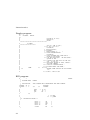
Troubleshooting 26
Twinax interface self-test 28
Printing the error log 31
Printing unprocessed data 33
Appendix 37
ASCII control characters 37
Twinax jumper configuration 38
Factory switch settings 39
Setting the twinax rear panel switches 40
EBCDIC - ASCII code conversion table 41
2
Twinax Interface
T
Introduction to the twinax interface
This user’s manual describes how to use an Intermec printer with a twinax
interface adapter in an IBM twinax cable system. The twinax interface enables
the printer to operate with an IBM System/34, System/36, System/38, or
AS/400 host computer. With the twinax interface, your Intermec printer
emulates an IBM 5256 Model 1 printer. Host-to-printer commands are sent from
the host computer to the twinax interface. The twinax interface converts
EBCDIC/IBM twinax protocol into ASCII/Intermec printer protocol.
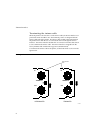
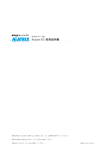
The following figure illustrates how an Intermec printer with twinax interface
fits into an IBM twinax system.
Twinax interface system relationship
IBM
System
34/36/38
AS/400
Twinax
Device
Twinax
Device
➤
Twinax Cable
IN
Twinax
Device
➤
OUT
Intermec
Printers
TWIN-01
3
Twinax Interface
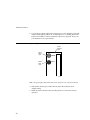
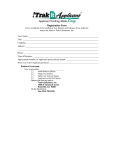
Twinax interface parts and function
The following table describes the twinax controls and indicators illustrated in
the figure on the facing page.
Number
4
Name
Description
1
Twinax interface card
Provides the twinax interface that allows
other IBM compatible devices to be serially
connected to the printer.
2
40-pin accessory cable
Connects the twinax interface to the
printer CPU PCB assembly.
3
Online light
Flashes or stays on to indicate the twinax
interface is communicating with the host
computer or system controller.
4
Rear panel switches
Enable or disable the twinax interface selftest.
5
Fault light
Flashes or stays on to indicate there is a
problem with the twinax interface or the
commands received by the twinax
interface. Pulses (comes on for one
second and then goes out) to indicate that
a message is being recorded in the error
log.
6
Twinax in connector
Connects the printer to the twinax system.
7
Terminate switch
Switch selectable load provides proper
termination when the twinax interface is
at the end of the twinax cable.
8
Twinax out connector
Connects the twinax interface to the
printer CPU PCB assembly.
9
Mounting screws
Secure the twinax interface to the printer.
Twinax Interface
T
Twinax interface with parts labeled
1
2
3
4
E
T
UL
FA
1 2 3 4 5 6 7
LIN
ON
5
O
I
9
IN
6
T
OU
7
8
TWIN-02
Note: Intermec does not provide twinax interface cables.
5
Twinax Interface
Preparing the twinax interface for operation
The twinax interface has been installed in your printer at the main
manufacturing plant or by a field service technician. Before you can use the
twinax interface with your Intermec printer, you need to do the following:
• Connect the twinax interface to your host computer.
• Set up twinax communications.
• Understand the meanings of twinax interface status lights.
• Test for communication with the host.
Connecting the twinax interface to your
system
With a twinax interface installed, your Intermec printer can connect directly to a
host computer through the twinax in connector. Other IBM compatible twinax
devices can connect to the host through the twinax out connector.
Providing twinax interface cables
Intermec does not provide a twinaxial cable for you. You need to purchase a
twinaxial cable equivalent to IBM Part No. 7362267 or 7362062. The maximum
cable length allowed for the twinax interface is 5000 feet (1525 meters).
The twinax in connector attaches the twinax interface to a host computer. It can
also attach to the out connector of another twinax device attached nearer to the
host on the twinax cable system. The twinax out connector allows other IBM
compatible twinax devices to be connected to the system cable without the need
for a tee connector. The out connector requires the same twinax cable and
connector assembly that the in connector uses.
When you use the out connector on the twinax interface to connect other devices
to the system, be certain that the slide switch on the twinax interface rear panel
is set in the up (unterminated) position. If the twinax interface is the last device
or the only device on a cable, the out connector is not used. When this is the
case, the slide switch on the twinax interface rear panel must be set in the down
(terminated) position.
6
Twinax Interface
T
Connecting the twinax interface to your host
computer
Using the twinax cable described in the preceding section, connect the twinax
interface to your host computer according to the figure below.
Connecting the twinax interface to your host computer
LT
FAU
1 2 3 4 5 6 7
INE
ONL
O
{
I
LT
FAU
1 2 3 4 5 6 7
INE
ONL
Host Computer
O
I
optional
I
{
O
optional
TWIN-03
Note: The serial port on the printer rear panel remains active after the twinax interface
is installed. To ensure trouble-free operation, do not connect any computing device to
this port while you are operating the printer through the twinax interface. The other
computing device may transmit messages to the serial port that interfere with messages
sent to the printer through the twinax interface.
7
Twinax Interface
Terminating the twinax cable
When the printer is the last device on the twinax cable, the twinax interface rear
panel slide switch should be set to the terminate position to designate that the
twinax cable ends at the printer. The twinax cable should not be terminated at
the printer when other devices are connected to the host through the twinax
interface. The twinax interface disables the out connector when the slide switch
is set to terminate the twinax cable. The twinax interface is shipped from the
factory with the slide switch in the up position (unterminated).
To terminate the twinax cable at the printer, set the slide switch as shown in the
figure below.
Setting twinax termination
Twinax Interface
Panel
IN
IN
TERMINATE
OUT
➡
➡
UNTERMINATED
➡
➡
OUT
TERMINATE
TERMINATED
TWIN-04
8
Twinax Interface
T
Setting up twinax communications
To run your printer with the twinax interface installed, you need to do the
following:
• Set the twinax address.
• Enable IBM language translation.
• Select a character set.
• Understand characters set limitations.
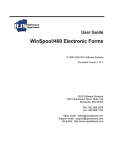
Setting the twinax address
This section shows you how to set the rear panel switches to change the twinax
interface device address. The only tool necessary is a miniature flat-tip
screwdriver (Intermec Part No. 523298).
The twinax device address is set by switches 5, 6, and 7. You can set the twinax
interface address to one of seven numbers from 0 to 6. The twinax interface is
shipped from the factory with the address set at zero. To select another address,
determine which address is not used by another twinax device and then set the
switches for that address as shown in the figure on the following page. For the
changes to take effect, switch the printer power off and then on.
9
Twinax Interface
Setting twinax address
O
INE
I
ONL
LT
FAU
1 2 3 4 5 6 7
LT
FAU
1 2 3 4 5 6 7
INE
ONL
O
I
I
7
7
6
6
5
5
3
6
5
6
6
5
5
6
5
7
7
2
7
1
7
0
5
5
6
6
7
7
O
TWIN-05
4
*Invokes Self-Test.
10
5
6
*Do not
use
T
Twinax Interface
Enabling IBM language translation
To work in an IBM environment, you must enable IBM language translation on
your Intermec printer installed with a twinax interface. This feature allows IBM
compatible characters to replace standard ASCII characters based on the current
printer language. Refer to the printer commands section of your printer user’s
manual for the command to enable IBM language translation (<SI>i{n}) and for
information on how to download it to your printer.
While running your printer with IBM language translation enabled, use the
following table to find the right hex codes for the international character sets.
IBM translation character table
4F
7B
5B
7C
4A
E0
5A
5F
79
C0
6A
D0
A1
U.S. ASCII
|
#
$
@
¢
\
!
¬
`
{
|
}
~
U.K. ASCII
|
#
£
@
$
\
!
¬
`
{
|
}
−
Germany
!
#
$
§
Ä
Ö
Ü
^
`
ä
ö
ü
ß
France
!
£
$
à
°
ç
§
^
`
é
ù
è
¨
Norway/Denmark
!
Æ
Å
∅
#
\
¤
^
`
æ
φ
å
ü
Sweden/Finland
!
Ä
Å
Ö
§
É
¤
^
é
ä
ö
å
ü
Spain
|
Ñ
Pt
@
[
\
]
¬
`
{
ñ
}
¨
Italy
!
£
$
§
°
ç
é
^
ù
à
ò
è
ì
Selecting the character set
Refer to the common character set table on the following page for a complete set
of characters that your Intermec printer can print. These characters remain the
same no matter which language you select for printer communications. The
IBM translation character table in the previous section lists the characters unique
to each international character set. These characters take the place of the shaded
boxes in the common character set table depending on the international
character set selected. For example, if you select the German character set, the
character β appears when you enter the hex code A1 from your host terminal.
11
Twinax Interface
Common character set
0
0
1
2
3
More Significant Hex Digit
4 5 6 7 8 9 A
space
1
L
e
s
s
S
i
g
n
i
f
i
c
a
n
t
H
e
x
D
i
g
i
t
&
-
ø
Ø
°
é
⁄
É
a
j
µ
B
C D E
¢
F
0
£
A
J
1
¥
B
K
S 2
L
T
2
â
ê
Â
Ê
b
k
s
3
ä
ë
Ä
Ë
c
l
t
C
4
à
è
À
È
d
m
u
D M U 4
5
á
í
Á
Í
e
n
v
§
E
6
ã
î
Ã
Î
f
o
w
¶
F O W 6
7
å
ï
Å
Ï
g
p
x
G
8
ç
ì
Ç
Ì
h
q
y
H Q
9
ñ
ß
Ñ
i
r
z
I
A
:
ª
»
º
B
.
C
<
*
%
D
(
)
_
'
E
+
;
>
=
Io
?
"
±
F
´
«
¡
¬
¿
3
5
N V
P
R
-
7
X
Y 8
9
Z
:
ô
û
Ô Û
æ D
´
ö
ü
Ö Ü
Ç
¨
ò
ù
Ò Ù
ó
ú
Ó Ú
õ
ÿ
Õ
Æ I
®
TWIN-06
= This character will change depending on the character set selected.
= Printer will not print this character.
12
Twinax Interface
T
To select an international character set, refer to the printer commands section of
your printer user’s manual. Look for the command to select printer language
(<SI>l{n}). Your printer user’s manual contains details on how to select the
different languages. For example, to set the printer language to Italian, send the
following command: <SI>l{6}.
Understanding character set limitations
There are certain characters that are not available to you. These characters were
either not available in the Intermec purchased fonts or they were not defined in
the multinational character set at the time of product introduction. Your
Intermec printer cannot print the following seven EBCDIC characters:
Character
≤
↑
ƒ
≠
=
≥
∋
Hex Code
8D
AD
B4
BC
BF
DA
FA
You are now ready to try your printer with the twinax interface. Before you
start, take time to learn about the status light meanings.
13
Twinax Interface
Status light meanings
The twinax interface rear panel contains two status lights as illustrated in the
figure below. Descriptions of the two status lights, online and fault, are
contained in the following paragraphs.
Twinax
Interface
Panel
ONLINE
FAULT
TWIN-07
Online
This light illuminates when the host is communicating with the twinax interface.
The online light switches off if connection with the host is lost. It flashes briefly
when the printer is first powered on, but goes out until the host establishes
contact.
Fault
If this light illuminates while you are operating your printer, a fault has
developed that requires service. If the light pulses (comes on for one second and
then goes out), the twinax interface has recorded an error in the error log. Refer
to page 31 for instructions on printing the error log. If the fault light indicates
that the twinax interface has failed, call your Intermec service representative for
assistance. The fault light will come on or flash briefly when the printer is first
powered on, but goes out a few seconds after the twinax interface establishes
contact with the printer.
14
Twinax Interface
T
Testing the twinax connection
Before running a print program from the host terminal, you need to ensure that
your host system is configured to operate with the twinax interface. You then
need to test the connection between the twinax interface and the host computer.
Host configuration
Configure your host to recognize the twinax interface as an IBM 5256 Model 1
printer. For host configuration instructions, refer to your IBM System
Configuration Manual.
Downloading a data file
1. Ensure the printer is powered on and active:
• Check the printer status information at the host terminal.
• Check that the printer power light is on, the twinax interface rear panel
online light is on, and the fault light is off.
2. If you cannot power on the printer, if the fault light comes on, or if the
twinax interface online light is off, check for the following:
• Correct address set on the twinax interface.
• Correct cabling from the twinax interface to the host.
• Configuration of the host system to recognize the twinax interface as an
IBM 5256 Model 1 printer.
3. Check for terminal-to-printer communication by entering Data Line Print
mode on your printer. Refer to your printer user’s manual for information
on entering Data Line Print mode.
4. Send down some characters from the host. When the printer is in Data Line
Print mode it does not attempt to interpret any printer commands, it simply
prints each character it receives along with its hexadecimal equivalent
underneath. An example of possible information is given below:
P R I N T E R
3400-t5
15
Twinax Interface
5. When your printer has successfully completed downloading information
with Data Line Print, refer to your printer user’s manual for information on
returning to normal print mode.
If the printer responded as described in the procedure, you have successfully
installed the twinax interface. Proceed to the following section entitled
“Programming for the twinax interface.”
If the printer failed to produce the results described in the above procedure,
refer to the “Troubleshooting” section starting on page 26. If you cannot get the
printer to print the sample labels after following the recommendations in
“Troubleshooting,” call your Intermec service representative.
Programming for the twinax interface
This section describes how to write RPG print programs for your host computer
that enable the twinax interface to control printer output. An example RPG
print program is provided for you. When you complete this section, you will be
able to do the following:
• Understand how to send control characters to the twinax interface.
• Understand how to send label formats and data to the twinax interface.
• Understand how the twinax interface handles the erroneous messages it
receives from the host.
• Write RPG print programs for your Intermec printer with a twinax interface.
16
Twinax Interface
T
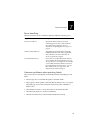
Programming requirements
There are special programming requirements that you need to understand
before you can send valid print messages to the printer through the twinax
interface. These special requirements involve the following:
• Configuration requirements
• Control character format
• Character set limitations
• Formatting label data
• Designing labels
Your printer user’s manual provides general information pertaining to these five
topics. The following paragraphs provide you with supplemental information
necessary for proper operation of the twinax interface.
Configuration requirements
Configure the host to recognize your Intermec printer as an IBM 5256 Model 1
printer. Instructions for doing this are provided in your IBM System
Configuration Manual.
Control character format
Many of the printer commands are control codes. To facilitate entering and
viewing of control codes at an IBM terminal, they are entered and displayed as
mnemonics. The twinax interface in the printer recognizes mnemonics and
converts them into control codes before passing them to the printer. The
Appendix found on page 37 of this manual, provides a list of standard ASCII
control character mnemonics used for composing printer messages. Refer to
your printer user’s manual to see how ASCII control characters are used in
programming the printer.
To send a control character to the twinax interface as part of a printer message,
you need to send the control character mnemonic in upper case letters bracketed
by these two characters:
< >
17
Twinax Interface
Example: The control character to clear format data is represented by the
mnemonic “CAN”. To clear data out of image RAM, send CAN to the twinax
interface in the following format:
<CAN>
(in human-readable format)
or
4C C3 C1 D5 6E
(in EBCDIC Hex format)
Some control character mnemonics, such as “FF”, are only two letters in length.
The mnemonic “FF” advances the printer media to the next start-of-print point.
Send “FF” to the twinax interface in the following format:
<FF>
Formatting label data
All data sent to the twinax interface for printing must begin with <STX> and
end with <ETX>. Any printer data not sent with these beginning and ending
control character mnemonics is not printed.
Note: The twinax interface uses the <STX> and <ETX> delimiters to determine where
the printer commands begin and end. Do not enter a semicolon (;) after <STX> and
<ETX>.
Also, all data sent to the twinax interface for printing must be a valid command
or a printable character. The printer ignores invalid commands and data; it
substitutes a default value whenever possible, skips to the next valid command,
and continues to print.
Example: The message below causes the printer to print the word “DATA”.
The <ETB> control character mnemonic enables the printer to print the label:
<STX><ESC>E0<CR>DATA<ETB><ETX>
The maximum print line handled by the IBM 5256 printer is 132 characters long.
Your Intermec printer with the twinax interface can handle a maximum of 512
characters in one message.
18
Twinax Interface
T
Error handling
The twinax interface and your Intermec printer handle the following errors:
Type of error
Response
Host Protocol Errors
The twinax interface ignores messages
containing protocol errors and records the
error in the twinax interface error log.
Instructions for printing the error log are on
page 31.
Printer Command Errors
The printer ignores bad printer commands,
substitutes default values where applicable,
and continues to the next command. No
errors are reported or logged.
Twinax Interface Errors
Errors that occur within the twinax interface
are recorded in the twinax interface error log.
An opcode error is an example of an error that
occurs within the twinax interface. The error
log holds the 20 most recent errors. To read
the contents of the error log, refer to the
instructions provided on page 31.
Common problems when printing labels
These are the five most frequently encountered problems in printing bar code
labels:
• The message does not end with the printer command <ETB>.
• The program contains printer commands that the printer does not recognize.
The printer ignores invalid commands and, when possible, substitutes a
default value.
• The label data contains too many characters for its field on the label.
• The label is physically too small to hold the data.
• The twinax interface has not been installed and tested correctly.
19
Twinax Interface
Printing labels on demand from a host
computer
IBM System/3X computers do not start sending data to printers until the printer
file is closed. If you want to send labels that you design on a system terminal
immediately to the twinax interface for printing, you must follow these
guidelines:
IBM System/34 and System/36 If you are using IBM System/34 or System/36,
you need to finish the RPG to close the printer file. OCL statements may be
used to reload the program for the next print job.
IBM System/38 and AS/400 If you are using IBM System/38 or AS/400, you
need to call a separate print program that will print the on-demand label or,
after writing a label, explicitly close the printer file within the RPG program.
Label design
When you print a label with the twinax interface installed in the printer, design
your label’s format and data by using a label design software program or your
host terminal. Refer to your printer user’s manual for information on label
design at the host terminal.
Example print program
The following pages provide an example RPG print program for the AS/400.
The next few paragraphs provide you with details about the RPG print
program.
File specifications The file specifications used in the RPG example program
are identical to those used for the IBM 5256 printer.
Extension specification The extension specification defines a compile time
array named FMT. The FMT array contains the label format.
Calculations specifications Miscellaneous label fields and printer control
characters are initialized by the calculation specifications. The calculation
specifications also contain the FORMAT subroutine used to send the label
format to the twinax interface.
20
Twinax Interface
T
About the RPG example print program
After compiling these programs, called DEM44C, a display screen appears
warning you about having the correct print file and outque. If necessary,
change DEM44C.
The display screen requires a user name. Enter your name and press the ENTER
key. The screen blanks out and a label prints. Use the CMD KEY 3 to exit the
program.
Note: The following program contains X’s in place of a printer model number. Please
insert the model number of your printer in place of the X’s.
RPG example print program
I N T E R M E C
PRINTER DEMONSTRATION
DEM44D
THIS PROGRAM WILL SHOW YOU HOW TO PRINT TO AN OUTQUE ON THE IBM AS/400. WE ARE USING
QPRINT AS THE OUTPUT FILE AND PRT01 AS THE OUTQUE. IF YOU DO NOT HAVE EITHER OR BOTH,
PLEASE STOP AND CHANGE THE CLP PROGRAM DEM44C.
CLP program
/*
/*
/*
PROGRAM:
DEM44C
PGM
OVRPRTF
CALL
DLTOVR
ENDPGM
*/
*/
*/
FILE(QPRINT) OUTQ(PRT01)
PGM(DEM44R)
FILE(QPRINT)
21
Twinax Interface
Display program
A*
A*
PROGRAM: DEM44D
A*
A
DSPSIZ(24 80 *DS3)
A
MSGLOC(23)
A
PRINT
**************************************
A
R SCRN01
**********************
A
CF03(03 'END OF JOB')
A
1 32'I N T E R M E C'
A
DSPATR(HI)
A
2 3DATE EDTCDE(Y)
A
2 68'DEM44D'
A
3 3TIME EDTWRD('0 : : ')
A
3 31'XXXX DEMONSTRATION'
A
DSPATR(HI)
A
6 16'THIS PROGRAM WILL SHOW HOW TO A
PRINT TO AN OUTQUE'
A
8 16'ON THE IBM AS/400. WE ARE USING A
QPRINT AS THE '
A
10 16'OUTPUT FILE AND PRT01 AS THE OUTA
QUE. IF YOU DO'
A
12 16'NOT HAVE EITHER OR BOTH, PLEASE A
STOP AND CHANGE'
A
14 16'THE CLP PROGRAM DEM44C.'
A
17 14'PLEASE ENTER YOUR NAME:'
A
NAME
25
B 17 40
A 80
ERRMSG('NAME CAN NOT BE LEFT BLANK'A
80)
A
23 30'CMD 3: END OF JOB'
RPG program
H
1
*
* PROGRAM NAME: DEM44R
*
* DESCRIPTION:
THIS PROGRAM WILL DEMONSTRATE THE XXXX PRINTER
*
FDEM44D CF E
WORKSTN
FQPRINT O
F
132
OF
PRINTER
*
E
INIT
1 10 80
E
WRK
80 1
E
QRX
125 1
*
I
DS
I
1 80 CMDQ
I
27 36 QUEUE
*
*** INITIALIZE VALUES **
*
C
MOVE '1'
ON
1
C
MOVE '0'
OFF
1
C
MOVE 'Y'
YES
1
C
MOVE 'N'
NO
1
C
Z-ADD1
AX
30
*
22
DEM44R
Twinax Interface
T
*** INITIALIZE FOR DATA DOWNLOAD
*
C
MOVE '<CR>'
QCR
4
C
MOVE '<ETB>'
QETB
5
C
MOVE '<ESC>'
QESC
5
C
MOVE '<CAN>'
QCAN
5
C
MOVE '<STX>'
QSTX
5
C
MOVE '<ETX>'
QETX
5
C
MOVE '<RS>'
QRS
4
C
MOVE '<FS>'
QFS
4
C
MOVE '<US>'
QUS
4
C
MOVEL'<ESC>'
QKINC1 7
C
MOVE 'I1'
QKINC1
C
MOVEL'<ESC>'
QKDEC1 7
C
MOVE 'D1'
QKDEC1
*
*** DOWNLOAD FORMAT TO OUTQUE **
*
C
EXSR DLOADQ
*
*****************************************************
**
MAINLINE LOGIC
**
*****************************************************
*
C
MOVE 'A'
FUNCTN 1
*
C
FUNCTN
DOWNE'Z'
C
FUNCTN
CASEQ'A'
SCRN1
C
END
C
END
*
C
SETON
LR
**************************
*
*****************************************************
** SCRN1 - PROMPT SCREEN
**
*****************************************************
*
C
SCRN1
BEGSR
*
C
EXFMTSCRN01
*
C
*IN03
IFEQ ON
C
MOVE 'Z'
FUNCTN
C
ELSE
C
EXSR EDIT01
*
C
ERR
IFEQ NO
C
EXSR LABELQ
C
MOVE *BLANKS
NAME
C
END
*
C
END
*
C
ENDSR
**************************
*
*****************************************************
** EDIT01 - EDITS THE PROMPT SCREEN FIELD
**
*****************************************************
*
C
EDIT01
BEGSR
*
23
Twinax Interface
C
MOVE OFF
*IN80
C
MOVE NO
ERR
1
*
C
NAME
IFEQ *BLANKS
C
SETON
80
C
MOVE YES
ERR
C
END
*
C
ENDSR
**************************
*
*****************************************************
** DLOADQ - DOWNLOAD TO PRINTER OUTQ SUB-ROUTINE **
*****************************************************
*
C
DLOADQ
BEGSR
*
*
LINES IN THE <INIT> ARRAY:
C
Z-ADD10
MXRD
30
*
*
SET-UP CHANNEL CODE & <ESC> CHARACTER
C
Z-ADD1
AX
C
MOVE *BLANKS
QRX
C
MOVEAQESC
QRX,AX
C
ADD 5
AX
*
*
OUTPUT ALL <INIT> ARRAY PRINTER STATEMENTS TO PRINTER
C
1
DO
MXRD
BX
30
C
MOVEA*BLANKS
WRK
C
MOVEAINIT,BX
WRK
C
Z-ADD80
CX
30
*
C
WRK,CX
DOWEQ' '
C
SUB 1
CX
C
END
*
C
120
SUB AX
TMP
30
C
ADD 1
TMP
C
TMP
IFLT CX
C
EXCPTPRINTQ
C
MOVE *BLANKS
QRX
C
Z-ADD1
AX
C
END
*
C
MOVEAINIT,BX
QRX,AX
C
ADD CX
AX
C
END
*
C
EXCPTPRINTQ
*
C
ENDSR
**************************
*
*****************************************************
** SETUPQ SET-UP OUTPUT ARRAY FOR PRINT QUEUE
**
*****************************************************
*
C
SETUPQ
BEGSR
*
C
Z-ADD1
AX
C
MOVEA*BLANKS
QRX
*
C
ENDSR
24
Twinax Interface
T
**************************
*
*****************************************************
** LABELQ - PRINT LABEL SUBROUTINE (PRINT QUEUE) **
*****************************************************
*
C
LABELQ
BEGSR
*
C
EXSR SETUPQ
C
MOVEAQESC
QRX,AX
C
ADD 5
AX
C
MOVEA'E3'
QRX,AX
C
ADD 2
AX
C
MOVEAQCAN
QRX,AX
C
ADD 5
AX
C
MOVEAQCR
QRX,AX
C
ADD 4
AX
C
MOVEANAME
QRX,AX
C
ADD 20
AX
C
MOVEAQCR
QRX,AX
C
ADD 4
AX
C
MOVEAQETB
QRX,AX
C
ADD 5
AX
C
MOVEAQETX
QRX,AX
C
EXCPTPRINQQ
*
C
ENDSR
**************************
*
*****************************************************
** OUTPUT SPECIFICATIONS
**
*****************************************************
OQPRINT E
PRINTQ
O
QSTX
+ 0
O
QRX
+ 0
O
QETX
131
O
E
PRINQQ
O
QSTX
+ 0
O
QRX
+ 0
*********************************************
** INIT - LABEL FORMAT **
P;E3;F3;H0;
H1;o050,050;c2;w2;h3;d3,INTERMEC;
H2;o075,100;c2;w1;h1;d3,Presents the;
H3;o115,125;c2;w1;h2;d3,MODEL;
H4;o075,165;c2;w1;h2;d3,XXXX PRINTER;
B5;o082,200;c0,0;f0;h35;w1;i1;d3, XXXX ;
I5;o113,238;c0;w1;h1;
H6;o135,255;c2;w1;h1;d3,to;
H7;o050,285;c2;w1;h2;d0,20;
R
25
Twinax Interface
Troubleshooting
This section describes functional problems that you may encounter with the
twinax interface and possible solutions.
Problem: The amber fault light comes on and goes out after one second.
This indicates that the twinax interface has recorded an error message in its
error log. To see if the twinax interface is recording error messages in its error
log, watch the rear panel fault light as the host transmits a message to the twinax
interface. To print the contents of the error log, follow the directions starting on
page 31. The error log may tell you where to look for the problem: it may be
located between the host and the twinax interface, between the twinax interface
and the printer, or inside the twinax interface.
Problem: The amber fault light continually flashes.
This indicates that the twinax interface PCB assembly has failed its power-on
test. When the printer is first switched on, the twinax interface runs a set of tests
to verify that the RAM and ROM on the twinax interface PCB assembly are
functioning correctly and that the twinax interface can communicate with the
printer. The fault light flashes and the twinax interface ceases to function if a
failure is detected.
The fault light emits flashes to indicate where the problem is located:
No. of flashes
Problem
1
2
3
4
5
6
7
ROM checksum error
RAM error
Biphase Communications Processor (BCP) shared RAM error
BCP instruction RAM error
BCP internal loopback test timeout
BCP internal loopback test error
Printer interface error
Note: The fault light will flash anywhere from one to seven times, pause, and then
repeat the process until whatever caused the error is corrected.
Switch the printer power off and then on. If the fault light still flashes, call for
service.
26
Twinax Interface
T
Problem: The amber fault light comes on and stays on.
This indicates that the twinax interface PCB assembly has failed and is no longer
functioning. In this situation, call for service.
Problem: The green online light stays on or flickers as it should, but the printer
does not print.
This indicates that the connection between the host and the twinax interface is
good, but that the host is sending bad printer commands. Check the printer
commands for errors. Correct any error you find and try again. If the printer
still does not print, try examining the data the twinax interface is receiving from
the host. Refer to “Printing unprocessed data” on page 33 for more information.
Problem: The green online light goes out and the twinax interface stops
communicating with your host system.
This problem has several possible causes:
• The twinax cable has become disconnected. Check twinax cable connections
at the host and all twinax devices including the printer twinax interface.
• The twinax cable has been terminated before the end of the cable or has been
unterminated. Check the last twinax device for proper termination; check all
other twinax devices to see that they are unterminated.
• Another twinax device has the same address as the printer twinax interface.
Check addresses of all other twinax devices (especially those added after the
printer twinax interface). Change addresses that conflict with the printer
twinax interface.
• The host has broken off communications with the twinax interface. Check
the program and the host configuration, making certain that the host is
ignoring the twinax interface.
27
Twinax Interface
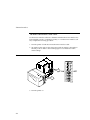
Twinax interface self-test
Use the twinax interface self-test to determine whether the twinax interface has
been installed correctly or whether it is faulty. To run the twinax interface selftest, complete the following procedure:
1. Turn the printer off and disconnect the twinax interface cable.
2. Set switches 5 through 7 to the ON position and set switches 1 through 4 to
the OFF position. Refer to the following figure for an illustration of the
switch settings.
5
6
7
Twinax interface self-test switch settings
LT
FAU
1 2 3 4 5 6 7
INE
ONL
O
3
ON
4
I
O
2
LT
FAU
1 2 3 4 5 6 7
INE
ONL
1
I
I
O
TWIN-08
3. Turn the printer on.
28
OFF
Twinax Interface
T
4. The printer continuously prints the twinax interface test label shown in the
figure below.
Twinax interface self-test label
This label is not available
electronically.
5. After printing six labels, refer to your printer user’s manual for directions on
how to stop the printer from printing labels. You may need to press the
printer front control panel key or a front panel button.
29
Twinax Interface
6. Look at the two lights on the twinax interface rear panel. Both the green light
and the amber light should be off. If either light is on or flashing, the twinax
interface has failed its self-test and must be repaired or replaced. Please call
your Intermec service representative.
Twinax interface rear panel lights
Twinax
Interface
Panel
Green
Online
Light
Amber
Fault
Light
ONLINE
FAULT
TWIN-09
Note: The green light is OFF because the twinax interface is not connected to the host.
7. If the twinax interface passed the self-test, return the switches to their
original setting.
8. Install the twinax interface cable, turn the printer on, and resume normal
operation.
30
Twinax Interface
T
Printing the error log
A buffer in the twinax interface called the error log stores the last 20 recorded
errors. When more than 20 error messages accumulate, the first error message
stored is deleted and the new message is added. The accumulated errors report
the occurrence of bad commands received over the twinax system cable, errors
communicating with the printer, or errors the twinax interface encounters while
executing its own code.
Printing the contents of the error log may help you troubleshoot problems by
showing you where to look for errors. However, if you cannot determine the
cause of the problem, call for service.
To print and interpret the contents of the error log:
1. Record the setting of the twinax interface rear panel switches; you need to
know how to set the switches after testing is complete.
2. Without switching off the printer power, set switches 5 through 7 to the ON
position as shown in the figure below. At this point, the printer ignores
incoming messages from the host.
Print error log switch settings
LT
FAU
1 2 3 4 5 6 7
INE
ONL
O
5
6
7
I
LT
FAU
1 2 3 4 5 6 7
INE
ONL
O
I
ON
OFF
I
O
TWIN-10
31
Twinax Interface
3. The printer starts printing the contents of the error log, one error per label. It
prints errors in the order they are received by the printer, starting with the
newest and ending with the oldest. The error label is shown in the following
figure.
Note: The error log will not record errors in printer commands. The error log is erased
when it is printed.
Error log label
This label is not available
electronically.
4. After the printer stops printing error labels, set the twinax interface rear
panel switches back to the original setting you recorded in Step 1.
32
Twinax Interface
T
Examine your error log labels. Each one has a number and a brief description.
The errors fall into three categories:
Error #100 - #499. Twinax interface-to-printer CPU error. This type of error may
be caused by faulty installation of the twinax interface or by errors generated by
the twinax interface that you cannot correct. If you cannot determine the cause
of the problem, call for service.
Error #500 - #699. Host-to-twinax interface error. This is a protocol error.
Usually correcting the program or the host configuration will remedy this
situation.
Error #700 - #999. Internal error. This type of error is not correctable by the
user. Call for service.
Printing unprocessed data
Printing unprocessed data may help you troubleshoot problems by showing
how the twinax interface handles data sent from the host. However, if you
cannot determine the cause of the problem, call for service.
Data from the host is filtered through several stages of processing before being
sent to the printer. You can print data from two of these stages. The following
procedure instructs you to first print data from one of the early stages of
processing (stage 1) and then from the final stage of processing (stage 2).
1. Enter Data Line Print mode on your printer. Refer to your printer user’s
manual for the procedure to enter Data Line Print mode. The printer enters a
state in which it prints every character it receives (including ASCII control
characters) with the matching hexadecimal code underneath.
2. Record the setting of the twinax interface rear panel switches; you need to
know how to set the switches after testing is complete.
3. Without switching off the printer, set switches 1 through 4 to the ON
position and switches 5 through 7 to the OFF position as shown in the
following figure.
33
Twinax Interface
7
Printing stage one unprocessed data switch settings
E
6
T
UL
FA
1 2 3 4 5 6 7
LIN
ON
O
OFF
1
2
3
ON
4
5
I
4400-163
4. Send some printer commands (data) down from the host. The printer starts
printing each character that is not filtered out at this stage by the twinax
interface.
At this stage in the processing, all of the host protocol characters are removed
and the EBCDIC code has been converted to ASCII code. Here is what you
might expect to see on the labels:
34
Twinax Interface
T
• The first five characters are the printer command string delimiter <STX>.
If <STX> is missing, the printer will not respond to any commands.
Characters before <STX> are filtered out.
• The next characters you see are printer commands and data. Here are
some examples:
3400-t2
The final characters of the printer command string form the Print
command:
3400-t3
Look for invalid printer commands or incorrect syntax within the printer
command string.
• The last five characters printed are the final delimiter of the printer
command string <ETX>. If <ETX> is missing, no data will be sent to the
printer from the twinax interface. Characters following <ETX> are
filtered out.
5. Print the data from the final stage of processing. Without switching off the
printer, set the twinax interface rear panel switches back to the original
setting you recorded in Step 2.
6. Run the print program on the host. The printer prints each character that is
not filtered out by the twinax interface.
At this stage in the processing, all the host protocol characters have been
removed, the EBCDIC code has been converted to ASCII code, the ASCII
control code mnemonics have been converted to actual ASCII control codes,
and characters outside of printer command delimiters have been filtered out.
There should not be any characters other than the printer commands. If you
see any characters that are not printer commands, you should suspect they
are causing printing problems.
35
Twinax Interface
Here are some examples of printer commands:
3400-t1
The last characters of the printer command string form the Print command:
3400-t4
Within the printer commands, look for invalid printer commands or
incorrect syntax.
7. If there is no printout, suspect the host of transmitting illegal characters that
are inhibiting processing of data during the final stage. Go back and
examine the printout from the earlier stage of processing. There you should
be able to find characters that are causing the problem.
8. After you have completed the test, refer to your printer user’s manual for
information on how to return to normal operation.
If you cannot solve your printing problems, call Intermec for service.
36
Twinax Interface
T
Appendix
ASCII control characters
Character value Definition
ASCII hex
NUL
SOH
STX
ETX
EOT
ENQ
ACK
BEL
BS
HT
LF
VT
FF
CR
SO
SI
DLE
DC1
DC2
DC3
DC4
NAK
SYN
ETB
CAN
EM
SUB
ESC
FS
GS
RS
US
SP
DEL
00
01
02
03
04
05
06
07
08
09
0A
0B
0C
0D
0E
0F
10
11
12
13
14
15
16
17
18
19
1A
1B
1C
1D
1E
1F
20
7F
NULL
START OF HEADING
START OF TEXT
END OF TEXT
END OF TRANSMISSION
ENQUIRY
ACKNOWLEDGE
BELL
BACKSPACE
HORIZONTAL TAB
LINE FEED
VERTICAL TAB
FORM FEED
CARRIAGE RETURN
SHIFT OUT
SHIFT IN
DATA LINK ESCAPE
DEVICE CONTROL 1
DEVICE CONTROL 2
DEVICE CONTROL 3
DEVICE CONTROL 4
NEGATIVE ACKNOWLEDGE
SYNCHRONOUS IDLE
END TRANSMISSION BLOCK
CANCEL
END OF MEDIUM
SUBSTITUTE
ESCAPE
FILE SEPARATOR
GROUP SEPARATOR
RECORD SEPARATOR
UNIT SEPARATOR
SPACE
DELETE
37
Twinax Interface
Twinax jumper configuration
The following is a list of jumpers resident on the coax and twinax cards.
Jumper
Function
J5-1 to J5-2
J7-1 to J7-2
J7-2 to J7-3
J8-1 to J8-2
J9-1 to J9-2
J9-2 to J9-3
J10-1 to J10-2
J10-2 to J10-3
J10-2 to J10-4
J11-1 to J11-2
J11-2 to J11-3
J16-1 to J16-2
J16-2 to J16-3
Processor clock enable
Personality select, coax I/O
Personality select, twinax I/O
Bypass capacitor for coax cable
8K processor SRAM select
32K processor SRAM select
Host select, 4400
Host select, test
Host select, 3000A
8K I/O processor data SRAM select
32K I/O processor data SRAM select
8K I/O processor CODE SRAM select
32K I/O processor CODE SRAM select
Twinax defaults
J5-1 to J5-2
J7-2 to J7-3
J9-1 to J9-2 (hardwired, no jumper required)
J10-1 to J10-2
J11-1 to J11-2 (hardwired, no jumper required)
J16-1 to J16-2 (hardwired, no jumper required)
38
Twinax Interface
T
Factory switch settings
Seven miniature toggle switches and one slide switch are provided on the rear
panel of the twinax interface. Three of the seven miniature toggle switches set
the twinax address and enable the twinax self-test. The slide switch terminates
the twinax cable.
The switches are numbered 1 through 7 counting from bottom to top. The
switches are easily set ON or OFF with a miniature flat-tip screwdriver
(Intermec Part No. 523298). For the switch settings to take effect, switch the
printer power off and then on. The twinax interface is shipped with the seven
switches set to the OFF position as shown in the figure below.
With the seven switches set to the OFF position (factory settings), the twinax
address is 0 (zero) and the self-test is disabled.
7
Factory setting of twinax switches
LT
FAU
1 2 3 4 5 6 7
INE
ONL
O
5
6
I
O
ON
OFF
3
I
4
LT
FAU
1 2 3 4 5 6 7
INE
ONL
I
1
2
O
TWIN-12
39
Twinax Interface
Setting the twinax rear panel switches
Address Switch settings (switches 5,
6, and 7)
0
1
2
3
4
5
6
000
001
010
011
100
101
110
Self-Test
Self-Test On 111
Note: For switch setting changes to take effect, switch the printer off and then on.
40
Twinax Interface
T
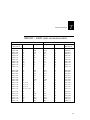
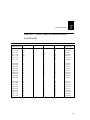
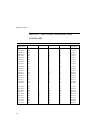
EBCDIC - ASCII code conversion table
EBCDIC
Bits
7654 3210
Hex code
Graphic
ASCII
Graphic
Hex code
Bits
654 3210
0000
0000
0000
0000
0000
0000
0000
0000
0000
0000
0000
0000
0001
0010
0011
0101
0111
1011
1100
1101
1110
1111
00
01
02
03
05
07
0B
0C
0D
0E
0F
NUL
SOH
STX
ETX
HT
DEL
VT
FF
CR
SO
SI
NUL
SOH
STX
ETX
HT
DEL
VT
FF
CR
SO
SI
00
01
02
03
09
7F
0B
0C
0D
0E
0F
000
000
000
000
000
111
000
000
000
000
000
0000
0001
0010
0011
1001
1111
1011
1100
1101
1110
1111
0001
0001
0001
0001
0001
0001
0001
0001
0001
0001
0001
0000
0001
0010
0011
0110
1000
1001
1100
1101
1110
1111
10
11
12
13
16
18
19
1C or 22
1D or 30
1E or 35
1F, 31, or 36
DLE
DC1
DC2
DC3
BS
CAN
EM
FS
GS
RS
US
DLE
DC1
DC2
DC3
BS
CAN
EM
FS
GS
RS
US
10
11
12
13
08
18
19
1C
1D
1E
1F
001
001
001
001
000
001
001
001
001
001
001
0000
0001
0010
0011
1000
1000
1001
1100
1101
1110
1111
0010
0010
0010
0010
0010
0010
0101
0110
0111
1101
1110
1111
25
26
27
2D
2E
2F
LF
ETB
ESC
ENQ
ACK
BEL
LF
ETB
ESC
ENQ
ACK
BEL
0A
17
1B
05
06
07
000
001
001
000
000
000
1010
0111
1000
0101
0110
0111
41
Twinax Interface
EBCDIC - ASCII code conversion table
(continued)
EBCDIC
Bits
7654 3210
Graphic
ASCII
Graphic
Hex code
Hex code
Bits
654 3210
0011
0011
0011
0011
0011
0010
0111
1100
1101
1111
32
37
3C
3D
3F
SYN
EOT
DC4
NAK
SUB
SYN
EOT
DC4
NAK
SUB
16
04
14
15
1A
001
000
001
001
001
0110
0100
0100
0101
1010
0100
0100
0100
0100
0100
0100
0100
000
1010
1011
1100
1101
1110
1111
40
4A
4B
4C
4D
4E
4F
Sp
.
[
<
(
+
!
Sp
.
[
<
(
+
!
20
5B
2E
3C
28
2B
21
010
101
010
011
010
010
010
0000
1011
1110
1100
1000
1011
0001
0101
0101
0101
0101
0101
0101
0101
0000
1010
1011
1100
1101
1110
1111
50
5A
5B
5C
5D
5E
5F
&
]
$
*
)
;
^
&
]
$
*
)
;
^
26
5D
24
2A
29
3B
5E
010
101
010
010
010
011
101
0110
1101
0100
1010
1001
1011
1110
0110
0110
0110
0110
0110
0110
0110
0110
0000
0001
1010
1011
1100
1101
1110
1111
60
61
6A
6B
6C
6D
6E
6F
/
|
,
%
_
>
?
/
|
,
%
_
>
?
2D
2F
7C
2C
25
5F
3E
3F
010
010
111
010
010
101
011
011
1101
1111
1100
1100
0101
1111
1110
1111
42
Twinax Interface
T
EBCDIC - ASCII code conversion table
(continued)
EBCDIC
Bits
7654 3210
Graphic
ASCII
Graphic
Hex code
Hex code
Bits
654 3210
0111
0111
0111
0111
0111
0111
0111
1001
1010
1011
1100
1101
1110
1111
79
7A
7B
7C
7D
7E
7F
`
:
#
@
'
=
"
`
:
#
@
'
=
"
60
3A
23
40
27
3D
22
110
011
010
100
010
011
010
0000
1010
0011
0000
0111
1101
0010
1000
1000
1000
1000
1000
1000
1000
1000
1000
0001
0010
0011
0100
0101
0110
0111
1000
1001
81
82
83
84
85
86
87
88
89
a
b
c
d
e
f
g
h
i
a
b
c
d
e
f
g
h
i
61
62
63
64
65
66
67
68
69
110
110
110
110
110
110
110
110
110
0001
0010
0011
0100
0101
0110
0111
1000
1001
1001
1001
1001
1001
1001
1001
1001
1001
1001
0001
0010
0011
0100
0101
0110
0111
1000
1001
91
92
93
94
95
96
97
98
99
j
k
l
m
n
o
p
q
r
j
k
l
m
n
o
p
q
r
6A
6B
6C
6D
6E
6F
70
70
72
110
110
110
110
110
110
111
111
111
1010
1011
1100
1101
1110
1111
0000
0001
0010
43
Twinax Interface
EBCDIC - ASCII code conversion table
(continued)
EBCDIC
Bits
7654 3210
Hex code
1010
1010
1010
1010
1010
1010
1010
1010
1010
0001
0010
0011
0100
0101
0110
0111
1000
1001
1100
1100
1100
1100
1100
1100
1100
1100
1100
1100
1101
1101
1101
1101
1101
1101
1101
1101
1101
1101
44
Graphic
ASCII
Graphic
Hex code
Bits
654 3210
A1
A2
A3
A4
A5
A6
A7
A8
A9
~
s
t
u
v
w
x
y
z
~
s
t
u
v
w
x
y
z
7E
73
74
75
76
77
78
79
7A
111
111
111
111
111
111
111
111
111
1110
0011
0100
0101
0110
0111
1000
1001
1010
0000
0001
0010
0011
0100
0101
0110
0111
1000
1001
C0
C1
C2
C3
C4
C5
C6
C7
C8
C9
{
A
B
C
D
E
F
G
H
I
{
A
B
C
D
E
F
G
H
I
7B
41
42
43
44
45
46
47
48
49
111
100
100
100
100
100
100
100
100
100
1011
0001
0010
0011
0100
0101
0110
0111
1000
1001
0000
0001
0010
0011
0100
0101
0110
0111
1000
1001
D0
D1
D2
D3
D4
D5
D6
D7
D8
D9
}
J
K
L
M
N
O
P
Q
R
}
J
K
L
M
N
O
P
Q
R
7D
4A
4B
4C
4D
4E
4F
50
51
52
111
100
100
100
100
100
100
101
101
101
1101
1010
1011
1100
1101
1110
1111
0000
0001
0010
Twinax Interface
T
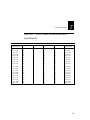
EBCDIC - ASCII code conversion table
(continued)
EBCDIC
Bits
7654 3210
Graphic
ASCII
Graphic
Hex code
Hex code
Bits
654 3210
1110
1110
1110
1110
1110
1110
1110
1110
1110
0000
0010
0011
0100
0101
0110
0111
1000
1001
E0
E2
E3
E4
E5
E6
E7
E8
E9
\
S
T
U
V
W
X
Y
Z
\
S
T
U
V
W
X
Y
Z
5C
53
54
55
56
57
58
59
5A
101
101
101
101
101
101
101
101
101
1100
0011
0100
0101
0110
0111
1000
1001
1010
1111
1111
1111
1111
1111
1111
1111
1111
1111
1111
0000
0001
0010
0011
0100
0101
0110
0111
1000
1001
F0
F1
F2
F3
F4
F5
F6
F7
F8
F9
0
1
2
3
4
5
6
7
8
9
0
1
2
3
4
5
6
7
8
9
30
31
32
33
34
35
36
37
38
39
011
011
011
011
011
011
011
011
011
011
0000
0001
0010
0011
0100
0101
0110
0111
1000
1001
45
Corporate Headquarters
6001 36th Avenue West
Everett, Washington 98203
U.S.A.
tel 425.348.2600
fax 425.355.9551
Twinax Interface User's Manual
*060554-001*
*060554-001*