1
V1.0
USER MANUAL
SADV 1250 R HD
Order No. 9103-0360
2
Welcome.
We are delighted that you have decided to purchase a product. With your new SADV 1250 R HD you have acquired
a top-quality piece of equipment which has been designed and developed with the wishes of the audiophile music lover
as absolute top priority.
Our innovative approach to solving problems, solid and carefully thought-out construction, and the highest quality
materials ensure that this unit will satisfy your greatest demands and requirements over a period of many years.
Thorough quality checking of all materials, painstaking production by highly qualified staff, and a fully automatic,
computer-controlled final quality control process guarantee a product of high quality which meets the specification in full.
In our production system we avoid the use of all environmentally harmful and potentially injurious substances, such as
chlorine-based solvents and CFCs.
Moreover we avoid the use of plastics (especially PVC) as a constructional element wherever possible. Instead we rely
upon metals and other non-harmful materials which on the one hand are recyclable and on the other offer very good
electrical shielding characteristics.
Our insistence on solid all-metal cases eliminates the problem of adverse effects on sound quality caused by external
sources of interference. This also ensures that the electro-magnetic radiation (electro-smog) caused by our equipment is
effectively shielded, reducing it to an absolute minimum.
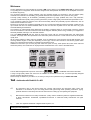
Your new SADV 1250 R HD will play back all media that comply with the universal DVD-Video and SACD-Audio
standard. This player offers the reproduction with cinema like picture with stereo or multi channel sound at the highest
quality level.
All the unique features of DVD video are available, such as selecting the sound channel and sub-title language, and
choosing different angles of view (also depending on DVD type). The unit also includes a child security system which
allows you to determine which DVDs your children are permitted to view.
Additional to DVD discs you can also play back Video-CDs (VCD, S-VCD), JPEG picture discs, MP3 music CDs and
audio CDs (CDDA). The media that can be played back are labelled with one or more of the labels below:
1)
2
The unit features digital audio outputs for connection to
,
) and MPEG multi-channel decoders.
A range of high-quality cables and connectors is available as accessories for this unit, as well as specially designed
furniture matching the player‘s design.
Please accept our thanks for your faith in us; we wish you many hours of pleasure with your SADV 1250 R HD.
elektroakustik GmbH & Co KG
All components used in this device satisfy the currently valid German and European safety norms and
standards. In the interests of your own safety please read right through these operating instructions, paying
particular attention to the safety notes and the instructions for setting up and operating the equipment.
1)
Manufactured under licence to Dolby Laboratories. „Dolby“ and the double-D symbol are registered trademarks
of Dolby Laboratories. Confidential, unpublished documents. © 1992-1997 Dolby Laboratories. All rights
reserved.
2)
„DTS“ is a registered trademark of Digital Theater Systems, Inc.
This product complies with the Low Voltage Directive (73/23/EEC), EMV Directives (89/336/EEC, 92/31/EEC) and CE
Marking Directive (93/68/EEC).
3
IMPORTANT!
CAUTION!
This product contains a laser diode of higher class than 1. To ensure continued safety, do not remove any covers or
attempt to gain access to the inside of the product.
Refer all servicing to qualified personnel.
The following caution label appear on your device:
Rear panel
CLASS 1
LASER PRODUCT
On the inner protective housing of the DVD mechanism
CAUTION:
VORSICHT:
ATTENTION:
DANGER:
VISIBLE AND INVISIBLE LASER RADIATION WHEN OPEN.
AVOID EXPOSURE TO BEAM
SICHTBARE UND UNSICHTBARE LASERSTRAHLUNG,
WENN ABDECKUNG GEÖFFNET NICHT DEM STRAHL AUSSETZEN
RAYONNEMENT LASER VISIBLE ET INVISIBLE EN CAS
D'OUVERTURE EXPOSITION DANGEREUSE AU FAISCEAU
VISIBLE AND INVISIBLE LASER RADIATION WHEN OPEN.
AVOID DIRECT EXPOSURE TO BEAM
4
Contents
Operating the unit
Front panel controls ........................................................................................................................ 6
Hints for using the SADV 1250 R HD in combination with SR 1535 R and DD 1535 R ....................... 9
Remote control of the SADV 1250 R HD ....................................................................................... 10
Operating the SADV 1250 R HD .................................................................................................... 12
Play back of MP3 / JPEG / Kodak Picture CD ............................................................................... 13
Listening to SACD .......................................................................................................................... 14
Disc menu and Setup menu
Menu Functions of the SADV 1250 R HD ...................................................................................... 15
Disc menu
DVD / VCD special functions .................................................................................................
• Menu function ........................................................................................................................
• Calling up and operating the DISC menu ..............................................................................
• Manual cursor control ............................................................................................................
16
16
16
16
Setup menu
Menu - overview .....................................................................................................................
General Setup Menu ................................................................................................................
Audio Setup Menu ....................................................................................................................
• Digital Audio Setup ................................................................................................................
• Sound mode ..........................................................................................................................
• Video Setup ...........................................................................................................................
• Basic settings (Preference page) ..........................................................................................
17
18
18
19
19
20
21
Installation, using the unit for the first time
Back panel connections .................................................................................................................
Setting up the DVD player .............................................................................................................
Wiring .............................................................................................................................................
Wiring diagrams
• SADV 1250 R HD and SR 1535 R with S-Video and Vomponent YUV Video ............................
• SADV 1250 R HD in combination with DD 1535 R and PA 1535 R (S-Video-mode) ..................
• SADV 1250 R HD connected to a stereo amplifier .....................................................................
• SADV 1250 R HD connected to a surround amplifier .................................................................
24
26
27
28
29
30
31
Safety notes ...................................................................................................................................
Approved usage .............................................................................................................................
Fitting new batteries .......................................................................................................................
Care of the unit ..............................................................................................................................
Device approval and conformity with EC directives .......................................................................
FCC Information to the user ...........................................................................................................
32
33
33
33
33
33
Miscellaneous
Explanation of terms, useful information ........................................................................................
Technical description OVERSAMPLING ........................................................................................
• Standard OVS FIR filter ............................................................................................................
• OVS 1 (short FIR filter) .............................................................................................................
• OVS 2 (Bezier interpolator plus IIR filter) .................................................................................
• OVS 3 (pure Bezier interpolator) ..............................................................................................
Trouble-shooting ............................................................................................................................
Specification ..................................................................................................................................
5
34
36
36
36
36
36
37
41
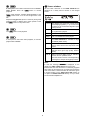
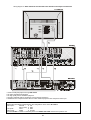
Front panel controls
On / Off switch. The green LED glows when the unit is
switched on and ready to use.
With this button the video section
SADV 1250 R HD can be switched off.
(CD and SACD only)
of
the
When switched off the high frequency video signals can
not influence the susceptible audio signals. Switching off
the video section is recommended for highest possible
audio reproduction quality.
Note:
If the SADV 1250 R HD is connected to a pre-amplifier,
integrated amplifier or receiver within an 'R' system, it can be
switched off, with the whole system, by pressing the
button on the remote control handset.
Note:
The mains button does not disconnect the device from the mains
completely. Some parts of the circuit are still live when the unit is
switched off.
Selection of the oversampling method
Repeatedly pressing this button cyclically steps through
the various oversampling algorithms offered by the
SADV 1250 R HD.
Auto-Off function
The SADV 1250 R HD features an automatic power-off
function. If the player goes into ‘STOP’ mode at the end of
playing a disc, and if no controls are operated in the next
approx. 30 minutes, the SADV 1250 R HD automatically
switches itself off.
For SACD and CD playback each have two different sets
of oversampling algorithms. These special algorithms
implemented in the SADV 1250 R HD are optimised for
each data format.
A detailed description of the oversampling algorithms can
be found in chapter 'Technical Description
Oversampling'.
CD Drawer
The drawer of the SADV 1250 R HD consists of a
combination of a special plastic with good damping
qualities, and solid, precision-machined treated
aluminium. It’s floating and flexible suspension system
eliminates the transfer of mechanical vibration to the disc,
which can have an adverse effect on the sound.
Selects the audio playback mode.
Brief press:
• DVD
Selection of the DVD sound track (language or audio
format), if there are different sound tracks on the disc.
• SACD
When the disc is stopped this button chooses between
the CD or SACD layer of hybrid SACDs. During
playback of SACDs with stereo and multichannel areas
this button toggles between stereo or multichannel
playback.
Button for opening and closing the drawer.
With this button, the bandwidth of the analogue output
filter for SACD playback can be switched between
60 kHz (normal mode) or 100 kHz ('WIDE' mode).
A security switch at the back panel of the SADV 1250 R HD
must be set to the 'WIDE ENABLE' to allow the wide
bandwidth position to be chosen. 'WIDE' mode cannot be
chosen without the security switch set to 'WIDE ENABLE'
(also see: chapter 'Back Panel Connections').
Long press:
• DVD/ CD/SACD
Sound mode selection (stereo / virtual surround /
MCH).
Note:
The position 'WIDE' should only be used in combination with
amplifiers that are capable of reproducing audio frequencies up
to or beyond 400 kHz. If in doubt, please consult the manual of
your amplifier or ask the manufacturer.
In combination with all amplifiers the 'WIDE' position can
be used without limitation.
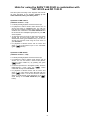
6
Cursor block
(multi function buttons)
If you set the resolution to 576p or 1080I on the back
panel, the button can be used to switch to 720p. If
you set 720p on the back panel, pressing the button has
no effect on the resolution.
The screen briefly displays the message ' 720-P ' (720p) or
' CUSTOM ' (resolution as switch position on the back panel).
These multi-function buttons are used for navigation
within On-Screen-Menus and for play back control (track
jump, cueing etc.)
MenuNavigation
Adjustment of the display brightness
By repeatedly pressing the -button the brightness
of the alpha-numercal display can be adjusted in 3 steps:
1. Normal setting:
good legibility, even in bright conditions and sunlight.
2. Subdued:
Subdued setting, for dark locations.
3. Display off:
the screen is switched off completely. The screen
lights up for a few seconds whenever a command is
sent to the unit, so that you can see the new setting.
Brief press:
Selection of the REPEAT-mode.
(see chapter 'Operation of the SADV 1250 R HD').
selection
buttons
adjustment
buttons
Play Back Control
These buttons are used to
jump to the next / previous
track, chapter or title.
For MP3 music discs these
buttons select a title within
the current directory.
Fast Forward / Reverse
The fast mode is ended by
pressing the button.
For MP3 music discs these
buttons select the active
directory on the disc.
A short keypress will start
the playback or will resume
playback after a pause.
confirm button A long keypress will switch
to CURSOR-Mode (NAVIGATION
Mode)
(see
chapter 'Manual Cursorcontrol').
Long press:
Selection of the display mode.
• DVD
Title / Chapter
• CD/SACD Single elapsed / Single remain /
Total elapsed / Total remain
A short keypress opens the disc menu of a video DVD.
(see chapter 'Menu-Functions').
A long keypress (approx. 3 sec.) opens the Setup Menu
of the SADV 1250 R HD.
7
Screen window
A short press on this button switches the unit to Pause /
static picture. Press the -button to resume
playback.
All the screen elements of the SADV 1250 R HD are
displayed in a clearly laid-out window on the integral
screen:
During DVD playback repeated short presses of the
button move on to the next single frame of the
film.
Repeated long presses (around 2 seconds) during DVD
playback switch to different slow motion speeds. Press
the -button to stop slow motion.
1/2/3
This display area shows the currently active
oversampling algorithm (1...3). If none of the
numbers are lit, the standard algorithm (FIR
Filter) is active.
CD
is lit if a standard audio CD or the CD layer
of a hybrid disc is played
The button ends playback.
SACD
is lit when a SACD is played
MCH
is lit if a multichannel track is played
This indicator is lit, if the analog output of
the SADV 1250 R HD is switched to high
bandwidth (WIDE-mode).
P
indicates that the P-scan mode (progressive
scan) is active for the YUV component video
output
this indicator is leit, if the video output is
switched OFF (pure high quality AUDIOMode).
123,45
Alpha-numerical display area for indication
of track, time or operation mode.
A short press on this button starts playback, or resumes
playback after a Pause.
This area is also used for context depending
messages for example during player menus.
Note:
In case the message 'OVERHEAt' is displayed on the
display, the SADV 1250 R HD has become too hot.
Please make sure that the device is sufficiently supplied
with cooling air and that the air can freely flow around the
case of the device. Read and follow all instructions given
in chapter Setting up the SADV 1250 R HD. Please do
not place the SADV 1250 R HD directly on top of other
hot devices like amplifiers etc.
8
Hints for using the SADV 1250 R HD in combination with
SR 1535 R and DD 1535 R
Wire the system according to the diagrams and execute
all steps described in the chapters 'Setting up the
SADV 1250 R HD, Wiring and Safety Notes'.
Operation of DD 1535 R
(software version > 1.10)
• For DVD (S/VCD) playback choose the DVD input.
• For playback of CDs in Stereo mode choose “CD” as
source and switch to PREAMP-mode. You will now
hear the CD in highest possible sound quality over the
excellent D/A converters of the SADV 1250 R HD and
the short direct and audiophile signal paths of your
stereo amplifier.
• To play back CDs in ProLogic or NEO:6 surround mode
choose CD as source and switch your system to
SURROUND mode (green SRND button). You can now
choose the surround mode using the main menu of
your DD 1535 R.
• For playback of SACDs choose 'CD' as source and
switch to the multi-channel input of the DD1535R
(green -button).
Operation of SR 1535 R
(software version > 1.20)
• For DVD (S/VCD) playback choose the DVD input.
• For playback of CDs in Stereo mode choose 'CD' as
source. You can now select a sound mode (Stereo,
Surround, Sound Fields etc.) by pressing the green
button.
• For stereo reproduction in the highest quality, switch to
HIGH-QUALITY mode using the button
underneath the flap of the SR 1535 R.
• For playback of SACDs choose 'CD' as source and
switch to the multi channel input (MCH-IN) with the
green button. You will now hear the SACD in
Stereo or multi-channel mode depending on the audio
mode setting of the SADV 1250 R HD (see
button).
9
Remote control of the SADV 1250 R HD
The SADV 1250 R HD receives
remote control
commands from the RLINK –Master device (amplifier or
surroundreceiver). It is switched ON with the
button.
General
The SADV 1250 R HD can be remote operated with the
remote controls F6 and F12 or with the system
control F1.
Note:
On the following diagrams all buttons used for the control
of the SADV 1250 R HD are marked '
'. All other
buttons are without function for the SADV 1250 R HD.
If there is no master unit present, the SADV 1250 R HD
can be directly remote operated with the remote control
set (FBS12, FBS6) which is available as an optional
accessory.
10
F1
F12
F6
Switches DVD player on, selects DVD as program source
- Switches SADV 1250 R HD ON, if RLINK 2
on back panel)
Switches DVD player to stand-by
Switch to HiFi control
In STOP mode: Starts playback (PLAY)
During playback: Selects next title
MP3-CD:
Select the next track within an album directory
MP3-CD:
Selects previous title
Select the previous track within an album directory
MP3-CD:
Fast rewind / forward
Select the album
brief press:
MP3-CD:
Ends following modes:
PAUSE / SEARCH / SCAN
Switches to cursor control
(see 'Manual cursor control')
Start playback
brief press:
long press:
Open Disc menu (see 'Menu function')
open player on-screen menu
brief press:
long press:
Interrupt playback
Next individual DVD frame
1
1
1
Slow motion: /2 , /4 , /8 speed
End playback
Open drawer
long press:
brief press:
long press:
Number buttons: direct track / chapter select
..
..
..
brief press:
long press:
brief press:
ADDR = AUX ist selected (switch
start playback, re-start playback after pause
nd
long press:
changes between different sound tracks (languages or
DOLB/dts/stereo sound) if there are multiple sound tracks on
the disc (same function as button on the front panel)
during playback:
MCH / Stereo
stopped disc:
SACD / CD-DA Layer selection
Camera view angle
brief press:
select sub title language or sub title off
long press:
select sound mode (stereo / virtual surround / multichannel)
select REPEAT mode (see 'Operating the SADV 1250 R HD')
DVD
chapter / title / disc / off
VCD/CD / MP3 / SACD / JPEG
track / disc / off
select display mode (see button '
, Front panel
controls')
DVD
title / chapter
CD/SACD single elapsed / single remain / total elapsed / total
remain
Menu control
In Select menus the following buttons are used for navigation within the menu:
up
left
right
down
Select / confirm button [ENTER]
11
Operating the SADV 1250 R HD
Switching on
Starting playback
Press the button on the front panel of the unit.
The green indicator LED above the button lights up, as
does the display screen. The unit is now ready for use.
Some discs feature an “autostart” function. These discs will
start automatically. Other DVDs show an On-Screen-Menu
after start-up. Please follow the instructions of the menu.
CD and SACD are started by pressing the -button.
For Stereo playback (CD /SACD) switch ON your HiFi
system and select the audio input the SADV 1250 R HD
is connected to.
Stopping playback
For playback of SACD multichannel discs select the
analogue 5.1 or 7.1 multichannel input of your surround
amplifier or surround receiver.
You can stop playback at any time by pressing the
button.
For playback of DVDs select the appropriate digital input
of your surround decoder or surround receiver. Switch on
your TV set and choose the video input to which the
SADV 1250 R HD is connected to.
Resuming playback
You can resume playback of a stopped CD / DVD / VCD
by pressing the - button on the front panel, or the
or button on the remote control handset.
Loading a Disc
1. Press the button on the front panel to open
the drawer.
2. Place the disc in the centre of the circular recess in
the drawer, with the side to be played facing down.
RESUME
After loading a previously played DVD/VCD the playback
can be continued at the position where the playback was
interrupted before. Please press the /
button while the 'RESUME' icon is displayed on the
screen.
Note:
Some discs suppress the resume function in which case,
these discs can only be started from their disc menu.
The RESUME function is available not only for the DVD
played last, but also for the last four DVDs that were played.
Selecting a Chapter or Title
1.) Selecting using a skip button
3. Press the button on the front panel to close
the drawer.
You can initially select CD tracks, DVD titles or chapters
by pressing the skip forward button or the skip back
button repeatedly until you reach the desired point.
Note:
Note regarding DVD:
After closing the disc tray, the SADV 1250 R HD
automatically selects the playback mode suited best for
the format of the disc /Stereo for CD, MCH for DVD and
SACD).
Please make sure that for SACD playback the 5.1/7.1
multichannel input and for DVD playback either the digital
input or the 5.1/7.1 multichannel input of your surround
amplifier/receiver is selected.
For CD playback either the stereo- or the 5.1/7.1 MCH
Input of your amplifier can be used.
If the last chapter of a title is reached, the machine
skips automatically to the previous or following track.
2.) Selecting using the DVD disc menu
Most DVDs feature a Select menu for titles and scenes in
a film. Once you insert a DVD this menu usually appears
automatically. During playback the disc menu can be
opened at any time by pressing the button on the
front panel or the blue button of the remote
control briefly (F1: bue rocker).
Select the desired scene in the disc menu and confirm
your selection by pressing the button. Playback
will jump now to the selected scene.
Starting playback
Some discs feature an “autostart” function. These discs
will start automatically. Other DVDs show an On-ScreenMenu after start-up. Please follow the instructions of the
menu.
3.) Selecting chapter and track - direct numeric input
It is also possible to select a DVD chapter or CD track by
entering the number of the section using the numeric buttons
(
. . . ) on the remote control handset.
CD and SACD are started by pressing the button.
Note:
If the number has more than one digit, press the digits
quickly in sequence.
12
SEARCH
Play back of MP3 / JPEG / Kodak
Picture CD
The standard search takes place at quadruple speed,
and is started by pressing the front panel buttons
/ or the remote control buttons / .
Press the search button again to increase the search
speedto 32 times normal speed. The search can be
stopped at any time by pressing the button.
The SADV 1250 R HD can play back MP3, JPEG, VCD
and SVCD files from recorded available CD-R/RW discs
or from comercially available CDs.
The sound is muted during the search process.
A MP3-CD may contain up to 32 album files (directories)
with music titles.
SEARCH via the On-Screen-Menu
The search function can also be controlled by the OSD
(see 'Menu Toolbar/Search').
To select an album file use / buttons on
the front panel or the / buttons of the remote
control.
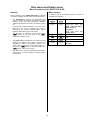
REPEAT
To select one title/track within a directory /
buttons on the front panel or the / buttons of the remote control.
The device offers several REPEAT-modes for repeating
chapters, titles or entire discs:
•
•
The desired album / title number can alternatively enteres
directly using the numerical buttons of the remote control:
DVD
Chapter / Title / Disc / Off
VCD/CD / MP3 / SACD / JPEG
Track / Disc / Off
REPEAT mode
Screen display (short
message)
Chapter
RPT CHAPT
Title
Track
RPT TITL
RPT TRACK
Disc
RPT DISC
Off
RPT OFF
•
In STOP-mode the number buttons are used for the
album selection.
•
During PLAY the number buttons select a track
within the current album.
Play back of a MP3 title can be paused by pressing the
button and be resumed by pressing the /
button.
Note:
To switch on and select a REPEAT mode press the
button on the front panel repeatedly until the
desired mode is displayed.
Due to the big number of tracks on a MP3 discs it may
last a couple of seconds until the disc structure is read
and entirely resolved by the player.
REPEAT
Only the first session of Multi-Session-Discs is supported
by the SADV 1250 R HD.
using the F1/F6 remote control handset
• The REPEAT-modes can be selected with the
button.
The following formats are suppoerted:
•
•
•
•
•
•
•
CDs according to ISO 9660
max. 30 characters
max. 8 directory levels
max. number of albums: 32
VBR-bit rate supported
sampling frequencies for MP3-CD: 32 kHz, 44.1 kHz,
48 kHz
supported bit rates for MP3-CD: 32, 64, 96, 128,
192, 256, 320 (kbps)
following formats are not supported:
•
•
•
•
•
13
*.WMA, *.AAC, *.DLF, *.M3U, *.PLS
file names containing chinese symbols
disks containing sessions not closed (Non Session
Closed)
discs recorded in UDF-format
files containing ID3V2 tags
Listening to SACD
Play back of the CD layer of hybid SACD
discs
It exist three types of SACD discs: single layer, double
layer and hybrid discs. The hybrid discs contain a
standard CD and a SACD layer.
The SADV 1250 R HD can play back both of the SACD
and the CD layer of these discs. Switching between CD
and SACD layer is accomplished by pressing the
button while the disc is stopped. After switching to the CD
layer, the “CD” indicator in the display will be lit.
The SACD layer should always contain the music in a
pure stereo format. Additionally it may contain the music
in multi channel format. Some rare discs however contain
only multi channel signals on the SACD layer. The
SADV 1250 R HD can play back all of these discs.
Please follow the instructions below.
Note:
During play back it is not possible to switch between CD
and SACD layers. First stop a playing disc before
switching layers.
Play back of Super Audio CD (SACD)
Stereo SACD
• The player will automatically select the stereo SACD
layer as the default. After reading the disc, the SACD
indicator will light up.
• Now the disc may be started by pressing the
button.
SACDs containing a stereo and multi-channel area
• After loading and reading such a disc, the player will
automatically select the multi-channel part as the
default. This is indicated by the SACD and MCH
indicator.
• Start the disc by pressing the button.
Compatibility with recordable media
The SADV 1250 R HD can play back recordable and
rewritable discs (for details refer to the technical data
section of this manual).
Due to the vast number of different disc types, disc
manufacturers, disc recorders and software programs a
guarantee for compatibility with every software /
hardware / disc combination can not be given.
If compatibility problems occur we recommend to use a
different type of disc, a different recording device and/or
a different software.
• Note:
If you want to play back the stereo part of the disc,
press the button (repeatedly) until you get the
indication 'SACD'. If you now start the play back by
pressing the button, you will hear the stereo
part of the disc through the multichannel analogue
output of the SADV 1250 R HD.
14
Disc menu and Setup menu
Menu Functions of the SADV 1250 R HD
General
Menu control
During operation of the SADV 1250 R HD two different
menus are available: the disc menu and the setup menu.
In selection menus the following buttons are used for
navigation and selection:
•
•
The Disc-Menu is stored on the DVD itself. This
menu is intended for selecting and operating special
features of the disc like sound-track, subtitles,
additional information on the film, film trailers, games
etc.
Contents and navigation/operation of the disc menu
differ from disc to disc. Normally this menu is
operated by the buttons described below. Please
follow the instructions given on the screen.
The disk-menu is opened by a brief press of the
button on the front panel or the
button of the remote control.
The Setup menu is intended for the control of special
functions and settings of the player. This menu is
described in detail in the following chapters. The
setup menu is opened by a long press (approx. 3
sec.) on the button on the front panel or the
Sbutton of the remote control.
The Setup menu will be automatically closed after a
short while, if no further navigation or button presses
are executed.
15
Remote
Control
Front
Panel
downwards
left
right
Confirmation button
[ENTER]
brief press:
Open Disc menu (see
'DVD / VCD Disc Menu /
Menu function')
long press:
Enter setup menu (see
'Setup menu')
DVD / VCD Disc Menu
(menu operation and navigation)
Menu function
Manual CURSOR control
A DVD may contain a Disc Menu with selection facilities
for individual titles and / or chapters. Depending on the
DVD, the disc may also contain games, bonus material or
alternatives for camera angle, synchronous languages or
sub-titles, which can be set or called up via the Disc
Menu.
The CURSOR buttons on the remote control handset
are used with the SADV 1250 R HD both to control the
functions of the mechanism (skip back, skip forward,
search) and also to navigate within menus. The
SADV 1250 R HD detects automatically whether you are
operating the disc mechanism or finding your way
through a menu.
Note:
The contents, appearance and behaviour of the Disc
Menu are dictated and controlled by the disc itself. If you
encounter problems in connection with the Disc Menu,
please contact the manufacturer or retailer of the disc.
A few DVDs, mostly older and quite rare examples, give
the machine no clues whether a menu is currently open,
i. e. they do not pass relevant information to the player.
With these discs the screen display 'INFO' does not
appear when a menu is open, and it is not possible to
navigate within the menu. In such cases the
SADV 1250 R HD can be switched to 'Cursor
Navigation' mode.
Calling up and operating the DISC Menu
The Disc Menu can be called up at any time during
playback, in order to make adjustments.
• To enter the disc menu, briefly press the button
on the front panel or the button of the remote
control.
If the DVD contains a Select menu, this now appears
on the TV screen. The integral screen displays the
message 'INFO'.
Switching to CURSOR control
Hold the button pressed in until the message
'CURSOR' appears on the integral screen. Now even
problematic menus can be operated.
Switching off CURSOR control
• Select a menu item by navigating with the cursor keys
(
, , , ) or by entering a number (if
numbers are given in the menu).
To revert to normal operation hold the button
pressed in again until the 'CURSOR' message on the
screen disappears.
• To select or execute a menu item, press button
[ENTER].
Note:
In Cursor mode the buttons of the control button block
carry out menu control functions exclusively.
• To close the disc menu press the button on the
front panel or the button of the remote control.
For normal control of the disc mechanism you must
therefore first leave Cursor mode.
Opening and closing the menu
using the F1 remote control handset
Press the blue - rocker to call up the Disc Menu.
Press the blue - rocker again to leave the menu.
16
Setup menu
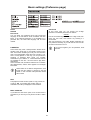
Menu- overview
17
General Setup Menu
Disc lock
OSD language
Not all discs are categorised or coded by the
manufacturer regarding their suitability for young
persons. You can prevent playback of specific DVDs by
blocking them, or alternatively release the DVD for
viewing, disregarding its category.
If you block a disc, you will be asked to enter your
password (PIN) before playback. Without the password
the machine will not play the disc.
In this menu point you can set the language to be used
for the disc player’s Setup Menu.
Screen saver
The screen saver helps to prevent damage to your
television screen. If the screen saver is switched on, the
TV screen will be switched off after a while if playback
has been stopped or paused.
To set a password see the Chapter ‘Preferred
settings / Password’.
Sleep
The Sleep function automatically switches the
SADV 1250 R HD off after a preset time. In the ‘OFF’
setting the Sleep function is disabled.
Program
You can play the contents of the disc in your own desired
sequence by programming the order of the tracks to be
played.
In this menu point you can create your own playback
program for the disc in the drawer.
You can program the desired tracks in the desired
sequence under the point ‘INPUT’; up to twenty tracks
can be stored.
Audio Setup menu
Night mode
When night mode is switched on, sound is reproduced
with a reduced dynamic range.
The result is that loud passages are reproduced more
quietly. The ‘night mode’ is particularly useful when you
wish to avoid disturbing neighbours or other people in
your house with loud sound special effects in films.
18
Digital Audio Setup
Digital output
LPCM output
The digital output of the SADV 1250 R HD can be used
for connecting external surround decoders or digital
recording equipment. Set the data format of the digital
output to suit the requirements of the devices to be
connected to the unit.
At this point you can activate the 96 kHz setting for the
digital output.
If you activate the 96 kHz output, audio signals from
DVDs featuring a 96 kHz sound track are reproduced in
their native 96 kHz format. Please note that the decoder
or recorder connected to the SADV 1250 R HD must also
be designed for 96 kHz operation, and must also be set
to that value (see the operating instructions supplied with
the decoder / recorder).
PCM only
Select this setting if the connected device is not capable
of decoding multi-channel audio. It should be used, for
example, with digital stereo audio recorders (DAT, CD
recorder, MD recorder).
All
Select this setting of you have connected an external
surround decoder to the ‘Digital Audio Out’ output.
Sound mode
The SADV 1250 R HD features a room sound processor
which can create an artificial room sound atmosphere
when playing DVDs (film mode) and CDs (music mode).
For film and music reproduction various sound programs
are available which you can select at this menu point.
19
Caution:
If your decoder does not support the 96 kHz
data rate, it is essential to set the 48 kHz
setting in this menu point, as your decoder is
not capable of reproducing the audio data
correctly. If you use the system with the
wrong
settings,
under
unfavourable
circumstances your loudspeakers could be
damaged.
Video Setup
TV type
TV display
This menu contains the options for selecting the TV
norm, which must be set to match your monitor or
television screen.
In this menu you set the picture output of the
SADV 1250 R HD to match the geometry of your TV set.
Note:
PAL
The format which you select must be available on the
disc. If this is not the case, the selected picture format
settings will have no effect on the picture during
playback.
Select this setting if the picture output is to be reproduced
on a PAL TV set. At this setting, DVDs in NTSC format
will be converted to the PAL format by the
SADV 1250 R HD.
4:3 Pan Scan
NTSC
This produces a picture of full screen height; if a widescreen film is played, the centre of the picture fills the
screen of a 4:3 TV set. Less important areas of the
picture are cropped.
Select this setting if the picture output is to be reproduced
on an NTSC television. At this setting, DVDs in PAL
format will be converted to the NTSC format by the
SADV 1250 R HD.
Pan Scan is only supported by a few DVDs.
4:3 Letterbox
This option produces a ”wide-screen” reproduction with
black bars at the top and bottom of the picture. In this
setting the entire picture content of the DVD is
reproduced.
We recommend this setting for use with 4:3 televisions.
16:9 (wide-screen)
For reproduction on a wide-screen television (16 : 9
format).
20
Basic settings (Preference page)
Audio
Subtitle
Disc menu
You can
language
Menu. If
particular
instead.
Password
At this menu point you can change the six-digit
password. The default password is as follows:
000 000
Use the numerical keypad to enter the 6-digit code, then
enter your new code, and confirm it by entering it a
second time.
The new password is now valid. Please remember the
new password carefully, as you will need to enter it for all
access functions from now on.
select your preferred menu and synchronous
in the sub-menus Audio, Sub-titles and Disc
the selected language is not available on a
disc, the basic disc language will be used
PARENTAL
Some DVDs may have a child-protection feature which
applies to the whole disc or just specific scenes on the
disc. This function enables you to set your own restriction
level. The categorisation takes the form of levels 1 to 8,
and is country-specific. In this way you can prevent the
playback of particular discs which you consider
unsuitable for your children, or - where alternative scenes
are available on the disc - force the DVD to play these
alternatives.
Home-recorded VCD, SVCD and CD discs do not feature
this categorisation, and the same applies to most illegal
DVD discs.
Some DVDs do not feature categorisation, even
though the film category is printed on the disc
sleeve. In this case the child protection feature
will not work.
PBC
The playback control function (VCD 2.0 only) can be set
to ‘On’ or ‘Off’. If you select ‘On’, the disc menu (if
available on the disc) is displayed on the television.
MP3 / JPEG Nav
If you select the ‘with menu’ option, an on-screen menu is
provided for you to find your way around an MP3 / JPEG
disc.
21
If you have forgotten your old password, enter
‘000 000’.
22
Installation
Using the unit for the first time
Safety notes
This chapter describes all the matters of fundamental importance for setting up and operating your DVD player. This
information is not relevant to your daily handling of the system, but should still be read and noted carefully before using
the machine for the first time.
23
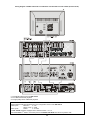
Back panel connections
/ MULTI CHANNEL ANALOG OUT
DIGITAL OUT SURROUND
The analogue output of this player deliveres analogue
multi channel (
) and stereo- (
) output signals. The
multi channel output can be connected to surround
decoders/receivers with a 5.1 or 7,1 multi channel input.
The stereo output can be connected to any stereo preamp, integreted amp or receiver.
Optical digital output for connecting a digital surround
decoder.
Co-axial digital output for connecting a digital surround
decoder. Please be sure to use high-quality 75 Ω cable
with Cinch connectors.
Note:
In a system the MCH output is connected to the 5.1
or 7.1 MCH input of the surround decoder / surround
receiver. (see wiring diagrams 1 and 2).
RC-IN
Input socket for external IR (infra-red) remote control
receiver E2000 (* optional accessory) or external remote
device such as a programmable key pad.
WIDE
Switch for the analogue high frequency output filter of the
SADV 1250 R HD. With this switch the bandwidth
selction (switch 'WIDE' on the front panel) can be
disabled for security reasons.
Set this switch to the position 'disabled' if your amplifier
or loudspeaker system is not capable of processing audio
signals above 120 kHz.
RLINK
Control input / output sockets for the RLINK system:
Both sockets are wired identically - either of the two
sockets can serve as input, while the other can then be
used as output to the next RLINK device.
Note:
For all amplifiers the position 'WIDE ENABLE' can
be safely used.
RLINK 2nd ADDR.
Attention!
Toggle switch for the selection of the remote control
address of this device within a -RLINK system.
If you are not sure if your system is suited for wide
bandwidth operation, please consult the manual of the
amplifier and speaker system.
If in doubt, please use the position 'WIDE DISABLE'.
Note:
If no CD player is operated within the 'R' system,
the 'RLINK 2nd ADDR.' switch of the SADV 1250 R HD
should be configured to the additonal CD address
(position switch position = 'CD')
In this case the stereo output should be connected to
the CD input of the pre- or integrated amplifier. The
button will then select the SADV 1250 R HD for
normal stereo CD play back, the DVD button will select
the SADV 1250 R HD for DVD play back. The unit will
respond to remote control signals for both of the CD and
DVD inputs.
If a stereo CD player is present in the system, please set
the switch to position '-'. The SADV 1250 R HD now will
only respond to remote control signals if the input DVD is
selected as source.
24
RS 232 connector
Control input for controlling the
through a serial RS232 interface.
AV OUT (SCART)
SADV 1250 R HD
Socket for for TV sets, video recorders or other
equipment with SCART audio/ video inputs.
Note:
This socket delivers additional to standard composite
(CVBS) video signals the high quality RGB component
video signals. To achieve the best possible video
performance, please select the RGB mode at your
TV/monitor if this device is capable of processing these
signals.
RS 232 protocol and command sets are available for
download under www.taelektroakustik.de.
Mains input
The mains power lead is connected to this socket. For
details of a correct mains connection please read the
notes in the chapter 'Installation, Using the unit for the
first time, Safety notes'.
ANALOG OUT
Stereo audio output for TV sets, video recorders or
surround decoders.
HDMi OUT
For Plasma / LCD panel or beamer (projector).
YUV video output
This video output deliveres high quality YUV (P Pb Pr)
output signals. Use this output to connect a video
projector/monitor with YUV input.
Important Note:
!
The YUV output can be set to „progressive scan“
operation with the P-Scan switch on the front
panel. In progressive mode full frames instead of
half frames are output by the YUV output. This
gives a far better picture quality. The
monitor/projector used must be compatible with
progressive video ! (please refer to the manual of
the video monitor/projector)
VIDEO OUT
Video output for TV sets, video recorders or other
equipment with standard composite (CVBS) video inputs.
S-VIDEO OUT
Output socket for TV sets, video recorders or other
equipment with S-Video (S-VHS) video inputs.
25
Setting Up the SADV 1250 R HD
Carefully unpack the SADV 1250 R HD and store the
original packing materials carefully. The carton and
packing are specially designed for this unit and will be
needed again if you wish to move the equipment at any
time. Please be sure to read the safety notes in these
instructions.
When installing the unit on a shelf or in a cupboard it is
essential to provide an adequate flow of cooling air, to
ensure that the heat produced by the unit is dissipated
effectively. For this reason there must be at least 10 cm
free space to both sides and behind the units. There
should also be 10 cm above the case to the next cupboard or shelf.
If the unit gets very cold (e. g. when being transported),
condensation may form inside it. Please do not switch it
on until it has had plenty of time to warm up to room
temperature, so that any condensation evaporates
completely.
Before placing the unit on a sensitive surface, please
check the compatibility of the lacquer and the unit’s feet
at a non-visible point. Fit a layer of protective material if
necessary.
The unit should be set up on a rigid, level base. If you are
placing the unit on resonance absorbers or de-coupling
components, make sure that they do not com-promise its
stability.
The unit should be set up in a dry, well-ventilated site, out
of direct sunlight and away from radiators and other
heaters. It must not be located close to heat-producing
objects or devices, or anything that is heat-sensitive or
highly inflammable.
The SADV player must never be set up between heatgenerating devices such as integrated amplifiers (PA),
power amplifiers or surround decoders (DD).
Any heat build-up will shorten the life
of the DVD player, and could be a
source of danger!
Mechanical de-coupling
The area on which you set up your high-quality Hi-Fi
equipment, and the actual surface on which it stands,
have an influence on the achievable sound quality which
should not be under-estimated. The surface should be as
heavy, stable, hard and flat as possible. The unit is
supplied with the newly developed conical absorber
feet. These feet feature internal damping characteristics
which de-couple the player extremely effectively from the
base surface.
Note:
The absorber cones can be screwed in or out to
compensate exactly for any unevenness of the base surface.
The SADV should never be placed on top of an amplifier
or any other device that can become hot during
operation.
Either place the device at the side of other equipment or
on top of cool devices like tuners, pre-amps etc.
'R' series devices dissipate some of their heat via the
case cover. For this reason units of any other make
which are placed on top of a 'R' series device must
stand on feet at least 2 cm high.
The unit must be adjusted carefully so that it is exactly
horizontal in all directions. All the feet must make firm
contact with the base surface; the unit must not 'wobble'!
26
Wiring
Notes on wiring
•
You will find wiring diagrams on the following pages.
•
Make all connections as shown in the wiring
diagrams.
•
Push all connectors firmly into their sockets. Loose
connections can cause humming and other unwanted
noises.
•
Please also make all necessary adjustments like input
assignments etc. on your surround amplifier or
surround receiver.
•
Deploy the mains and loudspeaker cables and the
RLINK lead as far as possible from signal interconnects and aerial leads.
•
Connect the machine to a properly earthed mains
socket using the mains lead supplied.
•
To obtain maximum interference rejection the mains
plug should be fitted in the mains socket with phase
connected to the mains input socket contact which is
marked with a dot (). The phase of the mains socket
can be found using a suitable instrument; ask your
specialist dealer for details.
Loudspeaker and signal cables
The cables employed in any Hi-Fi system have a crucial
influence on the sound of the system as a whole.
therefore recommends the use of high-quality cables and
connectors.
For this reason has developed its own range of
cables which includes the ideal type for every application.
These cables are designed to match the special
characteristics of our loudspeakers and har-monise
perfectly with them.
For difficult and cramped set-up conditions you can also
use special-length cables and right-angle connectors
from the range of accessories. With these items you
can solve virtually any problem concerning con-nections
and set-up.
Mains leads and mains filters
The mains power supply carries the essential energy to
operate your equipment, but also often carries interference from distant equipment, radios and computer
systems.
We recommend the use of the ready-made
'POWER LINE' mains lead in conjunction with the
'POWER BAR' mains distribution panel; this unit features
a phase indicator as standard.
To shield your equipment from electro-magnetic interference, our accessory range includes the specially
shielded 'POWER FOUR' mains lead, the ready-made
'POWER LINE' mains lead with integral wrap-around
filters, and the 'POWER BAR' filtered mains distribution
panel. Using these accessories can in many cases
improve the reproduction quality of our equipment.
Once the system is completely wired, set the volume
control to a very low value and switch the player on.
The integral screen of the SADV 1250 R HD should now
light up, and the player should respond to control
commands.
For any questions concerning cables and wiring please
contact your local specialist dealer, who is trained to
provide comprehensive and unbiased assistance. We will
also be delighted to send you a full information pack on
this subject.
Place an audio CD in the disc drawer, and press the
button to start playback.
Switch the amplifier to the source device 'CD', switch on
the loudspeaker output, and you should hear the CD.
If you encounter problems when using the player for the
first time, please note that they often have simple causes
that are equally simple to correct. Read the chapter
entitled 'Trouble-shooting' in these instructions.
27
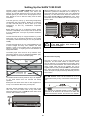
Wiring diagram 1: SADV 1250 R HD and SR 1535 R with S-Video and Component YUV Video
*1 used for Dolby/dts playback through SR 1535 R
*2 for multi channel SACD playback
*3 for high-quality Stereo CD/SACD playback
*4 S-Video+2channel audio is needed for VCR recordings and Zone 2
*5 additional YUV-ComponentVideo-cable for Video monitors/projectors with component video input
Note:
Please make the following assignments in the configuration menus of the SR 1535 R :
Audio Inputs:
MCH-IN
CD
DIG-3 (coax) DVD
YUV-Inputs:
YUV1
DVD
Video-Inputs:
DVDin
S-Video
nd
The switch RLINK 2 ADDR. on the back panel of the SADV 1250 R HD must be set to position 'CD'.
28
Wiring diagram 2: SADV 1250 R HD in combination with DD 1535 R und PA 1530 R (S-Video-mode)
*1 for Dolby/dts playback through DD 1535 R
*2 for multichannel SACD playback
*3 for high quality Stereo CD/SACD playback
Note:
Please make the following assignments in the configuration menus of the DD 1535 R:
Audio Inputs:
MCH-IN
CD
DIG-3 (coax) DVD
Video-Inputs:
DVDin
S-Video
The DD 1535 R should be equipped with a software version > V1.10
nd
The switch RLINK 2 ADDR. on the back panel of the SADV 1250 R HD must be set to position 'CD'.
29
In this configuration the SADV 1250 R HD is switched
ON with the source button . The switch RLINK
nd
2 ADDR. must be set to position 'CD'.
If the SADV 1250 R HD is to be operated in a non-
system, the E 2000 remote control receiver must be connected to the RC-IN socket if you wish to remote-control
the player.
Wiring diagram 3: SADV 1250 R HD connected to a stereo amplifier
* optional accessories
When playing back multichannel SACDs or DVDs switch to STEREO operation (
-button on the front panel).
30
Wiring diagram 4: SADV 1250 R HD connected to a surround amplifier
* optional accessories
Note:
Carry out the adjustments for setting speaker size, volume level and speaker distances in the menus of the
SADV 1250 R HD.
31
Safety notes
All components used in this device meet the current
German and European safety norms and standards. For
your own safety please be sure to read right through
these operating instructions. It is especially important to
observe the safety notes and the instructions regarding
setting up and operating the equipment.
This device should never be used without proper
supervision. The machine should be set up well out of the
reach of small children. This applies to all electrical
equipment.
We are able to guarantee that our products are of the
highest quality, and meet all our specifications in full,
because we carry out strict quality checking of all
materials, employ painstaking production methods
controlled by highly qualified staff, and carry out a fully
automatic, computer-controlled final quality control
procedure.
CAUTION ! LETHAL DANGER !
The unit should only ever be opened by a
qualified specialist technician.
Repairs and fuse replacements should be entrusted to an
authorised specialist workshop.
With the exception of the connections and procedures
described in these instructions, no work of any kind may
be carried out on the machine by unqualified persons.
Please read right through these operating instructions
carefully before you attempt to use your new equipment.
Note in particular the information regarding setting up
and operating the unit, and the safety notes.
If the unit is damaged, or if you suspect that it is not
functioning correctly, immediately disconnect the mains
plug at the wall socket, and ask an authorised
specialist workshop to check it.
The machine must be set up in such a way that there is
no chance of anyone - especially children - touching the
back panel connections. Be sure to observe the notes
and instructions in the chapter entitled 'Installation,
Using the unit for the first time, Safety notes'.
The unit may be damaged by excess voltage in the
power supply, the cable network or aerial systems, as
may occur due to static discharge or during thunderstorms (lightning strikes).
The power supply required for this machine is printed on
the mains supply socket. The unit must never be
connected to a power supply which does not meet this
specification. If the machine is not to be used for a long
period, disconnect it from the mains supply at the wall
socket.
Special power supply units and excess voltage protectors
such as the 'Power Bar' mains dis-tribution panel
offer some degree of protection from damage to
equipment due to the hazards described above.
However, if you require absolute security from damage
due to excess voltage, the only solution is to disconnect
the unit from the mains power supply and any aerial
systems.
Mains leads must be deployed in such a way that there is
no danger of damage from furniture, or people treading
on them etc. Take particular care with mains plugs, distribution panels and the connections on the back panel of
the player.
If you believe there is a danger of excess voltage (e. g.
when an electrical storm is building up) disconnect the
machine from the mains and the aerial socket.
Liquid or foreign bodies must never be allowed inside the
case through the ventilation slots. Mains voltage is
present inside the unit, and there is a risk of lethal electric shock.
All mains power supply and aerial systems to which the
unit is connected must meet the currently valid
regulations, and must be installed by an approved electrical installer.
Protect the unit from drips and splashes of water; never
place flower vases or other vessels containing fluids on
top of the case.
Do not exert undue force on the mains connectors.
Note:
Caution!
Many insurance companies offer lightning damage cover
for electrical equipment as part of their general
household insurance.
The mains button is not a mains isolation switch.
Even when the green LED is not glowing, parts of the
machine remain connected to the mains power
supply. If the machine is not to be used for a long
period, we recommend that you isolate it from the
mains by pulling out the plug at the wall socket.
32
Approved usage
Device approval and conformity with EC
directives
This device is designed exclusively for reproducing
sound and/or pictures in the domestic environment. It
must be operated in a dry indoor room which meets all
the recommendations stated in these instructions.
Where the equipment is to be used for other purposes,
especially in the medical field or for any purpose where
safety is an issue, it is essential to establish the unit’s
suitability for this application with the manufacturer, and
to obtain prior written approval for such usage.
equipment which includes a radio or television
receiving section must be operated within the regulations
laid down by the Post Office and the Tele-communications authorities in the country in which it is used.
This unit may only be employed to receive or reproduce
those transmissions which are intended for public
consumption. The reception or reproduction of other
transmissions (e. g. police radio or mobile radio broadcasts) is prohibited.
In its original condition the unit meets all currently valid
German and European regulations. It is approved for use
as stipulated within the EC.
By attaching the symbol to the machine,
declares its conformity with the EC directives
89/336/EEC, amended by 91/263/EEC and 93/68/EEC,
and 73/23/EEC, amended by 93/68/EEC, and the
national laws based on those directives.
The original, unaltered factory serial number must be
present on the outside of the unit, and must be clearly
legible. The serial number is a constituent part of our
conformity declaration and therefore of the official
approval for operation of the device.
The serial numbers on the device and in the original
documentation supplied with it (in particular the inspection and guarantee certificates), must not be removed or
modified, and must match exactly.
Infringing any of these conditions invalidates conformity and approval, and the unit may not then be
operated within the EC. Improper use of the equipment
renders the user liable to penalty under current EC and
national laws.
Any modifications or repairs to the unit, or any other
intervention by a workshop or other third party not
authorised by , invalidates the approval and
operational permit for the equipment.
Only genuine accessories may be connected to the
DVD player, or such auxiliary equipment which is itself
approved, and fulfils all currently valid legal requirements.
When used in conjunction with auxiliary devices or as
part of a system, this device may only be used for the
purposes stated in the section entitled 'Approved
usage'.
The only permissible method of disposing of
this product is to take it to your local collection
centre for electrical waste.
Fitting new batteries:
To
open
the
battery compartment disconnect
the
latch
by
pressing in, then
lift the cover out.
Remove the old
cells and fit new
dry cells of the LR 03 (MICRO) type in the battery
compartment, taking care to fit them with correct polarity.
Please remember that all the cells must be replaced at
the same time.
FCC Information to the user
Note:
(for use in the United States of America only)
If you have already re-set the remote control system to
Address 2, you will need to repeat the change procedure
after fitting new batteries.
Class B digital device
– instructions:
Note: This equipment has been
tested and found to comply with the limits for a Class B
digital device, pursuant to Part 15 of the FCC Rules.
These limits are designed to provide reasonable
protection against harmful interference in a residential
installation. This equipment generates, uses and can
radiate radio frequency energy and, if not installed and
used in accordance with the instructions, may cause
harmful interference to radio communications. However,
there is no guarantee that interference will not occur in a
particular installation. If this equipment does cause
harmful interference to radio or television reception,
which can be determined by turning the equipment off
and on, the user is encouraged to try to correct the
interference by one or more of the following measures:
Reorient or relocate the receiving antenna.
Increase the separation between the equipment and
receiver.
Connect the equipment into an outlet on a circuit
different form that to which the receiver is connected.
Consult the dealer or an experienced radio/TV
technician for help.
Note regarding disposal of exhausted batteries:
Exhausted batteries must not be thrown in the
ordinary domestic waste! In accordance with the
battery decree (BattVO) they should be returned to the
battery supplier or to your local toxic waste collection
point, so that they can be recycled or disposed of safely.
Local councils are obliged to make collection containers
available, or to make other arrangements for collecting
exhausted batteries.
Care of the DVD player:
Always disconnect the unit from the mains supply before
cleaning it.
The surfaces of the case should be wiped clean with a
soft, dry cloth only.
Never use abrasive or solvent-based cleaners!
Before switching the unit on again check carefully that no
short-circuits exist at the terminals, and that you have not
disturbed any connections.
33
Explanation of terms, useful information
DVDs can be recognised by the
logo shown here.
Video CDs (VCD) can be
recognised by the logo shown
here. They also provide digital
picture and sound information,
but their lower storage capacity
means that they do not quite
attain the quality of DVDs.
DVDs have a very high storage
capacity, and offer top-quality
picture and sound reproduction.
Depending on the type of material stored on the DVD or
VCD (cinema film, video clips, film trailers, information,
bonus material etc.) the disc may contain one or several
titles. Each title may be sub-divided into several
Chapters. These chapters allow direct access to
individual film scenes.
This DVD player provides simple, convenient access to
any title or chapter by means of the on-screen control
bar.
For historical reasons titles on a VCD are also known as
tracks, and chapters as an index.
Important notes
The actual behaviour of any particular
DVD is determined by the disc
manufacturer. Different DVDs may vary
considerably in their menu operation and
running characteristics (e. g. resume, skip
back to menu, end of playback at end of
title etc.).
These operating instructions can only
describe the basic „normal behaviour“.
If a DVD does not conform to this, please
follow the DVD manufacturer’s instructions, as displayed on the TV screen.
Some DVDs feature a regional code implanted by the
manufacturer, designed to limit the use of these discs to
particular regions of the world. The SADV 1250 R HD
plays all DVDs intended for the region the unit is intended
for and all DVDs which feature no regional restriction.
If you insert a DVD in the disc drawer, and see a note on
the screen informing you of an incorrect regional code,
please contact your DVD supplier and exchange the DVD
for a version approved for your region.
34
CD
Camera angle
A Compact Disc (CD) is a digital data medium that
requires a little care in handling:
Many DVDs and VCDs contain scenes
which were recorded using different camera
view angles. When such a disc is played
back, the screen displays a symbol which
indicates the number of available angles
(e. g. 7) and the currently selected angle (e. g. 3). The
SADV 1250 R HD can easily be switched to any of the
different camera viewing angles.
•
The surface of a CD may only be
cleaned using a soft, dry cloth. Wipe
in straight lines from the centre
towards the edge.
•
Never use petrol, paint thinners, disc
cleaning fluids or similar agents.
•
CDs must be handled with care to avoid major
damage to the surface. Severely scratched surfaces,
writing on the discs, or sticking labels on the discs
may result in a CD that can no longer be read.
•
3/7
Menu function
A DVD may contain a Disc Menu with selection facilities
for individual titles and / or chapters. Depending on the
DVD, the disc may also contain alternatives for camera
angle, synchronous languages, sub-titles etc. The menu
function of the DVD player enables you to select these
options from the Disc Menu.
CDs should not be heated or bent. Choose a storage
site that fulfils these requirements.
DSP (Digitaler Signal Prosessor)
The SADV 1250 R HD features a freely programmable
signal processor. A DSP can process digital signals in
any way, and that is why they allow better oversampling
rates than standard modules.
SHUFFLE
In Shuffle mode the tracks of a CD or the titles of an FTS
program can be played back in a randomly selected
order.
DVD
DVD video exploits the latest state of
MPEG 2 data compression technology, which makes it possible to store
an entire cinema film on a single
12 cm CD.
CD SINGLES
CD singles are discs of smaller diameter and
correspondingly
shorter
playing
time.
The
SADV 1250 R HD is capable of playing CD singles. To
load a CD single place the disc in the circular depression
in the centre of the drawer.
The variable bit rate compression of the DVD, with a read
speed of up to 9.8 Mbit per second, is capable of
recording even the most complex images in their original
quality. The crystal-clear digital pictures have a horizontal
resolution of 720 pixels (points) over more than 500 lines.
This resolution is twice as high as that of the VHS
system, is better than that of LaserDisc, and is directly
comparable to the resolution of digital master recordings
made in recording studios.
DVDs are produced to meet either the PAL or NTSC
video norm. This multi-norm playback device is suitable
for reproducing both types, and plays them in the best
possible quality on your multi-norm TV set. Speech
barriers are a thing of the past, thanks to sound tracks in
up to eight languages, and sub-titles - if present on the
disc - in up to 32 languages. And whether you watch
DVDs on a wide-screen or conventional television, the
quality will always be the same as when you originally
viewed the film at the cinema.
TOC
Internal index (TABLE OF CONTENT) of a CD.
If the TOC area of a CD is unreadable due to damage,
scratches etc., the entire CD is rendered unusable.
FTS
The FTS title select program gives the user the
opportunity to change the sequence of playback of the
tracks on an audio CD. The selection is made and played
using the „OSD“ menu.
TRACK
Track is another termed used for a title on a CD. The
tracks and their duration are stated on the CD sleeve.
35
Technical description
OVERSAMPLING
OVS 1 (short FIR filter)
The audio data on CDs and DVDs is stored at a sampling
rate of 44.1 or 48 kHz - i. e. for each second of music
44.100 or 48.000 sampled values are available for each
channel. In the SADV 1250 R HD the audio data read
from the DVD or CD is „multiplied“ to a higher sampling
rate (384 kHz) before it is converted back into analogue
music signals. This process delivers a significantly better,
more finely graduated signal to the converter, which can
then be converted with correspondingly higher precision.
The raised sampling rate is a calculating process for
which there are many different mathematical methods. In
almost all digital audio devices which exploit the
advantages of increased digital sampling rate a process
known as a FIR (Finite Impulse Response) filter is
employed for this purpose. At we have been
carrying out research for more than ten years, aimed at
improving the oversampling process, because the
standard FIR method has one drawback to set against its
indisputable advantages: it adds small pre- and postechoes to the music signals. At we have developed
mathematical processes (known as Bezier polynomial
interpolators) which do not share this disadvantage. For
this reason they should sound better and more natural
than the usual standard process. Since the calculating
procedure employed by us is con-siderably more
complex
than
the
standard
method,
the
SADV 1250 R HD features a high-performance digital
signal processor (DSP) which carries out the oversampling process with immense precision (56 bit) using
special algorithms developed by .
Shortening the filter (lower coefficient) reduces the time
range errors, albeit combined with a slight loss of linearity
in the frequency range and damping per-formance.
Frequency response and transient characteristics of
the short FIR filter
OVS 2 (Bezier interpolator plus IIR filter)
In this process an ideal Bezier interpolator is combined
with what is known as an IIR filter. This eliminates the
problematic pre-echo of the FIR method. This process
produces highly „analogue“ system characteristics, with a
sound quality and measured performance similar to those
of good analogue disc players.
The freely programmable DSP which we use is capable
of carrying out the oversampling process using any
method of calculation. For this reason we have implemented two slightly modified Bezier processes
(OVS 2) in the SADV 1250 R HD in addition to the pure
Bezier process (OVS 3), together with two variants of the
standard process (standard OVS FIR filter and OVS 1).
For more information on the different processes please
refer to the next section. You can switch between the
different algorithms using the FILTER button, and decide
for your-self which of the filters you prefer.
Frequency response and transient characteristics of
the Bezier interpolator plus IIR filter
OVS 3 (pure Bezier interpolator)
This process delivers a perfect reconstruction of the
original music signal. It exhibits no pre- or post-echoes of
any kind, and does not add coloration or timing errors to
the original signal. In sonic terms this method offers an
impressive blend of naturalness, good dynamics and
accuracy. This is our preferred process due to its advantages in respect of sound, and is the basic (default)
setting of the SADV 1250 R HD.
Standard OVS FIR filter
The long FIR filter is the standard oversampling process
in digital technology, offering extremely linear frequency
response, very high damping, linear phase characteristics and constant group delays. The disadvantage is
the pre- and post-echoes which are added to the signal.
These „time range errors“ tend to affect the music
signal’s dynamics, precision and naturalness, and reduce
spatial orientation.
Frequency response and transient characteristics of
the Bezier interpolator
Frequency response and transient characteristics of
the long FIR filter
36
Trouble-shooting
Many problems have a simple cause and a correspondingly simple solution. The following section describes a few difficulties you may encounter, and the
measures you need to take to cure them.
If you find it impossible to solve a problem with the help
of these notes, please disconnect the unit from the mains
and ask your authorised specialist dealer for advice.
Problem:
Machine does not switch on (green
LED stays dark).
Cause 4:
The DVD player is not selected as current
listening source on the pre-amplifier,
integrated amplifier or receiver, i. e. the
control commands from the handset are
being passed to another 'R' system
device.
Remedy:
Press the (or - see next
point) on the remote control handset, and
try again.
Cause:5:
The remote control address of the DVD
player (AUX or CD) does not correspond
to the selected audio input sockets on the
pre-amplifier, integrated amplifier or
receiver.
Remedy:
The 'RLINK 2 ADDR.' switch on the back
panel can be used to configure the DVD
player either as AUX or CD. You must
then select the appropriate input sockets
(see 'Back panel connections').
Cause:
Mains lead not connected correctly.
Remedy:
Check connection, push in firmly.
Problem:
Machine does not
buttons are pressed.
Cause:
Static discharge or powerful interference
(e. g. lightning) have affected the
processor’s memory.
Remedy:
Reset machine: disconnect the mains
plug, wait about 10 seconds, then plug in
again. Switch the machine on.
Problem:
Loud hum from the loudspeakers.
Cause:
Cinch plugs making poor contact, or faulty
Cinch lead.
Machine responds correctly when front
panel buttons are pressed, but cannot
be remote-controlled via an 'R' series
pre-amplifier, integrated amplifier or
receiver.
Remedy:
Check all connections and connecting
leads carefully.
Problem:
No sound, or distorted sound.
Cause:
Audio connection to amplifier or TV set not
correct.
Remedy:
Complete the connections as shown in the
wiring diagram; push connectors in firmly.
Select a different listening source to check
the amplifier.
Problem:
No sound signal via the digital output.
Cause 1:
Digital plug not connected correctly to the
digital output socket on the machine.
Remedy:
Complete connections as per wiring
diagram; push connectors in firmly.
Cause 2:
The data format of the selected audio
channel (e. g. Dolby Digital or DTS) is not
recognised by the decoder connected to
the system.
Remedy:
Use a decoder which supports the data
formats.
Problem:
respond
when
Cause 1:
Batteries in remote control
exhausted or fitted incorrectly.
Remedy:
Fit new batteries, or re-fit batteries with
correct polarity.
Cause 2:
RLINK or RC plug not connected correctly
to machine’s RLINK or RC socket.
Remedy:
Complete connections as shown in wiring
diagram; push connector in firmly.
Cause 3:
Remedy:
handset
No visual contact between remote control
transmitter and remote control receiver of
the 'R' series pre-amplifier, integrated
amplifier or receiver.
Ensure direct visual contact between
remote control transmitter and receiver
(glass doors may prevent contact).
The maximum range of the remote control
system is about 8 metres.
Position the remote control receiver so
that it is not subjected to direct sunlight or
excessively bright lighting. Fluorescent
lamps and energy-saving bulbs are
powerful sources of interference.
37
nd
Problem:
Surround decoder / receiver fails to
recognise digital surround programs
(Dolby Digital or dts).
Cause:
The digital output of the SADV 1250 R HD
is wrongly configured (PCM instead of
ALL).
Problem:
After removing the disc the machine
fails to return to the Start screen.
Cause:
The program may be waiting for a further
disc.
Remedy:
Insert the next disc.
Set the digital output to the correct ALL
setting (see 'Digital audio setup').
Problem:
The picture is displayed too small or
incompletely (abbreviated).
Problem:
Nothing displayed on the screen.
Cause 1:
Cause:
Screen switched off.
The DVD in the drawer is not set to the
same picture format (4 : 3 or 16 : 9) as the
TV set connected to the system.
Remedy:
Press button to switch it on again.
Remedy:
Set the correct picture format in the Setup
menu.
Problem:
The disc will not play once the disc
drawer is closed.
Cause 2:
Cause 1:
Disc not inserted correctly.
Many DVDs contain film recordings in
different picture formats on the front and
rear faces.
Remedy:
Position the disc centrally: printed face up.
Remedy:
Cause 2:
Disc soiled.
Turn the DVD over, or set the correct
picture format in the menu 'Video Setup /
TV display'.
Remedy:
Carefully clean the disc by wiping with a
soft cloth from the centre to the edge.
Replace the disc and try again.
Cause 3:
The television is set to the wrong picture
format.
Remedy:
Set the TV to the correct picture format,
i. e. the one corresponding to the DVD.
Remedy:
Cause 3:
Disc damaged in the area of the Table of
Contents (TOC). Disc unusable.
Remedy:
No remedy possible.
Problem:
The SADV 1250 R HD fails to carry out
certain functions.
Cause 4:
Machine has got very cold (e. g. after
transport), allowing condensation to form
on the laser sensor optics.
Cause 1:
Function blocked for this DVD.
Cause 2:
Remedy:
Leave the machine to warm up for about
an hour in a warm, well ventilated place.
Function (e. g. camera angle, sub-titles
etc.) not present on this DVD.
Remedy:
No remedy possible.
Problem:
Disc stops playing, or ‘skips’.
Problem:
Cause:
Disc dirty or damaged.
After inserting a DVD the screen
displays a warning of the wrong
regional code.
Remedy:
Clean disc. Damage cannot be repaired!
Cause:
The DVD is not approved for your region.
Problem:
Black and white picture, distortion or
scrolling when playing a DVD or VCD.
Remedy:
Contact your DVD supplier and exchange
the disc for a version approved for your
region.
Cause:
The television is not set to the same
picture name (PAL / NTSC) as the disc, or
cannot process its picture norm.
Problem:
In rare cases the DVD’s Disc Menu
cannot be operated when the 'PanScan' picture format is set.
Remedy:
Set picture format to "Letterbox"; call up
the Disc Menu again.
Remedy 1: chose PAL/NTSC according to your TV
set in the menu 'Video setup /TV type'
Remedy 2: Use a multi-norm TV set. These sets
automatically switch to the current picture
norm, or can be switched over manually
38
Problem:
If the SADV 1250 R HD is connected to
a TV set directly using a SCART lead,
this can result in a scrolling DVD
picture appearing on all programme
memories. This problem may occur
with many types of TV.
Problem:
No picture.
Cause:
Video-output switched off
Remedy:
switch ON the video output (
button on the front panel)
Problem:
Bad or distorted sound reproduction
Cause 1:
Multi channel mode is selected but only a
stereo amplifier is connected
Remedy:
Switch to STEREO operation (
button on the front panel).
Cause 2:
a multi channel amplifier is used but it is
switched to STEREO operation mode
Remedy:
switch the surround-amplifier to multi
channel mode
Remedy 3: When watching TV, switch off the DVD
player by pressing the button on
the front panel.
Problem:
'overheat' displayed, playback stopped
Cause:
Device is over heated, too little flow of
cooling air
Problem:
Remedy:
change the installation of your system to
provide sufficient cooling.
Cause:
The TV set is analysing the A/V switching
signal from the DVD player incorrectly, or
not at all.
Remedy 1: If possible, call up the Setup menu for
your TV set and switch off RGB priority.
Select the RGB signal type for the DVD
SCART input of your TV set.
Remedy 2: If your television does not provide this
option, connect the DVD player using an
S-VHS lead, or use a SCART lead without
RGB signal. Ask your dealer for help
with this.
When used in a non- system the
machine does not respond to remote
control commands, or cannot be
switched on by remote control.
Cause:
E 2000 remote control receiver not connected.
Remedy:
Connect the E 2000 remote control
receiver as shown in Wiring Diagram 3.
Press the source select button
(or ) on the remote control handset
to switch the machine on.
Problem:
When operating the menu for the surround
decoder or surround receiver, the
SADV 1250 R HD also responds.
Cause:
E 2000
connected
SADV 1250 R HD.
Remedy:
Connect the E 2000 to the pre-amplifier,
integrated amplifier or receiver.
to
do not place the SADV 1250 R HD on top
of hot equipment like amplifiers or
surround receivers
Problem:
Not possible to switch to MCH mode
Cause:
Disc does not contain a multi channel
layer
Remedy:
no remedy, disc can only be played back
in Stereo.
Problem:
The 'WIDE'-mode can not be selected
Cause:
switch 'WIDE' at the back panel is set
position 'Disable'.
Remedy:
Set switch to position 'Enable'.
Problem:
Discs can not be played. A message to
enter a PIN appears.
Cause:
This disc is locked
Remedy:
Enter a valid PIN number or unlock the
disc (see menu 'Basic settings
(Preference page').
Note:
In case you have forgotten your PIN
number, enter the menu 'Basic settings
(Preference page) / Password'. Then
enter 000 000 twice. The PIN is now reset
to to 000 000.
the
Problem:
MP3 CD does not play back.
Cause:
MP3 format not supported
(see 'Playing MP3 CDs').
Remedy:
(see 'Playing MP3 CDs')
Problem:
Distorted or double picture at the YUV
output
Cause:
P-Scan switched on buit TV set not
compatible with progressive video signals
Remedy:
Switch P-Scan off (
button on the
front panel).
39
40
Specification
high precision linear tracking drive
Mechanism:
GaAlAs semiconductor laser:785 nm / 10 mW
650 nm / 7 mW
(VCD / CD)
(DVD / SACD)
Formats
Video
DVD, DVD+R / +RW, DVD-R / -RW, VCD, SVCD
Audio
CD, CD-R / RW, MP3-CD, SACD Stereo + Multi channel
Picture
Picture CD (JPEG)
Audio section
Analogue audio outputs
2 x Stereo, 6 x Multi channel, 2 x Stereo TV
Digital audio outputs
1 x coaxial, 1 optical,
D / A converter for CD, DVD, (S)VCD, MP3
front channels (MCH analog OUT)
Stereo channels L/R
Surround channels / Center / Subwoofer
Downmix (TV)
Double-Mono Differential 2x24 Bit / 384 kHz Sigma / Delta converter
4 x 24 Bit / 384 kHz Sigma / Delta
2 x 24 Bit / 384 kHz Sigma / Delta
Frequency response:
CD
SACD
DVD-V
DVD 96/24
2 Hz
2 Hz
2 Hz
2 Hz
–
–
-
IEC 60958 (CDDA / LPCM),
IEC 61937 (MPEG1/2, Dolby Digital, dts)
20 kHz / 100 dB
44 kHz / 110 dB
22 kHz / 100 dB
44 kHz / 110 dB
Total harmonic distortion / Intermodulation:
< 0.001 %
Effective system dynamics CD / SACD:
100 dB / 110 dB
Signal / noise ratio:
115 dB
Channel separation:
110 dB
Video section
TV-Standard:
PAL, NTSC
Video-Format:
MPEG 1 für VCD / MPEG 2 für DVD
HD outputs
480p/576p, 720p, 1080i
SD outputs
480i/576i
Video DA Converter
12-bit / 216 MHz
Bandwidth
12.5 MHz (Luma), 6 MHz (Chroma)
Video-Output:
1.0 VSS / 75 Ω
S-Video Output:
(Y)
1.0 VSS / 75 Ω
(C)
300 mVSS (Burst) / 75 Ω
RGB (SCART-Output):
0.7 VSS / 75 Ω
Analogue-Audio-Output:
1.9 Veff / 450 Ω
General
Power supply:
230 V / 50 Hz, 40 VA oder / or 117 V / 60 Hz, 40 VA
(see print on back panel)
standard accessories:
power cable, RLINK-cable, Video-cable, Stereo cable
User manual
We reserve the right to introduce technically founded modifications.
41
elektroakustik GmbH & Co. KG
Herford
*
Germany