1
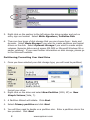
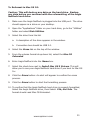
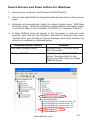
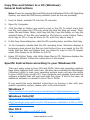
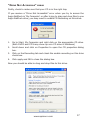
Aegis NetDock
User’s Guide
Copyright © Apricorn, Inc. 2010. All rights reserved.
Windows is a registered trademark of Microsoft Corporation.
All other trademarks and copyrights referred to are the property of their respective
owners.
Distribution of substantively modified versions of this document is prohibited without
the explicit permission of the copyright holder.
Distribution of the work or derivative work in any standard (paper) book form for
commercial purposes is prohibited unless prior permission is obtained from the
copyright holder.
DOCUMENTATION IS PROVIDED AS IS AND ALL EXPRESS OR IMPLIED CONDITIONS,
REPRESENTATIONS AND WARRANTIES, INCLUDING ANY IMPLIED WARRANTY OF
MERCHANTABILITY, FITNESS FOR A PARTICULAR PURPOSE OR NON-INFRINGEMENT,
ARE DISCLAIMED, EXCEPT TO THE EXTENT THAT SUCH DISCLAIMERS ARE HELD
TO BE LEGALLY INVALID.
FCC Compliance Statements
This equipment has been tested and found to comply with the limits for a Class B
digital device, pursuant to Part 15 of the FCC Rules. These limits are designed to
provide reasonable protection against harmful interference in a residential installation.
This equipment generates, uses and can radiate radio frequency energy and, if not
installed and used in accordance with the instructions, may cause harmful interference
to radio communications. However, there is no guarantee that interference will not
occur in a particular installation. If this equipment does cause harmful interference
to radio or television reception, which can be determined by turning the equipment
off and on, the user is encouraged to try to correct the interference by one or more
of the following measures:
Reorient or relocate the receiving antenna.
Increase the distance between the equipment and receiver.
Connect the equipment into an outlet on a circuit different from that to which the
receiver is connected.
Consult the dealer or an experienced radio/TV technician for help.
CAUTION
CHANGE OR MODIFICATIONS NOT EXPRESSLY APPROVED
BY PARTY RESPONSIBLE FOR COMPLIANCE COULD VOID
THE USER AUTHORITY TO OPERATE THE EQUIPMENT.
TABLE OF CONTENTS
Package Contents .........................................................
4
System Requirements ...................................................
4
Aegis NetDock Connections ...........................................
5
Hard Drive Installation ..................................................
6
Initializing your Hard Drive ............................................
7
8
Partitioning / Formatting ..........................................
Reformatting your Hard Drive for Windows ..................... 10
Reformatting your Hard Drive for Mac ............................ 11
Installing Software CD .................................................. 13
Device Drivers for Windows 2000/XP/Vista/7 .................. 14
Copy files and folders to a CD (Windows) ....................... 17
“Drive is not Accessible” error ........................................ 18
Disconnecting ............................................................... 19
Contacting Technical Support ........................................ 20
RMA Policy ................................................................... 20
Warranty Conditions ..................................................... 21
Aegis NetDock - Getting Started
Package Contents
Aegis NetDock
Stand
AC Adapter
USB Cable
Hard Drive Screws
Software CD:
• BurnAware CD/DVD Burning Software
• VLC Media Player
• MicroSoft SyncToy
System Requirements
Hardware:
1 GHz Intel® Pentium® or Atom™ processor
or equivalent
Apple® G3 or later, Mac OS X 10.4 or later
256MB RAM
Available USB port
CD ROM or CD-RW drive
Operating systems:
Microsoft:
Windows® 7, XP or Vista™
Mac:
OS 9.2 or higher
OS X 10.2 and later
PC Software:
200MB hard drive space for standard installation of
software components
Included software is not necessary with the Mac® OS;
Aegis NetDock hardware is compatible with Mac DVD /
CD authoring software and media playing software
4
www.apricorn.com
Connecting your Aegis NetDock
Perfect for connecting to all of your USB peripherals, the Aegis NetDock’s
4-port USB Hub has two regular ports and two ALWAYS ON USB ports,
ideal for charging cell phones or your MP3 player.
Two ALWAYS ON
USB Ports
Auto “ON” and “OFF”
Feature
Two regular USB Ports
The Aegis NetDock’s power
efficient design automatically
powers the NetDock when
connected to your computer
and powers down when
disconnected.
Ideal for charging cell
phones & MP3 players
Great for connecting to
your USB peripherals
Main USB connection
Connects to your
computer via included
USB Cable
Power connection
NOTE: The two ALWAYS ON
ports remain powered even
when the NetDock is powered
down as long as the unit is
receiving power from the
included AC Adapter.
Connects to the
included AC Adapter
www.apricorn.com
5
Hard Drive Installation
Whether you received your Aegis
NetDock with or without a hard drive
installed, the easy open design means
that you can change out your hard drive
in a snap.
Please make sure that the Aegis
NetDock is not connected to the
AC Adapter or your computer
when attempting the below.
Important hard drive handling info
•
Discharge static electricity by
touching a grounded bare metal
surface or grounding straps before
handling the hard drive
•
Install hard drive on a nonconductive or anti-static surface
•
Avoid direct contact with the circuit
card on the hard drive
Step 1
Remove the single screw found
on the back side of the case
Step 2
Turn the NetDock over and slide the
top case away from the bottom case as
shown
Step 3
Insert the hard drive by sliding the
drive to meet with the SATA hard
drive connector
Step 4
Secure the hard drive using the
included screws as shown below
Hard
Drive
Hard
Drive
Step 5
Once the hard drive is secured, slide the
top case back into place
6
Step 6
Once you have replaced the top case, turn
the NetDock over and replace the screw
www.apricorn.com
Initializing Your Hard Drive (self installed hard drives only)
1. To initialize your hard drive, you will need to go to Disk Management
in Windows. To get to Disk Management in Windows 2000, XP, Vista and 7,
right click “My Computer” (2000, XP) or “Computer” (Vista, 7) and
click on “Manage” in the list. If you purchased an Aegis NetDock that
already has a hard drive, you do not need to use this section
because the drive is already formatted for NTFS.
2. Double-click on Computer Management.
3. In Computer Management, you will find Disk Management under
the Storage section. Double-click on Disk Management. Windows XP
has a wizard to initialize new hard drives and may appear at this point. If
the wizard does not appear, follow the remaining instructions.
4. You will be able to easily identify the new drive in Disk Management.
The drive will show up as Unknown and Unallocated with a red no
entry sign on the disk number. If you do not see a red no entry sign
on the disk number, skip to “Partitioning/Formatting Your Hard
Drive” in the next section.
www.apricorn.com
7
5. Right click on the section to the left where the drive number and red no
entry sign are located. Select Write Signature / Initialize Disk
6. There are two types of disk storage that you can choose from: basic and
dynamic. Select Basic Storage if you want to create partitions and logical
drives on the disk. Select Dynamic Storage if you want to create simple
volumes (dynamic disks cannot access MS-DOS or Microsoft Windows 98 or
earlier versions). If you need further information on disk storage, please go
to the Microsoft website.
Partitioning/Formatting Your Hard Drive
1. Once you have selected your disk storage type, you will need to partition/
format your drive.
2. Right click on the drive and select New Partition (2000, XP) or New
Simple Volume (Vista, 7).
3. A Partition Wizard will initiate. Click Next.
4. Select Primary partition and click Next.
5. You will then need to decide on a partition size. Enter a partition size in the
box provided. Click Next.
8
www.apricorn.com
6. Select Assign a drive letter. Fill in the drive letter. Be sure to select a
drive letter that is not in use. Click Next.
7. “Format this partition with the following settings” is selected by
default.
NTFS is selected by default.
File System: Allocation unit size: Accept the default size.
Volume Label: Choose a name that is meaningful to you.
Perform a Quick Format: Optional
Enabling Perform a Quick Format reduces the format time significantly.
However a Quick Format is less thorough and does not scan for or mark bad
sectors. If you are concerned about errors on your drive do not perform a
quick format.
Enable file and folder compression:
Optional
Selecting this feature gives you the option to use file and folder compression
feature available to the NTFS files system.
8. Click Next. You will have to wait a bit. When completed, the drive
properties will be shown. You have completed partitioning and formatting
your new hard drive. You can begin cloning or imaging (see relevant
sections for instructions).
www.apricorn.com
9
Reformatting Your Hard Drive for Mac
Your Aegis NetDock’s hard drive is preformatted with the NTFS Windows File
System and will need to be reformatted to work within the Mac OS.
To Reformat in OS 9.x:
Caution: This will destroy any data on the hard drive. Backup any data
before you continue with the reformatting of the Aegis NetDock hard
drive.
1. Make sure the Aegis NetDock is plugged into the USB port.
2. Disable the file exchange in the Extensions Manager:
a. From the Apple Menu, select Control Panel, then Extensions
Manager.
b. From the list: uncheck the on/off button next to the File Exchange.
c. Click Restart.
Your Macintosh will restart and you will get the following message:
“This disk is unreadable by this computer
Do you want to initialize the disk?”
3. Enter Aegis NetDock into the Name box.
4. From the drop down list, select Mac OS Extended and click the Initialize
button. After the drive is initialized the drive named Aegis NetDock will
appear on your desktop.
5. To confirm that the Aegis NetDock hard drive is properly formatted,
select the Aegis NetDock drive, then Select: File, Get Info, General
Information. The drive should read Mac OS Extended.
6. You can now enable the file exchange extension.
a. From the Apple Menu, select Control Panel, Extensions Manager.
b. Check the on/off box next to File Exchange.
c. Click Restart.
10
www.apricorn.com
To Reformat in Mac OS 10:
Caution: This will destroy any data on the hard drive. Backup
any data before you continue with the reformatting of the Aegis
NetDock hard drive.
1 Make sure the Aegis NetDock is plugged into the USB port. The drive
should appear as a drive on your desktop.
2. Open the “Applications” folder on your hard drive, go to the “Utilities”
folder and select Disk Utilities.
3. Select the drive from the list:
a. A description of the drive appears in the window.
b. Connection bus should be USB 2.0.
4. Select the Erase tab on the top of the window.
5. From the volume format drop down list, select the Mac OS
Extended.
6. Enter Aegis NetDock into the Name box.
7. Select the check box next to Install Mac OS 9 Drivers. This will
allow you to see your Aegis NetDock hard drive if you boot to Mac OS
9.x
8. Click the Erase button: An alert will appear to confirm the erase
process.
9. Click the Erase button to start the formatting process.
10.To confirm that the Aegis NetDock hard drive is properly formatted,
Select the Aegis NetDock drive, then Select: File, Get Info. The
format should read Mac OS Extended.
www.apricorn.com
11
Installing the Software CD
The Aegis NetDock comes with three software downloads:
• BurnAware CD/DVD Burning Software
• VLC Media Player
• Microsoft SyncToy
Please note that the included software is compatible with PC only.
The included software is not necessary with Mac systems. The Aegis NetDock
hardware is compatible with all Mac DVD/CD authoring software and media
playing software
1. To install these programs, place the included software CD into your Aegis
NetDock.
2. A software launch window will popup. From here you can click on the
BurnAware, VLC or SyncToy options to download the programs to your
computer or download the latest product manual.
3. Follow the installation prompts on each of the programs to install on
your computer
12
www.apricorn.com
Device Drivers and Drive Letters for Windows
1. Boot up your computer into Windows 2000/XP/Vista/7.
2. Connect the Aegis NetDock integrated cable as described on the previous
page
3. Windows will automatically install its resident device driver (USB Mass
Storage Device). After the installation, Aegis NetDock will appear under
a new drive letter in ‘My Computer’ (2000/XP) or ‘Computer’ (Vista/7).
4. If Aegis NetDock does not appear in ‘My Computer’ or does not work
properly, right click on ‘My Computer’ and click on ‘Manage’ then under
‘System Tools’ you will click on ‘Device Manager’ and check whether the
devices are installed as indicated below.
Installed Device Drivers
Location
USB Mass Storage Device
Installed under ’Universal Serial
Bus Controllers’.
Slimtype DVDRW
Installed under ’DVD/CD-ROM
drives’ (the drive listed in the
figure may differ from your Aegis
NetDock drive).
www.apricorn.com
13
Device Drivers and Drive Letters for Windows
5. If the ‘Device Manager’ entries are correct and Aegis NetDock still does
not appear in ‘My Computer’, you may need to reassign the ‘Drive Letter’.
This is typically because you have mapped network drives and the Aegis
NetDock has assigned the same ‘Drive Letter’ as one of the mapped
drives.
6. To reassign the drive letter right click on ‘My Computer’ and click on
‘Manage’ then under ‘Storage’ you will click on ‘Disk Management’.
Right click
here to
change
drive letter
then refer
to Step 8
7. On the lower half of the window scroll down to see the CD-ROM Drives
listed in numerical order. You are looking for a CD-ROM with DVD and a
duplicate drive letter or no drive letter at all.
14
www.apricorn.com
Device Drivers and Drive Letters for Windows
8. Right click and open ‘Change Drive Letters and Paths’ dialog box.
9. Now click the down arrow next to the ‘Drive Letter’ to open the drop
down menu and choose a new ‘Drive Letter’. Make sure to choose a
‘Drive Letter’ that does not conflict with any of the mapped network
drives. Click on the OK button to assign the new ‘Drive Letter’ and
close all the windows.
10.Go to ‘My Computer’ to verify that Aegis NetDock appears.
11. You are now ready to start copying files and folders to the Aegis
NetDock.
www.apricorn.com
15
Copy files and folders to a CD (Windows)
General Instructions
Note: If your are copying files to a DVD using the Windows 2000 or XP Operating
System, you must use DVD buring software (such as the one provided).
1. Insert a blank, writable CD into the CD recorder.
2. Open My Computer.
3.
Click the files or folders you want to copy to the CD. To select more than
one file, hold down the CTRL key while you click the files you want. Then,
under File and Folder Tasks, click Copy this file, Copy this folder, or Copy the
selected items. If the files are located in My Pictures, under Picture Tasks,
click Copy to CD or Copy all items to CD, and then skip to step 5.
4. In the Copy Items dialog box, click the CD recording drive, and then click Copy.
5.
In My Computer, double-click the CD recording drive. Windows displays a
temporary area where the files are held before they are copied to the CD.
Verify that the files and folders that you intend to copy to the CD appear
under Files Ready to be Written to the CD.
6. Under CD Writing Tasks, click Write these files to CD. Windows displays the
CD Writing Wizard. Follow the instructions in the wizard.
Specific Instructions according to your Windows OS
There are many ways to burn CDs and DVDs. Most new operating systems
have these features built into them. We also have included the BurnAware
(Windows) utility in case your operating system does not have the ability
to burn a DVD (such as with XP). Your computer may already have burning
software installed that will work well with this drive. If this is the case, no
additional software is needed to burn CDs or DVDs.
If you would like more detailed instructions on burning a disc with your
specific operating system, please refer to the links below.
Windows 7
http://windows.microsoft.com/en-us/windows7/help/videos/burn-a-cd
Windows Vista/XP
http://windows.microsoft.com/en-US/windows-vista/Burn-a-CD-or-DVD
http://windows.microsoft.com/en-US/windows-vista/Burn-a-CD-or-DVDin-Windows-Media-Center
Mac OS X
http://support.apple.com/kb/HT1328
16
www.apricorn.com
“Drive Not Accessible” error
Firstly, check to make sure that your CD is in the right tray.
If you receive a “Drive Not Accessible” error when you try to access the
Aegis NetDock in ‘My Computer’ or after trying to drag and drop files to you
Aegis NetDock drive, you may need to enable CD Recording on this drive.
1. Go to Start, My Computer and right click on the appropriate CD drive.
(Both DVD’s and CD’s may show up as a CD drive in Windows)
2. Scroll down and click on Properties to open the CD properties dialog
box.
3. Click on the Recording tab and check the enable recording on this drive
check box.
4. Click apply and OK to close the dialog box.
Now you should be able to drag and drop files to this drive.
www.apricorn.com
17
Disconnecting
Windows 2000, XP, Vista and 7
1) Locate the system tray on your Windows Desktop (the system
tray is the part of the taskbar that displays the date and time).
2) Click on the “Safely Remove Hardware” icon
(2000, XP) or
(Vista, 7) in the system tray. A dialog box will appear.
Please note that in Windows Vista and 7 the “Safely Remove
Hardware” icon is different.
3) Click ‘Safely Remove Mass Storage Device – Drive (D:) in the
dialog box. (Your drive letter may differ).
4) Wait for few seconds until the system prompts ‘The hard disk
storage device can now be safely removed from the system.”
Click OK, and then unplug the Aegis NetDock.
NOTE: To protect against unexpected data loss, Windows checks that all files
on the drive are closed before allowing the USB device to be removed. If
you receive an error message that says “The device cannot be stopped right
now. Try stopping the device again later.” Close all Windows and Programs
that are using files from the drive, then repeat the procedure.
18
www.apricorn.com
Contacting Technical Support
Apricorn provides the following helpful resources for you:
1. Aegis NetDock User’s Guide and Quick Start Guide
2. Apricorn’s Website (http://www.apricorn.com)
This gives you the ability to check for up-to-date information.
3. E-mail us at [email protected].
4. Or call the Technical Support Department at 1-800-458-5448.
Apricorn’s Technical Support Specialists are available from 8:00 a.m.
to 5:00 p.m., Pacific Standard Time from Monday through Friday.
RMA Policy
An RMA (Return Merchandise Authorization) tracking number must be issued
by Apricorn. If you need to return or replace your Aegis NetDock, Apricorn
requires that you perform the following steps:
1. Find your original receipt.
2. Simply call Apricorn’s technical support department with your Aegis
NetDock part number and a description of the problem(s) you are
experiencing.
3. If the Apricorn representative finds cause for a return, they will issue an
RMA number. Please write this number down.
4. Fill out an RMA authorization form with your package. The RMA form is
available on-line at http://www.apricorn.com/support/rma.php.
5. Please send the prepaid package including RMA form and receipt to the
following address, make sure the RMA# is written on the exterior of the
package:
Apricorn
RMA#: __________
12191 Kirkham Road
Poway, CA 92064
The purchaser shall be responsible for any loss or damage to the returned
product until it is received by Apricorn. Purchaser should consider obtaining
insurance with respect to shipping the product.
www.apricorn.com
19
Warranty Conditions
One -Year Warranty:
Apricorn offers a 1-year warranty on Aegis NetDock products against defects
in materials and workmanship under normal use. The warranty period is effective from the date of purchase (validated by your original receipt) either
directly from Apricorn or an authorized reseller.
Disclaimer and terms of the warranties:
The warranty becomes effective on the date of purchase and
must be verified with your sales receipt or invoice displaying
the date of product purchase.
Apricorn will, at no additional charge, repair or replace defective parts with new parts or serviceable used parts that
are equivalent to new in performance. All exchanged parts
and products replaced under this warranty will become the
property of Apricorn.
This warranty does not extend to any product not purchased
directly from Apricorn or an authorize reseller or to any
product that has been damaged or rendered defective: 1. As
a result of accident, misuse, Neglect, abuse or failure and/or
inability to follow the written instructions provided in this
instruction guide: 2. By the use of parts not manufactured or
sold by Apricorn; 3. By modification of the product; or 4. As a
result of service, alternation or repair by anyone other than
Apricorn and shall be void. This warranty does not cover normal wear and tear.
No other warranty, either express or implied, including any
warranty or merchantability and fitness for a particular purpose, has been or will be made by or on behalf of Apricorn or
by operation of law with respect to the product or its installation, use, operation, replacement or repair.
Apricorn shall not be liable by virtue of this warranty, or
otherwise, for any incidental, special or consequential damage including any loss of data resulting from the use or operation of the product, whether or not Apricorn was apprised
of the possibility of such damages.
20
www.apricorn.com
Notes:
www.apricorn.com
21
12191 Kirkham Road
Poway, CA, U.S.A. 92064
1-858-513-2000