1
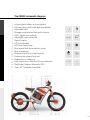
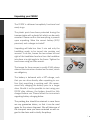
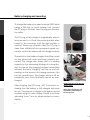
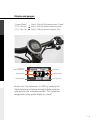
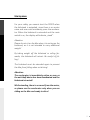
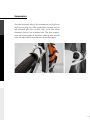
Version: 1.1 / December 2013
User manual
English
Contents
General Information ....................................... 3
The FEDDZ schematic diagram ....................... 4
Unpacking instructions ................................... 5
Battery charging and mounting ..................... 6/7
Handling and storage of the battery .............. 8
Disk brake adjustment .................................... 9
Handlebar controls, left/right ......................... 10
Display and gauges ......................................... 11
Starting directions .......................................... 12/13
Suspension ..................................................... 14
Seat height adjustment .................................. 15
Foot rest .......................................................... 16
Tires ................................................................ 17
Procedure when not in use ............................ 18
Technical data/Guarantee .............................. 19/20
Contact and Partner ....................................... 21
2
General Information
Congratulations for choosing to view the world from
a different angle, with a perspective of environmental responsibility and conserving our resources.
The quiet way into the future
This handbook contains information on the proper
use and maintenance of your new FEDDZ. For your
maximal safety and comfort, we recommend that
you carefully read the entire handbook before your
first use.
Conditions for ensuring the correct function, maintenance and optimal performance of your FEDDZ
include using professional service, following all driving and maintenance instructions and conducting
all recommended inspections by your authorized
FEDDZ dealer.
We wish you a safe and accident-free ride!
Your FEDDZ Team
3
The FEDDZ schematic diagram
1 - License plate holder and mud guard
2 - LED rear lamp with brake light and blinker
3 - Adjustable seat
4 - Storage compartment belt with closure
5 - RFID - digital start system
6 - Adjustable rear mirror left
7 - Digital Display
8 - LED front blinker
9 - LED-front head lamp
10 - Rear wheel hub drive electric motor
11 - Rear suspension
12 - Kickstand with auto-stop function
13 - Anodized aluminum foot rest
14 - Battery Eco or Premium
15 - Fork suspension: Manitou 80 mm excursion
16 - Disk brake: Magura Hydraulic MT4
17 - Tires: 26“ Schwalbe Crazy Bob
1
2
10
3
111213 14
4 5 678 9
15 16 17
4
Unpacking your FEDDZ
The FEDDZ is delivered completely functional and
ready to go.
The plastic parts have been protected during the
transportation with a plastic foil which can be easily
removed. Please confirm that everything is present
upon unpacking. Were the correct battery (ECO/
premium) and a charger included?
Unpacking will take less than 5 min and only the
handlebar needs to be turned into position and
secured. To do this, loosen the two screws left and
right of the handlebar head and turn the handlebar
into place at a right angle to the frame. Tighten the
two screws using an Allen wrench.
The torque for these screws is usually 5 NM; please
observe the instructions located on the stem, which
are obligatory.
The battery is delivered with a 20% charge, such
that you can drive directly after unpacking to confirm that everything is working well. We recommend fully charging the battery prior to a longer
drive. Should it not be possible to start using your
FEDDZ after delivery, the battery should be fully
charged before use. Please follow the instructions
regarding battery charging below.
The packing box should be retained in case there
are any guarantee claims, so that it can be used
again for the return shipment. We will take care of
the transport once you have contacted us with regard to the claim and to clarify the pickup.
5
Battery charging and mounting
To charge the battery you need a normal 230V-oulet
having a 16A-fuse or circuit breaker. First, connect
the DC-plug on the bike, then the plug into the electric outlet.
The DC-plug of the charger is magnetically and polarity secured, i.e. it finds the correct position when
turned in the connector until the right position is
reached. Please pay attention that the DC-plug is
clean. Even a little bit of dirt can prevent a good connection, so that the battery will not charge correctly.
The switch on the battery charger should be turned
on only when both ends have been properly connected. The charger then shows that it is working
properly by the alternating blinking of its lamp diodes. As soon as the charging has been successfully
initiated, the lamp “charging” will stay on and, depending on the amount of charging necessary, this
can last several hours. The charger will turn off automatically, such that the battery cannot be overcharged.
After charging, the LED Lamp „full“ is turned on indicating that the battery is fully charged and ready
for use. The amount of charge in the battery can be
checked using the main display. Should a red lamp
indicating “error” turn on, please contact us immediately.
Caution: Danger to life through
electric shock!
Never open the charger, and
only allow a professional to
service the unit!
6
Battery charging and mounting
The battery can be charged either while on the
FEDDZ or dismounted and where ever is convenient. If still mounted on the bike, the bike should be
turned off. To check how far the charging procedure
is, you can turn on the FEDDZ and check the main
display to see how much time is still needed.
To remove the battery you need to open the keyoperated switch on the right side of the bike and
lift the battery from the bike using the handle. This
should also be done with the bike turned off.
When replacing the battery be sure that the charger
connection is on the left side of the bike (in relation to the driving direction). Bring the battery into
place and let it slide into place without force. The
connection will be correctly poled automatically.
When successfully mounted, there will be a quiet
peep tone.
In rare occasions, the plug can become bent. This
may not allow the correct contact and prevent the
bike from being turned on. In such cases, lift the
battery slightly and move it back and forth carefully until it is correctly inserted and the peep tone is
heard. Such twisting of the plug can be seen if you
look from the side under the battery box.
Attention: Never push the battery into its holder with
force!
7
Handling and storage of the battery
The battery of the FEDDZ is delivered with a charge
of approximately 20-30%. This should be sufficient
for testing the proper function of the FEDDZ after
being unpacked with a short test drive, to detect
any possible transportation damage.
The next step should then be to completely charge
the battery before further use, a process that can
take 6-10 hours.
Once the charger indicates that the process is complete, turn on the FEDDZ using the red main switch
and check the battery indicator on the main display.
This should indicate of charge of 97-99%. Lower values indicate an incomplete charge.
In this case, check the connection between the
charger and the battery. Turn off the charger and
wait until the LEDs are turned off. Turn on the charger once again and see if it starts with a new charging cycle.
Please be sure that the battery does not fall below a
charge of 20-30% particularly when the FEDDZ will
not be used for a longer period of time. This may result in a complete discharging of the battery which
can damage it, a damage that is the responsibility of
the owner. If the FEDDZ will not be used for some
time, it is best to fully charge the battery and remove it for storage until further use where it does not
become too cold.
8
Adjustment of disk brakes
After the first 10-12 km of driving, the disk brakes
should be adjusted. They are then free of any dirt
and can be used more forcefully once they have
been adjusted. To adjust the brakes, the two screws
found on the brake should be loosened, so that the
unit sits loosely on the handle bar and has room to
move. The brakes should then be pressed so that
the brake pad settles on the disk. While maintaining
pressure on the brake, the unit can then be fastened
once again. Check the brake to ensure a good braking function and thereafter it is ready for use.
If the brakes make a squeaking or rubbing noise, this
can often be easily corrected by repeated performing a full brake at low speed (e.g. 25 km/h). Please
do this with care!
A high pitched noise from the brakes could indicate
a deterioration of the brakes or some foreign matter
(stone, dirt) in the brake. In case of doubt, please
contact your service partner.
Attention: Service of the brakes may only be performed by an authorized service partner!
9
Control elements left/right
On the left side of the handlebars you will find the
controls for the horn and the left blinker. There is
also a rearview mirror on the left hand side of the
handlebar. The controls can be adjusted if needed
by loosening the two screws.
On the right hand side of the handlebar you will find
the drive-mode control and the right blinker. These
can also be adjusted by loosening the two screws. A
mirror on the right hand side is usually not needed.
However, they are available in our shop and can be
easily mounted.
indicator (left) horn
driving mode indicator (right)
10
Display and gauges
„Power-Mode“
„ECO-Mode“
„City-Mode“
Number of
kilometres driven
Speed display
Battery display
Step 1- 45km/h full performance „Power“
Step 2- 45km/h reduced performance
Step 3- 30km/h reduced speed „City“
Odometer
Indicator (right)
Driving mode
Return the trip odometer to 000 by pushing the
Mode button found above the right blinker with the
side stand in the extended position. This should be
recognized on the speed display as „stand“.
11
Start system
To start the FEDDZ one must first turn on the red power switch. The display will become active, the head
lamp turns on, as does the rear lamp. For your safety these lights are always on when the bike is in use.
On the display, the speed, battery charge level, trip
odometer and the drive mode will be seen. The diving mode display has 3 steps indicated with 3 arrows found in the lower-right portion of the display.
By pressing the mode control, one can change
through the 3 steps. The last step selected will be
saved. Further pressing the control will always select the next higher level.
For safety the FEDDZ has an electric anti-theft device. This can only be deactivated with the RFID chip.
To deactivate, just move the magnetic key over the
frame immediately behind the red start switch. The
FEDDZ is now ready for use and you can begin driving by pressing the accelerator.
Power switch
12
Startsystem
For your safety, you cannot start the FEDDZ when
the kickstand is extended, since there is no motor
noise and one could mistakenly press the accelerator. When the kickstand is extended and the main
switch is on, the display will indicate „stand“.
Attention:
Please do not sit on the bike when it is resting on the
kickstand, as it is not intended to carry additional
weight!
By taking weight off the kickstand or rolling forwards, the kickstand will retract. Be careful of falling!
The kickstand must be extended again to prevent
the bike from falling when not driving!
Attention:
The accelerator is immediately active as soon as
the anti-theft device has been deactivated and the
kickstand retracted!
While standing, there is no sound from the motor,
so please use the accelerator only when you are
sitting on the bike and ready to drive!
13
Suspension
You can manually adjust the suspension on the front
fork by turning the ABS suspension system to the
left towards plus for a softer ride, or in the other
direction (minus) for a harder ride. The rear suspension has been given a standard setting and should
only be adjusted by a professional service agent.
14
Seat position adjustment
Your optimal seat position can be adjusted by loosening the Allen screw below the seat and pulling the
seat higher or pushing it lower. You have the perfect
position when you sit comfortably on the FEDDZ
with your feet able to lightly reach the ground.
15
Foot rests
The foot rests are already mounted on the rear
wheel linkage. Here they are placed slightly to the
rear given you a sporty position.
In case you prefer a more relaxed leg position, you
can later place the foot rest in the forward position
where it also positioned a bit lower.
16
Tires
The FEDDZ has a 26 inch (zoll) tire from Schwalbe
with the name „Crazy Bob“. These ties are available
in all bike shops or can be ordered. Changing the
tires can be performed by your FEDDZ-service partner or in any reliable bike shop.
The recommended tire pressure is 3-4 Bar depending on your needs and preferences. The allowable
pressures for the tire range from 2.5-4.5 bar.
Attention: Low tire pressure or worn out tires
change the driving characteristics and can change
the driving range dramatically!
17
Procedure when not in
use for a longer time period
The following procedure should be used if the
FEDDZ will not be driven for a longer period of time
(e.g. during winter or as a display bike). The battery
should have a charge between 60-80%. Too much
charge can cause the battery to age more rapidly
and too little charge may lead to a complete emptying of the charge and damage.
It is also recommended to remove the battery and
place it where it has moderate temperature, where
freezing temperatures are not found. This could be
in a cellar or anywhere else without high humidity
and stable temperature.
You should regularly check the charge level of the
battery. To do this you need to mount the battery in
the FEDDZ and turn it on. Be sure to not allow the
charge level to fall below 30%. Should a large loss of
battery capacity be noted while it is not being used,
please contact your service partner.
18
Technical data/Guarantee
Accessories and Features:
Cargo storage
2 belts with closures on the storage space
Battery (Eco or Premium)
Battery charger
High performance-LED-headlamp from Philips
LED rear light with integrated brake light
LED blinkers both in front and back
Display with data
RFID - digital start system.
Adjustable seat
High quality aluminum handlebar
Side stand with integrated anti-theft device
Mud guard and license plate holder
Anodized aluminum foot rest
Side mirror (left)
USB connector (optional)
Bluetooth ready
Chassis/frame:
Wheelbase: 1320 mm.
Hand-finished aluminum frame
Coul made from ABS platsic
Cargo room size: 420 x 360 x 220 mm
Tires: 26“ Schwalbe Crazy Bob
Front suspension fork Manitou 80 mm excursion
Disk brakes: Magura Hydraulik MT4
Diameter of disk brakes: 180 mm
Bike weight: 33,0 kg
Battery weight Eco: 11,5 kg
Battery weight Premium: 11,5 kg
Maximal allowable weight: 173 kg
19
Technical data/Guarantee
Motor:
Rear wheel hub electric motor (brushless)
Normal Power 2 KW / Peak Power: up to 4 KW
Speeds: 25 km/h oder 45 km/h
Torque: 60 Nm
3 driving options, selected using
handlebar controller
Batterie Eco/Premium:
Approximately 70 km driving range* (Eco)
Approximately 110 km driving range* (Premium)
Lithium-Ion 48 V
31,5 Ah / ca. 1600 Wh (Eco)
40,5 Ah / ca. 2100 Wh (Premium)
Max. 5.5h charge time with 6A charger (ECO)
Max. 7h charge time with 6A charger (Premium)
High quality BMS prepared for Bluetooth
Battery box removable or lockable on bike
Guarantee:
In case of a guarantee claim, please notify us immediately to describe the defect or possible source of the
problem. Following this assessment, if needed we will
arrange for the pickup of the FEDDZ for its return to us
for inspection at no cost. For this purpose please retain the carton used for delivery to protect the FEDDZ
during shipment.
20
Contact and Partners
emo-bike GmbH & Co. KG
Fabrikstrasse 15
88400 Biberach an der Riss
Germany
Tel: +49 (0)7351 53904001
Fax: +49 (0)7351 53904009
[email protected]
www.feddz.de
GreenRoad GmbH
Polan 32
9815 Kolbnitz
Austria
Tel: +43 (0) 676 9755525
[email protected]
www.greenroad.at
© Copyright - emo-bike GmbH und Co. KG 2013
21