1
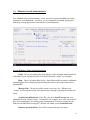
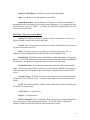
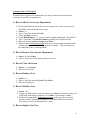
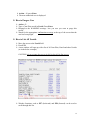
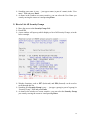
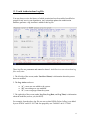
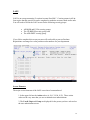
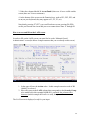
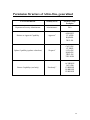
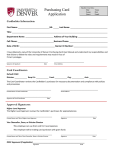
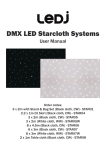
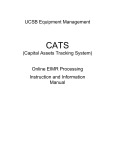
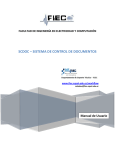
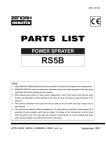
All-in-One Financial System Authorization Functions Guide ~ Terry Malosh Information Systems and Computing University of California, Santa Barbara August 28, 2008 1 Introduction The purpose of this document is to provide an overview of your duties as a “Department Security Administrator” (DSA). All-in-One is a suite of financial applications that includes a distributed, role-based authorization system. Within All-in-One there is an authorization system which controls access permissions for both mainframe and web based financial applications. All-in-One (ALLN01) itself is a Natural application that runs under Com-Plete. Access to Com-Plete requires TN3270 access (such as Host On-Demand, to login). Some of the systems that are accessible via ALLN01 include Requisition Express (REx), Capital Assets (CATS), Chart of Accounts, Vendor Queries, Liens, Checks/Invoices, and the Authorization System, for example. In addition, there are several web based applications. Access to these applications will require a properly-configured web browser (such as Internet Explorer, Netscape, or Firefox) to login. Some of these systems which are accessible via a web browser include BORIS, BARC, the Purchase Order Repository System, Transfer of Funds, Transfer of Expenditures, and Web Travel, for example. All these systems, either Web based, or within ALLN01 itself, are administered by a department DSA, by using the Authorization System within All-in-One (ALLN01). The purpose of DSA training, and this overview, is to acquaint you with this authorization system. There are two versions of All-in-One: ALLN01 is the production system and contains production data; and ALLND is the demonstration version and contains test data. 2 TABLE OF CONTENTS The Basics .................................................................................................................................... 4 How To Request All-In-One .................................................................................................................... 4 System Requirements............................................................................................................................... 4 Your Duties as a Department Security Administrator (DSA) .............................................................. 5 Duties of the Campus Security Administrator (CSA) ........................................................................... 5 How to Become a DSA ............................................................................................................................. 5 What Can I Use All-in-One For? ............................................................................................................ 6 Authorization Screens ............................................................................................... 8 The Application Menu ............................................................................................................................. 8 The Main Menu ........................................................................................................................................ 9 The Authorization System Main Menu ................................................................................................ 10 UA Maintain Userid Authorizations................................................................................................... 12 Screen Elements - What You Need to Know .................................................................................... 12 The Fields - What You Need to Know .............................................................................................. 13 Common Tasks “Cheat Sheet” .......................................................................................................... 14 UL Userid Authorizations Log File....................................................................................................... 17 SG Browse Security Group Members................................................................................................. 18 LAFS........................................................................................................................................................ 19 Screen Elements.................................................................................................................................. 19 How to access and fill out the LAFS screen...................................................................................... 20 System Cross Reference ....................................................................................... 25 Security Group Naming Conventions ............................................ 27 Permission Structure of All-in-One, generalized ......... 28 3 The Basics How To Request All-In-One To request All-in-One access, you must be a current DSA, Department Head, or acting Department Head. The request form can be accessed via the web by visiting the “Com-Plete Service Center” at: http://www.isc.ucsb.edu/osg/complete/complete-service-center.html ¾ If the user is new to Com-Plete, fill out and submit the IS & C Services Request Form. Be sure to check the boxes for Com-Plete (and ALLN01 which will appear on a subsequent page after you press Submit). ¾ If the user already has Com-Plete, you still need to fill out and submit the IS & C Services Request Form. The request will be transmitted to IS&C security for processing. Once IS&C staff has finished setting up the applicant, you will be notified by email. Please allow adequate time for processing. Retain your copy of the request form for audit purposes (for a period of two (2) years after the authorization has been deactivated). System Requirements In order to use an All-in-One secured application, the following are required: Approval of a DSA, Department Head, or acting Head, to use All-in-One; TN3270 emulation software (“Host-on-Demand” (HOD) or equivalent). Information about HOD is available at: http://www.isc.ucsb.edu/osg/hod/index.html A Computer Center Account; A Com-Plete userid and Com-Plete password; An Email address; An entry in the UCSB Directory; and An entry in the All-in-One authorization system. 4 Your Duties as a Department Security Administrator (DSA) As a DSA you will: Initiate requests for All-in-One access; Add users to All-in-One; Link or unlink users to All-in-One security groups; Set up LAFS account information as needed; Purge users from All-in-One; and Function as your department’s liaison with IS&C. Duties of the Campus Security Administrator (CSA) The responsibility of the Campus Security Administrator is to: Train DSAs to use the All-in-One system; Support DSAs in their All-in-One duties; Set up DSAs to use the All-in-One applications (ALLN01 and ALLND); Coordinate the creation of new Com-Plete userids and accounts; Troubleshoot problems as they arise within All-in-One; and Announce new All-in-One components as they are released. How to Become a DSA In order to become a DSA, you must be a UCSB employee and your Department Head (or Acting Department Head) must grant formal approval. If your department is interested in using this system, the Campus Security Administrator will contact your Department Head to explain the requirements. 5 What Can I Use All-in-One For? The suite of systems available within All-in-One has broadened considerably over the years, and now includes the following systems. Authorizations. The Authorization system enables a DSA to administer access for any of the systems available through All-in-One. BARC. The web-based Billing and Accounts Receivable system will enable your department to view customer accounts, prepare and submit batch jobs, or receive notification to review transactions. The BARC system and on-line tutorial is available at the following web site: http://www.busserv.ucsb.edu/barc/tutorial.htm BORIS. BORIS is Communications Services' web-based Billing, Order, and Repair Information System. This system will enable your department to review monthly billing for telephone services, track any installation work orders or repair requests, and review account information. The BORIS help system and FAQ are available at the “Communication Services Accounts” web site: http://www.commserv.ucsb.edu/faculty%5Fand%5Fstaff/accounts/default.asp Capital Assets Tracking System and EIMR Forms. This system, commonly known as “CATS”, enables a department to review, modify, loan, transfer or dispose of inventorial equipment. Instruction manuals that provide detailed help on CATS and EIMR are available from the Equipment Management web site: http://www.busserv.ucsb.edu/Forms/CATS%20User%20Manual.pdf http://www.busserv.ucsb.edu/Forms/EIMR_User_Manual.pdf Chart of Accounts. Access to this system enables one to browse the Account Profile System for detailed information for all accounts. Review accounts for your department and other UCSB departments. While there is no on-line help or formal training for this system, it is largely self-explanatory and is easy to use. Questions regarding the Chart of Accounts can be directed to General Accounting. Checks & Invoices. Browse invoices by Vendor or Purchase Order, or, search on a Check Number. General questions regarding checks and invoices can be directed to Accounts Payable. Department Liens. Browse department lien balances for departments by Purchase Order or Location-Account-Fund-Sub (LAFS). General questions regarding department liens can be directed to Accounts Payable. Purchase Order Repository System (PORS). Purchase or change orders are transmitted electronically to a on-line repository, where it is saved as an Adobe PDF (Portable Document Format) file. The PORS Instruction manual is available at http://www.purchasing.ucsb.edu/Forms/PORSManual.pdf. 6 Software Depot purchases: The Campus Office of Software Licensing (COSL) provides software acquisition and licensing services to the UCSB community. General questions regarding the use of the Software Depot may be directed to Instructional Consultation. Requisition Express. This system, commonly known as “REx”, enables departments to create, modify, and browse on-line purchase requisitions. As a DSA, you must designate “approvers” who will be responsible for the review and approval of requisitions. In addition, you can enable your department to create, modify and browse LVPA (low-value) authorization numbers. Formal training from the Purchasing Department is required to use this system. Transfer of Expenditures. The Transfer of Expenditures (TOE) application is a web-based system that enables departments to transfer non-payroll expenditures recorded in the General Ledger. General questions regarding the TOE system can be directed to Sandra Featherson in Accounting. A user manual is available on-line at the TOE web site. Transfer of Funds. By using the web-based Transfer of Funds (TOF) system you can create, track, modify, forward, approve or reject a transfer of funds. General questions regarding the TOF system can be directed to the office of Budget and Planning. A user manual is available on-line at the TOF web site. Vendor Query. Look up Vendors and obtain business addresses, phone numbers, and other information. This system may be a helpful research tool for identifying and selecting Vendors for commodities or services that your department may be considering. There is an on-line help facility included in this easy to use system. General questions regarding the Vendor System can be directed to Asger Pedersen in Accounting or Lisa Klock in Purchasing. Web-TEV. This web-based system enables departments to create, modify, and browse on-line travel vouchers. As a DSA, you must designate “approvers” who are charged with the review and approval of travel vouchers. Formal training from Travel Accounting is required to use this system. The Web-TEV web site is: https://apps.accounting.ucsb.edu/travel Y-Cal Airfare Authorization. Generates a Tracking Number that can be used to authorize the purchase of a State of California Contract Airfare (if traveling on official university business) through the UCLA Travel Center. Your department may be able to save on airfare by using this system. Instructions on how to use this system are available from Travel Accounting. The UCLA Travel Center web site is at: http://www.travel.ucla.edu/index.shtml 7 Authorization Screens The Application Menu Below is an example Application Menu screen. This menu displays all the Natural applications that you are permitted to use. The Application Menu is a special menu available only to our All-in-One users. Your Application Menu screen may differ somewhat from the example below. If you have been permitted access to any other Natural applications (for example STAR01), these will be displayed on your particular Application Menu. A small number of All-in-One users do not use this Application Menu. There is a variety of reasons for this (for example, if the user needs access to a variety of special Com-Plete utilities such as UQ, UEDIT, or UDS, this menu is unsuitable). If you are one of these users, you will see the Com-Pass screen (see below example). If you have any questions about why you have (or someone in your department has) the Application Menu versus the Com-Pass screen, do not hesitate to ask. 8 The Main Menu Once you log into All-in-One (either the production version, ALLN01, or the demo version, ALLND), you will see the Main Menu, as in the below example. 9 Keep in mind that your screen may look quite different. The Systems and Codes that appear on a Main Menu depend on the Security Groups to which one is linked. Rule: as the DSA, you can setup access to any security group, for anyone you want, including yourself. Once the IS&C Campus Security Administrator (CSA) has informed you that you have been added to the DSA security group, you will see the AU code on your Main Menu. To access the Authorization System, input AU as the Code; press Enter. The Authorization System Main Menu The Authorization System Main Menu is only available to a DSA. The three functions displayed (codes UA, UL, & SG) on this menu enable a DSA to fully maintain and monitor permissions within the All-in-One system. There are several important components common to All-in-One screens. Please refer to the below annotated screen for a detailed explanation. 10 Screen Elements: 1. In the upper left corner, today’s date and your Com-Plete userid are displayed. 2. In the center of the screen, the title is displayed “Financial Systems Authorization System –Main Menu-“. 3. In the upper right, the Application is displayed (ALLND). Normally, you would be in the production application for your regular work (ALLN01). 4. The three Codes & Functions that are available to DSAs are: UA, Maintain Userid Authorizations UL, Browse Userid Authorizations Log SG, Browse Security Group Members by Group 5. To select a function, input one of the above Codes and press Enter (each Code and Function is discussed in the sections below). 6. All departments (Dept) have a 4-character code. You must know your own department code(s). If you are responsible for more than one department, you can switch between departments by typing other department codes here. 7. The Function keys (PF1 thru PF12) are displayed here (on your keyboard, these normally correspond to F1 thru F12). Function keys differ slightly depending where you are in the Application, or, what function you may be using. 11 UA Maintain Userid Authorizations The “Maintain Userid Authorizations” screen is used to execute the Action you wish to perform for your department. As a DSA, you are responsible for adding, purging and modifying security permissions for members of your department. Screen Elements - What You Need to Know Fields: This screen displays the fields that are used to maintain authorizations for individuals in your department (such as for the field named “Action”, for example). Help. There is an online help facility. Most fields on this screen have additional information that can be displayed by positioning the cursor to the field of interest and pressing PF1. Message Line. The top line of the screen is a message line. Whenever an “Action” is executed, the system will respond with a message regarding what action was taken. Scroll Forward/Backward. Press PF8 (frwrd) to Scroll Forward and view additional Security Groups (if any). Pressing PF8, for example, once will result in lines 6 thru 10 being displayed. As of this writing a maximum of 30 Security Groups may be linked for an individual. Pressing PF7 (bkwrd) will enable you to Scroll Backward. Return to previous Menu. Press PF2 to return to the previous menu. 12 Return to Main Menu. Press PF12 to return to the Main Menu. Quit. To quit the All-in-One application, press PF3. Department Codes. All departments at UCSB have a 4-character code that is maintained by the Accounting Services and Controls department. For example, the code for Information Systems is “INFO”. As a DSA, you must know all department codes for which you are responsible. The Fields - What You Need to Know Action. This field has 7 functions you can exercise, Add, Browse, Clear screen, Display, Modify, display Next record, and Purge. Userid. This field is where you input the Com-Plete userid of the All-in-One user (or select the userid from a list). Dept. This field is where you can input a 4-character department code. In addition, it lists the departments for which you have been authorized to use. Default Dept. This field is where the default (or initial) department is designated. Because a user can be authorized for more than one department, the default department is the one that is automatically assigned when the user logs on to All-in-One. E-mail Nickname. All-in-One has a mini-Email directory that is maintained by IS&C. All-in-One requires each user to have an email address, and IS&C will assign an email nickname that corresponds to that email address. Normally, this is the Com-Plete userid. Security Group. This field is where you input the Security Group that you wish to link user to (or select from a list). To unlink a user, blank out the unwanted Security Group. LAFS. This function enables a DSA to allow input of the LAFS to be authorized for the REx Security Groups. Cost Center. Not implemented. Project. Not implemented. Direct Command. Direct Commands allow one to quickly navigate through the All-in-One system, bypassing the normal menus. To use this feature, you must be familiar with the two character function codes used by this system. 13 Common Tasks “Cheat Sheet” Presented below are the most common tasks you may be called on to perform in the execution of your DSA responsibilities. How to Add a User to your Department ¾ Fill out and submit the All-in-One Access Request Form. Once you hear back from IS&C, proceed with the below steps. ¾ Action = A. ¾ Type a Com-Plete userid in Userid. ¾ Verify that Dept is correct. ¾ Set the Default Dept to “Y” (or leave blank if another department is the default). ¾ Type a “nickname” in E-Mail Nickname (normally the Com-Plete userid) ¾ Input one or more Security Groups; press Enter. ¾ Watch for the confirmation message at the top of the screen that should resemble “Authorized Userid DEPT-USERID added successfully”. This means that you have added the user to your department. How to Browse Users in your Department ¾ Action = B; press Enter. ¾ A list of your users will be displayed for your review. How to Clear the Screen ¾ Action = C; press Enter. ¾ This screen is cleared. How to Display a User ¾ Action = D. ¾ Type a Com-Plete userid in Userid; Press Enter. ¾ The user is displayed. How to Modify a User ¾ Action = M. ¾ Change any field on the screen as necessary; press Enter. Normally pressing will result in the fields being capitalized. Press Enter a second time to update. ¾ Watch for the appropriate confirmation message at the top of the screen that should resemble “Authorized Userid DEPT-USERID modified successfully”. This means you have modified this user’s entry. How to display Next User 14 ¾ Action = N; press Enter. ¾ The next authorized user is displayed. How to Purge a User ¾ Action = P. ¾ Type a Com-Plete userid in Userid; Press Enter. ¾ Respond to the WARNING message “Are you sure you want to purge this record”. ¾ Watch for the appropriate confirmation message at the top of the screen that the user has been purged. How to List All Userids ¾ Move the cursor to the Userid field. ¾ Press PF1. ¾ A new window will open up with a list of all Com-Plete, Email and other Userids (as in the below example). CAUTION: do not assume that a user in this list has All-in-One access. ¾ Window functions, such as PF7 (backward) and PF8 (forward) can be used to scroll through this list. 15 ¾ Searching on a name is easy … just type a name (or part of a name) in the “User name:” field and press Enter. ¾ As Items in the window are cursor sensitive, you can select the User Name you want by moving the cursor to it and pressing Enter. How to List All Security Groups ¾ Move the cursor to the Security Group field. ¾ Press PF1. ¾ A new window will open up which displays a list of all Security Groups, as in the below example. ¾ Window functions, such as PF7 (backward) and PF8 (forward) can be used to scroll through this list. ¾ Searching on a Security Group is easy … just type a group (or part of a group) in “Security Group:” field and press Enter. ¾ As items in the window are cursor sensitive, you can select the Security Group you want by moving the cursor to it and pressing Enter. 16 UL Userid Authorizations Log File You can always review the history of which permissions have been added, modified or purged for any user in your department. Any action that updates the authorization database generates a log item that is added to this log file. These log files are permanent and cannot be altered. Audit Services can review these log files at any time. 1. The left side of the screen (under Userid and Name) is information about the person that was modified. 2. The Log Action codes are: “A”, a new user was added to the system. “M”, an existing user was modified. “P”, a user was purged from the system. 3. The right side of the screen (under Log User, Log Date, and Log Time) is information about the modifier (such as you, the DSA). For example, from the above log file you can see that JLPOL (Polan, Jeffrey) was added by user SCDOC on 09/12/1997 and was purged by user TAMAL3 on 01/17/2001. 17 SG Browse Security Group Members The “Browse Security Group Members” screen provides a “snapshot” of the current permission settings within your department. This is an excellent way for you to keep track of who can do what for your department. 1. For each Security Group 2. The Userid, Name, and Department Code of each person linked to it are displayed. For example, there is one person linked to the CATS-DU security group: TAMAL2 (MALOSH, TERRY A). 18 LAFS LAFS is an acronym meaning “Location Account Fund Sub”. Certain systems in All-inOne require that this special screen be completed to authorize account, funds and/or subs. You will need to fill out the LAFS screen for the following security groups: All RQSB and LVPA security groups; The CS-BRWSE security group; and The APR-DEPT security group. If you fail to complete this screen your user will not be able to process Purchase Requisitions or manage low value purchase order numbers for your department. Screen Elements The major screen elements of the LAFS screen have been numbered. 1. In the upper left are the Action codes: (A, B, C, D, M, N, P). These action codes are the very same that you use to maintain user authorizations. 2. The Userid, Dept and Group are displayed for the person you have selected on the user authorization screen. 19 3. Under the columns labeled *L Accnt Fund S, there are 10 rows visible on this screen (there are 20 rows maximum). 4. At the bottom of the screen are the Function keys, such as PF1, PF2, PF3, and so on (on your keyboard, they may appear as F1, F2, F3, etc). Note that by pressing F7 (PF7), you scroll back one screen; pressing F8 (PF8) scrolls you forward one screen and your row counter shows lines 11 through 20. How to access and fill out the LAFS screen In order to fill out the LAFS screen you must first be at the “Maintain Userid Authorizations” screen (the below example assumes that you are already at this screen). 1. In the upper left are the Action codes. In this example an action code of M (Modify) is selected. 2. Move the cursor to the LAFS column that corresponds to the Security Group to be modified (in this example RQSB-DU); and mark the column with a character (in this example the letter x is used); then press Enter. The LAFS screen is displayed, ready for your input. 20 There are two ways to authorize accounts: (A) you can authorize all Account-Funds for this user, or, (B) you can authorize specific Account-Funds for this user. (A) To authorize all Account-Funds specific to a departmental code: 1. Select an action code of M (Modify). 2. On line 1, input an “8” in the *L column, and a single “*” under the Accnt, Fund, and S columns; press Enter. 21 You are returned to the “Maintain Userid Authorizations” screen and will see a message like “Authorized Userid DEPT-USERID modified successfully”. A “>” is now visible under the LAFS column for the security group just modified, as indicated by the large yellow arrow above (the presence of this character denotes that an existing authorization has been established). If you do not see a “>”, you have not successfully updated this person’s entry. (B) To authorize one or more specific Account-Funds: 22 1. Position your cursor to any line below the L column (in the above screen, the cursor has been moved to line 1); then press F1 (or PF1, help). 2. A new window will open up which will display all your department’s Active Accounts. You can then scroll through this list, move up to an Account-Fund-Sub with your cursor (in this instance 8 668500 19900 3 was selected); press Enter. 3. The Account-Fund-Sub is grabbed from the window and inserted into the line you selected. 23 4. Press Enter to update this entry. You are returned to the “Maintain Userid Authorizations” screen and will see a message like “Authorized Userid DEPT-USERID modified successfully”. A “>” is now visible under the LAFS column for the security group just modified, as indicated by the large arrow above (the presence of this character denotes that an existing authorization has been established). If you do not see a “>”, you have not successfully updated this person’s entry. 24 System Cross Reference System Name ALLN Menu Code and/or Web Site Security Group(s) Contact Authorizations AU DSA Terry Malosh, Information Systems & Computing Approvals of Requisitions AP APR-DEPT Lisa Klock, Purchasing BARC Access via BARC Web Site AR-DA AR-DAU AR-DAPR Steve Kriz, Billing Accounts Receivable & Cashiers Office BORIS Access via Comm Services Web Site CS-BRWSE Reilly Pollard, Communication Services Chart of Accounts CA AC-BRWSE Dale O’Donnell, Accounting Services & Controls Checks/Invoices CI IN-BRWSE Asger Pederson, Accounting Services & Controls Browse/Update CATS Inv. and EIMR data CT CATS-DB CATS-DU CT-APPR CT-PREP Vaughn Boyle, Purchasing Department Account Profile Functions DA AC-DEPT Dale O’Donnell, Accounting Services & Controls Liens LN LIEN-DEP Asger Pederson, Accounting Services & Controls Purchase Order Repository System Access via UCSB Espresso Web Site PORS-DB PORS-EM1 Lisa Klock, Purchasing Continued on next page 25 System Name ALLN Menu Code and/or Web Site Requisition Express RX Software Depot Visit the Software Depot Web Site Security Group(s) LVPA-DB LVPA-DU RQSB-DU RQSB-RL Contact Lisa Klock, Purchasing SWDEP-AP Sherene Strobach, Instructional Computing Also visit the UCLA Travel Center Web Site TRV-NUM Asger Pederson, Accounting Services & Controls Vendor File Queries VE VE-BRWSE Asger Pederson, Accounting Services & Controls Lisa Klock, Purchasing Transfer Of Funds Access via UCSB Espresso Web Site TOF-DB TOF-DU TOF-RL Arliene Shelor, Budget & Planning Transfer Of Expenditures Access via UCSB Espresso Web Site TOE-PRE1 TOE-REV1 Connie Feeley, Accounting Services & Controls Access via WEB-TEV Site TRVL-DU TRVL-RL Asger Pederson, Accounting Services & Controls TV Y-CAL Airfare Authorization Tracking Number Web Travel Voucher 26 Security Group Naming Conventions Suffix or Prefix Examples Meaning -DU RQSB-DU TRVL-DU Department Update (preparer) -RL RQSB-RL TRVL-RL Department Release (approver) -DB CATS-DB LVPA-DB Database Browse -BRWSE AC-BRWSE VE-BRWSE Database Browse -NUM TRV-NUM Number RQSB- RQSB-DU Requisitions Santa Barbara System TOF- TOF-DU Transfer of Funds System TRVL- TRVL-RL Travel System LVPA- LVPA-DB Low Value Purchase Authorization System CATS- CATS-DB Capital Assets Tracking System 27 Permission Structure of All-in-One, generalized Level of Permission Security Level Security Group Examples Department Security Administrator “Administrator“ DSA Release or Approval Capability “Approver” Update Capability (updates a data base) Browse Capability (read only) “Preparer” “Read-only” APR-DEPT CT-APPR RQSB-RL TRVL-RL CATS-DU CT-PREP LVPA-DU RQSB-DU TRVL-DU TRV-NUM AC-BRWSE CATS-DB CS-BRWSE IN-BRWSE VE-BRWSE 28