1
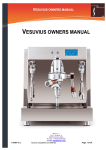
Information
Technology
VESUVIUS OWNERS
MANUALSolutions
DRAFT COPY
VESUVIUS OWNERS MANUAL
© M&V S.r.l.
M&V S.r.l.
Via L. Guerra, 9
80040 Cercola (NA)
Ph./Fax +39 0815552428
e-mail: [email protected]
vesuvius userguide9 Oct 7 2014.doc
Page 1 of 22
Information
Technology
VESUVIUS OWNERS
MANUALSolutions
DRAFT COPY
INTRODUCTION .................................................................................................................................................................... 3
VESUVIUS SUPPLIED ITEMS. .................................................................................................................................................... 3
PRODUCT SAFETY NOTICE ....................................................................................................................................................... 3
Inspection and unpacking ................................................................................................................................................... 3
General Installation precautions ........................................................................................................................................ 3
Always ensure the portafilter is locked in correctly............................................................................................................ 3
UNPACKING THE VESUVIUS ..................................................................................................................................................... 4
Attaching the feet ................................................................................................................................................................ 5
The Accessory Tray............................................................................................................................................................. 5
MAINS WATER CONNECTION................................................................................................................................................... 5
The internal tank................................................................................................................................................................. 5
Electronic selection -Tanked or mains plumbed ................................................................................................................. 5
Operation with Internal Tank ............................................................................................................................................. 6
PREPARING THE VESUVIUS FOR OPERATION ............................................................................................................................ 6
Filling the Vesuvius for the first time.................................................................................................................................. 6
Flushing the Vesuvius before using .................................................................................................................................... 6
DESCRIPTION OF THE MAJOR CONTROLS OF THE VESUVIUS ..................................................................................................... 7
Understanding the display & programming functions........................................................................................................ 9
Main Vesuvius Screens ....................................................................................................................................................... 9
Turning the Service (Steam) boiler on or off .................................................................................................................... 10
Hot Water Tip ................................................................................................................................................................... 10
Eco Mode Explained ......................................................................................................................................................... 12
Eco Mode Explained (cont.) ............................................................................................................................................. 13
Brew Water Preheat - HX on/off function......................................................................................................................... 13
Main menu screen (cont) .................................................................................................................................................. 14
The profile screen ............................................................................................................................................................. 15
Programming/examining pressure profiles....................................................................................................................... 15
Programming/examining pressure profiles (cont.) ........................................................................................................... 16
PROFILE ADVICE .................................................................................................................................................................... 16
Phase 1 Preinfusion times for the first low pressure phase .............................................................................................. 16
PROFILE ADVICE (CONT) ....................................................................................................................................................... 17
Phase 2 and beyond - The maximum or rising pressure phases ....................................................................................... 17
Later phases after maximum pressure .............................................................................................................................. 17
How the Vesuvius Controls pressure ................................................................................................................................ 17
GRINDERS.............................................................................................................................................................................. 17
COFFEE .................................................................................................................................................................................. 17
VESUVIUS SPECIFICATIONS.................................................................................................................................................... 18
THE ADVANCED MENU.......................................................................................................................................................... 19
MAINTENANCE ...................................................................................................................................................................... 22
Descaling .......................................................................................................................................................................... 22
Main Board Firmware - Manufacturer Reset ................................................................................................................... 22
PID values Explained ....................................................................................................................................................... 22
© M&V S.r.l.
M&V S.r.l.
Via L. Guerra, 9
80040 Cercola (NA)
Ph./Fax +39 0815552428
e-mail: [email protected]
vesuvius userguide9 Oct 7 2014.doc
Page 2 of 22
Information
Technology
VESUVIUS OWNERS
MANUALSolutions
DRAFT COPY
responsibly in accordance with your countries
recycling and disposal arrangements.
Introduction
Congratulations on the purchase of the worlds first
prosumer, computer controlled pressure profiling
espresso machine, using and E61 group. The
Vesuvius uses true pressure profiling via an FG304
gear pump and speed controllable brushless motor.
Currently there is no other prosumer machine
available with such advanced functions.
The pressure profiles and other functions can be set
up in many ways, so many, that the owners manual
is just a starting point for your journey.
I hope you enjoy the Vesuvius!
Paolo Cortese (Designer)
Vesuvius Supplied Items.
•
•
•
•
•
•
•
•
The Vesuvius Espresso machine
Wooden Accessory Case
2 portafilter handles (with double and single
baskets and blind filter basket
Small Accessories Bag (Various useful
maintenance items)
4 Metal Feet, 2 small (front), 2 large (Rear)
Drain hose
Water supply hose
Appropriate certifications, This manual and
any additional notes
Product Safety Notice
This manual is an integral and essential part of the
product and is to be delivered to the user. Carefully
read all warnings as they provide important
information required to install, use and maintain the
Vesuvius
Inspection and unpacking
After having removed the packaging, make certain
that the Vesuvius is not damaged in any way. If you
have any doubts, do not use the Vesuvius and
contact a professionally qualified person or your
dealer. Always keep all packaging including any
plastic bags, internal packing screws, and rubber
transit feet etc.). All packing materials should be
kept out of reach of children and disposed of
© M&V S.r.l.
General Installation precautions
Before switching on the Vesuvius make certain
that the rating indicated on the label matches the
available power supply. The serial number and
rating label is located behind the drip tray.
Installation should be in line with the standards and
laws within the of the country where it is being
installed, following any manufacturer's specific
instructions and checks.
We recommend skilled personnel install the
Vesuvius. The manufacturer cannot be held
responsible for any damages incurred if the system
is not electrically grounded, or by water leaks when
connected to the rising main.
For electrical safety, this machine requires a ground
or earth. If in any doubt contact a technically certified
electrician who must check that the electrical outlet
used has adequate capacity for the current draw of
the machine and that it is properly grounded.
We do not recommend the use of extension leads,
adaptors or any other equipment between the
Vesuvius and the mains supply socket. If for any
reason this type of equipment must be used, you
should consult a qualified electrician. Different
countries have different regulations for plumbed
in machines. Before plumbing in the Vesuvius,
you should consult with a qualified plumber
and/or ensure all in county regulations are
followed.
Always ensure the portafilter is locked in
correctly
Failure to do this can result in the portafilter coming
undone, with the risk of scalding or breaking any
cups below. Please lock to the 6:00 position or
further for safe operation
M&V S.r.l.
Via L. Guerra, 9
80040 Cercola (NA)
Ph./Fax +39 0815552428
e-mail: [email protected]
vesuvius userguide9 Oct 7 2014.doc
Page 3 of 22
Information
Technology
VESUVIUS OWNERS
MANUALSolutions
DRAFT COPY
Unpacking the Vesuvius
The Vesuvius comes in a special protective wooden
case, this item has been designed to not only protect
the Vesuvius, but when disassembled, folds flat to
allow the Vesuvius to be repackaged for
transportation at any time. To remove the Vesuvius
from the case, the following unpacking procedure
should be used.
1. All 4 screws securing the lid should be
removed. There are 1 on each side shown
by the arrows, 4 in total. Note: they are
NOT on the top.
2. The sides of the crate are secured by 4
metal clips, each held in place by a screw
that should be removed.
3. Remove the clips
The sides of the case can now be lifted away from
the base and the sides folded flat for storage.
The Vesuvius is secured to the base using rubber
transit feet with bots on the bottom that protrude
through the case and are secured with 4 wing nuts,
these must be undone. .
Once the wing nuts have been undone, the
Vesuvius will lift away from the base and have 4 soft
rubber transit feet attached. These should be
removed.
© M&V S.r.l.
M&V S.r.l.
Via L. Guerra, 9
80040 Cercola (NA)
Ph./Fax +39 0815552428
e-mail: [email protected]
vesuvius userguide9 Oct 7 2014.doc
Page 4 of 22
Information
Technology
VESUVIUS OWNERS
MANUALSolutions
DRAFT COPY
Attaching the feet
Remove the 4 transit feet and store in the accessory
case. The Vesuvius comes supplied with 4 feet in
the accessory case. 2 small and 2 large. The large
are placed on the rear mounting holes and the 2
small ones are placed in the very front mounting
holes. The extra holes near the middle are only used
for 2 of the 4 transit feet.
The Accessory Tray
The Vesuvius comes with a wooden accessory tray,
all supplied accessories will be in this tray. It also
functions to store screws clips and transit feet,
should the Vesuvius ever need to be repacked into
it's protective shipping case.
Mains Water Connection
The Vesuvius is supplied ready for a mains water
connection or internal tanked operation. The
Vesuvius only uses the mains water connection
to fill it's internal tank and the pump always
draws from the internal tank. A pressure reducer
is not required when plumbing in. Use the flexible
hose provided with the Vesuvius, connect it to a
connection hose 3/8” male with a shut off valve. The
use of a water softer or filtration system, is advised.
The drip tray can be plumbed to the waste or left
unplumbed.
© M&V S.r.l.
To plumb the waste, use the flexible hose provided
and remove the rubber stopper in the pipe at the
rear of the drip tray. The mains water connection is
underneath the Vesuvius towards the back.
The internal tank
The internal tank is accessed by opening the left
side panel using the opening latch.
Remove the tank and wash in warm soapy water
before first use. Ensure all tubes are replaced in the
tank. The longer of the 2 tubes must reach all the
way to the bottom of the tank (this is the pump inlet),
make sure the small particulate filter is in place. The
shorter tube is the vent tube from the safety release
valve and need not reach the base of the tank.
Routing the safety pressure release vent valve to the
water tank, protects both you and the electronics if a
fault causes any high pressure venting of steam
from the safety valve.
Electronic selection -Tanked or mains
plumbed
There is a switch under the Vesuvius at the rear,
after connecting to the water main, this needs to be
switched on...the switch will light when in the on
position.
M&V S.r.l.
Via L. Guerra, 9
80040 Cercola (NA)
Ph./Fax +39 0815552428
e-mail: [email protected]
vesuvius userguide9 Oct 7 2014.doc
Page 5 of 22
Information
Technology
VESUVIUS OWNERS
MANUALSolutions
DRAFT COPY
Operation with Internal Tank
If operating with the internal tank, ensure the mains
water/tank switch underneath is off (not lit). Access
and clean the internal tank as described in the mains
water connection section. The only difference is the
tank must be manually filled with water. We
recommend decalcified water, or water suitably
treated for espresso machines.
Even if the switch is accidentally placed in the mains
plumbed position (illuminated), when running
tanked. The Vesuvius will still work perfectly
normally and not leak water, because a blanking cap
is fitted to the mains inlet pipe. This needs to be
removed if running plumbed.
Preparing the Vesuvius for operation
The Vesuvius has been correctly installed as per the
previous guidance and is ready to be filled for the
very first time. You can think of this process as
bringing your Vesuvius to life. Be watchful during
this time for anything abnormal and to ensure
everything is working correctly. The portafilter should
not be locked into the group yet.
Filling the Vesuvius for the first time
There are 2 boilers in the Vesuvius, the Service
Boiler (Steam & Hot water) and the Brew boiler, for
coffee brew water only. The Service boiler has a
water level probe and will not switch on it's heating
element until the water level reaches the probe. The
brew boiler does not have this probe and does not
know whether the water level is low or not. This
makes some simple precautions important during
the first time fill.
Usually the brew boiler will be full of water from
factory testing, but if for any reason it has been
emptied prior to shipping the following procedure is
advised,
1. Open the side panel and observe the water
level in the tank.
2. Switch on the Vesuvius at the mains and
once the firmware has loaded, turn the
Vesuvius on from the front panel. Within a
few moments, the pump may start to run
3. Lift the brew lever, always do this!
© M&V S.r.l.
4. the water level in the tank should fall and
within a short time water should flow from
the group within 90s. Lower the lever when
water exits the group.
5. If the pump continues to run, you should
open the steam valve to aid the filling of
the service boiler (only open this once
the brew boiler is full, see 4 above). The
level of water in the tank should continue to
drop when the pump is running and the
service boiler will stop filling automatically.
If water does not appear from the group within 90s
and the tank level is not going down when the pump
runs, check for a blockage, kinked pipe, or other
obvious problem. Wait approximately 1 minute and
try again.
If the service boiler continues to fill with the lever
down, again check the level of water in the tank is
reducing. If not, switch the Vesuvius off, check for a
kinked hose or other blockage. Then switch on and
try again.
If the service boiler is filling, the water level is
dropping in the tank, but the pump does not stop
filling due to a fault. You will notice water exiting
from the steam wand (if open), this is a warning to
switch the Vesuvius off.. Please contact your dealer
for advice.
Flushing the Vesuvius before using
Although the Vesuvius is tested at the factory, we
always advise you flush before first use. This
removes any stale water and manufacturing
residues from the Vesuvius. We recommend the
following procedure.
1. Lift the lever and draw 1 litre through the group in
200ml amounts pausing for 15 seconds each time.
2. Switch on the steam boiler, under the eco option
in the main menu (see page 10). Once the steam
boiler has come up to temperature. Switch the
steam boiler off, then switch the Vesuvius off and
with a jug under the hot water tap, open the hot
water tap and drain as much water off as possible.
The pump should not run during this process. Switch
the Vesuvius on, allow the service boiler to refill and
repeat this process.
These procedures will remove any stale water and
residues. Any "new machine" taste, will correct itself
in a week or so.
M&V S.r.l.
Via L. Guerra, 9
80040 Cercola (NA)
Ph./Fax +39 0815552428
e-mail: [email protected]
vesuvius userguide9 Oct 7 2014.doc
Page 6 of 22
Information
Technology
VESUVIUS OWNERS
MANUALSolutions
DRAFT COPY
Description of the major controls of
the Vesuvius
Brew and steam
boiler LEDs,
lights when
heating
Cup Warmer
rack
Dot matrix
display
Touch sensitive
E61 group
Toggle Valve, to
draw steam
Toggle Valve, to
draw water
Brew Lever, raise
to start brewing,
lower completely
to stop brewing.
Always lower
completely to stop
brewing & depressurise group (even
if pump has stopped
automatically at the end
of the timed profile)
Steam wand,
ball-joint
mounted, "no
burn".
Water wand,
ball-joint
mounted, "no
burn".
E61 group vent,
when group
depressurises
waste exits
here, into drip
tray
Drip tray,
removable, can
accept hose for
draining.
© M&V S.r.l.
M&V S.r.l.
Via L. Guerra, 9
80040 Cercola (NA)
Ph./Fax +39 0815552428
e-mail: [email protected]
vesuvius userguide9 Oct 7 2014.doc
Height
adjustable
feet
Page 7 of 22
Information
Technology
VESUVIUS OWNERS
MANUALSolutions
DRAFT COPY
Side Panel
access toggle
Side panel hinges for access to
water tank and main on/off
switch
Dual pole,
illuminated
on/off rocker
switch
"Limit stat", high
temperature resettable
breaker (service boiler).
Brew boiler limit stat is at the
top of the brew boiler
Removable panel,
access heating
element removal &
service boiler drain
plug
Mains water inlet
© M&V S.r.l.
Plumbed/Tanked
operation rocker
switch. Illuminated
when set for
plumbed operation
M&V S.r.l.
Via L. Guerra, 9
80040 Cercola (NA)
Ph./Fax +39 0815552428
e-mail: [email protected]
vesuvius userguide9 Oct 7 2014.doc
Heating element, with
O'ring seal
Page 8 of 22
Information
Technology
VESUVIUS OWNERS
MANUALSolutions
DRAFT COPY
Understanding the display & programming
functions
The Vesuvius dot matrix display is capacitive
sensing and only has to be touched to elicit a
response, no pressure is necessary. The display
may appear not to respond, because some functions
have a programmed delay. In these cases the area
should simply be touched for the appropriate time
e.g. entering the advanced menu has a 10s delay, to
reprogram a profile has a 5s delay.
The third zone has a tank water level indicator,
which actually only shows full and empty. The
time and day of the week and on the right the brew
boiler temperature next to a thermometer graphic.
Main Vesuvius Screens
Home screen, this
is the usual screen
you will see.
Touch this
screen anywhere
to move to the
profile menu
The display above shows the Vesuvius on standby.
Touching the area marked with a red circle,
switches the Vesuvius on and the "home
screen" is shown (below).
Brew
Pressure
Service (steam)
Service (steam)
Boiler temperature Boiler pressure
Profile menu for
viewing and
changing profiles.
Touch the "House"
Icon to move to the
main menu
Main menu for
accessing most
commonly used
settings. Touch the "X"
icon to move to the
home screen
Remember this triangle to move from one menu to
another, after a few tries it becomes easy to use.
Tip: It helps if you think about accessing the
"main menu" as, two touches in the right hand
lower corner of the screen
Home Screen
The display is split into 3 Horizontal zones. The top
zone shows brew pressure (when brew lever
activated), Steam boiler temperature and pressure.
Note: Profile settings, as well as all other menu
settings are maintained even if the machine is
unplugged via a battery powered backup system
The next Zone shows what pressure profile is being
used and this is a sideways scrolling display.
© M&V S.r.l.
M&V S.r.l.
Via L. Guerra, 9
80040 Cercola (NA)
Ph./Fax +39 0815552428
e-mail: [email protected]
vesuvius userguide9 Oct 7 2014.doc
Page 9 of 22
Information
Technology
VESUVIUS OWNERS
MANUALSolutions
DRAFT COPY
Turning the Service (Steam) boiler on or off
The service boiler provides both steam and hot
water. The steam and hot water wands operate only
when it is switched on. To switch the service boiler
on, enter the ECO menu by the following sequence
Eco Mode + Eco Steam can be left enabled to work
automatically (as shown below) whenever you
switch the steam boiler on (fast access main
menu screen). You can leave Eco mode enabled in
the advanced menu, only needing to access it if you
want to change the number of minutes before the
Vesuvius enters Eco mode ("Time Economy"
function page 12 and 20).
Hot Water Tip
Eco steam mode can be very useful for hot water
production. If you set ECO mode to maintain the
service boiler temperature at 60 or 70C and you
want to use the Vesuvius for hot water, say for tea,
or just want a nice smooth flow. The best way is to
start drawing water as soon as the service boiler
reaches a little above 100C and some pressure is
shown.
This allows you to get an absolutely smooth flow of
water exiting the tap and it's a little cooler for tea.
This technique keeps your service boiler at an
economical 60C, but within a couple of minutes,
sufficient pressure is available to draw water. Unlike
other machines, ECO Steam mode makes this a
practical proposition, because you don't need a long
wait for hot water (as you would get if you switched
the steam boiler on/off to achieve this result).
Steam is switched on when the steam button is
touched and highlighted, as shown above
e.g. by the time you have prepared that espresso,
you can produce the Americano with water that has
reached a few degrees above boiling, no steamy
splutter.
Note: The steam on/off function is independent of
ECO mode. So Eco Steam might be highlighted, but
if the steam function is not switched on, the steam
boiler will not heat and it will not enter ECO Steam
mode, as "Eco Steam function" only operates
when the steam boiler is on.
© M&V S.r.l.
M&V S.r.l.
Via L. Guerra, 9
80040 Cercola (NA)
Ph./Fax +39 0815552428
e-mail: [email protected]
vesuvius userguide9 Oct 7 2014.doc
Page 10 of 22
Information
Technology
VESUVIUS OWNERS
MANUALSolutions
DRAFT COPY
Main Menu Screen
All the commonly used settings are here, entering
this screen is done via the "profile menu" screen.
The red circle denotes a "touch" zone action. The X
Icon takes you back to the "Home screen"
1
3
2
ECO menu
Touch to activate ECO mode immediately no wait
time, the screen will turn green (full eco mode) and
you will immediately be returned to the Home
screen. Note this only works if ECO mode is
enabled via the "Time Economy" option (page
20), is set to a value other than 0
Brew water preheat, enabled/
disabled. If using high steam
temperatures above 127C, OFF
prevents any possibility of brew
water overheating. Highlighted
when ON
Enabling, greatly increases
capacity for a busy session and
recommended if running "Eco
steam mode"
© M&V S.r.l.
Steam boiler on/off,
highlighted when ON
Recommend, steam boiler
is either off, or set to eco
steam mode with a
temperature of 60C
M&V S.r.l.
Via L. Guerra, 9
80040 Cercola (NA)
Ph./Fax +39 0815552428
e-mail: [email protected]
vesuvius userguide9 Oct 7 2014.doc
4
"Eco Steam mode"
only affects steam boiler
(recommended ).
Highlighted when ON
If OFF (not highlighted),
eco mode affects both
steam and brew boilers
(not recommended for
home use)
Page 11 of 22
Information
Technology
VESUVIUS OWNERS
MANUALSolutions
DRAFT COPY
Eco Mode Explained
Eco mode, reduces power consumption and
temperatures inside the Vesuvius for longer
component life. It does this by selectively reducing
the temperature of the brew and/or steam boilers,
based on the Eco time set ("Time Economy"
function in the advanced menu).
The Internal Eco timer starts counting down to 0
when there are no operations of the touch screen, or
anything causing the pump to run. Once it reaches
0, Eco mode is triggered. The Vesuvius immediately
exits ECO mode, if the brew lever is lifted, or the
display screen is touched, if not yet in Eco mode,
then the Eco countdown timer is reset.
ECO mode only operates if the "Time Economy"
option on page 20 is set to a number of minutes
greater than 0. This option is accessed via the
advanced menu.
Eco mode reduces the temperature of the
brew+steam or steam boiler only, by the value
set in the advanced menu option "Economy DT".
If a value of 80 is set, boiler temperatures will be
reduced by a value of 80C from their set point.
Values larger than 80 cannot be set.
If full ECO mode and not just the steam boiler (eco
Steam) is selected, with a typical "Economy DT" of
67 the brew boiler might reduce from 94C, to a brew
temperature of 27C. this would mean the boiler is
effectively switched off. Economy mode is of very
little use on a brew boiler (home environment),
as the group would cool down and require
significant time to warm up again.
In full eco mode (both boilers) ONLY, the display
switches to green when it enters ECO mode. In
steam ECO mode this does not happen.
If the steam (service) boiler is set to 127 and in the
advanced menu, "Economy DT" is set to 67, with
an Economy time ("Time Economy" value) of 4. After
4 minutes of inactivity, the steam boiler temperature
will reduce to 60C.
By setting the steam boiler to run this way, you can
walk away after steaming, knowing that the
temperature will automatically reduce after 4
minutes. This keeps the Vesuvius cooler and gives a
very rapid warm up to full steaming temperature.
60C provides optimum energy efficiency and a warm
up time reduced by 50%. This allows the boiler to
be ready for steaming in approximately 3
minutes instead of 6 minutes.
The Steam boiler will come out of ECO mode, when
the brew lever is lifted, the pump runs, or the display
is touched.
There is a further economy setting in the
advanced menu called. "Time to off". This setting
will switch the Vesuvius to standby in whatever
number of minutes has been set (max value 999),
after the Vesuvius enters economy mode. This can
be useful in a number of circumstances.
If you don't use the daily on/off timers and want the
Vesuvius to switch off if it's not being used
Or
You wish the Vesuvius to be on before you get up
and go to work, but your work pattern varies. You
can for example, set the Vesuvius to come on at
7am with no off time and on again at 7pm and off at
11pm. You then might set a "Time to off" of 2 hours
If you are in all day and using the Vesuvius it will
stay on. If you have to suddenly leave for a meeting,
the Vesuvius will switch off after 2 hours and then
switch on again in the evening at 7pm.
We recommend the ECO setting is restricted to
operate on the Steam boiler only. Touch to highlight
"Eco Steam" as below. The full Eco mode was a
commercial function we decided to retain on the
main-board firmware
© M&V S.r.l.
M&V S.r.l.
Via L. Guerra, 9
80040 Cercola (NA)
Ph./Fax +39 0815552428
e-mail: [email protected]
vesuvius userguide9 Oct 7 2014.doc
Page 12 of 22
Information
Technology
VESUVIUS OWNERS
MANUALSolutions
DRAFT COPY
Eco Mode Explained (cont.)
If Eco mode is active
and only the steam
boiler selected. The
home screen will show
"Eco", instead of the
If the steam boiler is
switched off in the ECO
menu, the display will
show "Off" instead of
steam temperature.
Note: Vesuvius will not enter ECO mode, when
the "Eco Steam function" is selected unless the
steam boiler is on, see page 10.
Tip: When in Eco steam mode, a touch on the
Eco (leaf) symbol will immediately put you in
ECO mode and take you back to the home
screen.
The tip above is for the times when you want to brew
a coffee and not necessarily steam milk. Once you
have finished, you may decide to put the Vesuvius
straight back into Eco mode. Again if it helps think of
this fairly quick procedure as:
•
2 touches on the lower left corner of the
display, followed by 2 touches on the top
left corner of the display.
It's a little difficult to understand why it works until
you try it and see the options you need are
positioned directly "underneath" each other on the
various screens. When the Home screen is shown,
you will see the word ECO on the display instead of
a temperature.
service boiler (steam boiler). Both these methods
are always on if the service boiler is on. They take
no account of the incoming water temperature, the
environmental temperature and can overheat a brew
boiler in certain circumstances. On some machines
this forces limits on how hot the service boiler can
be. It is also possible for heat to be lost into the
service boiler under certain circumstances on some
machines..
Switching off the preheat allows you prevent brew
water being preheated in these special
circumstances above. Even when preheat is on, if
no shot is being pulled, there is a mechanical
separation of the plumbing between the brew
boiler and service boiler.
When preheat is enabled the preheat function is
activated (and the mechanical separation removed)
the moment a shot is pulled on the Vesuvius.
Running with preheat disabled usually only affects
"capacity", the number of back to back shots you
can pull and unless you are very busy making
coffee, you generally won't notice much difference.
Enabling preheat may be beneficial in certain
circumstances
•
If ECO steam mode is enabled then the
steam boiler is likely to be at a lower
temperature than the brew water when the
shot is made.
•
The steam boiler is being run at lower
temperatures
•
The Vesuvius is in a very cold environment
•
Your really busy making a lot of coffees
This also works for full Eco mode (both boilers), but
in this case the display will turn Green.
Brew Water Preheat - HX on/off function
Some (not all) dual boiler machines have the ability
to preheat the brew water. They do this by using the
heat of the Service Boiler (steam boiler) to heat the
incoming water to the brew boiler. This can be by a
copper pipe spiral on the outside of the service
boiler, or by an Heat Exchange (HX) within the
© M&V S.r.l.
M&V S.r.l.
Via L. Guerra, 9
80040 Cercola (NA)
Ph./Fax +39 0815552428
e-mail: [email protected]
vesuvius userguide9 Oct 7 2014.doc
Page 13 of 22
Information
Technology
VESUVIUS OWNERS
MANUALSolutions
DRAFT COPY
Main menu screen (cont)
Touch to
set coffee
temperature
Touch +/to change
time and
day
Touch to
access
service
menu
Does
nothing,
touch + to
continue
This
actually
shows E61
group lever
operations
© M&V S.r.l.
M&V S.r.l.
Via L. Guerra, 9
80040 Cercola (NA)
Ph./Fax +39 0815552428
e-mail: [email protected]
vesuvius userguide9 Oct 7 2014.doc
The Vesuvius has an internal On/Off
timer, with 2 on/off times each day, 7
days per week. It can be ready in the
morning, off during the day and back on
again when you return from work.
If a timer has no value, it is ignored, in
the example above the machine will not
switch on or off for the first of Tuesdays
timer settings
Page 14 of 22
Information
Technology
VESUVIUS OWNERS
MANUALSolutions
DRAFT COPY
Programming/examining pressure profiles
The profile screen
The Vesuvius has 5 programmable pressure
profiles, each with up to 7 phases. Touching the
"home screen" anywhere when the Vesuvius is not
in stand by, brings up the profile screen below.
This screen shows the 5 profiles available and a
home icon. To program or view a profile, simply
touch one of the 5 profile icons for 5 seconds.
Touching the house icon returns you to the "main
menu" screen below.
The profiling system is very easy to use and can
achieve results as simple or complex as you care to
program. After you touch and hold a profile icon (P1)
for 5 seconds, you will enter this screen.
This screen tells us that for the 1st phase (of the 7
phases available), the Vesuvius will deliver a
pressure of 2.0 bar for 10s. A global Pump
acceleration parameter (page 20) affects how
quickly the pump responds and will affect the speed
at which any programmed pressure is reached.
•
Touching the - or + icon will increase or
decrease the seconds, touching the "tick"
icon will, store the value in memory and
move you to the pressure value.
•
The - or + icon will increase or decrease
pressure settings. touching the "tick" icon
saves the settings and displays the next
phase. The procedure is repeated to
program the next phase.
•
If no changes are desired, simply touch the
"tick" icon twice to move to the next phase.
Touching the "X" icon returns you to the "home
screen".
© M&V S.r.l.
M&V S.r.l.
Via L. Guerra, 9
80040 Cercola (NA)
Ph./Fax +39 0815552428
e-mail: [email protected]
vesuvius userguide9 Oct 7 2014.doc
Page 15 of 22
Information
Technology
VESUVIUS OWNERS
MANUALSolutions
DRAFT COPY
Programming/examining pressure profiles
(cont.)
Not all phases have to be used, enter a 0 time and
that phase will not be used. The screens that follow
show the rest of this example profile. Phase 7 is
unused shown by a value of 0 seconds. It is not
necessary to put 0.0 bar as well.
One useful tip, if just a small change is desired,
after touching the "Tick" Icon to save the value,
raising and lowering the brew lever returns you to
the Main menu screen.
Profile advice
The Vesuvius has advanced pressure profiling
capabilities but everyone's taste is different, so
some suggestions to get you started below
assuming a pump acceleration value of 400
(factory setting). Always remember, although you
have 7 phases for each profile, you don't have to
use them all.
Phase 1 Preinfusion times for the first low
pressure phase
You can choose to move straight to maximum
pressure, but the Vesuvius benefits from a
preinfusion phase. Note: the preinfusion chamber
within the E61 group has been disabled, as it's
operation interferes with pressure profiling.
Preinfusion, times shorter than 3 seconds will be
ineffective as this will mainly be lost in filling the
inactive preinfusion chamber in the E61 group and
the space above the coffee puck. The filling of the
redundant E61 preinfusion chamber also makes a
pre-flush unnecessary prior to pulling a shot.
Preinfusion times of 6 - 14 seconds have given good
results. With better grinders, even longer times may
be of benefit. Preinfusion pressures can be anything
you want, but not lower than 2 bar, testing has
mainly been with 2 bar preinfusion pressures. Early
testing did not show any benefits with pressure
lower than 2 bar due to low flow rates from the
pump.
One of the reasons the Vesuvius always supplies
the pump from it's internal tank, is to allow
preinfusion pressures lower than mains line
pressure (usually much higher than 2 bar).
© M&V S.r.l.
M&V S.r.l.
Via L. Guerra, 9
80040 Cercola (NA)
Ph./Fax +39 0815552428
e-mail: [email protected]
vesuvius userguide9 Oct 7 2014.doc
Page 16 of 22
Information
Technology
VESUVIUS OWNERS
MANUALSolutions
DRAFT COPY
Profile Advice (cont)
Phase 2 and beyond - The maximum or
rising pressure phases
You can reach maximum brew pressure any way
you want. A rise in stages from 2 bar to 5 bar and
from 5 bar to 10 bar, or a single rise to 10 bar. It is
up to you to experiment.
You may want higher pump acceleration and a
faster response, moderating the pressure rise by
having two rising stages. Or you may keep the
acceleration at the factory settings and use 1 stage
for a very soft and gentle rise to full pressure. We
have had good results with a single rise to maximum
pressure, but a 2 phase rise may not give benefits
for some coffees/temperatures.
We do not recommend using pressures over 11.5
bar, as the results do not seem to improve beyond
this point. The E61 group has a maximum limit of
pressure based on the Vent release valve spring
tension. For most E61 groups this is around 12.5-13
bar.
Note: the Vesuvius high pressure PTFE tubing and
fittings are rated for 25 bar pressure, well beyond
the capabilities of the pump.
Later phases after maximum pressure
Normally during the extraction process, the pour
starts to blonde and often it loses integrity. We feel
high pressure continually applied causes this and
progressively lowering the pressure as the pour
progresses will result in a better sweeter, more
rounded shot with improved body. This is probably
the reason for the good shots that many spring
lever machines produce, but we have a level of
repeatable control, well beyond that of any lever
machine.
How much you lower the pressure and how fast, is
influenced by your taste, coffee used and grinder
you have. It's good to experiment and share
information with other owners .
How the Vesuvius Controls pressure
The Vesuvius uses a pressure transducer,
commercial valve system and PID algorithm to
control pump pressure. Although not perfect, it is
© M&V S.r.l.
better than a simple on off control, which would be
unable to manage rapidly changing pressures.
You may notice brew pressures can overshoot the
set point sometimes, this mainly happens with
increasing pressures. High pump accelerations
increase this tendency as do different coffees and
grinds. As dynamic pressures approach the
static pressure potential in the system, pressure
changes happen very rapidly. The PID system
reacts very fast, but has a finite reaction time. If PID
settings are made very aggressive to damp this
response it can cause hunting lower down the
pressure ranges as the pressure falls.
These pressure overshoots are brief and have a
minimal effect on the shot, as it's mainly static
pressure showing rather than dynamic pressure.
The higher the pressures you ramp to e.g. 11 or 12
bar, or the faster the pump acceleration, the more
you might notice this.
You can fine tune the pump PID settings further, but
we recommend using the factory settings until you
become familiar with the machines operation.
Grinders.
The Vesuvius is not a cheap machine and it requires
a good grinder. To get the most benefit from this
advanced machine, we recommend a grinder
costing from approximately 25-50% of the machines
value. To give a real world example, a grinder such
as the Mazzer Super Jolly or similar class
grinder would be the absolute minimum required
and better results will be obtained with more
expensive grinders.
The Vesuvius is able to use a grind much finer than
standard espresso machines and less expensive
grinders tend not to grind as well at the finer
settings.
Coffee
To do the Vesuvius any justice at all, coffee must be
fresh. You should know the roast date of the coffee
and only use quality coffee from good roasters.
Ideally the coffee should rest for at least 5 days from
the roast date before being used, often even longer.
Use the time recommended by your roaster for
resting any specific coffee before use.
M&V S.r.l.
Via L. Guerra, 9
80040 Cercola (NA)
Ph./Fax +39 0815552428
e-mail: [email protected]
vesuvius userguide9 Oct 7 2014.doc
Page 17 of 22
Information
Technology
VESUVIUS OWNERS
MANUALSolutions
DRAFT COPY
Vesuvius Specifications
Weight
Dimensions
approx 24kg
415H x 368W x 510D
Brew boiler
0.8l - 1000W AISI 316L low corrosion stainless steel 2mm thick (8mm
end plates).
Steam boiler
1.5l - 1400W AISI 316L low corrosion stainless steel 2mm thick (8mm
end plates).
Max Pressure
12.5 bar E61 brew group limitation
Total Power Draw max
2.5Kw, detachable mains cord, 1500W with brew boiler priority &
sequential heating selected. Eco modes to reduce power consumption.
Pump & Motor
FG304 gear pump motor unit, brushless, 24V DC (4mm steel gears)
Water Tank Level Sensing
Capacitive (no magnets, sprung platforms or floats)
Water tank Capacity
2.9l to brim, normal fill 2.7 litres
Drip tray capacity
1.7l (can be drained)
Insulation
Both boilers
Useful Hot water draw
1000ml +/- 200 ml (dead draw with Vesuvius switched off is 910ml)
Low Voltage Transformer
24V 110W, commercial unit.
Low water alarm
Visual only
Feet
Metal, height adjustable
Steam and hot water wands
Ball joint no burn. Steam on left, water on right
Portafilters
2, 1 single and 1 double spout
Filter baskets
1 single, 1 double, 1 blind
Plumbed or tanked operation
Pipes and drain hoses supplied, drip tray has drain facility. Electronic
switch to change from mains to plumbed
Pressure Profiling
5 profiles, each with up to 7 stages. Battery backup of stored profiles
and all system settings.
Brew Boiler Isolation and
selectable preheat
The brew boiler is always mechanically isolated from the steam boiler
HX unit, the water path only opens when brewing begins and closes
when brewing finishes. Preheat of brew water can be switched on or off
as desired, even if the steam boiler is on.
PID control
Independent PID algorithms for brew boiler, steam boiler & pump
Timer
7 day timer, with up to 2 on/off times each day.
Wooden accessory case
Containing various small spares, feet, 2 portafilters single & double
basket, blind filter, all hoses required for plumbing.
Pressure profiling
5 profiles can be saved each with up to 7 stages.
Last shot protection
The Vesuvius will always complete the last shot, even if water is low
© M&V S.r.l.
M&V S.r.l.
Via L. Guerra, 9
80040 Cercola (NA)
Ph./Fax +39 0815552428
e-mail: [email protected]
vesuvius userguide9 Oct 7 2014.doc
Page 18 of 22
Information
Technology
VESUVIUS OWNERS
MANUALSolutions
DRAFT COPY
The Advanced Menu
This is a menu you will not use very often, It allows
customisation of Vesuvius functions. All parameters
are changed in the same way as the other menus.
To enter the advanced menu touch the screen at the
point indicated for 10 seconds. The options are
shown in the order they appear
What colour
you wish
the display
to be when
the machine
is on
standby
Select your
Language.
Spanish,
French,
German,
Italian,
English
Set this to
your
preference,
can be
normal or
reversed
Increase or
decrease to
improve
visibility for
particular
display
setting
What colour
you wish
the display
to be when
the machine
is on
© M&V S.r.l.
M&V S.r.l.
Via L. Guerra, 9
80040 Cercola (NA)
Ph./Fax +39 0815552428
e-mail: [email protected]
vesuvius userguide9 Oct 7 2014.doc
Your dealer
name, if
input. One
long press
of "tick",
moves to
next screen
Your dealer
phone
number, if
input. One
long press
of "tick",
moves to
next screen
Always
leave
enabled, if
you wish to
be able to
view &
change
profiles
Page 19 of 22
Information
Technology
VESUVIUS OWNERS
MANUALSolutions
DRAFT COPY
Pump PID settings
for controlling
pressure,
recommend using
these revised
values until
factory settings
are updated
Pump acceleration,
speed of response
to change. Values
above 700 have no
effect. Changing
value may require
change to pump PID
settings
There is no
Buzzer
Service boiler
autofill probe..
affects fill level,
leave on Mid. Low
allows higher
boiler water level,
High is less
Both boilers heat
at once or brew
boiler priority, if
enabled. Reduces
max power
consumption to
1500W approx
Does nothing
important
© M&V S.r.l.
M&V S.r.l.
Via L. Guerra, 9
80040 Cercola (NA)
Ph./Fax +39 0815552428
e-mail: [email protected]
vesuvius userguide9 Oct 7 2014.doc
Set to display
temperatures
in C or F.
Note F temps
omit decimal
values and
always round
down
Service
(steam) boiler
temperature. I
recommend a
setting of 127
or 128
(factory use
130)
PID settings
for steam
boiler
Temperature
range around
set point
where PID
operates. We
want only a
small range
for service
boiler
The delta
value for
economy.
E.g. this will
drop any
boiler
temperature
by 67C
How many
minutes before
machine
enters
economy
mode, if not
used. 0 to
disable. I also
recommend
using 4 or 5
minutes
Page 20 of 22
Information
Technology
VESUVIUS OWNERS
MANUALSolutions
DRAFT COPY
How many minutes (max
999) after machine enters
economy mode, before it
switches to standby(if not
used). 0 to disable
Set the
temperature of the
brew boiler (also
accessible from
main menu). I
personally use
93C or 94 most of
the time.
Allows for the drop in
temperature of water as it
passes from the brew boiler
to the coffee. E.g. Brew
Boiler water at 107 c, but 94 c
is displayed
Note: The programmers did make one
error when calculating F values that
were deltas.
e.g. In both "PID Setting" screens and
"Economy DT" They should have
deducted 32 from the F values and they
didn't, they just showed a change in
temp of 67C as 152F when in fact it
should be 120F
The one delta that is correct and
gives the mathematically correct F
value is the Offs.Tset Coffee
This is being corrected for USA
machines (and all future Europe
machines) . It has absolutely no effect
on the machines operation because all
values are calculated in C internally.
Also any displayed temperature values
for brew temperature and steam boiler
temperature are correct as these are not
deltas, but actual values
Revised
recommended PID
Values for Brew
Boiler.
Temperature range around set
point where PID operates. We
want a larger range for the brew
boiler. Your machine may be set
to 7C, I recommend you change
this to 5C
This value is the number of seconds the machine will wait before
1. Closing the mains water solenoid, preventing flooding if a fault develops on
a plumbed machine
2. Showing the red fill tank screen, when the water level is low
3. The length of time the pump will run when auto-filling the steam boiler
If you often walk away from the machine and miss the red low water warning
on the display, you can reduce this value to 100 seconds.
© M&V S.r.l.
M&V S.r.l.
Via L. Guerra, 9
80040 Cercola (NA)
Ph./Fax +39 0815552428
e-mail: [email protected]
vesuvius userguide9 Oct 7 2014.doc
Page 21 of 22
Information
Technology
VESUVIUS OWNERS
MANUALSolutions
DRAFT COPY
Descaling.
Maintenance
Service the Vesuvius on an annual basis, please
refer to your authorised dealer for advice.
Maintenance operations that you can perform
are:
• Changing the group gasket every 6-9
months, or as required.
•
Washing the internal Water tank, weekly
•
Removal and cleaning of shower screen
•
backflushing with detergent (lubricate group
afterwards)
•
Check for leaks (weekly)
•
Replace a heating element (with dealer
guidance)
Although descaling can be successfully performed at
home, it is beyond the scope of this manual and we
recommend only suitable filtered or treated water is
used. Please contact your dealer for advice.
Main Board Firmware - Manufacturer Reset
In the unlikely event of you having to perform a reset
of the main board firmware, please use the following
procedure. Note this will revert the board to the
board manufacturer settings, not factory settings
Switch the power off at the wall socket. Then power
the Vesuvius on an Touch the red zones above
simultaneously until a reset message appears on
screen.
The Vesuvius should only be cleaned with non
abrasive cleaners and a soft micro-fibre
(recommended), cloth
In the event of any abnormal operation or
problem with the display or main computer:
Switch the Vesuvius off and unplug it. Plug in and
switch on again. If this does not fix the fault, check
all the settings in the advanced menu, in case the
main board firmware has been accidentally returned
to the board manufacturers settings.
If a boiler fails to heat, the Vesuvius has 2
resettable limit stats:
Unplug your Vesuvius, remove either upper or lower
access panel to reset the relevant limit stat, by
pressing the little red button in the centre. The brew
boiler has this on the top, the steam boiler has one
located underneath. If the problem recurs, contact
your dealer for advice.
PID values Explained
Although we recommend you don't change the
values in the guide. With experience small changes
may benefit the operation of your specific machine.
The P gain stands for Proportional - it will try to
quickly restore the set point value. Too low, and
response is sluggish, too high can cause
overshoots.
Abnormal sounds or leaks:
The I gain stands for Integral - measures change
over time and will add more to the proportional gain
the longer we are not at the set point. Usually only
small values of I are needed, try reducing it if
overshoots/oscillations occur, or increasing I, if the
set point is not reached.
Contact your dealer for advice. Sometimes the
repair may be very simple, e.g. a leaking high
pressure PTFE pipe joint, and the dealer can talk
you through quickly fixing it. At other times it may be
more serious and require the Vesuvius to be
returned for repair
The D gain stands for Derivative - Measures
change over speed. It will reduce the effects of P
and I more, the faster the set point is approached. It
acts as a damping factor. Low values of D can
cause overshoots, high values of D can make
response sluggish.
© M&V S.r.l.
M&V S.r.l.
Via L. Guerra, 9
80040 Cercola (NA)
Ph./Fax +39 0815552428
e-mail: [email protected]
vesuvius userguide9 Oct 7 2014.doc
Page 22 of 22