Download Operating instructions
Transcript
en Index Safety instructions . . . . . . . . . . . . . Getting to know your appliance . . Water softener . . . . . . . . . . . . . . . . Filling the salt dispenser . . . . . . . . Adding rinse aid . . . . . . . . . . . . . . . Utensils . . . . . . . . . . . . . . . . . . . . . . Detergent . . . . . . . . . . . . . . . . . . . . auto 3in1 . . . . . . . . . . . . . . . . . . . . . Overview of programmes . . . . . . . 4 6 6 7 8 9 12 13 15 Washing dishes . . . . . . . . . . . . . . . Additional functions . . . . . . . . . . . . Maintenance and care . . . . . . . . . . Fault finding . . . . . . . . . . . . . . . . . . Customer Service . . . . . . . . . . . . . Information . . . . . . . . . . . . . . . . . . . Installation . . . . . . . . . . . . . . . . . . . . Waste disposal . . . . . . . . . . . . . . . . 16 18 18 20 23 23 24 25 en Safety instructions Delivery Immediately check the packaging and dishwasher for any damage which may have been caused in transit. Do not use a damaged appliance, but consult your supplier. Please dispose of packaging material properly. Installation Install and connect the appliance according to the installation and assembly instructions. The dishwasher must NOT be connected to the power supply during installation. Ensure that the protective conductor system of the domestic electricity supply has been installed correctly. Electrical connection conditions must correspond with the specifications on the rating plate of the dishwasher. If the dishwasher is to be installed in a high-sided unit, ensure that the unit is attached properly and also at the rear. Built-under and built-in appliances should always be installed under a continuous work surface which is attached to the adjacent cupboards, in order to ensure that the appliance is entirely stable. After the appliance has been installed, the mains plug should still be easily accessible. Not on all models: The plastic housing on the water input contains an electrically operated valve. The connecting wires are inside the inlet hose. Do not cut through this hose and do not immerse the plastic housing in water. 4 Warning For safety reasons, if the appliance is not fitted in a recess, thereby making a side wall accessible, the door hinge area should be covered at the side. (Risk of injury) Covers are available as optional accessories from customer services or specialist stores. In daily use Warning Knives and other sharp-pointed utensils must be placed with the points down in the cutlery basket or horizontally in the utensils basket. Use the dishwasher only in the household and only for its designed purpose, i.e. for washing domestic dishes. Do not lean or sit on the open door. The appliance could tip. Please note that free-standing appliances may tip over if the baskets are overloaded. The water in the appliance is not drinking water. Do not add any solvents to the washing chamber. Danger of explosion! Open the door carefully when the programme is still running. There is a risk of hot water spraying out of the appliance. To prevent injuries, e.g. caused by stumbling, open the dishwasher only briefly in order to load and unload the dishwasher. Read and observe the safety nformation and instructions for use on the packaging for cleaning and rinsing agents. en Children in the household If fitted, use the childproof lock. An exact description can be found in the back of the envelope. Do not allow children to play with or operate the appliance. Keep children away from detergents and rinse aid. These may cause chemical burns in the mouth, throat and eyes or asphyxiation. Keep children away from an open dishwasher. There could still be detergent residue inside. If the appliance is installed at eye-level, ensure when opening and closing the door that children are not caught or crushed between the appliance door and the cupboard door situated below. Childproof lock (button lock) You can secure your appliance from being unintentionally switched over (e.g. improper operation by children). Activating the button lock: Select the required programme. Hold down the button B for is indicated approx. 4 sec. until this on the digital display. If any button is pressed while the programme is running, this is indicated on the digital display. It is not possible to end (reset) the programme. Deactivating the button lock: Hold down the button B for approx. 4 sec. until the display goes out. At the end of the programme ( on the digital display) the button lock is cancelled. If there is a power failure, the button lock is retained. Whenever a programme is restarted, the button lock must be reactivated. Damage The appliance may be repaired and opened up by a technician only. First disconnect the appliance from the power supply. Pull out the mains plug (do not tug the power cord!) or switch off the fuse. Turn off the tap. Disposal Make redundant appliances unusable to prevent subsequent accidents. Dispose of the appliance in an environmentally friendly manner. Warning Children could get locked in the appliance (risk of suffocation) or get stuck in other positions. Therefore: Remove the mains plug, cut the mains wire and set aside. Damage the door lock so that the door can no longer be closed. You will need to purchase the following before using the dishwasher for the first time: – special salt for use in dishwashers – detergent – rinse-aid Only use products, which are suitable for dishwashers. 5 en Getting to know your appliance Diagrams of the control panel and the interior of the appliance can be found in the envelope at the front. Individual positions are referred to in the text. Control panel 1 2 3 4 5 6 7 8 9 Main switch Door opener Digital display Time delay Additional options * Programme buttons Programme sequence indicator Salt refill indicator Rinse-aid refill indicator Appliance interior 20 21 22 23 24 25 26 27 28 29 30 31 Upper basket with additional cup rack Additional cutlery basket for the top basket* Top spray arm Bottom spray arm Dispenser for salt Filters Cutlery basket Bottom basket Lock for detergent dispenser Dispenser for rinse aid Detergent dispenser Rating plate * some models 6 Water softener In order to rinse dishes and glasses satisfactorily, the dishwasher requires soft water, i.e. containing little or no lime, otherwise water stains will be left behind on crockery and glasses, etc. If the tap water exceeds a certain level of hardness, it must be softened, i.e. decalcified, so that it can be used in the dishwasher. This is achieved by adding a special salt to the water softener inside the dishwasher. The water softener, that is the required amount of salt, is set up according to how hard the tap water is. Setting up the water softener Determine the level of hardness of your tap water. Your local water company or service agent can help you with this. Identify setting from the following water hardness table. Water hardness table en Close the door. Hold down programme button B and press 1 main switch until the digital display illuminates, then release the buttons. The LED for button B flashes and the digital display displays the factory setting . To change the setting, press programme button B . Each time the button is pressed, the set value increases by 1; after , the . setting goes back to Switch off the main switch 1 . The chosen setting has now been stored. Filling the salt dispenser Salt must always be filled before the appliance is switched on, so that excess salt solution is immediately flushed away to prevent corrosion. Open the screw-type cap of the compartment 24 . Before using the appliance for the first time, pour about 1 litre of water in the salt container. Then refill with salt (not cooking salt) until the salt container is full (max. 1.5 kg). When you refill the salt, water is being displaced and drains off. The LOW SALT indicator 8 on the front panel will light up initially but will extinguish again after a short period when the salt solution has become sufficiently concentrated. , it is not When the control is set to necessary to fill up with salt as none will be consumed while the dishwasher is operating. The LOW SALT indicator is switched off. If the control is set between and , then salt must be added to the dispenser. Warning Do not pour detergent into the container for special salt. This would destroy the water softener. 7 en Salt refill indicator As soon as the salt refill indicator 8 is lit on the control panel, refill with salt immediately before the next rinse cycle. Depending on the washing frequency and the hardness setting, the regeneration salt may not have to be topped up for several months. Adding rinse aid The rinse aid is required for stain-free utensils and clear glasses. Use only rinse aid for domestic dishwashers. Open the cover on the rinse-aid dispenser 29 . To do this, press the mark (1 ) on the cover and simultaneously lift the cover on the control plate (2 ). Carefully pour in the rinse aid to just below the edge of the filler opening. Close the lid, ensuring that you hear it snap closed. To prevent excessive foam formation during the next rinse cycle, remove any rinse aid which has run over with a cloth. 8 en Adjusting the amount of rinse-aid The amount of rinse-aid added to the water can be varied by adjusting the stepless control. The rinse-aid control has been set to ”4” in the factory. Do not alter the setting of the rinse-aid control unless streaks (turn knob towards ”–”) or water marks (turn knob towards ”+”) are left on the dishes. 29 Rinse aid controller Rinse-aid refill indicator As soon as the rinse-aid refill indicator lights up on the control panel 9 , refill with rinse aid. If using detergent products with integrated rinse aid, the rinse-aid refill indicator can be switched off (see “Switching the rinse-aid refill indicator off and on” in the “auto 3in1” chapter). Utensils Not suitable Cutlery and utensils made of wood. Fragile decorative glasses, hand-crafted and antique utensils. These decorative items are not dishwasher-proof. Plastic parts sensitive to hot water. Copper and tin utensils. Utensils which are soiled with ash, wax, lubricating grease or ink. Absorbent materials such as sponges and cloths. Aluminium and silver parts have a tendency to discolour and fade during the wash cycle. Even some types of glass (e.g. crystal glass objects) may turn cloudy after many wash cycles. Recommendation: In future buy utensils which are identified as dishwasher-proof. Damage to glassware and other dishes Possible causes: type of glass or manufacturing process chemical composition of detergent water temperature and duration of dishwasher programme. Suggested remedy: Use glassware or porcelain dishes that have been marked ’dishwasher–proof’ by the manufacturer. Use a mild detergent that is described as ’kind to dishes’. If necessary, seek further information from detergent manufacturers. Select a programme with as low a temperature and as short a duration as possible. To prevent damage, take glass and cutlery out of the dishwasher as soon as possible after the programme has ended. 9 en Loading the dishwasher Pots and pans Remove large food remnants. It is not necessary to rinse them off under running water. When loading the dishwasher, ensure that D all utensils are secure and cannot fall over. D the openings of all receptacles are face down. D curved or indented utensils are at an incline, allowing water to drain. D the two spray arms can rotate freely. Very small items should not be washed in the dishwasher as they could easily fall out of the baskets. Lower basket 27 Removing the dishes To prevent water dripping from the top basket onto the dishes in the lower basket, we recommend that you empty the lower basket first and then the top basket. Cups and glasses Upper basket 20 Cutlery Cutlery should be placed in the dishwasher always unsorted and with the eating surface pointing downwards. The spray jet is then better able to reach the individual parts. To prevent injuries, place long, pointed accessories and knives on the étagère (some models) or on the knife shelf (available as an accessory). Folding spikes * * on applicable models To improve stacking of pots and pans, the spikes can be folded down. * not included with all models 10 en Shelf * * not on all models Lean tall glasses and those with long stems against the shelf – not against other items to be washed. Adjusting the height of the basket * * some models If required, the height of the upper utensils basket can be adjusted to provide more space for tall utensils either in the upper or lower basket. Appliance height in cm 81 86 Max. ø in cm upper 20/25* 20/25* max. ø in cm lower 30/25* 34/29* Select one of the two following procedures according to the design of the top basket for your appliance model: Long items, serving cutlery, salad servers or knives should be placed on the shelf so that they do not obstruct the rotation of the spray arms. The shelf can be folded back when not required for use. Top basket with upper and lower roller pairs Pull out the top basket. Remove the top basket and re-attach it to the upper or lower rollers. Small accessories holder* * some models Light-weight plastic accessories, e.g. cups, lids, etc. can be held securely in the small accessories holder. 11 en Top basket with side levers (Rackmatic) Pull out the top basket. To lower the basket, press in one lever and then the other situated on the left and right of the basket exterior, holding the basket firmly on the sides of the upper edge to prevent it from falling down. Detergent You can use commercially available liquid or powder proprietary detergents for dishwashers or TABS (do not use handwash!). If phosphate-free detergents are used with hard tap water, white deposits may be deposited more easily on utensils and the container walls. This can be remedied by adding more detergent. See detergent packaging to determine whether a detergent is suitable for silver parts. If you have any other questions, we recommend that you contact the helplines of the detergent manufacturers. Detergent dispenser with dosing aid To raise the basket, hold the basket on the sides of the upper edge and lift it up. Before re-inserting the basket again, ensure that it is at the same height on both sides. Otherwise, the appliance door cannot be closed and the upper spray arm will not be connected to the water circuit. The graduated detergent dispenser helps you pour in the correct amount. Lower line: 15 ml Middle line: 25 ml Full to the brim: 40 ml If the detergent dispenser 30 is still closed, press the lock 28 to open the detergent dispenser. Adding detergent Fill the dispenser 30 with detergent. Dosage: see manufacturer’s instructions on the detergent packaging. Note The cleaning tabs from various manufacturers exhibit differing dissolving properties, so washing power may not develop fully during short programmes and there may be undissolved cleaning agent residue. It is recommended to use washing powder for these programmes. The Intensive programme (on some models) requires one tab only. When using washing powder, you can apply some of this cleaning agent to the inside of the appliance’s door. 12 en auto 3in1 Reduce costs! If your dishes are only moderately dirty, you may be able to use less detergent than recommended. Close the lid on the detergent compartment. Press down the lid (1) until it clicks shut (2). If you are using detergent in tablet form, read the manufacturer’s recommendations on the packaging in order to determine where the tablets should be placed inside the dishwasher (e.g. in cutlery basket, detergent compartment, etc.). Make sure that the lid on the detergent compartment is closed, even if you are using tablets. The use of so-called combined detergent products may make the use of rinse aid and/or salt unnecessary. There are currently several types of combined detergent products available. 2in1: They contain detergent and rinse aid or salt function. 3in1: They contain detergent, rinse aid and salt function. 4in1: They contain a detergent, rinse-aid, salt function and an additional glass protection component. In addition, other combined products with a comparable effect are offered according to the manufacturer. >>> Always check the type of detergent or combined product which you are using! Always follow the operating instructions or the information on the packaging. The rinse programme is automatically adjusted in order to obtain the best possible rinsing and drying result. Observe the following important information if using combined cleaning products: Regeneration salt is not required up to a water hardness of 21_ dH (37_ fH, 26_ Clarke, 3.7 mmol/l) only. No other settings on the appliance are required. Salt is still required if the water hardness is above 21_ dH (37_ fH, 26_Clarke, 3.7 mmol/l). Fill the salt dispenser with salt 24 and select setting 6 on the water softening system. If in doubt, please contact the detergent manufacturer, especially if: the utensils are very wet at the end of the programme. limescale forms. 13 en Note Optimum rinsing and drying results can be obtained by using standard detergents in conjunction with separate application of salt and rinse aid. Observance of the operating instructions or information on the packaging of the combined detergents determines their effectiveness. Note Even if the rinse aid and/or salt refill indicator is lit, the rinse programme runs correctly when 3in1 products are used. If the rinse aid refill indicator 9 or salt refill 8 indicator is defective and you would like to switch it off, proceed as follows: Switching the rinse aid refill indicator off and on You can switch the rinse aid refill indicator 9 on or off. This function can be changed as follows. Close the door. Hold down the programme button 4 and press the main switch 1 until the digital display lights up, then release the buttons. 3 is indicated on the digital display (rinse aid refill indicator on). By pressing the programme button 4 , you can switch off or switch the rinse aid indicator. on Switch off the main switch 1 ; the setting is saved. 14 Switching the salt refill indicator / water softening system off and on Close the door. Hold down the programme button B and switch on the main switch 1 , then release the buttons. The illuminated button B and the factory-set value on the digital display flash. To change the setting: press the programme button B . Each time the button is pressed, the set value increases by one; when the value is reached, the display jumps back to (the salt refill indicator / water softening system has been switched off). Switch off the main switch 1 . The set value is stored within the device. Approx. 4 litres of water are required to regenerate the water softening system. As a result, the water consumption per rinse cycle increases by 0 to maximum 4 litres depending on the water hardness setting. Note If you use the detergent and rinse aid separately or switch from combined detergents to standard cleaning products, ensure that the rinse aid refill indicator has been switched on and the water softening system has been set to the correct water hardness. en Overview of programmes The max. possible number of programmes is illustrated in this overview. The corresponding programmes for your appliance can be found on the fascia. Type of Dishes e.g. porcelain, Non-sensitive pans, cutlery, glasses, etc. Soups, soufflés, potatoes, pastries, rice, eggs, fried food Amount of food remnants State of food remnant Wash programme Programmesequence Delicate Soups, potatoes, pastries, rice, eggs, fried food Coffee, cake, milk, sausage, cold drinks, salads Large Very adhesive Intensive 70_ Prerinse 40_ Clean 70_ Intermediate rinse Little Auto 55_-70_ Mixed Very little Rinse off if the dishes have been stacked for several days in the dishwash er prior to washing. Lightly Adhesive Medium The programme sequence is optimised and adjusted according to the degree of soiling on the utensils. Type of food remnants e.g. Mixed Eco 50_ Gentle 40_ Quick 45_ Prerinse Prerinse Clean 50_ Clean 40_ Clean 45_ Intermediate rinse Intermediate rinse Intermediate rinse Clean 65_ Clean 55_ Clean 55_ Dry Dry Prerinse Prerinse Clean 70_ Dry Dry 15 en Programme selection The most appropriate programme can be identified by comparing the type of crockery, cutlery, etc., as well as the amount and condition of food remains, with the details contained in the programme overview. If the turbidity is greater, the water is drained and is replaced with fresh water. In this way water consumption can be reduced by approx. 4 litres. Switching the dishwasher ON Turn on the tap. Set main switch 1 to ON. Indicators light up according to the last programme that was selected. This same programme will run again if no other programme button 6 is pressed. The numerical display 3 shows the expected duration of the programme. The programme starts automatically. You will find the appropriate programme information in the introduction. Washing dishes Reduce costs! If only a small number of dishes have been loaded into the dishwasher, selecting a programme that operates at the next lowest temperature will usually suffice. Programme sequence indicator 7 Your dishes are being cleaned. Programme specifications The programme specifications can be found in the summary of instructions. Programme specifications refer to normal conditions. Greater deviations may occur due to: varying amounts of dishes water supply temperature water pipe pressure ambient temperature mains voltage tolerances and the tolerances specific to the appliance (e.g. temperature, amount of water, etc.) The water consumption values refer to a set water hardness value of 4. Your dishes are being rinsed. Your dishes are being dried. Remaining running time display When the appliance has started, the expected programme running time is displayed. The programmed running time is affected by the water temperature, the number of dishes, as well as the degree of soiling. If these conditions are changed, the running time (depending on the selected programme) can vary greatly. As the effect is not detected until a programme is running, the time may be longer or shorter than expected. Aqua sensor * Time delay * some models The Aquasensor is an optical measuring device (light barrier) which measures the turbidity of the rinsing water. The Aqua sensor is used according to the programme. When the Aqua sensor is active, “clean” rinsing water may be transferred into the next rinsing bath and/or the temperature adjusted. You can delay the start of the programme in 1-hour steps up to 24 hours. Switch on the appliance. Press the timer programming button 4 until the digital display 3 jumps . to 16 
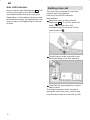
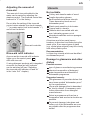
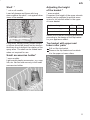
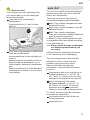
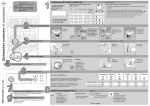
en Keep pressing the timer programming button until the required time is displayed. To delete the timer programming, keep pressing the button until is displayed. You can change your programme selection at any time until the programme starts. End of programme The programme has ended when a figure appears in the numerical display 3 . Switching the dishwasher OFF Several minutes after the programme has ended: Set the main switch 1 to OFF. Turn the water tap off. (Does not apply when Aqua-Stop unit has been fitted) Remove dishes, etc. when they have cooled down. At the end of the programme please open the door fully and not partially when emptying the dishwasher. Any escaping water vapour could damage sensitive worktops. Interrupting the programme Switch off the main switch 1 . The lit display goes out. The programme is saved. If there is a warm water connection or if the machine has already heated up and the appliance door was opened, leave the door open for several minutes and then close. Otherwise, expansion may cause the appliance door to spring open. Switch on the main switch again. Terminating the programme (Reset) Simultaneously press programme buttons A and C for approx. 3 sec. . The numerical display indicates The programme sequence lasts approx. 1 min. Switch off the main switch 1 . Changing the programme When the appliance is switched on, the programme can be changed within minutes. If the programme is changed subsequently, programme sections (e.g. Cleaning) which have already started run to the end. The new remaining time consists of the remaining time of the previous programme section and the remaining time of the newly selected programme. Intensive drying In the final rinse the appliance operates at a higher temperature and therefore an improved drying result is obtained. (Caution if utensils are fragile!) Close the door. Hold down programme button A and press main switch until 1 the digital display illuminates. Release both buttons. The LED for button A flashes and the digital display 3 displays the factory (off) or (on). setting To change the setting, press programme button A . Switch off the main switch 1 . 17 en Additional functions * on some models additional functions 5 can be set with the buttons. Soaking * The soaking cycle runs before the main programme and must be selected before the programme starts. In this additional programme cooking utensils, e.g. pans, bowls, etc., can be soaked and prerinsed in the bottom basket. It is recommended to put approx. 5 g of detergent on the door. Saving time (VarioSpeed) * The >>Save time<< function can reduce the running time by approx. 20% to 50% depending on the selected rinse programme. The particular change in the running time is indicated on the time remaining display. To obtain optimum cleaning and drying results at a reduced running time, water and energy consumption are increased. Half load* If you have only a few items to wash (e.g. glasses, cups, plates), you can switch to “Half load”. The “half load” additional function saves water, energy and time. It is recommended to put a little less detergent in the detergent dispenser than for a full load. Maintenance and care A regular inspection and maintenance of your machine will help to prevent faults. This saves time and prevents problems. Overall condition of the machine Check washing chamber for grease and limescale deposits. If you find such deposits: Fill the detergent dispenser with detergent, start the appliance without utensils in the programme which has the highest wash temperature. Clean the appliance with detergents/ appliance cleaners which are particularly suitable for use with dishwashers. Regularly wipe the door seal with a damp cloth. Never use a steam cleaner to clean your dishwasher. The manufacturer is not liable for any consequential damage. Regularly wipe the front of the appliance and panel with a damp cloth; water and a little washing-up liquid will suffice. Do not use sponges with a rough surface or abrasive detergents, as these could scratch the surfaces. Attention! Never use other chlorinated household detergents! Health hazard! Salt and rinse aid Check the refill indicators 8 9 . If required, top up the salt and/or rinse aid. Filters The filters 25 prevent larger remnants of food or other objects from getting inside the pump. This residue can occasionally clog up the filters. The filter system consists of a filter cylinder, a flat fine filter and, depending on the model, a microfilter (*). 18 en Inspect the filters for obstructions every time the dishwasher has been used. By unscrewing the filter cylinder, you can remove the filter system. Remove any food remnants and clean the filters under running water. Spray arms Lime and remnants of food in the washing water can block the nozzles in the spray arms 22 and 23 and the arm mountings . Inspect the nozzles in the spray arms for blocked holes due to remnants of food. If necessary, pull the lower arm 23 upwards and lift it off. Unscrew the upper spray arm 22 . Clean both spray arms under running water. Reassembly: Insert the filter system and screw down with the filter cylinder. 3 2 1 0 Refit the spray arms. Ensure that the lower arm has locked into place and the upper one is screwed tight. 19 en Pump * * on applicable models Larger remnants of food that have not been trapped by the filters and have been left in the water can cause a blockage in the pump. The water is no longer pumped out of the dishwasher and it can be seen covering the filter. Proceed as follows: First, always disconnect the appliance from the power supply. Ladle out as much water as possible. Remove the filters 25 . Undo the screw in the cover (Torx T 20) and remove the cover. Inspect the inside and remove any obstructions that you find. Re-insert the cover and screw down. Re-insert the filters and screw down. Torx T20 2 1 20 Fault finding Resolving minor problems yourself Experience has shown that you can resolve most problems that arise during normal daily usage yourself, without having to call out a service engineer. Not only does this save costs, but it also means that the appliance is available for use again that much sooner. The following list of common occurrences and their remedies should help you identify the causes of most problems. Problems ... Attention Remember: Repairs may be carried out by a technician only. If a component has to be replaced, ensure that only original spare parts are used. Improper repairs or use of non-original spare parts may cause considerable damage and put the user at considerable risk. ... when the appliance is switched on The appliance does not start. The mains fuse has tripped. The appliance plug has not been inserted. The appliance door has not been shut properly. The tap has not been turned on. en The filter on the water supply hose is blocked. Switch off the appliance and pull out the mains plug. Turn off the tap. Then clean the filter which is situated at the connection of the supply hose. Finally, restore the power, turn on the tap and switch on the appliance. Water remains inside appliance after programme has ended Blockage or kink in drainage hose. Pump is jammed. Filters are blocked. The programme is still running. Wait for the programme to end (numerical display will indicate 0). Perform “Reset” function. ... during washing ... with the appliance itself Lower spray arm rotates with difficulty Spray arm is blocked by small items or food remains. Lid in detergent compartment cannot be closed Detergent compartment has been overfilled. Mechanism is clogged with remnants of detergent. Indicator lamps do not extinguish after washing has finished. Indicator lamps do not extinguish after washing has finished Main switch is still set to ON. Remnants of detergent stuck inside dispenser Compartment was damp when it was filled up with detergent. Compartment must be dry before detergent is added. Refill display does not light up. Rinse aid refill indicator switched off. (see auto 3in1 chapter) Salt refill indicator switched off. (see auto 3in1 chapter) Unusual amount of foam is created Normal washing up liquid has been poured into the rinse-aid container. Remove any spilled rinse aid with a cloth as it could otherwise lead to excessive foaming during the next washing cycle. Appliance stops suddenly while washing is taking place Cut in electricity supply to appliance. Water supply has been interrupted. Knocking sound can be heard while washing is taking place A spray arm is knocking against the dishes inside the appliance. Rattling sound can be heard while washing is taking place Crockery has not been stacked properly inside the appliance. Knocking sound coming from inlet valves This is caused by the way the water pipes have been laid and it has no effect upon the way the appliance functions. There is no remedy for this. 21 en ... with the dishes, cutlery, etc. Remnants of food are stuck to the dishes, cutlery, etc. Dishwasher was not loaded properly. Jets of water could not reach all parts of the dishes, etc. Too many items in the rack. Items in the rack were touching each other. Not enough detergent was added to dispenser. Selected wash programme was not intensive enough. Rotation of spray arm was obstructed by dish, etc. Nozzles in spray arm are blocked by remnants of food. Filters are blocked. Filters have been incorrectly fitted. Waste-water pump is jammed. Plastic items are discoloured Not enough detergent was added to dispenser. White stains are left on crockery, glasses have a milky appearance Not enough detergent was added to input compartment. Amount of rinse-aid was set too low. Although water is quite hard, no salt has been put in appliance. Water softener was set too low. Lid on salt container is not screwed tight. If you used a phosphate-free detergent, try a detergent containing phosphates and compare results. 22 Dishes, cutlery, etc. have not been dried Selected programme did not include drying function. Amount of rinse-aid was set too low. Items were removed from dishwasher too soon. Glasses have a dull appearance Amount of rinse-aid was set too low. Tea stains or traces of lipstick have not been completely removed Detergent does not have a sufficient bleaching effect. Washing temperature was set too low. Traces of rust on cutlery Cutlery is not sufficiently rustproof. Salt content in washing water is too high. Lid on salt container is not screwed tight. Too much salt was spilt while filling container. Glasses become clouded and discoloured; coating cannot be wiped off Unsuitable detergent was used. Glasses are not dishwasher-proof. Smears left behind on glasses and cutlery; glasses have acquired a metallic appearance Amount of rinse-aid set too high. en Customer Service Please call your local service agent, if you are not able to resolve any problem yourself. The name of your nearest service agent is shown in the Customer Service address list. When you call, please provide details of the model number (1) and the production (FD) number (2) which are shown on the nameplate 31 on the appliance door. 1 FD 2 Attention Please note that a visit by the customer service technician in the event of a fault or one of the problems previously discussed is not free of charge even during the warranty period. Information Notes on comparison tests You will find details of the conditions for the comparison tests on the additional ”Notes on comparison tests” sheet. The consumption values for the relevant programmes are given in the introduction. General Built-under and integrated appliances which are subsequently installed as free-standing appliances must be secured to prevent them from falling over, e.g. by screwing them to the wall or by installing them under a continuous worktop which is screwed to the adjoining units. For Swiss version only: The appliance can be installed without difficulty between wooden and plastic walls in a kitchen range. If the appliance is not connected via a plug, the installation side must feature an all-pole disconnector with a contact gap of at least 3 mm in order to satisfy the relevant safety regulations. 23 en Installation The dishwasher must be connected by a qualified technician to ensure correct operation. The specifications for supply, drainage and connected load must fulfil the required criteria as stated in the following paragraphs or in the installation instructions. Install the appliance in the following sequence: – Check the delivery – Install the appliance – Connect the waste water – Connect the fresh water – Connect the power supply Delivery Your dishwasher was checked at the factory to ensure that it was in perfect working order. This may have left some small water stains in the dishwasher. These will disappear after the first rinse cycle. Installation The required installation dimensions can be found in the installation instructions. Using the height-adjustable feet, adjust the appliance until it is level. Ensure that the appliance is standing firmly. Waste water connection See the installation instructions for the required connection steps. If required, attach a siphon with drainage spigot. Using the enclosed parts, connect the waste water hose to the drainage spigot of the siphon. Ensure that the drainage hose is not kinked, crushed or twisted (ensure that there is no sealing cover which prevents the waster water from flowing away!). 24 Fresh water connection Using the enclosed parts, connect the fresh water connection to the tap according to the installation instructions. Ensure that the fresh water connection is not kinked, crushed or twisted. When replacing the appliance, always connect a new water supply hose to the water supply. The old supply hose must not be re-used. Water pressure: Minimum 0,05 MPa (0,5 bar) – maximum 1 MPa (10 bar). If the water pressure is higher, install a pressure reducing valve. Flow rate: Minimum of 10 litres per minute. Water temperature: We recommend that you use cold water. If you do use hot water, the temperature should not exceed 60 °C. Electrical connection Connect the appliance only to 230 V alternating current via a correctly installed socket with protective conductor. See rating plate for required fusing 31 . The socket must be attached near the dishwasher and be freely accessible. The connection may be modified by an electrician only. Use only a residual-current-operated circuit-breaker which features the symbol. Only this circuit breaker guarantees compliance with the currently valid regulations. Removing the appliance It is essential, when removing the appliance, to observe the following sequence: First, disconnect the appliance from the power supply. Pull out the mains plug. Turn off the water supply. en Disconnect the waste water and fresh water connections. Loosen the fastening screws under the worktop. If fitted, remove the base panel. Pull out the appliance, carefully pulling the hose behind. Transporting the dishwasher Drain water from the dishwasher. Secure all loose parts. The appliance should only be transported in an upright position. If the appliance is not kept upright during transport, any water left inside may seep into the control module and cause subsequent errors with programme functions. The appliance must be drained in the following sequence: Turn on the tap. Close the door. Set main switch to ON. Select the B programme. The programme duration in minutes is shown in the numerical display. Wait for approximately 4 minutes. Terminate the programme by pressing A and C simultaneously. The time display changes to . Wait a further minute and then switch the appliance off. Turn off the tap. Waste disposal Disposal Old appliances are not worthless rubbish. Valuable raw materials can be reclaimed by recycling old appliances. Pull out the mains plug of the redundant appliance. Cut off the power cord and discard with mains plug. To prevent children from locking themselves in the appliance and suffocating, destroy the door lock and childproof lock (if fitted). You received your new appliance in a protective shipping carton. All packaging materials are environmentally friendly and recyclable. Please contribute to a better environment by disposing of packaging materials in an environmentally-friendly manner. All plastic parts of the appliance are identified by internationally standardised symbols (e.g. >PS< polystyrene). When the appliance is being disposed of, the plastic waste can be sorted for environmentally-friendly recycling. Please ask your dealer or inquire at your local authority about current means of disposal. Protection from freezing temperatures If the appliance is installed in a location where there is a risk of freezing temperatures (e.g. in a holiday home), all water must be completely drained out of the interior (see “Transporting the dishwasher”). Turn OFF the tap, disconnect the supply hose and allow to drain. 25 en Disposal of the packaging Please dispose of the packaging material in an environmentally friendly manner. Keep children away from shipping carton and packaging components. Danger of suffocation from folding cartons and plastic film. D Corrugated cardboard consists mainly of wastepaper. D The moulded polystyrene parts do not contain any chlorofluorohydrocarbons. D The polyethylene film (PE) consists partly of secondary raw materials. D The wooden frames (if fitted) are made of untreated residual wood. D The hoops (if fitted) consist of polypropylene (PP). Disposal of redundant appliances Make redundant appliances unusable to prevent subsequent accidents. Dispose of the appliance in an environmentally friendly manner. 26 Warning Children could become locked in the appliance (risk of suffocation) or find themselves in other dangerous situations. Therefore: Pull out the mains plug, sever and dispose of the power cord. Destroy the door lock so that the door can no longer be closed. This appliance is labelled in accordance with European Directive 2002/96/EG concerning used electrical and electronic appliances (waste electrical and electronic equipment – WEEE). The guideline determines the framework for the return and recycling of used appliances as applicable throughout the EU. Child-proof lock * 40 41 42 Switch on the child-proof lock Open the door with child-proof lock switched on Switch off the child-proof lock When the door is open, the child-proof lock offers no protection. Baking sheet spray head * Large sheets or grilles and plates which have a diameter greater than 30 cm (gourmet plates, pasta plates, dinner plates) can be cleaned with the aid of the spray head. To do this, remove the top basket and insert the spray head as illustrated in the diagram. To ensure that the spray jet can reach all parts, arrange the baking sheets as illustrated (max. 4 baking sheets and 2 grilles). Never operate the dishwasher without the top basket or baking sheet spray head! * some models Summary of instructions for dishwasher en Brief and handy: everything your dishwasher needs... Before using for the first time, read the installation and operating instructions! Adjusting the water softening system * Request the water hardness value in your area from your water supply company and enter it here ... Quickly sorted Read off the correct setting for your water hardness – Each time button B is pressed, the setting increases by 1; after H:07, the setting goes back to H:00 . – Switch off the main switch. The chosen setting has now been stored. * only before first use of the appliance or if the water hardness changes Fill with special salt Dissolves limescale (not required for set value 0!) Only before using the dishwasher for the first time pour approx. 1 l / 2 pt water into the salt opening. Unscrew the lid. Fill with rinse aid Pour in max. 1.5 kg / 3 lb 5 oz salt (never detergent!) Everything is sparkling clean ... Press mark 1, lift up lid 2. Fill with detergent Warning, When the display shows 0:00 (end of programme), press On/Off switch Push the lid shut, press. PLOP! Intensive 70_ Auto 55_/65_ Eco 50_ Gentle 40_ Quick 45_ Prerinse 2:15 1,60 16 13 1:25-2:20 1,05-1,60 10-17 – 2:20 1,05 12 – 1:12 0,80 14 11 0:30 0,70 10 – 0:19 0,05 4 – Duration: hs/mins Switch off the appliance Everything O.K... Pour in detergent. Quick, economical or intensive The programme data are laboratory readouts according to European Standard EN 50242. In practice, deviations are possible. Press On/Off switch, running time of the chosen programme appears Close the lid. CLICK! combination products are not suitable for all programmes, follow manufacturer’s instructions. This overview shows the maximum number of programmes available. You’ll find the corresponding programmes of your device on your control panel. Switch on appliance Pour in rinse aid. Very dirty dishes, a lot of detergent ... If required, open the lid (press the pin). Select programme Screw on the lid. Switch on dishwasher immediately. Refill whenever level indicator is light! Programme Overview 9000 155 371 How to adjust the water softening system – Hold down programme button B and press main switch until the digital display illuminates, then release the buttons. The LED for button B flashes and the digital display displays the factory setting H:04. Energy Consumption: kWh Water Consumption: litres With Aquasensor Additional programmes ** Soak ...crockery in the lower basket, programme starts automatically, remember to add an extra 5g of cleaning agent when the door unlocks. Time reduction/ time saving ...shortens the cleaning time, reduces the drying. Increased flexibility ... h. Time selection ...switches on as soon as you press the time selection button: Alters the programme start in hourly steps Maintenance and care Cleaning the waste-water pump * For perfect rinsing results ... * With some models Strainers ... Check, if required, clean Rotate filter cylinder, remove filter system ... rinse under flowing water ... Insert ... Screw in filter system NOTE MARK! Spray arms ... Remove blockages/deposits Pull lower arm upwards ... Unscrew upper arm ... Clean spray nozzles under flowing water (perhaps with toothpick) ... – Ladle out water and remove filters – Unscrew cover (Torx T20) – Check area of fan impeller for foreign objects – Screw in cover and insert filters Insert lower arm ... Screw in upper arm Eliminating minor faults yourself ... ... Self–help pays! Fault Possible Cause Remedy Residual water in the device Waste-water pump blocked Clean waste-water pump (see above). Dishes not clean Close and switch on appliance or terminate programme (see Terminating the programme). Sand or grainy residues on dishes Programme not yet ended Device does not work/stops Plastic parts / parts of dishes discoloured Cutlery rusty Supply fitting not open Open supply fitting. Supply hose kinked Lay supply hose without kinks. Supply fitting jammed or calcified 1. Unscrew water connection. 2. Clean filter in the water connection. 3. Flow rate must be min. 9 l/min when the water inlet is open. If the flow rate is less, replace the supply fitting. Too little cleaning product Discoloration caused by food colourings (tomato sauce) Fault Stains and streaks Possible Cause Remedy Utensils are situated too close to each other or on top of each other Spread out the utensils, avoid contact between the utensils. Too little cleaning product Follow manufacturer’s specifications (detergent). Unsuitable programme selected Select more intensive programme. Spray nozzles blocked Clean spray arms (see above). Filters dirty, not installed securely Clean the strainers (see above). Spray arms blocked Arrange the utensils so that the spray arms can rotate freely. Rinse aid dosage too high / too low Streaks: Reduce dosage. Water or limescale stains: Increase dosage. Milky residues on dishes (can be removed) Water softening system incorrectly set; Set water softening system correctly. no special salt Refill with special salt. Milky film, glasses cloudy / dull (cannot be removed) Glasses not dishwasher-proof. Use dishwasher-proof glasses. Follow manufacturer’s specifications (detergent). Discoloration is quite safe; fades after subsequent rinse cycles. Cutlery not rust-proof Hard knife blades are more susceptible Use dishwasher-proof cutlery. Extraneous rust Never wash rusting parts in the appliance. Use glass-friendly cleaning products. Further advice can be found in the instruction manual Stopping the programme ... Press and hold the two reset buttons simultaneously for approximately 3 seconds while the programme is running (RESET) Loading the dishwasher correctly ... ”0:00” appears The programme will stop after 1 minute Switch off the appliance. Arrange dishwasher-proof utensils (having removed any ash, wax, grease, ink, sticky labels; remove, large remnants of jam, dairy products and food) according to the operating instructions and check that the spray arms can rotate freely.