1
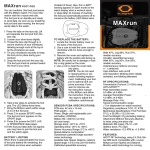
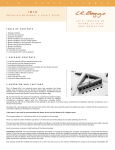
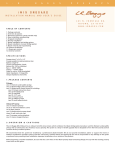
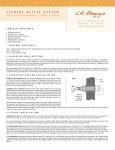
L
.
R
.
B
A
G
G
S
P
P
E
A
M
P
S
MIXPRO
USER'S
GUIDE
4 8 3
N .
F R O N T A G E
N I P O M O ,
C A
R D .
9 3 4 4 4
W W W . L R B A G G S . C O M
1 . Q U I C K S TA RT
1. Install the battery
2. Locate the "Internal Controls" diagram in section three to use as a reference.
3. If either of your sources require phantom power, turn it on now.
4. Plug a three-foot stereo cable into the guitar and into the Mixpro's input.
5. Plug a mono cable from the Mixpro into the PA or amp.
6. Pan the mix control completely to the first channel and set the gain and EQ.
7. Pan the mix control fully to the second channel and carefully set the gain so
that it is about as loud as the first channel.
8. Adjust the low cut to work with your second source's EQ settings.
9. Fine-tune the gain again to match the second source's volume with the first
source.
10. Turn the mix control to 12:00 and try both positions of the relative phase
switch to find the best phase for your combination. If you can't decide, choose
the relative phase that provides the smoothest pan.
2.EXTERNAL CONTROLS
A
C
B
D
A. Treble control: Use to add or subtract the highest frequencies, also known as
"presence."
B. Bass control: Use to add or subtract lower frequencies, add warmth or cut
feedback.
C. Trim control: The trim control is a movable 12dB/octave filter that is
adjustable from 27hz to 200hz. This filter customizes the effect of the Bass
control and makes it possible to boost the low end in the warmth region without
adding excessive low bass. It is also useful to tame excessive low end from minimics and woofers.
H
D. Volume control: Unlike gain, whose adjustment will affect the character and
personality of the sound, the volume simply controls the amount of the signal
that gets out of the box. The Mixpro will likely be the quietest thing in your
signal chain. So for the best system signal to noise ratio, we recommend that you
run the volume as high as you can without causing the PA to distort.
E. 1/4” output: This is a regular unbalanced output for a standard mono cable.
You can plug this into just about anything.
F. Invert: This control changes the polarity of the signal. When the button is out,
the output will be in phase with the input signal. Phase affects the way the
guitar top is pressurized by the speakers. When the guitar top and speaker are in
phase with each other, low-end feedback can occur.
G. Battery status LED: The battery status LED remains on at all times when the
unit is plugged in. As the battery weakens the light will gradually dim. When it
becomes difficult to see, replace the battery.
H. Battery compartment: To change your battery, remove the two screws
adjacent to the belt clip using a screwdriver or a dime. Slide the preamp out of
the housing and replace the battery.
I. Mix control: This control allows you to blend the two inputs to suit your taste
or application. As you face the control, full counter-clockwise (left) will give
100% of whatever pickup you have placed on the tip. Full clockwise will give you
100% of the ring.
J. Input: This input will accept a 1/4" stereo cable. You can also use a standard
mono cable if you just want one pickup or do not have a stereo cable (there will
E
F
G
I
J
not be any signal on the ring channel). When installing the pickups in the guitar,
choose the primary pickup -- this is usually the one that is most stable -- to be on
the tip channel. A standard application would be a pickup such as the Ribbon
Transducer or magnetic pickup on the tip and a mini-microphone on the ring.
B
3. INTERNAL CONTROLS
D
G
The Mixpro contains all of the essential controls to configure two pickups to
successfully blend or complement each other. These controls may be accessed by
removing the two large screws on the back of the unit, then sliding the preamp
out.
3.1 Tip Channel Controls:
F
E
A
C
A. Gain control: Turn the mix control completely counter-clockwise before
setting this. Please see section 4.4 (setting the gain) for more information.
B. Nine volt phantom power: The Mixpro provides phantom power for mini-mics
and devices that may be powered externally, eliminating the need for batteries
on the guitar.
Caution: Do not use phantom power with anything other than devices that
specifically require it, such as mini-mics or the L.R. Baggs Buffer Jack. Application
of phantom power reduces the input impedance to less than 20K ohms and will
render most passive pickups useless. If your passive pickup sounds thin or weak,
check to make sure phantom power is turned off.
3.2 Ring Channel Controls:
The most common use of the ring channel is for mini-microphones. The Mixpro will work with and power most mini-mics that can be configured
for a two-wire connection. Many of these mics have a third wire that must be attached to the ground connection, through a resistor, to achieve
two-wire status. We have provided a chart for some of the more popular mics, which shows the wiring and resistor value required for optimum
performance -- see section 4.1.
C. Gain control: Turn the mix control completely clockwise before setting this. It is recommended that the ring channel gain be set so that the
device attached to this channel has a similar volume to that of the tip channel. This will provide a 50/50 mix when the mixer is normalized at the
12:00 position. See section 4.4 (setting the gain) for additional information.
D. Nine volt phantom power: The Mixpro provides phantom power for mini-mics and devices that may be powered externally, eliminating the
need for batteries on the guitar.
Caution: Do not use phantom power with anything other than devices that specifically require it, such as mini-mics or the L.R. Baggs Buffer Jack.
Application of phantom power reduces the input impedance to less than 20K ohms and will render most passive pickups useless. If your passive
pickup sounds thin or weak, check to make sure phantom power is turned off.
E. Low-cut trim: This control is useful for controlling excess boominess from mini-mics and body-type pickups. As a general rule, adjust the low
end of the mic or body pickup, using this control, to
have a similar low end response to your primary pickup on the tip channel. Adjust the low end response of the ring pickup before finalizing the
gain setting, as the low end response will affect the loudness of the pickup.
F. Low-cut range switch: A wide range of low-cut adjustment has been provided. The low range should provide adequate low frequency
attenuation for mini-mics used in the standard near-soundhole mounting, or body pickups, which, being deeper in the body, require a deeper low
cut.
Mics placed deeper in the body or boomy body pickups may require more low frequency attenuation. For these, use the high range.
G. Relative phase switch: This control allows you to optimize the blend between your two sources. With the mix control at 12:00 (equal parts tip
and ring channels), there will often be one relative phase setting that sounds superior. The optimum phase will usually be obvious. If it isn't,
choose the relative phase that produces the smoothest blend as you pan from tip channel to ring channel.
4. USER'S GUIDE
4.1 Two Sources: The Mixpro will mix just about any two pickups together. Some pickups require a preamp/buffer on the guitar when mixed with
certain types of pickups; others can be run passively down one cord. The most common use of the Mixpro is to blend a piezo undersaddle pickup
with a mic.
Using a passive piezo pickup with a mini-mic down a stereo cord will cause crosstalk (see section 4.2 for more information about this). The solution
to this problem is to use an active preamp/buffer on the guitar or to replace the battery-powered preamp with our phantom-powerable Buffer
Jack.
Many undersaddle pickups have some sort of battery-powered preamp/buffer, which has an output that is compatible with a mini-mic signal.
Many have solder pads to attach a mic to the ring channel. Some provide power for the mic from the battery and others require phantom power
for the mic. The Mixpro will work with either type and can provide power for the mic (and pickup) if necessary.
The following chart shows some common combinations and requirements:
Pickup
Onboard Buffer Required?*
Mic + Ribbon
Transducer
Yes -- use Buffer Jack or RTS
preamp**
Mic + LB6
No -- but best with Buffer
Jack***
Mic + Hex Pickups
No
Mic + Matrix
Yes -- use Matrix preamp or
Buffer Jack
Mic + B-Band
Yes -- use B-Band preamp
only
Mic + Magnetic Pickup
No
Contact Pickups +
Ribbon Transducer
No
* when used with 3ft stereo cord
** requires Strapjack Plus 4-pin stereo jack. See enclosed RTS supplement
*** you may find that an acceptable level of crosstalk is achievable with a high-output ceramic piezo pickup
4.2 Crosstalk: Crosstalk is interference or "bleed" between two signals within a common shield, such as a stereo guitar cable. This common
problem is often encountered when a high-impedance piezo pickup is mixed with a low-impedance active source, such as a mini-mic. The bleed
signal from the mic mixes in the cord with the pickup signal and appears in the pickup channel. The higher the amount of amplification (gain)
required for the pickup (and longer the cable), the more of the mic signal will be present in the pickup channel. It is common to encounter 25% to
50% mic bleed into a clean pickup channel.
Often the best relative phase for a particular pickup and a mic will require that the actual mic channel be out of phase with the phase of the bleed.
This causes frequency response problems with the mic and leads to a confusion of the phase relationship between pickup and mic. This causes
unpredictable frequency cancellation.
Worse, it is often impossible to get the mic bleed in the pickup channel low enough to allow it to be turned up without the mic starting to feed
back! The only adequately clean way to send a high-impedance piezo pickup and a mic signal side by side down one cord is to have some sort of
active buffer for the piezo on the guitar itself.
4.3 Buffer Jack: The Buffer Jack preamp is phantom-powerable by the Mixpro and provides an input for the mic on the ring and an all-discrete
class A preamp/buffer for the piezo on the tip. The Buffer Jack eliminates crosstalk, preserves the integrity of both signals and gets the batteries off
of the guitar. It is available from L.R. Baggs.
4.4 Setting the Gain: Gain is not volume. Gain is the amount of amplification
that is applied to an input signal to boost it to a useful level. To accommodate a
wide range of pickups, active devices and such, the Mixpro has adjustable gain.
The idea is to adjust the gain to find a window between hiss and distortion.
Ground
Pickup
Hot
For instance, if you are using a low output passive pickup such as the Ribbon
Transducer, and you fail to turn the gain way up, you will need to turn the PA up
so high to hear the pickup that there will be a lot of hiss. Conversely, if you plug
in a high output active pickup and do not turn the gain way down, there will be
massive distortion. The Mixpro is so quiet that the gain window is pretty wide.
But there is a smaller sweet spot within that window.
With everything plugged in and turned on, play your instrument very hard. Turn
the gain trim up (clockwise) slowly while playing until you begin to hear some
distortion, then back the gain off (counter-clockwise) until the distortion just
disappears. This setting will be the richest sounding and the most quiet. Once
you have determined your preferred setting, we recommend that you leave the
gain control alone. Do not use the gain control as a volume control. Using it in
this manner will vary the character of your sound as you adjust it up and down.
Hot
3rd wire
Ground
Mic