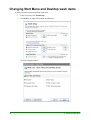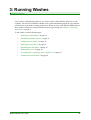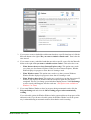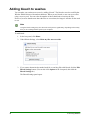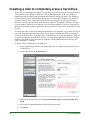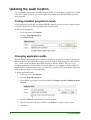
1
Webroot
®
Window Washer
User Guide
Webroot Software, Inc.
385 Interlocken Crescent Boulevard
Suite 800
Broomfield, CO 80021
www.webroot.com
Version 6.6
Window Washer User Guide
Version 6.6 International; April 2011
© 2004–2011 Webroot Software, Inc. All rights reserved. Webroot, Window Washer, and the Webroot and Window
Washer icons are registered trademarks or trademarks of Webroot Software, Inc. All other trademarks are properties
of their respective owners.
Contents
1: Getting Started . . . . . . . . . . . . . . . . . . . . . . . . . . . . . . . . . . . . . . . . . . . . . . . . . . . . .1
Starting Window Washer . . . . . . . . . . . . . . . . . . . . . . . . . . . . . . . . . . . . . . . . . . . . . . . . . . . . . . . . . . . .2
Changing program settings . . . . . . . . . . . . . . . . . . . . . . . . . . . . . . . . . . . . . . . . . . . . . . . . . . . . . . . . . .4
Updating Window Washer . . . . . . . . . . . . . . . . . . . . . . . . . . . . . . . . . . . . . . . . . . . . . . . . . . . . . . . . . . .6
Protecting settings with a password . . . . . . . . . . . . . . . . . . . . . . . . . . . . . . . . . . . . . . . . . . . . . . . . . . . .7
Shutting down Window Washer . . . . . . . . . . . . . . . . . . . . . . . . . . . . . . . . . . . . . . . . . . . . . . . . . . . . . . .8
Renewing your subscription . . . . . . . . . . . . . . . . . . . . . . . . . . . . . . . . . . . . . . . . . . . . . . . . . . . . . . . . . .8
2: Selecting Wash Items . . . . . . . . . . . . . . . . . . . . . . . . . . . . . . . . . . . . . . . . . . . . . . . .9
Changing Internet Explorer wash items . . . . . . . . . . . . . . . . . . . . . . . . . . . . . . . . . . . . . . . . . . . . . . . .10
Changing Firefox wash items . . . . . . . . . . . . . . . . . . . . . . . . . . . . . . . . . . . . . . . . . . . . . . . . . . . . . . . .12
Using the Cookie Keeper . . . . . . . . . . . . . . . . . . . . . . . . . . . . . . . . . . . . . . . . . . . . . . . . . . . . . . . . . . .14
Changing Instant Messaging wash items. . . . . . . . . . . . . . . . . . . . . . . . . . . . . . . . . . . . . . . . . . . . . . .15
Changing Start Menu and Desktop wash items . . . . . . . . . . . . . . . . . . . . . . . . . . . . . . . . . . . . . . . . . .18
Changing Windows system wash items . . . . . . . . . . . . . . . . . . . . . . . . . . . . . . . . . . . . . . . . . . . . . . . .20
Changing Outlook Express wash items . . . . . . . . . . . . . . . . . . . . . . . . . . . . . . . . . . . . . . . . . . . . . . . .22
Changing Recent Activity wash items . . . . . . . . . . . . . . . . . . . . . . . . . . . . . . . . . . . . . . . . . . . . . . . . .24
Changing Microsoft Office wash items . . . . . . . . . . . . . . . . . . . . . . . . . . . . . . . . . . . . . . . . . . . . . . . . .26
Managing Custom Wash items . . . . . . . . . . . . . . . . . . . . . . . . . . . . . . . . . . . . . . . . . . . . . . . . . . . . . .27
Selecting Webroot Custom Wash items . . . . . . . . . . . . . . . . . . . . . . . . . . . . . . . . . . . . . . . . . . . .27
Creating your own wash items. . . . . . . . . . . . . . . . . . . . . . . . . . . . . . . . . . . . . . . . . . . . . . . . . . . .29
3: Running Washes . . . . . . . . . . . . . . . . . . . . . . . . . . . . . . . . . . . . . . . . . . . . . . . . . . .33
Running a wash manually . . . . . . . . . . . . . . . . . . . . . . . . . . . . . . . . . . . . . . . . . . . . . . . . . . . . . . . . . .34
Scheduling automatic washes . . . . . . . . . . . . . . . . . . . . . . . . . . . . . . . . . . . . . . . . . . . . . . . . . . . . . . .34
Adding bleach to washes . . . . . . . . . . . . . . . . . . . . . . . . . . . . . . . . . . . . . . . . . . . . . . . . . . . . . . . . . . .36
Washing file slack space . . . . . . . . . . . . . . . . . . . . . . . . . . . . . . . . . . . . . . . . . . . . . . . . . . . . . . . . . . .38
Shredding files and folders. . . . . . . . . . . . . . . . . . . . . . . . . . . . . . . . . . . . . . . . . . . . . . . . . . . . . . . . . .39
Washing free space . . . . . . . . . . . . . . . . . . . . . . . . . . . . . . . . . . . . . . . . . . . . . . . . . . . . . . . . . . . . . . .40
Creating a disk to completely erase a hard drive . . . . . . . . . . . . . . . . . . . . . . . . . . . . . . . . . . . . . . . . .42
Updating the wash location . . . . . . . . . . . . . . . . . . . . . . . . . . . . . . . . . . . . . . . . . . . . . . . . . . . . . . . . .44
Finding installed programs to wash . . . . . . . . . . . . . . . . . . . . . . . . . . . . . . . . . . . . . . . . . . . . . . . .44
Changing application paths . . . . . . . . . . . . . . . . . . . . . . . . . . . . . . . . . . . . . . . . . . . . . . . . . . . . . .44
A: Webroot Contacts . . . . . . . . . . . . . . . . . . . . . . . . . . . . . . . . . . . . . . . . . . . . . . . . . .45
Index . . . . . . . . . . . . . . . . . . . . . . . . . . . . . . . . . . . . . . . . . . . . . . . . . . . . . . . . . . . . . . 47
Window Washer User Guide
i
ii
Contents
1: Getting Started
Window Washer® removes all traces of your Web browsing history, files that show your computer
use, and other files that reveal your activity. By removing these items, no one else who has access
to your computer can see what Web sites you have visited or what search terms you have used.
Window Washer also removes unnecessary files that consume valuable disk space, such as files in
the Recycle Bin or files in temporary folders.
Using Window Washer, you can protect your privacy and improve system performance as follows:
•
Privacy. As you work on your computer and browse the Internet, you leave behind traces.
These traces may be in the form of temporary files placed on your hard drive, lists of
recently used files in programs, lists of recently visited Web sites, or cookies that Web
sites placed on your hard drive. Anyone who has access to your computer, whether a
hacker or someone who sits down at your desk, can view these traces and know where you
have been and what you have done on your computer. Removing these traces may be
particularly important if you share a computer with others or you are working on a public
computer.
•
Performance. Window Washer can delete unnecessary files to help improve computer
performance. Microsoft Windows stores many files on your computer without you being
aware of them. Many files are useful, and even required, for your computer to operate
properly. However, other files are not necessary and consume valuable space on your hard
drive. Even with today’s large hard drives, storing many potentially large, unnecessary
files can impair your computer’s performance.
To get started with Window Washer, see the following topics:
•
“Starting Window Washer” on page 2
•
“Changing program settings” on page 4
•
“Updating Window Washer” on page 6
•
“Protecting settings with a password” on page 7
•
“Shutting down Window Washer” on page 8
•
“Renewing your subscription” on page 8
Window Washer User Guide
1
Starting Window Washer
You can open the Window Washer main interface in one of these ways:
•
From the Windows Desktop, double-click the Window Washer desktop icon
.
•
From the system tray, double-click the Window Washer tray icon . The system tray is
located in the lower right corner of your computer screen desktop. If the icon doesn’t
display in the system tray, the Window Washer process is not running.
•
From the Windows Start menu, click Start > Programs (or All Programs), Webroot >
Window Washer, then click Window Washer.
The main interface opens and displays the Home panel:
Icon panel
Main panel
The icon panel on the left provides the following buttons:
Icon panel buttons
2
Home
Opens the Home panel, which is shown in the example above.
Wash
Opens the Wash panel, where you can start a wash and view details
as they happen.
Wash Setup
Opens the Wash Setup panel, where you can customize the types of
items you want removed.
Options
Opens the Options panel, where you can create a schedule, set
bleach options, and set program options.
1: Getting Started
Icon panel buttons (continued)
Free Space Washing
Opens the Wash Free Space panel, where you can remove data left
behind from any non-secure deletions.
System Eraser
Opens the System Eraser panel, where you can completely erase
your entire computer, in preparation for giving it to someone else.
The main panel provides the following buttons and links:
Main panel buttons, links, and checkboxes
Wash My Computer
• Select Wash Items link. Lets you select the items you want to
remove during the wash (see Chapter 2, “Selecting Wash Items”
on page 9).
• Wash My Computer Now button. Starts a wash and displays a
summary panel (see Chapter 3, “Running Washes” on page 33).
Bleach Settings
• Make my files unrecoverable checkbox. Lets you make your
washes more secure by overwriting deleted files one or more times
(see “Adding bleach to washes” on page 36).
• Edit Bleach Settings button. Lets you change the method used for
overwriting files (see “Adding bleach to washes” on page 36).
Wash Statistics
• Reset Statistics button. Sets all wash statistics to zero.
• Store wash statistics checkbox. If you do not want to store wash
statistics at all, deselect this checkbox.
Version Information
• Check Now button. Goes to the Webroot Web site to see if updates
are available (see “Updating Window Washer” on page 6).
Subscription
• About My Subscription link. Opens a panel that shows the
remaining days on your subscription, the program version, and
your keycode.
Window Washer User Guide
3
Changing program settings
To change program settings:
1. In the icon panel, click Options.
The Options panel opens.
2. Click the Program Settings tab, in the upper right.
The following panel opens:
3. Select or deselect options, as described in the table below. Items with a checkmark are
enabled; items without a checkmark are disabled.
Program settings
Load Window Washer at
Windows startup
Ensures that Window Washer is always open in your system tray
and available to run scheduled washes. We recommend using this
option.
Warn me if my browser is
still open before washing
(Internet Explorer only)
Prompts you if Internet Explorer is open when you start a wash. If
you leave the browser open, Window Washer cannot wash any
items associated with Internet Explorer. Turning this option on
lets you close the browser, so all wash items are included in the
wash.
Show washing progress
when automatically
washing
Shows progress during an automatic wash.
If you do not select this option, Window Washer continues
running in the system tray and its icon is animated during an
automatic wash to show that the wash is running.
Minimize Window Washer Minimizes Window Washer to the system tray after a wash, which
to system tray after a wash leaves it running and available for automatic washes.
4
1: Getting Started
Program settings (continued)
Shut down Window
Washer after a wash
Closes Window Washer completely after a wash, making it
unavailable to run automatic washes, until you start Window
Washer again.
Disable splash screen
Turns off the Window Washer splash screen when you start
Window Washer. The splash screen only displays briefly while
the program starts.
Prompts you when an updated program version is available for
Automatically check for
downloading or when updated Custom Wash items are available.
Window Washer and
Custom Wash Item updates You must be connected to the Internet for this option to work.
from Webroot
Password-protect Window Prompts for a password when you click Wash Setup, Options, or
Washer settings
System Eraser in the icon panel. The password prevents anyone
with access to your computer from changing your Window
Washer settings.
For more information, see “Protecting settings with a password”
on page 7.
Proxy settings
Allows you to enter proxy settings, if you use a proxy server to
connect to the Internet.
Click the checkbox next to Proxy settings, then click the Change
Proxy Settings button. Another dialog opens where you can click
a button to export the settings from Internet Explorer or enter your
own, as follows:
• Proxy server: Enter the fully qualified domain name of the
server (for example, proxy.company.com).
• Port: Enter the port number the server uses.
• User name and Password: Enter the user name and password
for the server, if used.
• Basic authentication: If the server uses another form of
authentication besides basic Windows authentication, deselect
this checkbox.
Application Paths
Use the Redetect All button to find programs you installed after
you installed Window Washer. For more information, see
“Finding installed programs to wash” on page 44.
Use the Software drop-down list and fields below it to tell
Window Washer where to find folders for certain Windows,
browsers, and instant messenger programs that you installed to
locations other than the default location. For more information,
see “Changing application paths” on page 44.
Window Washer User Guide
5
Updating Window Washer
Window Washer automatically notifies you when updates to the program or Custom Wash items
are available, unless you deselected the “Automatically check for ...” option from the Program
Settings panel. If you turned off that option or want to check for updates at any other time, you can
click Check Now from the Home panel.
To update Window Washer:
1. Make sure your computer is connected to the Internet.
2. Make sure the Home panel is open (in the icon panel, click Home).
3. Under Version Information, click Check Now.
Window Washer accesses the Webroot Web site and displays messages about the status of
any updates.
4. If an updated program version is available, follow the instructions to download the file
that contains the updated version.
If there are updated Custom Wash items available, Window Washer downloads and
activates them for you. You should review the new items and determine if you want to
keep them activated. To select which Custom Wash items you want to use during a wash,
see “Selecting Webroot Custom Wash items” on page 27.
6
1: Getting Started
Protecting settings with a password
You can protect your Window Washer settings with a password. After you enable password
protection, Window Washer will require the password when you click Wash Setup, Options, or
System Eraser in the icon panel.
Caution
Remember your password. If you forget it, you must uninstall and reinstall Window Washer, which
means you will lose all of your current settings and user-defined Custom Wash items.
To protect settings with a password:
1. In the icon panel, click Options.
2. Click the Program Settings tab.
3. Click the checkbox for Password-protect Window Washer settings.
A Change Password dialog opens.
4. Enter the password you want to use in both Password fields, then click OK.
If you want to change the password in the future, click the Change Password button.
Window Washer User Guide
7
Shutting down Window Washer
To close the Window Washer main interface, click the Close
button in the upper right corner of
the panel. This closes the main interface, but keeps Window Washer open in the system tray
(lower-right corner of your monitor). You must keep Window Washer running in the system tray if
you have created any scheduled washes or set Window Washer to run whenever you close your
browser or shut down Windows.
To shut down Window Washer completely, right-click the Window Washer icon in your system
tray and select Shut down Washer from the pop-up menu.
To run Window Washer again, go to the Windows Start menu, click Start > Programs (or All
Programs), Webroot > Window Washer, then click Window Washer.
You only need to shut down Window Washer if you are uninstalling the program. If you want to
uninstall Window Washer, shut it down as described above, then go to the Windows Start menu,
select Start > Programs (or All Programs) Webroot > Window Washer > Uninstall Window
Washer.
Renewing your subscription
To determine how much time is left on your subscription and your product keycode, click the
About My Subscription link from the Home panel.
When your subscription is within 30 days of expiration, you will see a red banner and a Renew
button at the top of the main interface.
To renew your subscription, you can do either of the following:
•
When you see a red banner display at the top of the main interface, click Renew Now.
•
Access the Webroot Web site (www.webroot.com) and click the Renew your
subscription link.
The renewal adds time to your existing subscription, so you never lose any subscription time that
you have paid for.
8
1: Getting Started
2: Selecting Wash Items
You can control items that Window Washer removes during washes for browsers, instant
messaging programs, Microsoft Windows, and other programs. Before you run a wash, make sure
you review which items you want deleted or ignored, then change the options if desired.
See the following topics:
•
“Changing Internet Explorer wash items” on page 10
•
“Changing Firefox wash items” on page 12
•
“Using the Cookie Keeper” on page 14
•
“Changing Instant Messaging wash items” on page 15
•
“Changing Start Menu and Desktop wash items” on page 18
•
“Changing Windows system wash items” on page 20
•
“Changing Outlook Express wash items” on page 22
•
“Changing Recent Activity wash items” on page 24
•
“Changing Microsoft Office wash items” on page 26
•
“Managing Custom Wash items” on page 27
Window Washer User Guide
9
Changing Internet Explorer wash items
To change Internet Explorer wash items:
1. In the icon panel, click Wash Setup.
2. Click Edit to the right of Internet Explorer.
Note
If the Edit button is grayed out and you know you have the application installed, select
click here to redetect under Application Paths, then click the Redetect All button
under Application Paths. For more information, see “Updating the wash location” on
page 44.
The following panel opens:
10
2: Selecting Wash Items
3. Select or deselect the Internet Explorer options, which are described in the following table.
Items with a checkmark will be washed; items without a checkmark will be ignored.
4. When you’re done, click Apply.
Internet Explorer wash items
Address bar history
Removes the list of recently visited Web sites, which is stored as
part of Internet Explorer’s AutoComplete feature. You see this list
when you click the arrow on the right side of the Address dropdown list at the top of the Internet Explorer browser.
While this list can be helpful, it also reveals your visited sites to
other people using your computer.
Cookies
Deletes all cookies from your computer. Cookies are small files that
store information about your interaction with a Web site and may
reveal what sites you visited. Be aware that if you remove all cookie
files, some Web sites will not “remember” you. This means that you
may need to re-enter passwords, shopping cart items, and other
entries that these cookies stored. If you want certain cookies left on
your computer, you can use the Cookie Keeper. For more
information, see “Using the Cookie Keeper” on page 14.
Temporary Internet Files
folder (cache)
Deletes copies of stored Web pages that you visited recently. This
improves performance by helping Web pages open faster the next
time you visit them, but also reveals your visited sites to other
people using your computer and can consume a lot of space on your
hard drive.
History (visited sites)
Deletes the list of recently visited Web sites. You see this list when
you click History on the Internet Explorer toolbar. While this
history can be helpful, it also reveals your visited sites to other
people using your computer.
Index.dat (Wash with
bleach on Windows
startup)
Marks files in the index.dat file for deletion, then clears those files
after you reboot the system. The index.dat file is a growing
Windows repository of Web addresses, search queries, and recently
opened files. This option works when you also select one or more of
the following options: Cookies, Temporary Internet Files folder, or
History.
Note: Index.dat functions like an active database. It is only cleaned
after Windows startup.
Setup log file
Deletes log files created when you update Internet Explorer. After
you install the updates, you no longer need these files.
Downloaded folder
memory
Deletes the contents in the folder that stores files you last
downloaded using Internet Explorer. After downloading, you no
longer need these files.
Window Washer User Guide
11
Internet Explorer wash items (continued)
Media bar (Media Player)
history
Removes the list of audio and video files recently opened with the
media player in Internet Explorer, which plays audio and video files
that you access on Web sites. While this list can be helpful, it also
reveals the names of videos and audio files you are loading.
Autocomplete form data
Deletes data that Internet Explorer stores when you enter
information into fields on Web sites. This is part of Internet
Explorer’s AutoComplete feature, which predicts a word or phrase
based on the characters you begin to type (for example, your email
address or password). While this feature can be helpful, it also
reveals information you entered in forms to other people using your
computer.
Changing Firefox wash items
To change Firefox wash items:
1. In the icon panel, click Wash Setup.
2. Click Edit to the right of Firefox.
Note
If the Edit button is grayed out and you know you have the application installed, select
click here to redetect under Application Paths, then click the Redetect All button
under Application Paths. For more information, see “Updating the wash location” on
page 44.
12
2: Selecting Wash Items
The following panel opens:
3. Select or deselect the Firefox options, which are described in the following table. Items
with a checkmark will be washed; items without a checkmark will be ignored.
4. When you’re done, click Apply.
Firefox wash items
Internet cache
Deletes copies of stored Web pages that you visited recently. This
cache improves performance by helping Web pages open faster the
next time you visit them, but also reveals your visited sites to other
people using your computer and can consume a lot of space on your
hard drive.
Cookies
Deletes cookie entries from the Firefox cookie file. Cookies are small
bits of text generated by a Web server and then stored on your
computer for future use. Be aware that if you remove all cookie
entries, some Web sites will not “remember” you. This means that you
may need to re-enter passwords, shopping cart items, and other entries
that these cookies stored. If you want certain cookies left on your
computer, you can use the Cookie Keeper. For more information, see
“Using the Cookie Keeper” on page 14.
Form data
Deletes data that Firefox stores when you enter information into fields
on Web sites (if you previously selected a privacy option to save form
data). You see this data automatically appear as you type information
into a field (for example, your email address or password). While this
feature can be helpful, it also reveals information you entered in forms
to other people using your computer.
History
Deletes the list of Web sites that you visited recently. You see this URL
list when you select History from the Go menu. While this history can
be helpful, it also reveals your visited sites to other people using your
computer.
Window Washer User Guide
13
Using the Cookie Keeper
Some Web sites place small bits of text on your computer, called cookies, which store information
about your interaction with that site. Some cookies track which ads the site displayed on a Web site
to make sure the site does not display the same ads again the next time you visit. Other cookies
may store preferences that you set, passwords you create for the site, information about the pages
you visited, and so on. Some vendors buy information from companies that gather data from
cookies. These types of cookies typically track the Web sites you visit and selections you make on
Web sites. Companies who buy this information can create a profile on you based on information
in the cookies.
While some cookies may be a privacy concern, other cookies are helpful and you may want to use
the Cookie Keeper to make sure they are not deleted. Certain types of cookies store your user
name, password, and other information that is convenient for you, especially for sites that you visit
often. Before you decide to keep a cookie, be sure to read the company’s privacy policy to see how
it can use your information. You may want to check the policy periodically, because policies
change. Unfortunately, you cannot easily know exactly what information a cookie stores in it. You
can open a cookie file in a text editor, such as Notepad, but most cookie files contain codes that are
not easy to understand. If you decide to delete cookies, be sure that you keep a record of your user
names and passwords you created for Web sites. After you delete cookies and form data, you will
not be able to automatically log in to the Web site.
To use the Cookie Keeper:
1. In the icon panel, click Wash Setup.
2. Under Internet Items, click the blue click here for the Cookie Keeper link.
The Cookie Keeper wizard opens.
3. Select the browser that contains the cookies you want to keep, and click Next.
In the next panel, you can set Window Washer to keep individual cookies or all cookies
from a specific domain name. (A domain name is the home address for a Web site; for
example, webroot.com.)
4. Select individual cookies or all cookies from a domain by clicking the checkboxes next to
each one. After selecting the cookies you want to keep, click Next.
5. In the next panel, review your selections. These are all the cookies that will be ignored in a
wash. If you want to make further modifications to the list, you can remove a domain from
the left panel and select Remove Domain or select individual cookies from the right panel
and select Remove Cookie. When you are done, click Next.
6. In the summary panel, click Finished.
14
2: Selecting Wash Items
Changing Instant Messaging wash items
You can select items to wash for the following instant messaging programs: AOL Instant
Messenger, MSN Messenger, Yahoo! Messenger, and Windows Live Messenger.
To change Instant Messenger wash items:
1. In the icon panel, click Wash Setup.
2. Click Edit to the right of Instant Messaging.
The Instant Messaging dialog opens.
Note
If the items are grayed out and you know you have the application installed, select click here to
redetect under Application Paths, then click the Redetect All button under Application Paths.
For more information, see “Updating the wash location” on page 44.
Window Washer User Guide
15
3. Select or deselect the Instant Messaging options, which are described in the following
tables. Items with a checkmark will be washed; items without a checkmark will be
ignored.
4. When you’re done, click Apply.
AOL Instant Messenger
Downloaded files
AOL Instant Messenger uses this folder to store files that you
download through AOL Instant Messenger. This option deletes the
folder and all downloaded files in it.
Recent screen names
AOL Instant Messenger uses this file to store the screen names of
people you recently communicated with. This option deletes these
screen names.
MSN Messenger
16
My Chat Log folder
MSN Messenger uses this folder to store your chat log, if you turn
on that option in MSN Messenger. This option deletes all files in
the chat log.
My Received Files folder
MSN Messenger uses this folder to store files that you receive
through MSN Messenger. This option deletes the folder and all
received files in it.
2: Selecting Wash Items
Yahoo! Messenger
Clear Pager settings
Yahoo! Messenger uses this folder to store your notification
information. This option deletes the notification information, so
other users will not know you are online.
Reset Yahoo! profiles
This option deletes all information about all Yahoo! profiles you
have set up. If you select this option and want to use any of your
Yahoo! profiles, be sure to write down the user ID information
before running a wash.
Temporary Internet files
Yahoo! Messenger uses this folder to store temporary Internet
files. This option deletes the folder and all files in it.
Windows Live Messenger
My Chat Log folder
Windows Live Messenger uses this folder to store your chat log, if
you turn on that option in Windows Live Messenger. This option
deletes all files in the chat log.
My Received Files folder
Windows Live Messenger uses this folder to store files that you
receive through Windows Live Messenger. This option deletes the
folder and all received files in it.
Window Washer User Guide
17
Changing Start Menu and Desktop wash items
To change the Start menu and desktop wash items:
1. In the icon panel, click Wash Setup.
2. Click Edit to the right of Start Menu and Desktop.
The following panel opens:
18
2: Selecting Wash Items
3. Select or deselect the Start Menu and Desktop options, which are described in the
following table. Items with a checkmark will be washed; items without a checkmark will
be ignored.
4. When you’re done, click Apply.
Start Menu and Desktop wash items
Recycle bin
Removes all files from your Recycle Bin, which contains files you have
deleted using Windows Explorer. When you delete a file, it is stored in the
Recycle Bin until you empty it. You should periodically empty the Recycle
Bin to preserve valuable disk space on your computer.
Document history
Clears the history of recently opened files, which is accessible from the
Windows Start menu. (This option does not delete the files themselves.)
While this list can be helpful, it also reveals your activity to other people
using your computer.
Start Menu click
history
Clears the history of shortcuts to programs that you recently opened using
the Start menu. (This option does not delete the programs themselves.)
While this list can be helpful, it also reveals your activity to other people
using your computer.
Run history
Clears the history of commands that you recently entered into the Run
dialog, which is accessible from the Start menu. While this list can be
helpful, it also reveals your activity to other people using your computer.
Note: After the wash, you may need to restart your computer to
completely remove items from the Run dialog.
Find and Search
history
Clears the history of files or other information that you searched for on
your computer. Your computer stores recent searches and displays them
when you start entering a new search that starts with the same characters.
You access the search (also called “find”) from Windows Explorer or from
your Start button. (This option does not delete the files themselves.) While
this list can be helpful, it also reveals your activity to other people using
your computer.
Start Menu order
history
Reverts the list of programs and documents in the Start menu back to
alphabetical order, which is the default setting. (This option does not
delete any of the programs or files themselves.) After you run the wash,
you must reboot your system for the list to revert back to alphabetical
order.
Window Washer User Guide
19
Changing Windows system wash items
To change the Windows system wash items:
1. In the icon panel, click Wash Setup.
2. Click Edit to the right of Windows System.
The following panel opens:
3. Select or deselect the Windows System options, which are described in the following
table. Items with a checkmark will be washed; items without a checkmark will be ignored.
20
2: Selecting Wash Items
4. When you’re done, click Apply.
Windows system wash items
Clipboard contents
Clears the contents from the Clipboard, where Windows stores data when
you use either the Copy or Cut function from any Windows program.
Windows Temp
folder
Deletes all files and folders in the Windows temporary folder, but not files
that are in use by an open program. This folder is usually:
C:\Windows\Temp
You should not put any files here that you need to keep. The files in this
folder can consume a lot of space on your hard drive.
System Temp folder
Deletes all files and folders in the system temporary folder, but not files
that are in use by an open program. This folder is usually:
C:\Documents and Settings\[username]\Local Settings\Temp
You should not put any files here that you need to keep. The files in this
folder can consume a lot of space on your hard drive.
MS Download Temp Deletes all files and subfolders in this folder. Microsoft stores temporary
folder
files for Windows updates and service packs in this folder
(msdownld.tmp). Once you install the update or service pack, you no
longer need these files.
Temporary Windows Deletes all files and subfolders in the temporary update folder, but not files
update files
that are in use by an open program. Windows uses these files when you
run Windows Update. After you install the updates, you no longer need
these files.
Paging (Swap) file
(Applies only to Windows XP.) Clears the paging file (also called a swap
file) that Windows uses to store parts of programs and files that do not fit
into memory.
Registry streams
Clears the history of recent changes you made to the Windows registry.
(This option does not delete the registry changes themselves.)
Default logon user
names
Deletes the Windows registry entry that stores the last name used to log on
to your computer. When the registry entry is deleted, you must enter your
user name each time you turn on or restart your computer. This wash
option does not affect computers that use the default Welcome screen.
Memory dump file
Deletes the memory dump file (memory.dmp) that Windows creates when
you receive certain Windows errors. The file contains information about
what happened when the error occurred.
CD burning storage
folder
Deletes the Windows project files, created when you use the Windows
built-in function to copy files to a CD. These project files are typically
stored in one of the following directories:
C:\Documents and Settings\[username]\Local Settings\Application
Data\Microsoft\CDBurning
C:\Users\[username]\AppData\Local\Microsoft\Windows\Burn\Burn
Window Washer User Guide
21
Changing Outlook Express wash items
You can change several wash items that are related to Outlook Express 6.0. These settings are only
applicable if you use Outlook Express to send or receive e-mail. These options only affect Outlook
Express 6.0. If you use any other version of Outlook that came with Microsoft Office, these
options do not apply.
To change Outlook Express wash items:
1. In the icon panel, click Wash Setup.
2. Click Edit to the right of Outlook Express.
The following dialog opens:
22
2: Selecting Wash Items
3. Select or deselect the Outlook Express options, which are described in the following table.
Items with a checkmark will be washed; items without a checkmark will be ignored.
4. When you’re done, click Apply.
Outlook Express wash items
Inbox
Permanently deletes the e-mail messages in this folder from your
computer. Outlook Express uses this folder to store e-mail messages you
receive until you delete them or move them to another folder.
Outbox
Permanently deletes the e-mail messages in this folder from your
computer. Outlook Express uses this folder to store e-mail messages until
you send them.
Deleted items
Permanently deletes the e-mail messages in this folder from your
computer. Outlook Express uses this folder to store deleted e-mail
messages. (When you delete an e-mail message, Outlook Express does not
actually remove it from your computer. Outlook Express moves it to the
Deleted Items folder.)
Sent items
Permanently deletes the e-mail messages in this folder from your
computer. Outlook Express uses this folder to store e-mail messages you
send.
Outlook Express log
file
Deletes the log file from your computer. This log file stores commands,
errors, and other information that have been sent to and from your mail
servers. This log can be useful for troubleshooting, but consumes space on
your computer.
Window Washer User Guide
23
Changing Recent Activity wash items
To change the recent activity wash items:
1. In the icon panel, click Wash Setup.
2. Click Edit to the right of Recent Activity.
The following dialog opens:
24
2: Selecting Wash Items
3. Select or deselect the Recent Activity options, which are described in the following table.
Items with a checkmark will be washed; items without a checkmark will be ignored.
4. When you’re done, click Apply.
Recent activity wash items
Application
debugging history
Deletes the log file. Windows creates this history when it asks if you want
to debug an error and you say yes. The file is typically in
C:\Windows\Debug.
Common dialog
history
Deletes the registry entries used to store the last files you opened or saved
using Windows programs, such as Windows Explorer and Internet
Explorer. This option does not delete any of the opened or saved files
themselves, only the “memory” of what you recently opened or saved.
Direct3D recent
applications
Deletes the Windows registry entries used to store information primarily
used by games to aid with the game animation.
DirectDraw recent
applications
Deletes the Windows registry entries used to store information primarily
used by games to aid with the game animation.
DirectInput recent
applications
Deletes the Windows registry entries used to store information primarily
used by games to aid with the game animation.
Disk error checking
Deletes all .CHK files. The Windows error-checking program creates these
files. These files do not normally contain data you need.
MS Paint recent file
list
Clears the history of files you recently opened using the Windows Paint
program. You see this list on the File menu in Paint. This option does not
delete the files themselves, only the “memory” that you recently opened
them.
Recent network
connections
Deletes the registry entry, so Windows will not remember your recent
network usage. This Windows registry entry stores known network and
domain connections.
Recent printer
connections
Deletes the registry entry, so Windows will not remember your recent
printer usage. This Windows registry entry stores known printer
connections.
Recent Regedit
commands
Clears the history of Windows registry changes you made using Regedit.
This option does not delete the registry changes themselves, just the
“memory” that you recently made the changes.
Note: You must restart your computer to wash these items.
WordPad recent file
list
Clears the history of files you opened using the Windows WordPad
program. You see this list on the File menu in WordPad. This option does
not delete the files themselves, only the “memory” that you recently
opened the files.
Media Player recent
file list
Clears the history of files you opened using the Windows Media Player.
You see this list on the File menu in Media Player. This option does not
delete the files themselves, only the “memory” that you recently opened
the files.
Window Washer User Guide
25
Changing Microsoft Office wash items
You can remove the list of files that you recently opened with a Microsoft Office program (2007 or
2010). You see this list when you click the File menu in each program. This option does not delete
the files themselves, only the “memory” that you opened them.
To change the Microsoft Office wash items:
1. In the icon panel, click Wash Setup.
2. Click Edit to the right of Microsoft Office.
The following dialog opens:
26
2: Selecting Wash Items
3. Select or deselect the Microsoft Office programs you want to wash. Items with a
checkmark will be washed; items without a checkmark will be ignored.
4. When you’re done, click Apply.
Managing Custom Wash items
Custom Wash items let you set up Window Washer to wash more than just the files used by
Windows, Microsoft Office, and your browsers. Many other programs such as Windows
RealPlayer, Adobe Photoshop, and Paint Shop Pro store recent user activity, too. Evidence of the
pictures you view, Web sites you visit, and media you play is all left on your computer. Custom
Wash items remove these unnecessary traces.
Many Custom Wash items are predefined in Window Washer; however, you can also define
Custom Wash items yourself. See the following topics:
•
Selecting Webroot Custom Wash items
•
Creating your own wash items
Selecting Webroot Custom Wash items
To select Custom Wash items to use in a wash:
1. In the icon panel, click Wash Setup.
2. Click Edit to the right of Custom Wash Items.
Window Washer User Guide
27
The Custom Wash Items panel opens, with a list of all Custom Wash items and their type.
A Custom Wash item can be one of the following types:
•
Webroot. Predefined items that come with Window Washer. When you installed
Window Washer, you had the option to activate (detect) Webroot Custom Wash items
for any corresponding programs on your computer.
•
User-defined. Items you define yourself to delete unneeded files, folders, and registry
entries from your computer. For more information, see the next section, “Creating
your own wash items.”
3. Select the radio buttons next to Show to display the type of Custom Wash items you want
to see, either All, Webroot, or User-defined.
4. Select or deselect the custom options you want to wash. Items with a checkmark will be
washed; items without a checkmark will be ignored.
The selections you make work for all washes (manual and automatic) until you change the
selections.
5. If you want to see exactly what will be removed with each item, hold your mouse pointer
over the item name. Information about the files, folders, or registry entries that it washes
pops up.
To edit a user-defined Custom Wash item, right-click the name.
28
2: Selecting Wash Items
Creating your own wash items
Window Washer lets you create your own, user-defined Custom Wash items to delete unneeded
files, folders, and registry entries from your computer when you run a wash.
Caution
Creating user-defined Custom Wash items is for advanced users. Custom wash items delete the
files, folders, or registry entries you select. Use care when selecting or entering items to delete, or
you may affect your ability to use some programs on your computer.
To create or edit a user-defined Custom Wash item:
1. In the icon panel, click Wash Setup.
2. Click the blue link: click here to create custom wash items.
The Custom Wash Item Wizard opens.
3. In the wizard screen, select one of the following:
•
To create a new item, enter a description below Create new custom wash item.
•
To edit an existing item, select the Edit existing custom wash item option and select
an item from the drop-down list.
4. Click Next.
5. Select one or more options for the type of actions you want the Custom Wash item to take,
as described in the following table.
Creating Custom Wash items
Add individual files
for washing
Window Washer User Guide
Adding a file to a Custom Wash item deletes the file you select each time
you run a wash. You may want to use this feature when a program creates
a log file that gets very large over time. Be sure that the program will recreate the log file and that deleting it is not a problem.
To add individual files:
1. Click the box next to Add Individual Files for Washing, then click the
Next button at the bottom.
2. In the Step 1 panel, navigate to the folder where the desired file is
located. In the Step 2 panel, select the file you want to remove. Then
click Add. If desired, you can add more files by following the steps
above.
Note: To remove a file from the list of files to wash, select the file and
click Remove. To remove all files, click Remove All.
3. When you’re done adding folders, click Next.
4. When the Completion window opens, click Finished.
29
Creating Custom Wash items (continued)
Add folders
containing multiple
files to wash
30
Depending on your selections, adding a folder to a user-defined Custom
Wash item deletes the folder or specific files within the folder each time
you run a wash. You may want to use this feature when a program creates
a folder that gets very large over time or that contains files you do not want
to keep. Be sure that the program will re-create any deleted files or folders
and that deleting them is not a problem.
To add folders with multiple files:
1. Click the box next to Add Folders Containing Multiple Files to
Wash, then click the Next button at the bottom.
2. In the Step 1 panel, navigate to the desired folder. In the Step 2 panel,
select the options you want to use:
• If root folder is empty, then delete the folder. Select this checkbox
if you want Window Washer to delete the top-level folder you
selected in the Step 1 panel.
• Include subfolders. Select this checkbox if you want Window
Washer to delete the same files from each subfolder under the toplevel folder you selected in the Step 1 panel.
If subfolder is empty, then delete the folder. Select this checkbox
if you want Window Washer to delete empty subfolders.
• Change default mask. By default, Window Washer deletes all files
in the selected folder. If you want to delete only files with a specific
file extension, enter the extension in the field. (For example, enter
.log to remove log files.)
3. When you’re done selecting folders, click Add. If desired, you can add
more folders by following the steps above.
Note: To remove a folder from the list of folders to wash, select the
folder and click Remove. To remove all folders from the list of folders
to wash, click Remove All.
4. When you’re done selecting folders, click Next.
5. When the Completion window opens, click Finished.
2: Selecting Wash Items
Creating Custom Wash items (continued)
Add registry keys or
values for washing
Adding registry entries to a user-defined Custom Wash item deletes the
registry entry you select. Deleting a registry entry may prevent a program
on your computer from working properly.
Caution: This function is for advanced users only. If you do not have a
good understanding of the Windows registry, you should not add registry
entries to a user-defined Custom Wash item.
To add registry keys or values:
1. Click the box next to Add Registry Keys or Values for Washing, then
click the Next button at the bottom.
2. In the Step 1 panel, select the Root Key from the drop-down box, then
select the option you want:
• Delete entire subkey. Select this radio button to delete the entire
subkey that you will select in the Step 2 panel.
• Delete a subkey value. Select this radio button and enter a specific
subkey value to have Window Washer delete only that value from
the subkey that you will select in the Step 2 panel.
3. In the Step 2 panel, select the registry key or value you want to wash.
4. When you’re done, click Add. If desired, you can add more values by
following the steps above.
Note: To remove a key from the list of keys to wash, select the key
and click Remove. To remove all keys from the list of keys to wash,
click Remove All.
5. When you’re done selecting values, click Next.
6. When the Completion window opens, click Finished.
The selections you make work for all washes (manual and automatic) until you change the
selections.
Window Washer User Guide
31
32
2: Selecting Wash Items
3: Running Washes
You can run a wash manually whenever you want to remove unneeded files and traces on your
computer. You can also set Window Washer to run a wash automatically based on a day and time,
or based on an event, such as closing your browser. When you run a wash, Window Washer deletes
files, cookies, and lists of recently used files based on your settings (see Chapter 2, “Selecting
Wash Items” on page 9).
To run washes, see the following topics:
•
“Running a wash manually” on page 34
•
“Scheduling automatic washes” on page 34
•
“Adding bleach to washes” on page 36
•
“Washing file slack space” on page 38
•
“Shredding files and folders” on page 39
•
“Washing free space” on page 40
•
“Creating a disk to completely erase a hard drive” on page 42
•
“Updating the wash location” on page 44
Window Washer User Guide
33
Running a wash manually
You can run a wash immediately from the main interface or from the system tray.
To run a wash immediately from the main interface:
1. Make sure the Home panel is displayed. (If not, click Home from the Icon panel.)
2. If you want to check what items will be removed in the wash, click the blue link for Select
Wash Items.
3. From the middle panel, click Wash My Computer Now.
To run a wash immediately from the system tray:
1. Right-click the Window Washer icon
lower-right corner of your screen.)
in your system tray. (The system tray is in the
2. From the pop-up menu, select Wash now.
Scheduling automatic washes
You can schedule automatic washes based on time intervals, such as once a day, or schedule
washes based on a specific event, such as when Windows shuts down. To use the automatic wash
settings, Window Washer must be running in the system tray. Look for the Window Washer icon
in the lower-right corner of your monitor. If Window Washer is not running, you must start it
for scheduled washes (see “Starting Window Washer” on page 2).
Automatic washes use all of the wash settings and options at the time the wash starts. Before you
run a wash, check the wash settings by clicking the Wash Setup button. See Chapter 2, “Selecting
Wash Items” on page 9.
To run washes automatically:
1. In the icon panel, click Options.
2. Click the Schedule tab.
34
3: Running Washes
3. If you want to create a scheduled wash that runs based on a specific time interval, click the
Yes radio button to the right of Do you want to schedule a timed wash?. Then select the
time interval.
4. If you want to create a scheduled wash that runs after a specific event, click the Yes radio
button to the right of Do you want to schedule session washes?. Then select the event:
•
When Internet browsers close (Internet Explorer only). This option runs a wash
every time you close Internet Explorer. When you close Internet Explorer, Window
Washer displays its progress to show that it is running a wash.
•
When Windows starts. This option runs a wash every time you start Windows.
Window Washer displays its progress to show that it is running a wash.
•
When Windows shuts down. This option runs a wash when you shut down (turn off)
Windows, but displays the Windows shut-down options again after the wash is
completed. This lets you change your mind about shutting down. Click Edit Settings
to select exactly what happens after the wash runs. (This option is not available on
Windows 7 or Vista.)
5. If you want Window Washer to show its progress during an automatic wash, click the
Program Settings tab and select the Show washing progress when automatically
washing.
If you select this option, the Window Washer window opens and shows the progress of the
automatic wash. If you do not select this option, the Window Washer icon in the system
tray is animated during an automatic wash to show that the wash is running.
Window Washer User Guide
35
Adding bleach to washes
You can make your washes more secure by adding “bleach.” The bleach overwrites each file that
Window Washer deletes with random characters. When you use bleach, no one can recover files
using a recovery tool. You can select the number of times that bleach overwrites the files.
However, be aware that the more times the files are overwritten, the longer it will take for the wash
to run.
Note
Using the bleach settings may slow down the wash process significantly, depending on how many
files you are washing and the speed of your computer.
To add bleach:
1. In the icon panel, click Home.
2. Under Bleach Settings, select Make my files unrecoverable.
3. If you want to determine the method used for overwriting files with bleach, click the Edit
Bleach Settings button. (You can also click Options in the icon panel, then click the
Bleach Settings tab.)
The Bleach Settings panel opens.
36
3: Running Washes
4. Make sure the Yes button is selected to the right of Would you like to add bleach?.
5. Select the bleaching method you want.
Bleaching methods
DOD 5220.22-M
Overwrites each deleted file three times with random characters in
accordance with the US Department of Defense (DOD) 5220.22-M
directive.
NSA
Overwrites each deleted file seven times with random characters based on
the US National Security Agency (NSA) guidelines.
Gutmann
Overwrites each deleted file 35 times using different patterns each time.
This overwrite process is based on a 1996 paper by Peter Gutmann,
Department of Computer Science, University of Auckland.
Random
Overwrites each deleted file as many times as you select with random
characters. Remember that the more overwrite passes you select, the longer
the wash will take.
These bleach settings are applied to the next wash.
Window Washer User Guide
37
Washing file slack space
You can set up Window Washer to remove the slack space in files. Slack space relates to unused
hard drive space that is allocated to a file. Two key issues cause slack space to pose a potential
security risk:
•
How Windows deletes files. When you delete a file, Windows does not actually remove
the contents of the file from your hard drive. Windows only deletes a reference to the file
from a table that lists all files on your computer. The table is like a table of contents that
tells Windows where files are. Windows says that the file is deleted, but the content of the
file still exists until Windows overwrites the same area on the hard drive with new
information.
•
How Windows allocates hard drive space to files. Windows allocates space for files on
a hard drive in blocks of bytes (also called clusters). When you save a file, Windows
allocates space to the file in the form of these blocks. The size of the file determines how
many blocks get assigned. If the file does not completely fill the last block allocated to it,
the remainder is considered slack space, as shown below.
Block 1
Block 2
Block 3
Block 4
File content
Block 5
Slack space
In the figure above, the file consumes all of blocks 1 through 4 and part of 5. The
remainder of block 5 is slack space. Data from a previously deleted file may still be in the
slack space. This figure shows how a block allocated to a file may contain the content
from a file that was previously saved to that block, then deleted. If that previous file had
sensitive information in it and was deleted using a standard method, some of the file
content still exists.
Window Washer determines how much slack space remains at the end of a file that it is deleting
and overwrites that content.
Note
Using the slack space setting may slow down the wash process significantly, depending on how
many files you are washing and the speed of your computer.
To wash file slack space:
1. In the icon panel, click Options.
2. Click the Bleach Settings tab.
3. Select Yes, to the right of Would you like to wash file slack space?.
38
3: Running Washes
Shredding files and folders
Window Washer adds a Shred (Wash with bleach) item to the menu that opens when you rightclick a file or folder in Windows Explorer. Using this “shred” feature deletes the selected files or
folders and overwrites each deleted item once with random characters, similar to the bleach option
when you run a wash. This is a more secure way of deleting files from your computer. You cannot
recover shredded files from the Recycle Bin or by using a recovery tool.
Note
The Shred context menu option is not available for 64-bit Windows Vista or 64-bit Windows 7.
To shred files or folders:
1. From Windows Explorer, right-click the files or folders you want to shred.
2. From the pop-up menu, select Shred (Wash with bleach).
Window Washer User Guide
39
Washing free space
You can wash the free space on your hard drive to remove any remnants from deleted files. Free
space is unused hard drive space that is not allocated to any current files. However, free space may
still contain all or part of files you have deleted. (When you delete a file, Windows does not
actually remove the contents of the file from your hard drive. Windows only deletes a reference to
the file from a table that lists all files on your computer.)
Caution
After washing free space, you cannot recover deleted files from the Recycle Bin or by using a
recovery tool.
To wash free space:
1. In the icon panel, click Free Space Washing.
The Wash Free Space panel opens.
2. From the Logical drive drop-down list, select the drive you want to wash.
All installed and removable drives display in the list. If you have connected and
disconnected a removable drive, it may still display in the list. When you completely shut
down Window Washer and start it again, the removable drive will no longer be included.
40
3: Running Washes
3. Select the bleaching method you want.
Overwrite methods
Single Pass
Overwrites each deleted file once with random characters.
DOD 5220.22-M
Overwrites each deleted file three times with random characters in
accordance with the US Department of Defense (DOD) 5220.22-M
directive.
NSA
Overwrites each deleted file seven times with random characters based on
the US National Security Agency (NSA) guidelines.
Gutmann
Overwrites each deleted file 35 times using different patterns each time.
This overwrite process is based on a 1996 paper by Peter Gutmann,
Department of Computer Science, University of Auckland.
4. Click Start Washing Free Space.
Window Washer User Guide
41
Creating a disk to completely erase a hard drive
If you want to sell or donate a computer you no longer need, you should make sure that no data of
yours remains on the computer’s hard drive. This is important because of the way Windows
handles files that you delete using the normal delete function. When you delete a file, Windows
does not actually remove the contents of the file from your hard drive. Windows only deletes a
reference to the file from a table that lists all files on your computer. The files still exist until
Windows overwrites the same area on the hard drive with new information. Therefore, files that
you may think no longer exist can often be recovered with an undelete or recovery program. The
Webroot System Eraser makes it impossible for anyone to recover these files, which protects your
privacy.
To ensure that none of your data remains on the hard drive of a computer you no longer need, you
can create a bootable disk that will securely remove all data, including the Windows operating
system, from the hard drive. A bootable disk is a disk that you use to start the computer. After you
create the bootable disk using Window Washer, you must put the disk into the computer with the
hard drive you want to erase and restart the computer. The bootable disk will work in any XP,
Vista, or Windows 7 computer.
To create a disk to completely erase a hard drive:
1. Insert a blank floppy disk into your floppy disk drive or a blank compact disc into your
CD/DVD drive.
2. In the icon panel, click System Eraser.
3. Select the radio button next to either Create bootable floppy or Create bootable CD/
DVD.
4. Select the corresponding disk drive from the drop-down list.
5. Click Start.
42
3: Running Washes
6. Remove the disk you just created.
Caution
When you use the bootable disk, it will completely erase everything from the hard drive,
including the operating system (Windows), programs, and data. Make sure that is what
you want to do before you use the bootable disk.
7. To use the disk, insert it into the computer with the hard drive you want to completely
erase and turn on or restart the computer.
If you created a floppy disk, your computer will automatically use the bootable disk when
it starts. The Webroot System Eraser program will start automatically and guide you
through the erase process.
If you created a CD, your computer may be able to detect that the CD is a bootable disk
and use it when it starts. If your computer starts normally, that is, Windows starts as usual
and you do not see an option to boot to the CD, you have to make some changes to use the
bootable CD:
•
If your computer does not detect the bootable CD, you need to make a change to your
computer’s BIOS (this is a program that your computer’s processor uses to start the
computer and to control other functions). When your computer starts, you usually see
a message that says to press F5 or F8 or Delete during startup to edit the BIOS. Once
in the BIOS, you must change the boot sequence to put the CD drive first in the boot
sequence.
•
Consult your computer’s manual or manufacturer for more information.
Window Washer User Guide
43
Updating the wash location
If you installed a program after installing Window Washer or you installed a program to a location
other than its default location, you need to update the location where Window Washer looks for
these programs.
Finding installed programs to wash
If you installed a program after you installed Window Washer, you need to select a redetect option
so Window Washer knows the new programs have been installed.
To find installed programs:
1. In the icon panel, click Options.
2. Click the Program Settings tab.
3. Click Redetect All.
Changing application paths
Window Washer automatically detects where certain files are located. These files are for specific
Windows, browser, and instant messaging programs listed in the Wash Setup panel. Most of the
time, you do not need to change these folder locations in Window Washer. However, if you
installed a program to a location different from the default or you changed the default folders for
temporary files, Internet Explorer cache, or cookie files, you must specify the different application
paths so Window Washer can find the folders.
To change application paths:
1. In the icon panel, click Options.
2. Click the Program Settings tab.
3. At the bottom of the panel, select the checkbox for Enable override of default program
location.
4. From the Software drop-down list, select the program.
5. Enter the full path to the correct folder or use Browse to navigate to the location.
6. Click Save.
44
3: Running Washes
A: Webroot Contacts
Webroot provides the following technical support services:
•
Web Site. To submit a trouble ticket to our service representatives, access the Support
Web site at:
support.webroot.com
We make every effort to respond to your request on the same day you send it in, but please
allow up to 48 hours.
•
Phone. Call a service representative (Monday through Friday, 7 a.m. to 6 p.m., Mountain
Standard Time). Phone numbers are listed on the Support Web site.
Window Washer User Guide
45
46
A: Webroot Contacts
Index
A
Address bar history 11
AOL Instant Messenger, wash settings for 15
Application debugging history 25
Application Paths 5
Autocomplete form data 12
automatically check for updates 5
B
bleach, adding to washes 36
bootable disk, creating 42
browsers, wash settings for 10, 12
C
CD burning storage folder 21
Change Password button 7
Clear Pager settings 17
Clipboard contents 21
closing Window Washer 8
Common dialog history 25
Cookie Keeper 14
Cookies wash item 11, 13
custom wash items 27
creating user-defined 29
selecting Webroot-defined items 27
updating 6
D
Default logon user names 21
Deleted items 23
Direct3D recent applications 25
DirectDraw recent applications 25
DirectInput recent applications 25
Disable splash screen 5
Disk error checking files 25
Document history 19
DOD 5220.22-M overwrite option 37, 41
Downloaded files 16
Downloaded folder memory 11
E
e-mail, wash settings for 22
Enable override of default program location 44
exiting Window Washer 8
F
file slack space, washing 38
Window Washer User Guide
files, shredding 39
Find and Search history 19
Firefox, wash settings for 12
folders, shredding 39
Form data 13
free space washing 40
G
Gutmann overwrite option 37, 41
H
hard drive, erasing completely 42
History 13
History (visited sites) 11
Home panel, functions described 2
I
Inbox 23
Index.dat (Wash with bleach on Windows startup) 11
instant messaging wash settings 15
Internet cache 13
Internet Explorer, wash settings for 10
K
keycode 3
L
Load Window Washer at Windows startup 4
M
main window, functions described 2
Media bar (Media Player) history 12
Media Player recent file list 25
Memory dump file 21
Microsoft Office, wash settings for 26
Minimize Window Washer to system tray 4
MS Download Temp folder 21
MS Paint recent file list 25
MSN Messenger, wash settings for 15
My Chat Log folder
MSN Messenger 16
Windows Live Messenger 17
My Received Files folder
MSN Messenger 16
Windows Live Messenger 17
N
NSA overwrite option 37, 41
47
O
Office, wash settings for 26
opening Window Washer 2
Outbox 23
Outlook Express log file 23
Outlook Express, wash settings for 22
overwriting deleted files 36
P
Paging (Swap) file 21
password, protecting wash settings with 7
Password-protect Window Washer settings 5
program settings, changing 4
Proxy settings 5
R
Random overwrite option 37
Recent Activity wash settings 24
Recent network connections 25
Recent printer connections 25
Recent Regedit commands 25
Recent screen names 16
Recycle Bin 19
Redetect All button 44
Registry streams 21
registry, creating user-defined custom wash items for 31
Reset Yahoo! profiles 17
Run history 19
S
scheduling washes 34
Sent items 23
settings
adding bleach to washes 36
creating user-defined custom wash items 29
for Firefox 12
for Instant Messaging 15
for Internet Explorer 10
for Microsoft Office 26
for Outlook Express 22
for Windows 18, 20, 24
keeping selected cookies 14
protecting with a password 7
selecting custom wash items to use 27
washing file slack space 38
Setup log file 11
Show washing progress when automatically washing 4
shredding files and folders 39
Shut down Window Washer after a wash 5
shutting down Window Washer 8
48
Single Pass overwrite option 41
slack space, washing 38
Start Menu and Desktop wash settings 18
Start Menu click history 19
Start Menu order history 19
stopping Window Washer 8
subscription 3
System Temp folder 21
T
Temporary Internet files 17
Temporary Internet Files folder (cache) 11
Temporary Windows update files 21
U
uninstalling the program 8
updating Window Washer 6
user-defined custom wash items
creating for files 29
creating for folders 30
creating for the registry 31
V
version of program 3
W
Warn me if my browser is still open 4
wash settings
adding bleach to washes 36
cleaning file slack space 38
creating user-defined custom wash items 29
for Firefox 12
for Instant Messaging 15
for Internet Explorer 10
for Microsoft Office 26
for Outlook Express 22
for Windows 18, 20, 24
keeping selected cookies 14
protecting with a password 7
selecting custom wash items to use 27
washing free space 40
Windows Live Messenger, wash settings for 15
Windows System wash settings 20
Windows Temp folder 21
Windows, wash settings for 18, 20, 24
Word Pad recent file list 25
Would you like to add bleach? 37
Y
Yahoo! Messenger, wash settings for 15
Index