1
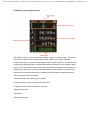
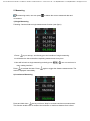
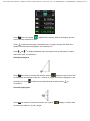
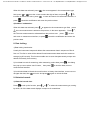
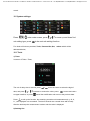
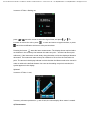
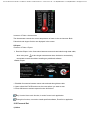
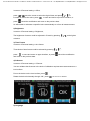
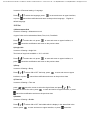
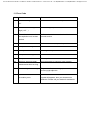
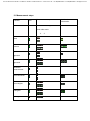
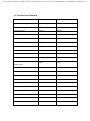
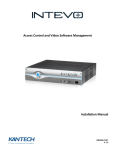
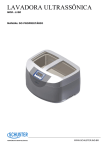
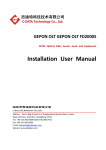
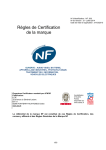
Cosinus Messtechnik GmbH - Lise-Meitner-Straße 6 - 85521 Ottobrunn - www.cosinus.de - Tel: 089/66559410 - Fax: 089/66559430 - [email protected] MileSeey S3 series handheld laser distance meter user guide 1. Overview MileSeey S3 series product measures up to 100m, integrates tilt sensor and full color screen, is specially for professional users. Initial adoption of li-ion battery, which greatly enhances usage life and can last for several years. In addition, it is more green. mOS V1.0, is an innovated and patent measuring system, which has vivid colorful screen, strong interactive interface, and has professional measuring functions. The various supplement functions and unique personal setting providing unexpected measuring experience and fun. The perfect combination of ergonomic design and fashion provides amazing functions and experience. The product leads to a new era of professional measurement. 2. Start-up&Shut-down 1) Inserting/replacing batteries Remove battery compartment lid by pressing it lightly, insert the provided Li-ion battery and close the cover. Remove the batteries before any long period of non-use to avoid the danger of corrosion. Your strongly recommended to user li-ion batteries which is produced by original laser meter producer. 2) Start-up Press key to start-up, and directly go to the interface of single measuring(see figure). Cosinus Messtechnik GmbH - Lise-Meitner-Straße 6 - 85521 Ottobrunn - www.cosinus.de - Tel: 089/66559410 - Fax: 089/66559430 - [email protected] 3) Manual Shut-down Pressing this button for longer switches the instrument off. 4) Auto Shut-down The instrument switches off automatically after three minutes of inactivity. Cosinus Messtechnik GmbH - Lise-Meitner-Straße 6 - 85521 Ottobrunn - www.cosinus.de - Tel: 089/66559410 - Fax: 089/66559430 - [email protected] 3. Button functions 1.Area/Volume/ Pythagoras 2.Plus/Go Up 3. Tilt/ triangle 4.Confirmation 5.Go Right 6.Saving/Historical data 7. Power On/Measuring (On/Single/continuous meas) 8.Menu/Power Off 9.Minus/Go Down 10. Reference 11.Go Left 12. Clear/Cancel Cosinus Messtechnik GmbH - Lise-Meitner-Straße 6 - 85521 Ottobrunn - www.cosinus.de - Tel: 089/66559410 - Fax: 089/66559430 - [email protected] 4. Display screen general view The graphics screen of the measurement window is split into different areas. Top second screen is the measurement functional field, which contains the currently selected measuring program. Just to the left/right appears the program submenu, which shows the measuring programs that can be selected by pressing the same key the required number of times. The measurement field contains the individual measurements of the measuring program with reference to a series of separate distance measurements. Three lines are provided for last measurement data. A horizontal line separates the measurement field and the result bar from one another. 1 Status bar with (time, battery status, bubble) 2 Program selection with measurement instructions 3. Status of measurement, (Reference, laser on) 3 Measurement field 4 Result bar 5 Measurement type Cosinus Messtechnik GmbH - Lise-Meitner-Straße 6 - 85521 Ottobrunn - www.cosinus.de - Tel: 089/66559410 - Fax: 089/66559430 - [email protected] 5. Measuring In measuring mode, user can press to delete the current measured data and re-measure. 1) Single Measuring Following 3 entries lead to single measurement function (see figure) Press key to start-up, and directly go to the interface of single measuring It will be back to this mode after completing measurement every time. User will be back to single measuring mode by press one or more times in menu setting interface. Press to activate the laser. Press again to trigger the distance measurement. The result is displayed immediately. 2) Continuous Measuring Press and hold down the key until hear "beep" to activate continuous measurement. This function enable user to measure the minimum or maximum distance from a fixed Cosinus Messtechnik GmbH - Lise-Meitner-Straße 6 - 85521 Ottobrunn - www.cosinus.de - Tel: 089/66559410 - Fax: 089/66559430 - [email protected] measuring point. User can press or to stop the function, and The values for maximum and minimum distances are shown in the display as well as the last measured value in the summary line. 3) Area Measuring Press once, the symbol appears in function filed of display. Press to take the first distance measurement (e.g. Length). Press again to take the second distance measurement (e.g. width). The results of length, width, perimeter and area are displayed in the historical data line in order. 4) Volume Measuring Cosinus Messtechnik GmbH - Lise-Meitner-Straße 6 - 85521 Ottobrunn - www.cosinus.de - Tel: 089/66559410 - Fax: 089/66559430 - [email protected] Press twice, the symbol appears in the function field on the display, and the volume function activated as well. Press to take the first length measurement (e.g. Length). Next get the width, then heights, the final result is displayed in the summary line. Press and to display additional room information such as ceiling/floor, surface area of the walls, circumference. 5) Single Pythagoras Press three times to activate the function,symbol appears in the function field on the display as following to take No. 1, and No. 2 length, the result is displayed on the summary line. Press to delete any measured length and then press to re-measure. 6) Double Pythagoras Press four times to activate the function, the symbol as following to take No.1,2 and 3 length, display in function field Cosinus Messtechnik GmbH - Lise-Meitner-Straße 6 - 85521 Ottobrunn - www.cosinus.de - Tel: 089/66559410 - Fax: 089/66559430 - [email protected] the height is displayed on the summary line. Press to find additoinal information 6. Tilt measurement 1) Tilt measurement Press button,the symbol appears in the function field, press to take the inclination and the distance. The inclination sensor measures tilts between ± 45°. During the measurement of tilt, the instrument should be held without transverse tilt, as far as possible within ± 10°. The accuracy is 0.3°. 2) Auto horizontal measurement Press twice ,the symbol appears in the functional field. Press button to measure angel and distance, The summary line displays the result as the direct horizontal distance 3) Auto height measurement Press third times ,the symbol appears in the functional field. Press button to take both sloping sides, the vertical height is displayed in the summary line. 4) Triangular measurement Press four times ,the symbol appears in the functional area. Press button to take 3 sloping sides respectively, the area is displayed in the summary line. Press to find out each angel of the Triangular and circumference. 7. Edit Measuring data Function Note: this function is only enabled in measurement mode and at least a measured data display in the screen. 1) Select data Press or to select measuring type in measuring process file (left handside of the screen) , press to locate the corresponding data, the data frame turning yellow indicates the data has been selected. 2) Re-measure: When this data was selected, press satisfied. Press or to re-measure the distance till the result is return to measurement interface, 3) Adjust measurement result: Cosinus Messtechnik GmbH - Lise-Meitner-Straße 6 - 85521 Ottobrunn - www.cosinus.de - Tel: 089/66559410 - Fax: 089/66559430 - [email protected] When this data was selected, press field, press or move the cursor to select the digit of data, and press increase or reduce the value, press press , the cursor appears in the measurement type or to to save and return to measurment interface, or cancel the modification and return the previous data. 4) Addition / subtraction: When this data was selected, press to appears in the measuremnt type field, press the next measurement is added to the previous, In the same approach, Press the The next measurement is subtracted from the previous one. press and return to measurment interface, or press , to save cancel the modification and return the previous data. 8. Data locking: 1)Data locking introduction: Usually the instrument keeps and deletes the measurement data in sequence of first in first out. The first in value will be deleted if total measurement data reach the maximum storage (eg.30 records). This function enable user to save data permanently except user deletes it manually from memory. 2) Lock data:in mode of measuring, when measuring, select data, press box pop up user to select “save” button, then press “ , the dialog ” to lock the data, return to measurement interface. 3) Lock/unlock data:in Historical record function: In history data interface, move cursor to navigate the data, then to lock it. And press again to unlock the data. 9. Historical record: 1) Historical record view: Press to call up the function, press or to select the measurment type, sorting by which, all of the data record displays in sequnce of created time. Cosinus Messtechnik GmbH - Lise-Meitner-Straße 6 - 85521 Ottobrunn - www.cosinus.de - Tel: 089/66559410 - Fax: 089/66559430 - [email protected] 2) View detail record Press to read detail informaton of this record, including data type (locked/unlocked) ,no.of order all data, date, time, measurement function, measurement types , corresponding result, additional information, For example, in function of volume measuemnt, additional infomration such as ceiling/floor area , surface area of the walls , circumference displays. 3) Historical record delete Batch records delete: When cursor select one of measurement type, Press , then press to delete all the historical records belonging to this measurement type. Single record delete: Press or to browse the record then Press Press or to browse the record then repeatedly press , and press to delete the record. to loock and unlock the Cosinus Messtechnik GmbH - Lise-Meitner-Straße 6 - 85521 Ottobrunn - www.cosinus.de - Tel: 089/66559410 - Fax: 089/66559430 - [email protected] record. . 10. System settings: Press enter main screen, press or to move up and down find to be next sub-setting function. out setting type, press Five kinds of funcitons proivded, Tools, Personal Set ,Set, others which will be addressed below, 10.1 Tools 1) Timer In screen of Tools-> Timer, The unit of delay time is second, press data, and press or move the cursor to select the digit of to increase or reduce the value, press to upper interface, or press Press or to save and return cancel the modification and return to the previous data. to call up the function, the remaining seconds until measurement (e.g. 10, 9, 8...) are displayed in a countdown. The last 5 seconds are counted down with a beep. After the last beep the measurement is taken and the value is displayed. 2) Staking Out Cosinus Messtechnik GmbH - Lise-Meitner-Straße 6 - 85521 Ottobrunn - www.cosinus.de - Tel: 089/66559410 - Fax: 089/66559430 - [email protected] In screen of Tools-> Staking out press or move the cursor to select the digit of data, and press increase or reduce the value, press or to to save and return to upper interface, or press cancel the modification and return to the previous data. Pressing the button starts the laser measurement. The display shows required stake out distance in the summary line between the stake out point and the instrument (rear reference). If the instrument moved slowly along the stake out line the displayed distance decreases. The instrument starts to beep at a distance of 0.1m from the next stake out point. The arrows in the display indicate in which direction the Meter needs to be moved in order to achieve the defined distance. As soon as the staking out point is reached, the symbol appears in the display. 3) Level In screen of Tools-> Level, 3 mercury columns represents X, y and 45 axis, the value display when meter is rotated. 4) Thermometer Cosinus Messtechnik GmbH - Lise-Meitner-Straße 6 - 85521 Ottobrunn - www.cosinus.de - Tel: 089/66559410 - Fax: 089/66559430 - [email protected] In screen of Tools-> thermometer The thermometer records the current temperature of meter in the environment. Both Fahrenheit and degree Celsius are displayed in the screen. 5) Export In screen of Tools-> Export Real time Export :in the Connection between meter and terminals through data cable, when user press to take single measurement date, the data is automatically transmited to terminals without installing any additional software. Battch Export: 1. Establish Connection between meter and terminals through data cable 2. Open editors like EXCEL and move the cursor where you want to start 3. Press OK button to activate export function till finished Only U series’ have such function, A series’ haven't such application. Using this function, not need to install specified software, Excel file is applicable. 10.2 Personal Set 1) Offset Cosinus Messtechnik GmbH - Lise-Meitner-Straße 6 - 85521 Ottobrunn - www.cosinus.de - Tel: 089/66559410 - Fax: 089/66559430 - [email protected] In screen of Personal setting-> Offset, press or move the cursor to select the digit of data, and press increase or reduce the value, press press or to to save and return to previous interface, or cancel the modification and return to the previous data. An offset adds or subtracts a specified value automatically to or from all measurements. 2) Brightness In screen of Personal setting-> Brightness, The brightness of screen could be adjusted in 5 levels by pressing or to be lighter or darker. 3) Time Format In screen of Personal setting-> time format Three kinds of time format could be selected by pressing press to save and return to upper interface, or press or ,. cancel the modification and return to the previous data. 4) G-Sensor In screen of Personal setting-> G-Sensor You can calibrate the tilt sensor in the device. Calibration requires two measurements on a level surface. Put on the device on the level surface, press Rotate the device horizontally through 180°, press 5) Language , The tilt sensor is calibrated. Cosinus Messtechnik GmbH - Lise-Meitner-Straße 6 - 85521 Ottobrunn - www.cosinus.de - Tel: 089/66559410 - Fax: 089/66559430 - [email protected] In screen of Personal setting-> Language Press or to select the language, press to save and return to upper interface, cancel the modification and return to the previous language. English is or press default language. 10.3 Set 1) Measurement Unit In screen of Setting-> Measurement unit 4 type of units can be selected as Meter, Feet, Inch, Feet&Inch. Press or press to select the unit; press to save and return to upper interface, or cancel the modification and return to the previous data. 2) Angle Unit In screen of Setting-> Angle Unit Two kinds of angel unit available +/- 0.0° or 0.00% Press or to select the unit; press to save and return to upper interface, or cancel the modification and return to the previous data. press 3) Beep In screen of Setting-> Beep, Press or to select ON or OFF the beep, press interface, or press to save and return to upper cancel the modification and return to the previous data. 4) Time Set In screen of Setting-> Time set press or move the cursor to select the digit of data, and press increase or reduce the value, press or to to save and return to upper interface, or press cancel the modification and return the previous data. 5) Bubble In screen of Setting-> Bubble Press or screen, press to select ON or OFF the bubble which is display in the status filed in the to save and return to upper interface, or press cancel the Cosinus Messtechnik GmbH - Lise-Meitner-Straße 6 - 85521 Ottobrunn - www.cosinus.de - Tel: 089/66559410 - Fax: 089/66559430 - [email protected] modification and return to the previous data. 10.4 Others 1) About us In screen of Setting-> Others>About us Software information display: Version Copyright, Press to go back to upper interface or 2) Factory Reset In screen of Setting-> Others> Factory Reset Press , the device returns to the factory settings and stack and memory are deleted. 3) Reset In screen of Setting-> Others> Reset Press memory. , the device returns to the factory settings but the records are still in the Cosinus Messtechnik GmbH - Lise-Meitner-Straße 6 - 85521 Ottobrunn - www.cosinus.de - Tel: 089/66559410 - Fax: 089/66559430 - [email protected] 11. Error Code Code Cause Corrective Measure 156 Transverse tilt greater than Hold the instrument without any transverse tilt 10° 160 Main tilt direction, angle too Measure angle up to max. ± 45° high (> 45°) 162 The calibration has not been Calibrate the device on an absolute Horizontal accomplished on a leveled leveled surface. surface 204 Calculation error Refer to user menu, repeat the procedures 208 Temperature too high Cool down 220 Battery too low Recharge battery 252 Temperature too High Cool down instrument 253 Temperature too Low Warm up instrument 255 Receiver signal too weak, Use target plate or change a good refection measurement time too long 256 Received signal too strong Target too reflective use target plate or do not aim at strong light objective Error Hardware error and Switch on/off the device several times. If the uncertainty error symbol still appears, then your instrument is defective. Please call your dealer for assistance Cosinus Messtechnik GmbH - Lise-Meitner-Straße 6 - 85521 Ottobrunn - www.cosinus.de - Tel: 089/66559410 - Fax: 089/66559430 - [email protected] 12. Measurement steps Function Icon Measurement steps Information Red side measuring Green side result 1 Area Volume Pythagorean1 Pythagorean2 Inclination measurement Auto Horizontal Auto Heights Triangular Staking out Additional 2 3 Cosinus Messtechnik GmbH - Lise-Meitner-Straße 6 - 85521 Ottobrunn - www.cosinus.de - Tel: 089/66559410 - Fax: 089/66559430 - [email protected] 13. Technical specifications Functional Spec S3A S3U Typical measuring accuracy ±1.5 mm ±1.5 mm Measurement range 100m 100m Measuring units M/in/ft M/in/ft Laser Class Class 2M Class 2M Display 2 Inch Full color screen 2 Inch Full color screen Tilt measurements YES YES Tilt sensor Accuracy ± 0.3° ± 0.3° Battery Li-ion battery/1200mAh Li-ion battery/1200mAh Battery life 15,000 times 15,000 times Horizontal measurement YES YES YES YES Staking out function YES YES Recall last values 30 1000 Buzzer indication YES YES Dust Protect/Splash proof IP54 IP54 Operating Temperature 0°C to 40°C 0°C to 40°C Storage Temperature -10°C to 60°C -10°C to 60°C Data Interface USB No YES Auto instrument switch-off after 3 min after 3 min Dimension 115x48x35mm 115x48x35mm Weight 105g 106g Angle measurement using tilt sensor(± 45°) Cosinus Messtechnik GmbH - Lise-Meitner-Straße 6 - 85521 Ottobrunn - www.cosinus.de - Tel: 089/66559410 - Fax: 089/66559430 - [email protected] 14. Package Porch Li-ion battery Power Charger, Data Cable 15. Contact ShenZhen MileSeey Technology Co.,Ltd ADD: F/6, Building 9, Zhongguan Honghualing Industrial South Park II,1213 Liuxian Ave, Taoyuan Street,Nanshan District, Shenzhen, 518055, P.R. China. TEL:+86-755-86329055 FAX:+86-755-86701592 Website: www.mileseey.net