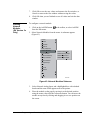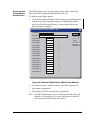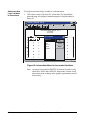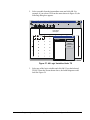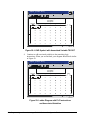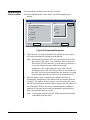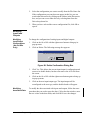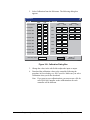
1
FAN 636.4, 1628.4 Programming and Commissioning Section User’s Guide Issue Date 0799 GX-9100 Software Configuration Tool for Windows General Setup Instructions Page 3 • Introduction *3 • System Requirements *5 • Software Installation *5 • Program Start • Connection to the DX-9100 *7 • Connection to the DX LCD Display *9 7 Creating a Configuration 11 • Configuration Process *11 • Starting the GX-9100 *12 • Defining Job Information *23 • Defining the Global Data *24 • Defining Analog Inputs and Digital Outputs *25 • Defining Analog Outputs and Digital Inputs 27 • Defining Modules *29 • Defining Programmable Modules *40 • Defining Network Modules (DX Version 3.x Only) *43 • Defining PLC Modules *48 • Connecting and Disconnecting Modules Creating a Configuration *57 • Defining the Trend Log Module (for DX Versions 1.4, 2.4, 3.4, or Later) *66 • Saving the Configuration *73 • Downloading to a DX Controller *74 * Indicates those sections where changes have occurred since the last printing. © 1999 Johnson Controls, Inc. Code No. LIT-6364060 1 www.johnsoncontrols.com • Viewing Configurations • Printing Configurations • Creating Tag Name ASCII Files • Creating DDL Files Page *78 83 *85 Modifying Configurations 87 • Uploading a Configuration from the Controller *87 • Opening a Configuration File *88 • Modifying Inputs and Outputs *89 • Deleting Modules • Modifying Modules *90 • Modifying Connections *92 • Calibrating Analog Inputs and Outputs 90 92 Configuring the DX LCD Display *95 Importing DOS GX-9100 Files *97 Commissioning 99 Troubleshooting 101 • Note on Ranges 101 • Common Error Messages *101 Appendix 1: Source Points *103 Appendix 2: Destination Points 109 Appendix 3: Trend Log Items *113 Appendix 4: DX LCD Display Data Points *115 Appendix 5: Item Abbreviations *117 Appendix 6: Comparison with the DOS Version *119 Appendix 7: Custom Home Page Syntax *121 * Indicates those sections where changes have occurred since the last printing. 2 *75 Programming and Commissioning—GX-9100 Software Configuration Tool for Windows General Setup Instructions Introduction In this document, Facility Management System (FMS) is a generic term that refers to the Metasys Network, Companion, and Facilitator supervisory systems. The specific system names are used when referring to system-specific applications. GX-9100 Graphic Configuration Software is used to configure the DX-9100 Extended Digital Plant Controller, the XT-9100 and XTM-905 Extension modules (XTM-905 is not available in North America as of May, 1999), and the DX LCD Display. This manual assumes that the reader is familiar with the DX-9100, XT-9100, XTM-905, and DX LCD Display. The GX-9100 software runs on an IBM, or 100% compatible computer with a minimum of 4 Mb memory and a 486 processor. The DX-9100 processes the analog and digital input signals it receives, using 12 multi-purpose programmable function modules, a softwareimplemented Programmable Logic Controller (PLC), time schedule modules, and optimal start/stop modules. It uses these components, as needed, to produce the required outputs, depending on the module configuration, operating parameters, and programmed logic. The DX-9100 can accept eight analog inputs and eight digital inputs. It provides up to 14 output modules, which are configured to give 8 analog outputs (2 analog outputs in the Version 1 controller) and 6 digital outputs (triacs). The triacs can be separately configured to provide six on/off or pulse outputs, six duration adjust outputs, 3-position adjust (incremental) outputs, three start/stop outputs, or any combination using up to six triacs. The DX-9100 input/output can be extended by up to 64 remote inputs/outputs, analog or digital, depending on the type of the connected XT-9100 or XTM-905 extension module configurations (XTM-905 is not available in North America as of May, 1999). Each XTM-905 with an XP module can provide either eight analog points or eight digital points (XTM-905 is not available in North America as of May, 1999). An XT/XTM can be expanded to provide eight additional digital points in one physical configuration by connecting two to four XP modules to the XT/XTM module. Programming and Commissioning—GX-9100 Software Configuration Tool for Windows 3 The Version 3.x controller (LONWORKS® DX-9120) can receive and transmit analog and digital data over the network to other Version 3.x controllers. Each controller accommodates 16 network analog inputs, 16 network analog outputs, 8 blocks of 16 digital inputs, and 8 blocks of 16 digital outputs. Network inputs and outputs allow DX-9120 controllers to share data on a LONWORKS N2 trunk without the need for a supervisory controller. A configuration comprises a set of parameters for each module, which are stored in a series of memory locations in the controller. Through the GX-9100 software, each module is assigned a type, details are entered in its data window, and outputs (source points) are connected to the inputs (destination points) of other modules. The PLC requires the generation of a logic diagram using different types of logic instructions. Finally, all the information is downloaded to the controller. Information uploaded from the controller may also be displayed via the GX-9100 program. The DX LCD Display unit is configured to display up to 96 data points from the DX controller configuration. It also displays alarm data, time schedules, trend logs, and a user-defined graphics screen. The GX-9100 is used to select data points for display and to define user text for all its various screens. Finally, all the data is downloaded to the controller and the DX LCD Display unit. Related Information Refer to Table 1 for additional information: Table 1: Related Information Document Title Code Number FAN DX LCD Display Technical Bulletin LIT-6364120 LIT-16284120 636.4 1628.4 GX-9100 for Windows Addendum, Configuring the DX LCD Display User’s Guide LIT-6364065 LIT-1628465 636.4 1628.4 DX-9100 Configuration Guide LIT-6364030 636.4 1628.4 DX Commissioning Using the Point Template Program User’s Guide LIT-6364080 LIT-1628480 636.4 1628.4 LONWORKS N2 Bus Technical Bulletin LIT-6364100 636.4 XTM-105 Extension Module, XPx-xxx Expansion Modules Technical Bulletin* LIT-6364200 636.4 *(XTM-905 is not available in North America as of May, 1999.) 4 Programming and Commissioning—GX-9100 Software Configuration Tool for Windows System Requirements The following system components are needed to run the Microsoft Windows version of the GX-9100 Graphic Configuration Software: • IBM AT, PS/2, or 100% compatible computer • minimum of a 486 processor • minimum of 4.0 Mb of RAM, with Windows running • minimum of 5.0 Mb of hard disk space • a 1.44 Mb floppy disk drive or CD-ROM (for installation) • MS DOS, Version 5.0 or later • Microsoft Windows, Version 3.1 or later • RS-232 port (for downloading to or uploading from the controller) • RS-232 cable with null modem adaptor • printer for graphics and text • Windows compatible mouse Refer to the Configuration Tools Software Installation Instructions Technical Bulletin, in the Software Installation section of the HVAC PRO for Windows User’s Manual, FAN 637.5 or 1637.5 for instructions to install the GX-9100 software. Software Installation The installation procedure will automatically create or modify an initialization file, named GX9100.INI. It will also set up the program group, called Configuration Tools, and the icons needed for running the GX-9100 utilities, which are listed in the following table. An icon for the GX-9100 readme file is also created. Table 2: GX-9100 Utilities Icon Description Document (All in FAN 636.4 and 1628.4)) GX-9100 Configure the DX-9100 Controller and the XT/XTM-905 Extension Module and XT-9100 DX LCD Display (XTM-905 is not available in North America as of May, 1999). GX-9100 Software Configuration Tool for Windows User’s Guide DX Commissioning Point Template program, to commission the DX-9100 Controller, including: obtain controller information, monitor points and control loops, override and adjust points. DX Commissioning Using the Point Template Program User’s Guide NDM Configuration Create configuration files for the N2 Dialer Module (NDM), and related procedures. NDM Configurator Application Note Programming and Commissioning—GX-9100 Software Configuration Tool for Windows 5 Switching Languages/ Defaults The installed language file set determines the default temperature units, frequency, and language. To switch languages and program defaults without having to reinstall the GX-9100 program: 1. Copy the file GXRES.* to GXRES.DDL. 2. Copy the file DXMISC.* to DXMISC.LNG. 3. Copy the file DXTEXT.* to DXTEXT.LNG. Note: The * indicates the file extension that is the first three letters of the language/defaults you are switching to. Enabling Password Protection for the DX-9100 Download/ Upload Dialogs (DX Version 1.4, 2.4, or 3.4) To enable the download/upload password protection feature in the GX-9100, use a standard text editor, such as Windows Notepad, to add the following entry in the [Settings] section of the GX9100.INI file (located in the Windows directory): [Settings] PasswordEnable=Yes If the entry is not present in the GX9100.INI file, then the password protection feature is disabled by default, and the DX Password fields are not shown in the Download and Upload dialog boxes. Note: If the [Settings] section is not present, add it also, using square brackets as shown above. Changing the Default Controller Version To change the controller version that is chosen by default in the GX-9100 program, use a standard text editor, such as Windows Notepad, to add or change the following entry in the [Settings] section of the GX9100.INI file (located in the Windows directory): [Settings] DefaultControllerVersion=<version number> Valid entries for the <version number> parameter are: 1.1, 1.2, 1.3, 1.4, 2.0, 2.1, 2.2, 2.4, 3.0, 3.1, 3.2, and 3.4 If the <version number> variable is set to any value other than those listed above, or if the entry is not present in the GX9100.INI file, then the GX Tool defaults to Version 2.2. Note: If the [Settings] section is not present, add it also, using brackets as shown above. 6 Programming and Commissioning—GX-9100 Software Configuration Tool for Windows Program Start To call up the GX-9100 program, start Windows, then double click on the GX-9100 icon (Figure 1) in your Configuration Tools Program Group. GX9100 gxicon Figure 1: GX-9100 Program Manager Icon Connection to the DX-9100 There are two methods of connecting the computer to the DX-9100. For more information, refer to the Controller Access Technical Bulletin in the Programming and Commissioning section of this manual (FAN 636.4 or 1628.4). Local Access connection from the computer to the DX-9100, Version 1 or 2, is made via an IU-9100 or MM-CVT101 converter unit that, in turn, must be connected to drive the N2 Bus (Bus 91) on which the DX-9100 controller resides. Note: The controller must be disconnected from the supervisory system. With this configuration, each DX-9100, with its connected XT-9100 and XTM-905 modules (XTM-905 is not available in North America as of May, 1999) and any XT-9100 modules on the bus, can be downloaded one after the other, entering the appropriate controller address at the GX-9100 PC (Personal Computer). Use a standard cable with a null modem adaptor or a null modem cable to connect to the modules. The DX-9100 Version 2 or 3 controller with its connected XT-9100 and XTM-905 modules (XTM-905 is not available in North America as of May, 1999) may be downloaded directly via its RS-232 port. With this connection configuration, only this one DX-9100 and its XT/XTMs can be downloaded. Note: If you have a LONWORKS DX (Version 3.x), you cannot download via the LONWORKS trunk from the GX Tool. The only way is via the RS-232 port on the DX-9120 controller or through a Metasys Operator Workstation (OWS). Programming and Commissioning—GX-9100 Software Configuration Tool for Windows 7 A) IU-9100 to PC Connection Details PC IU-9100 Port Plug RS-232-C 9-pin Female 9-pin Male GND 1 2 TxD 3 4 RxD 5 6 7 8 9 IU-9100 Plug RS-232-C 9-pin Female 9-pin Male 1 2 3 4 5 6 7 8 9 1 2 3 4 5 6 7 8 9 1 2 3 4 5 6 7 8 9 RS-232-C Port Plug 9-pin Female 9-pin Male DCD RxD TxD DTR GND DSR RTS CTS RI PC 1 2 3 4 5 6 7 8 9 GND 1 2 TxD 3 4 RxD 5 6 7 8 9 RS-232-C 25-pin Male Plug 25-pin Female 2 3 4 5 6 7 8 20 2 3 4 5 6 7 8 20 TxD RxD RTS CTS DSR GND DCD DTR B) DX Version 2 and 3 -- Direct Download DX-9100 Version 2 and 3 RS-232-C 9-pin Male 1 RxD 2 TxD 3 4 GND 5 6 7 8 9 Plug 9-pin Female DX-9100 Version 2 and 3 PC Communication Plug (RS-232-C) Port 9-pin Female 9-pin Male 1 2 3 4 5 6 7 8 9 1 2 3 4 5 6 7 8 9 1 2 3 4 5 6 7 8 9 Plug RS-232-C 9-pin Male 9-pin Female 1 RxD 2 TxD 3 4 GND 5 6 7 8 9 DCD RxD TxD DTR GND DSR RTS CTS RI 1 2 3 4 5 6 7 8 9 PC Communications (RS-232-C) Port Plug 25-pin Female 25-pin Male 2 3 4 5 6 7 8 20 2 3 4 5 6 7 8 20 C) N2 Bus Download DX RT + RT COM N2 + N2 REF CVT PC N2 Download DX RT + RT COM IU-9100 Cable A (above) PC fig1 Figure 2: Connection Details for Download 8 Programming and Commissioning—GX-9100 Software Configuration Tool for Windows TxD RxD RTS CTS DSR GND DCD DTR Connection to the DX LCD Display The serial cable provided with the DX LCD Display unit is used for downloading the display configuration. Connect the 9-pin female plug, normally connected to the DX controller, to the COM1 or COM2 serial port of the PC (Figure 3). Personal Computer (Rear View) DX LCD Display Serial Cable (Supplied with DX LCD Display) COM1 or COM2 Serial Port 9/12 VDC Power Supply (AC Adapter) Pcconnct Figure 3: Connecting the DX LCD Display to the PC’s Serial Port Programming and Commissioning—GX-9100 Software Configuration Tool for Windows 9 10 Programming and Commissioning—GX-9100 Software Configuration Tool for Windows Creating a Configuration Configuration Process The process for configuring a DX controller is shown in the figure below. Start the GX-9100 program. ↓ Choose which version DX to configure. ↓ Define job information. ↓ Define Global Data ↓ Define XT, XTM, and EXP modules. ↓ Define analog inputs and digital inputs. ↓ Define analog outputs and digital outputs. ↓ Define network inputs and outputs (Version 3 only). ↓ Define programmable modules. ↓ Define PLC diagrams. ↓ Make connections. ↓ Define trend log module. ↓ Save the configuration. ↓ Download the configuration. Figure 4: DX Configuration Process Programming and Commissioning—GX-9100 Software Configuration Tool for Windows 11 When you start the GX-9100 Graphic Configuration Software by double-clicking on the icon in the Program Manager, Figure 5 appears for DX Version 2.x or 3.x, Figure 6 appears for Version 3.x. Starting the GX-9100 Minimize, Maximize, and Close Buttons Title Bar System Menu Box GX9100 - Untitled Menu Bar File Edit View Action Controller Window DX LCD Display Help Toolbar AI1 AI2 AI3 AI4 AI5 AI6 AI7 AI8 DI1 DI2 DI3 DI4 DI5 DI6 DI7 DI8 8 Analog Inputs 8 Digital Inputs 8 Analog Outputs 6 Digital Outputs AO1 AO2 AO9 AO10 AO11 AO12 AO13 AO14 DO3 DO4 DO5 DO6 DO7 DO8 Scroll Bar 11:05:30 Friday, October 3, 1997 Gxscre11 Figure 5: Main Screen for a DX Version 2.x 12 Programming and Commissioning—GX-9100 Software Configuration Tool for Windows GX9100 - Untitled File Edit AI1 AI2 AI3 AI4 AI5 AI6 AI7 AI8 DI1 DI2 DI3 DI4 DI5 DI6 DI7 DI8 View Action Controller Window DX LCD Display Help 2 Analog Outputs 8 Analog Inputs 6 Digital Outputs AO1 AO2 DO3 DO4 DO5 DO6 DO7 DO8 8 Digital Inputs 11:05:30 Friday, October 3, 1997 Gxscre2 Figure 6: Main Screen for a DX, Version 1.x (Not Available in North America) Menu Bar The menu bar is across the top of the main screen. Clicking on these menu items with the left mouse button displays a list of options you can choose from. The menu bar, shown below, groups the activities associated with configuration into eight categories. GX9100 - [Untitled] File Edit View Action Controller Window DX LCD Display Help Menubar Figure 7: Menu Bar Available options display in black text. Options that cannot be chosen are grayed-out. To choose an option, click on it once with the left mouse button. To leave the menu without choosing an option, click the left mouse button once anywhere on the screen outside of the menu. Following is a detailed description of the items in each menu. Programming and Commissioning—GX-9100 Software Configuration Tool for Windows 13 File The file menu, shown in Figure 8, contains options that allow you to open, save, and print configuration files. File New Open... Import... Save Save As... Print... Print Preview... Print Setup... Header/Footer ... Read User Names... Write User Names... DDL File Options... Exit... filemenu Figure 8: File Menu The following table describes the various file menu options. Table 3: File Menu Options 14 Menu Option Description New Opens a new configuration file. Open Opens an existing configuration file. Import Imports files generated by the DOS GX-9100, Version 2, configuration tool into the GX-9100 configuration tool for Windows. Save Saves the current configuration. Save As Saves a copy of the current configuration under a different name. Print Prints the current configuration. Print Preview Allows you to view the current configuration as it will be printed on the page. Print Setup Allows you to set print parameters, including default printer, portrait or landscape, paper size and source, and page range. Header/Footer Allows you to set up user-defined headers and footers. Read User Names Reads the contents of an existing Tag name ASCII file into a GX-9100 configuration and modifies the configuration Tag names. Write User Names Creates a Tag name ASCII file from an existing GX-9100 configuration and saves it to disk. DDL File Options Allows you to define the items to be written to the DDL files when the configuration is saved. Exit Terminates the GX-9100 configuration tool. Programming and Commissioning—GX-9100 Software Configuration Tool for Windows Edit Menu The Edit menu, shown in Figure 9, contains various options that allow you to create and change configurations. Edit Add PM Configure Delete Data... Change Module Number... Global Data... Add Alarm Disable Connect... F5 Disconnect... F4 Calibration... Job Information... Clear editmenu Figure 9: Edit Menu The following table describes the various Edit menu options. Table 4: Edit Menu Options Menu Option Description Add PM Brings up a submenu to add one of several types of programmable modules to the configuration. Configure Brings up a submenu that allows you to configure the highlighted module. Delete Deletes the current module. Data Brings up a data screen with information about the selected module that can be viewed and edited. Change Module Number Allows you to change the number of the highlighted module. Global Data Allows you to edit information that affects the whole configuration, including temperature units, frequency, initialization on power up, counter type, daylight saving start and end date, password, and user configuration code. Add Alarm Disable Adds an alarm disable function block to the configuration. Connect Connects source and destination points. Disconnect Disconnects previously made connections. Calibration Allows you to calibrate analog input and outputs, and trim the accuracy of the realtime clock. Job Information Allows you to enter information pertaining to the configuration, such as job name, controller name, engineer, and branch. Clear Erases all logic blocks from the PLC ladder diagram. Programming and Commissioning—GX-9100 Software Configuration Tool for Windows 15 View Menu The View menu, shown in Figure 10, contains various options that allow you to alter the way the configuration looks on the screen. View Show Selected Show All Show User Names Show Tag Names Show Connections Trace Snap to Grid viewmenu Figure 10: View Menu The following table describes the various View menu options. Table 5: View Menu Options 16 Menu Option Description Show Selected Change the view to only show the modules that are currently selected and the connections between these modules. (To select more than one module at a time, press Ctrl while clicking on each.) Show All Returns the view to show every module in the configuration. Show User Names Displays the user-defined names for all modules that have them. Show Tag Names Displays the predefined tag names for all modules. Show Connections Shows all connections for the currently selected module. Trace Creates a graphical trace of all modules connected to a selected module for easy tracing of a path, without showing lines to and from other modules. Snap to Grid Allows snapping boxes to a grid, permitting easier alignment. Programming and Commissioning—GX-9100 Software Configuration Tool for Windows Action Menu The Action menu, shown in Figure 11, allows you to upload and download configurations to and from the DX controller. Action Upload... Download... actmenu Figure 11: Action Menu The following table describes the various Action menu options. Table 6: Action Menu Options Menu Option Description Upload Uploads a configuration from a DX controller. Download Downloads a configuration to a DX controller. Controller Menu The Controller menu, shown in Figure 12, allows you to choose the controller for which you are creating a configuration. Controller DX Version 1.1, 1.2, 1.3 DX Version 1.4. 1.5 DX Version 2.0, 2.1, 2.2 DX Version 2.3, 2.4 DX Version 3.0, 3.1, 3.2 DX Version 3.3, 3.4 contmen Figure 12: Controller Menu The following table describes the various Controller menu options. Table 7: Controller Menu Options Menu Option Description Each option on the Controller menu sets up the initial screen to create a configuration for the indicated controller versions, as follows: DX Version 1.1, 1.2, 1.3 Versions 1.1, 1.2, and 1.3 of the DX controller. DX Version 1.4, 1.5 Version 1.4 of the DX controller (supports Trend). DX Version 2.0, 2.1, 2.2 Versions 2.0, 2.1, and 2.2 of the DX controller. DX Version 2.3, 2.4 Version 2.4 of the DX controller (supports Trend). DX Version 3.0, 3.1, 3.2 Versions 3.0, 3.1, and 3.2 of the DX controller. DX Version 3.3, 3.4 Version 3.4 of the DX controller (supports Trend). Programming and Commissioning—GX-9100 Software Configuration Tool for Windows 17 Window Menu The Window menu, shown in Figure 13, allows you to cascade, tile, or arrange multiple configuration windows on the screen. Window Cascade Tile Arrange winmenu Figure 13: Window Menu The following table describes the various Window menu options. Table 8: Window Menu Options 18 Menu Option Description Cascade Arranges multiple configurations on the screen in overlapping stair-stepped panes. Tile Arranges multiple configurations into equal-sized panes that fill the screen but do not overlap. Arrange Arranges icons and windows on the screen. Programming and Commissioning—GX-9100 Software Configuration Tool for Windows DX LCD Display Menu The DX LCD Display menu (Figure 14) contains all the options required to define a configuration for the DX LCD Display. DX LCD Display Global Data... Configuration Name... Define Default Configuration... Point Database TSn/OSn Description Text Define Trend Data Download Display... Read User Configuration Codes... displmen Figure 14: DX LCD Display Menu Table 9 below describes the DX LCD Display menu options: Table 9: DX LCD Display Menu Options Menu Option Description Global Data Edits global data that affects the operation of the display as a whole, such as the time-out period of the LCD backlight. Note: The user configuration code must be filled in or the DX LCD Display will not take a download. Configuration Name Edits the Configuration Name that is displayed when connected to a DX. Define Default Configuration Defines a default configuration to be used by the DX LCD Display in the event that none of the configurations stored in the unit matches the DX controller configuration. Point Database Opens a new window that allows you to define the points that are to be shown on the LCD display. TSn/OSn Description Text Opens a new window that allows you to edit the descriptions for Time Schedule modules and Optimal Start/Stop modules. Define Trend Data Opens a new window that allows you to define the points for which Trend Data is to be shown on the DX LCD display. Download Display Downloads the current configuration to the display unit. Read User Configuration Codes Reads the configuration codes and names of all of the configurations currently stored in the DX LCD Display unit. Programming and Commissioning—GX-9100 Software Configuration Tool for Windows 19 Help Menu The Help menu (Figure 15) allows you to view the copyright screen. Help About... helpmenu Figure 15: Help Menu The following table describes the Help menu option. Table 10: Help Menu Options Toolbar Menu Option Description About Displays copyright and version information for the GX-9100 tool. The toolbar is located just below the menu bar. It contains buttons that perform specific functions when clicked with the left mouse button. Table 11 shows the toolbar buttons and describes their functions. Table 11: Toolbar Buttons Toolbar Button Menu Bar Equivalent Description File--New Opens a new configuration file. File--Open Opens an existing configuration file. File--Save Saves the current configuration. Edit--Add PM Adds a programmable module or network input/output module to the current configuration. File--Print Brings up the series of print dialog boxes, which allow you to select items to print, as well as set print parameters. The following buttons only work with the DT-9100 DX LCD Display configuration: 20 Edit--Cut Removes the currently selected data and places it on the clipboard. Edit--Copy Places a copy of the currently selected data on the clipboard. Edit--Paste Pastes the data from the clipboard into the currently selected line. Programming and Commissioning—GX-9100 Software Configuration Tool for Windows Pop-Up Menus Pop-up menus display when you click the right mouse button on a point or module. The pop-up menu that displays depends on which type of point or module you click on. An example of the menu that displays when you click on an unconfigured Digital Output with the right mouse button is shown in Figure 16. P.A.T. D.A.T. On/Off Sta/Sto Pulse popmenu Figure 16: Unconfigured Digital Output Pop-Up Menu Example An example of the pop-up menu that appears when you click on a configured module is shown below. Data... Delete Connect... F5 Show Connections Show Selected Show User Names Trace ✔ Snap to Grid modmenu Figure 17: Configured Module Pop-Up Menu Example Select an option by clicking it with the left mouse button or highlighting it with the arrow keys, then pressing <Enter>. Click the left mouse button outside of the menu or press <Esc> to exit the menu without choosing a selection. Programming and Commissioning—GX-9100 Software Configuration Tool for Windows 21 User Names Each input and output point, connection source point, destination point, and programmable module has a predetermined tag name. (See the Appendices for details on these names.) However, you may define an 8-character user name that identifies the function of each point and programmable module in the application being configured. For programmable modules, inputs, and outputs, define these names in the data window’s User Name field. Note that you can also add a 24-character description in the data window’s Description field. For connection points, define the names by clicking the Input-Tag button (for destination points) or the Output-Tag button (for source points) in the appropriate data window, then enter the names in the fields next to the points. The View menu gives you the option to display the configuration with the predefined tag names or the user names. Controller Menu When started, the DX-9100 initial screen automatically defaults to Version 2.4. If you are using a different version controller, change the screen to reflect that version. To switch between the versions: 22 1. Click Controller on the menu bar. The current controller version is the checked menu item. 2. Select another controller version from the menu. The screen changes to that version. See Figure 5 and Figure 6. Programming and Commissioning—GX-9100 Software Configuration Tool for Windows Defining Job Information To define job information for a configuration: 1. Select Job Information from the Edit menu. The following dialog box will appear: Job Information OK Job Name: Cancel Controller Name: Engineer: Branch: Project Description: Date (YYYY/MM/DD): 1997 / 10 / 19 jobinfo Figure 18: Job Information Dialog Box 2. Fill in the empty data fields. Note that the current date is automatically entered into the date field if it has not been entered previously. 3. Click OK when you are finished. Programming and Commissioning—GX-9100 Software Configuration Tool for Windows 23 Defining the Global Data To define the configuration’s global data: 1. Select Global Data from the Edit menu. The following dialog box appears: Edit Global Data Temperature Units Frequency Celsius 50 Hz Fahrenheit 60 Hz Init On Power Up OK Cancel Counter Type maintained 15 bit cancelled 4 byte DL Saving Start Date (MM/DD) 0 / 0 DL Saving End Date (MM/DD) 0 / 0 Password 0000 User Config Code global Figure 19: Edit Global Data Dialog Box Notes: The User Configuration Code, used by the DX LCD Display unit, identifies the configuration to display the correct screens. It is downloaded to the controller and displayed on startup (Version 1.1 or later). The Password protects a configuration loaded into a controller. Once the password is downloaded into the controller along with the configuration, the controller only allows another download or upload when the same password is entered. Changing the GX9100.INI file later, or loading a new configuration does not affect the password. If you forget the password, return the controller to the factory to reset it. Enter a password of 0000 in the Edit Global Data screen to disable the password. The Password field is grayed and cannot be edited if the Password feature has not been enabled in the GX9100.INI file (see Enabling Password Protection for the DX-9100 Download/Upload Dialogs (DX Version 1.4, 2.4, or 3.4) under Software Installation at the beginning of this guide). 2. 24 Click OK to save the values and close the dialog box. Programming and Commissioning—GX-9100 Software Configuration Tool for Windows Defining Analog Inputs and Digital Outputs Defining analog inputs and digital outputs is a two step process. First, you must configure the AI or DO using the pop-up menus. Then, you must define the data associated with the AI or DO using the data windows. AI or DO Configuration To configure an analog input or digital output: 1. Using the right mouse button, click on the AI or DO you want to configure. Examples of the pop-up menus are shown below. Active P.A.T. Passive D.A.T. Analog Input Pop-up Menu On/Off Sta/Sto Pulse Digital Output Pop-up Menu iopopmnu Figure 20: Analog Input and Digital Output Configuration Menus 2. Select the type of AI or DO you want from the pop-up menu using the left mouse button. A double border appears around the point to indicate that it is configured. Programming and Commissioning—GX-9100 Software Configuration Tool for Windows 25 AI or DO Data Definition To define the data associated with the AI or DO: 1. Click on the configured AI or DO with the right mouse button and select Data from the pop-up menu that appears, or highlight the point, then select Data from the Edit menu. A data window appears like that in Figure 21 or Figure 22. 2. Enter the desired values in the empty data fields. Use an asterisk (*) to make or modify connections from the data window. 3. Click the Input-Tag button to assign user names to the destination points (if applicable). 4. Click the Output-Tag button to assign user names to the source points (if applicable). 5. Click OK when you are finished entering data to save the values and exit the data window. ANA IN [ACT] - Data User Name OK Description Measurement Units 0 Type of Active Input 0 High Range 100. Low Range 0. High Limit 100. Low Limit 0. Filter Constant (sec) 0. Limit Differential 2. Alarm Unfiltered (0=N) 0 Square Root (0=N) 0 CANCEL Output-Tag... Units of Measure : 0 = None, 1 = Temperature, 2 = % Type of Input : 0 = 0-10 VDC, 1 = 4-20 mA, 2 = 0-20 mA gxscre2b Figure 21: Active Analog Input Data Window 26 Programming and Commissioning—GX-9100 Software Configuration Tool for Windows P.A.T. (DO3) -- Data User Name Description OK Source Point --> Feedback --> Output Forcing --> Enable Limits --> Increase Source --> Decrease Source --> CANCEL Input-Tag... Output-Tag... High Range 100. Low Range 0. Stroke Time (Sec) 90. Deadband (%) 2. High Limit (%) 100. Low Limit (%) 0. Forcing Level (%) 0. Hold on Powerup (0=N) 0 Auto on Powerup (0=N) 0 dodata Figure 22: P.A.T. Digital Output Data Window Defining Analog Outputs and Digital Inputs To define analog outputs and digital inputs, only enter the data associated with the AO or DI. To enter the associated data: 1. Click on the configured AO or DI with the right mouse button and select Data from the pop-up menu that appears, or highlight the point, then select Data from the Edit menu. A data window like that in Figure 23 or Figure 24 appears. Programming and Commissioning—GX-9100 Software Configuration Tool for Windows 27 NETWORK ANALOG OUTPUT [NA01] - Data User Name Description OK --> Source Pt. Destination # Cntrl.Addr NAI# #1 0 0 #2 0 0 #3 0 0 #4 0 0 #5 0 0 0 0 0 0 #6 #7 CANCEL :::::: Data-2... Input-Tag... analogot Figure 23: Analog Output Data Window DIGITAL IN (DI1) -Data User Name Description Prescaler (counts) OK 1 CANCEL Output-Tag... didata Figure 24: Digital Input Data Window 28 2. Enter the desired values in the empty data fields. Use an asterisk (*) to make or modify connections from the data window. 3. Click the Input-Tag button to assign user names to the destination points (if applicable). 4. Click the Output-Tag button to assign user names to the source points (if applicable). 5. Click OK when you are finished entering data to save the values and exit the data window. Programming and Commissioning—GX-9100 Software Configuration Tool for Windows Defining Modules Table 12 shows the maximum number of each type of module you can use in a configuration. Table 12: Module Type Limits Type of Module Maximum Number Allowed Control Numeric Totalization 12 total Sequencer Binary Sequencer XT or XTM 8 total Time Schedule 8 PLC 8 Optimum Start/Stop 2 Analog Constants 1 Digital Constants 1 Exception Days 1 LRS1-32 1 LRS33-64 1 Trend Log 1 Network Modules NDO 8 NDI 8 NAO 16 NAI 16 Note: Once you reach a module’s limit, that module type is removed from the Add PM menu. Also, module types not supported by the selected controller version do not appear on the Add PM menu. Programming and Commissioning—GX-9100 Software Configuration Tool for Windows 29 Defining XT, XTM, and XP Modules To configure XT and XTM modules: 1. Click on the Add PM button from the Edit menu. on the toolbar, or select Add PM 2. Select XT or XTM from the Add PM menu. A submenu appears with options for the XP type. XPs and XTMs can be analog, digital, or expanded digital. Notes: The XP expanded digital options (preceded with EXP) only appear if the preceding module is an XT or XTM and not defined as EXP. The inputs/outputs of an XP are connected to the first XT or XTM module. An expanded digital XT or XTM (EXP) represents the inputs/outputs of the second XP on the preceding XT or XTM. The first XT/XTM software module actually represents two hardware modules. Control Numeric Totalization Sequencer Binary Sequencer Network Modules Time Schedule Optimum Start Stop Analog Constants Digital Constants Exception Days PLC LRS1-32 LRS33-64 XT 6AI 2AO XTM 4DI 4DO Trend 8DI 8DO EXP 4DI 4DO EXP 8DI EXP 8DO xpmenu Figure 25: XT Extension Module Configuration Menus 30 Programming and Commissioning—GX-9100 Software Configuration Tool for Windows Control Numeric Totalization Sequencer Binary Sequencer Network Modules Time Schedule Optimum Start Stop Analog Constants Digital Constants Exception Days PLC LRS1-32 LRS33-64 XT XTM Analog 4AI Trend 4DI 4DO 4AO 8DI 4AI 4AO 8DO 8AI XPM 8AO XPL 6AI 2AO XPE EXP xpmmenu Figure 26: XTM Extension Module Configuration Menus Configuring Analog XT Modules For an XT module, there is only one type of analog XP module: six analog inputs and two analog outputs (6AI 2AO). For an XTM module, there are several choices of analog XP modules (Table 13). Table 13: XTM Analog Modules Menu Option Description 4AI* four analog inputs 4AO* four analog outputs 4AI 4AO* four analog inputs and four analog outputs (2 XP modules) 8AI* four analog outputs (2 XP modules) 8AO* four analog outputs (2 XP modules) 6AI 2AO six analog inputs and two analog outputs * Not available in North America. Programming and Commissioning—GX-9100 Software Configuration Tool for Windows 31 To configure an analog input for an XT or XTM: 1. Select XT or XTM from the Add PM menu. 2. Select the desired analog configuration from the XT or XTM submenu using the left mouse button. See Figure 25 and Figure 26. Additional analog inputs and outputs appear around the sides of the screen in Figure 27. GX9100 - Untitled File Edit View Action Controller Window DX LCD Display Help AI1 AI2 AI3 AI4 AI5 AI6 AI7 AI8 DI1 DI2 DI3 DI4 DI5 DI6 DI7 DI8 XT1AI1 XT1AI2 XT1AI3 Inputs added for XT1AI4 XT module. XT1AI5 XT1AI6 11:05:30 Friday, October 3, 1997 XT1 Outputs added for XT module. AO1 AO2 AO9 AO10 AO11 AO12 AO13 AO14 DO3 DO4 DO5 DO6 DO7 DO8 XT1AO7 XT1AO8 gxscre10 Figure 27: XT Analog Inputs and Outputs Note: Input and output tags for XTM modules are the same as for XT modules (e.g., XTnAIm, XTnAOm). 3. Use the mouse to place the XT or XTM module block on the screen, then click the left mouse button. 4. Click on the desired XTnAIm with the right mouse button. The menu shown in Figure 28 appears. Active Passive Fig29 Figure 28: XT/XTM Analog Input Configuration Menu 32 Programming and Commissioning—GX-9100 Software Configuration Tool for Windows 5. Click on Active or Passive with the left mouse button to configure the analog input. A double border appears in the AI’s function block to indicate that it is configured. XT AI and AO Data Definition To define the data associated with XT or XTM analog inputs and outputs: 1. Click on the configured XT AI or XT AO with the right mouse button and select Data from the pop-up menu that appears, or highlight the point, then select Data from the Edit menu. A data window similar to that in Figure 29 or Figure 30, shown below appears. XP-ANA IN (ACT) (XT1AI1) - Data User Name OK Description Measurement Units 0 Type of Active Input High Range Low Range 0 100. High Limit Low Limit 0. 100. 0. Filter Constant (sec) Limit Differential Alarm Unfiltered (0=N) Square Root (0=N) 0. 1. 0 0 Cancel Output-Tag... Units of Measure : 0 = None, 1 = Temperature, 2 = % Type of Input : 0 = 0-10 VDC, 1 = 4-20 mA, 2 = 0-20 mA gxscre2c Figure 29: XT/XTM Analog Input Data Window Programming and Commissioning—GX-9100 Software Configuration Tool for Windows 33 XP-ANALOG OUT (XT2AO1) - Data User Name OK Description Cancel Type of Output Source Point 0 --> High Range 100 Low Range 0 XPA-4x2 only: Output Ramp Time Input-Tag... Output-Tag... :::::: 0 0 = Disabled 1 = 0-10 VDC 2 = 0-20 mA 3 = 4-20 mA AO11-AO14: 0-10V only Output Ramp Time: Units of 500 ms for full scale change aodata1 Figure 30: XT/XTM Analog Output Data Window Configuring Digital or Expanded Digital Extension Modules 2. Enter the desired values in the empty data fields. Use an asterisk (*) to make or modify connections from the data window. 3. Click the Input-Tag button to assign user names to the destination points (if applicable). 4. Click the Output-Tag button to assign user names to the source points (if applicable). 5. Click OK when you are finished entering data to save the values and exit the data window. For XT modules, digital or expanded digital XP modules may have eight digital inputs (8DI or EXP8DI), four digital inputs and four digital outputs (4DI 4DO or EXP 4DI 4DO), or eight digital outputs (8DO or EXP 8DO), as shown in Figure 31. 6AI 2AO 4DI 4DO 8DI 8DO EXP 4DI 4DO EXP 8DI EXP 8DO Fig32 Figure 31: Digital and Expanded Digital Extension Module Configuration Menu for XT 34 Programming and Commissioning—GX-9100 Software Configuration Tool for Windows For XTM modules, digital or expanded digital XP modules of the type XPM-4x1 (momentary output relays), XPL-4x1 (magnetically latched output relays), or XPE-4x1 (electrically latched output relays) may also be configured, as shown in Figure 32 below. Refer to the XTM-905 Extension Module, XPx-xxx Expansion Modules Technical Bulletin (XTM-905 is not available in North America as of May, 1999) for details of these modules. Analog 4DI 4DO 8DI 8DO XPM XPL XPE EXP 4DI 4DO 8DI 8DO XPM XPL XPE Fig33 Figure 32: Digital and Expanded Digital Extension Module Configuration Menu for XTM Note: Modules of type XPE-4x4 (x=0, 1, 2, or 3) must be configured as 4DI 4DO. To configure digital or expanded digital extension modules: 1. Select XT or XTM from the Add PM menu. 2. Select the desired combination of digital inputs and/or outputs from the XT/XTM submenu using the left mouse button. Additional inputs and/or outputs appear around the sides of the screen (Figure 33). Note: Expanded digital module options (options preceded with EXP) only appear on the submenu if the preceding module is an XT or XTM and the XP type is not defined as EXP. Programming and Commissioning—GX-9100 Software Configuration Tool for Windows 35 GX9100 - Untitled File Edit AI1 AI2 AI3 AI4 AI5 AI6 AI7 AI8 DI1 DI2 DI3 DI4 DI5 DI6 DI7 DI8 XT1DI1 XT1DI2 XT1DI3 XT1DI4 View Action Controller Window DX LCD Display Help XT1 Outputs added for XT module. Inputs added for XT module. AO1 AO2 AO9 AO10 AO11 AO12 AO13 AO14 DO3 DO4 DO5 DO6 DO7 DO8 XT1DO5 XT1DO6 XT1DO7 XT1DO8 11:05:30 Friday, October 3, 1997 Gxscre10a Figure 33: XT Digital Inputs and Outputs Note: Input and output tags for XTM modules are the same as for XT modules (e.g., XTnDIm, XTnDOm). 3. Use the mouse to place the XT or XTM module block on the screen, then press the left mouse button. 4. For outputs only, click on the desired output with the right mouse button. The following menu appears: On/Off Pulse Fig35 Figure 34: XT/XTM Digital Output Configuration Menu 5. 36 Click on On/Off or Pulse with the left mouse button to configure the digital output. A double border appears in the DO’s function block to indicate that it is configured. Programming and Commissioning—GX-9100 Software Configuration Tool for Windows Notes: Configure all DOs as On/Off or Pulse regardless of whether they are used. The only exceptions are the 4-output relay modules (XP-9107) When only one 4-output module is installed, select 8DO, but only configure DO1-DO4. When two 4-output modules are installed, configure both as one 8DO module, and configure DO1-DO8. IMPORTANT: XT DI and DO Data Definition Configure XPL-4x1, and XPE-4x1 modules as Pulse. The action of the outputs is determined by the hardware, not by the configuration. To define the data associated with XT and XTM digital inputs and outputs: 1. Click on the configured XT DI or XT DO with the right mouse button and select Data from the pop-up menu that appears, or highlight the point, then select Data from the Edit menu. A data window similar to Figure 35 or Figure 36 appears. XP-DIGITAL IN (XT1DI1) -Data User Name OK Description Cancel Prescaler (counts) Digital Input Type 1 0 :::::: XTM only: Normally Closed Contact (0=N) 0 Output-Tag... Digital Input Type: 0 - ON/OFF 1 - PULSE didata2 Figure 35: XT/XTM Digital Input Data Window Programming and Commissioning—GX-9100 Software Configuration Tool for Windows 37 XP-ON/OFF (XT1DO5) -Data OK User Name Description Cancel Source Point --> Input-Tag... Output-Tag... didata1 Figure 36: XT/XTM Digital Output Data Window 2. Enter the desired values in the empty data fields. Use an asterisk (*) to make or modify connections from the data window. 3. Click the Input-Tag button to assign user names to the destination points (if applicable). 4. Click the Output-Tag button to assign user names to the source points (if applicable). 5. Click OK when you are finished entering data to save the values and exit the data window. XT and XTM Data Definition To define the data associated with the operation of the complete XT or XTM module set: 1. Click on the XT or XTM box with the right mouse button and select Data from the pop-up menu that appears, or highlight the module, then select Data from the Edit menu. A data window, similar to Figure 37 or Figure 38 appears. XT-4DIDO (XT1) - Data User Name Description Hardware address Status on comm fail Comm. Timeout (sec) Digtl Output Pulse Time OK Cancel 0 0 60 200 Output-Tag... Status on comm. failure: 0 = Reset to OFF (Digital Outputs) 1 = Restore prev. status Dig. Output Pulse Time: Units of 5 msec fig38 Figure 37: XT Data Window 38 Programming and Commissioning—GX-9100 Software Configuration Tool for Windows XTM-8DI (XTM2) - Data User Name Description OK Cancel 0 Hardware address 0 DO status on comm. fail 60 Comm. Time-out (sec) 200 Digital Output Pulse Time 0 DO status after power fail Disable Man. Ovr. in Sup. (0=N) 0 Man. Ovr. status in DI1-4 (0=N) 0 0 Any Ovr. status in DI4 (0=N) Output-Tag... DO status on comm. fail: 0 = reset to OFF 1 = maintain status DO status after power fail: 0 = remain OFF 1 = restore previous status Digital Output Pulse Time: Units of 5 msec fig39 Figure 38: XTM Data Window 2. Enter the desired values in the empty data fields. 3. Click on the Output-Tag button to assign user names to the source points. 4. Click on OK when you are finished entering data to save the values and exit the data window. Programming and Commissioning—GX-9100 Software Configuration Tool for Windows 39 Defining Programmable Modules Configuring Programmable Modules To configure a programmable module: 1. Click on the Add PM button on the toolbar, or select Add PM from the Edit menu. The Add PM menu (Figure 39) appears. Control Numeric Totalization Sequencer Binary Sequencer Network Modules Time Schedule Optimum Start Stop Analog Constants Digital Constants Exception Days PLC LRS1-32 LRS33-64 XT XTM Trend Figure 39: Programmable Module Configuration Menu 40 Programming and Commissioning—GX-9100 Software Configuration Tool for Windows 2. Select the type of module from the menu. If opting for a control or numeric module, a submenu appears (Figure 40). Control PID Control Numeric On/Off Numeric Average Totalization Dual PID Totalization Minimum Sequencer Dual On/Off Sequencer Maximum Binary Sequencer Binary Sequencer Psychrometric Network Modules Network Modules Segment Time Schedule Time Schedule Four-Segment Select Optimum Start Stop Optimum Start Stop Analog Constants Analog Constants Calculator Digital Constants Digital Constants Eight-Calculator Exception Days Exception Days Timer PLC PLC Comparator LRS1-32 LRS1-32 LRS33-64 LRS33-64 XT XT XTM XTM Trend Trend Control Numeric pm2menu Figure 40: Control and Numeric Configuration Menus Once you have selected the type, a highlighted box with a dashed border and the type name and module number appears next to the pointer. 3. Programmable Module Data Definition Place the module on the page by moving it to the desired position using the mouse, then click the left mouse button. You can move the module at any time by clicking and dragging it to a new position on the screen. To define the data associated with a programmable module: 1. Click on the programmable module with the right mouse button and select Data from the pop-up menu that appears, or highlight the module, then select Data from the Edit menu. A data window like the one shown in Figure 41 appears. Programming and Commissioning—GX-9100 Software Configuration Tool for Windows 41 PID (PID1) - Data User Name OK Description Cancel Ena Shutoff: 0=N 0 Remote Setpoint Shutoff Out Level 0. Reference Variable --> Ena Startup: 0=N 0 Proportional Band --> Startup Out Level 100. OFF Mode Control --> Ena Symm Mode: 0=N 0 Standby Control --> ExtForce Out Level 0. Reverse Action --> Ena PID to P: 0=N 0 External Forcing --> Remote Mode: 0=N 0 Output Bias --> Ena Off Trans: 0=N 0 Minimum WSP --> Maximum WSP --> Process Variable --> --> Data-2... Input-Tag... Output-Tag... gxscre4 Figure 41: PID Module Data Window 2. Enter the desired values in the empty data fields. Use an asterisk (*) to make or modify connections from the data window. 3. Click the Input-Tag button to assign user names to the destination points (if applicable). 4. Click the Output-Tag button to assign user names to the source point (if applicable). 5. If the module has two pages, click the Data-2 button to access the second page. An example of the second page is shown below. PID (PID3) - Data-2 Local Set Pt. [LSP] 0. Out High Lmt [HIL] 100. Proport. Band [PB] 10. Out Low Lmt [LOL]] 0. Reset Action [TI] 0. Dev H.H. Limit [DHH] 10. Rate Action [TD] 0. Dev High Limit [DH] 5. Standby Bias [BSB] 0. Dev Low Limit [DLL] 5. Off Mode Bias [BOF] 0. Dev L.L. Limit [DLL] 10. Symmetry Band [SBC] 5. Minimum WSP [MNWS] -50. Err Deadband [EDB] 5. Maximum WSP [MXWS} 999. Output Bias (OB) 0. OK CANCEL gxscre4a Figure 42: PID Module Second Page 6. 42 Enter the desired values in the empty data fields of the second window. Use an asterisk (*) to make or modify connections. Programming and Commissioning—GX-9100 Software Configuration Tool for Windows Defining Network Modules (DX Version 3.x Only) 7. Click OK to save the new values and return to the first window, or Cancel to return to the first window without saving the values. 8. Click OK when you are finished to save all values and exit the data window. To configure a network module: 1. Click on the Add PM button from the Edit menu. on the toolbar, or select Add PM 2. Select Network Modules from the menu. A submenu appears (Figure 43). Control Numeric Totalization Sequencer Binary Sequencer Network Modules Network Analog Input Time Schedule Network Analog Output Optimum Start Stop Network Digital Input Analog Constants Network Digital Output Digital Constants Exception Days PLC LRS1-32 LRS33-64 XT XTM Trend Netmodsm Figure 43: Network Modules Submenu 3. Select Network Analog Input, and a highlighted box with a dashed border and the name NAIn appears next to the pointer. 4. Place the module on the page by moving it to the desired position using the mouse, then click the left mouse button. You can move the module at any time by clicking and dragging it to a new position on the screen. Programming and Commissioning—GX-9100 Software Configuration Tool for Windows 43 5. Repeat the same procedure, using the submenu options Network Digital Input (NDIn), Network Analog Output (NAOn), and Network Digital Output (NDOn) to define the network modules. GX9100 - Untitled File Edit View Action Controller Window DX LCD Display Help AI1 AI2 AI3 AI4 AI5 AI6 AI7 AI8 DI1 DI2 DI3 DI4 DI5 DI6 DI7 DI8 AO1 AO2 AO9 AO10 AO11 AO12 AO13 AO14 DO3 DO4 DO5 DO6 DO7 DO8 NAI1 NAO1 NDI1 NDO1 11:05:30 Friday, October 3, 1997 N&d_i&o Figure 44: Network Analog and Digital Modules Network Analog Input Module Data Definition To define the data associated with the network analog input module: 1. Right click on the configured NAIn and select Data from the pop-up menu that appears; or highlight the module, then select Data from the Edit menu. A data window like Figure 45 appears. NETWORK ANALOG INPUT (NAI1) - Data User Name OK Description Cancel Output-Tag... analogin Figure 45: Network Analog Input Data Window 2. 44 Enter the user name and description as appropriate. Programming and Commissioning—GX-9100 Software Configuration Tool for Windows Network Digital Input Module Data Definition 3. Click on the Output-Tag button and assign user names to the source points as appropriate. 4. Click on OK when you are finished to save all entries and exit the data window. To define the data associated with the network digital input module: 1. Right click on the configured NDIn and select Data from the pop-up menu that appears, or highlight the module, then select Data from the Edit menu. A data window like that in Figure 46 appears. NETWORK DIGITAL INPUT (NDI1) - Data User Name OK Description Cancel Output-Tag... digitlin Figure 46: Network Digital Input Data Window 2. Enter the user name and description as appropriate. 3. An Output-Tag can be assigned to each of the 16 binary points that each NDIn accommodates. Click on Output-Tag to enter the appropriate user names as shown in Figure 47. NETWORK DIGITAL INPUT [NDI1] -Output-Tag -1 -10 -2 -11 -3 -12 -4 OK CANCEL -13 -5 -14 -6 -15 -7 -16 -8 NDIU -9 digintag Figure 47: Network Digital Input (NDIn) Output-Tag Window Programming and Commissioning—GX-9100 Software Configuration Tool for Windows 45 4. Network Analog Output Module Data Definition Click on OK when you are finished to save all entries and exit the data window. To define the data associated with the network analog output module: 1. Click on the configured NAOn with the right mouse button and select Data from the pop-up menu that appears; or highlight the module, then select Data from the Edit menu. A data window like Figure 48 appears. NETWORK ANALOG OUTPUT (NAO1) - Data User Name OK Description Source Pt. Cancel --> :::::: Data-2... Destination # Cntrl.Addr #1 0 0 #2 0 0 #3 0 0 #4 0 0 #5 0 0 #6 0 0 #7 0 0 NAI# Input-Tag... nanlogot Figure 48: Network Analog Output (NAOn) Data Window 2. Enter the user name and description as appropriate. 3. Enter the Input-Tag for the source point of the network analog output. Note: The network analog output is connected to one source point in the same DX controller. Use an asterisk (*) to make the connections in the data window. NAOn Destination Definitions 46 1. Enter the destination controller’s addresses and the corresponding network analog input points. Click on Data-2 to define Destination Controllers 8-16. 2. Click on OK when you are finished to save all entries and exit the data window. Programming and Commissioning—GX-9100 Software Configuration Tool for Windows Network Digital Output Module Data Definition The NDOn contains up to 16 source binary points. Make connections between DX source points and NDOn in the usual way. To define network digital outputs: 1. Click on the configured NDOn with the right mouse button and select Data from the pop-up menu that appears, or highlight the module, then select Data from the Edit menu. A data window like the one shown in Figure 49 appears. NETWORK ANALOG OUTPUT (NAO1) - Data User Name OK Description Cancel Source Bit #1 --> :::::: Source Bit #2 --> :::::: Source Bit #3 --> :::::: Source Bit #4 --> :::::: Source Bit #5 --> :::::: Source Bit #6 --> :::::: Source Bit #7 --> :::::: Source Bit #8 --> :::::: Source Bit #9 --> :::::: Source Bit #10 --> :::::: Source Bit #11 --> :::::: Source Bit #12 --> :::::: Source Bit #13 --> :::::: Source Bit #14 --> :::::: Source Bit #15 --> :::::: Source Bit #16 --> :::::: Data-2... Input-Tag... digoutd1 Figure 49: Network Digital Output (NDOn) Data Window 2. The connected source points are shown. Enter the user name and description as appropriate. 3. Enter Input-Tag for the source points as appropriate. Note: The NDO contains up to 16 source binary points in the same DX controller. Use an asterisk (*) to make connections between DX source points and NDOn in the data window. Programming and Commissioning—GX-9100 Software Configuration Tool for Windows 47 NDOn Destination Definitions 1. To define destinations, click on Data-2. The following screen appears: NETWORK DIGITAL OUTPUT (NDO1) - Data-2 Destination # Cntrl. Addr #1 0 0 #2 0 0 #3 0 0 #4 0 0 #5 0 0 #6 0 0 #7 0 0 #8 0 0 #9 0 0 #10 0 0 #11 0 0 #12 0 0 #13 0 0 #14 0 0 #15 0 0 #16 0 0 NDI# OK Cancel digoutd2 Figure 50: Network Digital Output (NDOn) Data-2 Window Defining PLC Modules 48 2. Enter the destination controller’s addresses and the corresponding network digital input points. 3. Click on OK when you are finished to save all entries and exit the data window. The GX-9100’s software-implemented Programmable Logic Controller (PLC) supports most of the functions available in dedicated PLCs. PLC functions are defined in ladder diagrams. In the GX-9100 Graphic Configuration Software, the PLC is subdivided into eight pages, PLC1 to PLC8; each is represented by a separate ladder diagram and a separate module block on the screen. Programming and Commissioning—GX-9100 Software Configuration Tool for Windows Table 14 lists common instructions for building a ladder diagram. Table 14: PLC Instructions Add the PLC Module Block Module Instructions NOP No operation. LOAD Loads the value of the addressed logic variable into the result status. LOAD NOT Loads the inverted value of the addressed logic variable into the result status. AND Logical AND between the value of the addressed logic variable and the result status. AND NOT Logical AND between the inverted value of the addressed logic variable and the result status. OR Logical OR between the value of the addressed logic variable and the result status. OR NOT Logical OR between the inverted value of the addressed logic variable and the result status. ANDB Logical AND operation between two blocks. ORB Logical OR operation between two blocks. OUT Transfers the result status to the addressed logic variable. OUT NOT Transfers the inverted result status to the addressed logic variable. COS Change-of-state of the result status set the result status to 1 for one program cycle. SET Sets the addressed logic variable to the logical 1 if the result status is 1. RST (RESET) Resets the addressed logic variable to the logical 0 if the result status is 1. RSR (RESTART) Marks the place in the graphic ladder diagram for the restart of the program cycle when there has been no power failure or processor reset. (Location of RSR is given in END instruction in program code.) To add a PLC module block: 1. Click on the Add PM button from the Edit menu. on the toolbar, or select Add PM 2. Select PLC from the Add PM menu. 3. Place the PLC module block on the screen by dragging it to the appropriate position, then click once to anchor it. Programming and Commissioning—GX-9100 Software Configuration Tool for Windows 49 Add Instructions to the Ladder Diagram To add instructions to the ladder diagram: 1. Double-click on the PM module block. The following screen appears: Note: The top of the diagram is numbered (PLC1-PLC8). The User Name and Description fields can only be changed from the PLC block’s data window. GX9100 - [Untitled - PLC1] File Edit View Action Controller Window DX LCD Display Help Logic Module Ladder Diagram - PLC1 User Name: Description: 11:05:30 Friday, October 3, 1997 gxscre29 Figure 51: Initial Ladder Diagram The diagram has eight rows. Each row has eight dots called hot points. Double clicking on the control box in the corner allows you to leave the diagram. Upon leaving the diagram, you are prompted to save changes if you have not done so. 50 Programming and Commissioning—GX-9100 Software Configuration Tool for Windows 2. Click on the hot point at the top left. The dialog box shown in Figure 52 appears: GX9100 - [Untitled - PLC1] File Edit View Action Controller Window DX LCD DisplayHelp Logic Module Ladder Diagram - PLC1 User Name: Description: PLC List Box NOP LOAD LOAD NOT OK Cancel Delete 11:05:30 Friday, October 3, 1997 Gxscre31 Figure 52: Selecting the First Hot Point You can select LOAD or LOAD NOT as the first instruction. If you select LOAD and click on OK, the following screen appears: GX9100 - [Untitled - PLC1] File Edit View Action Controller Window DX LCD DisplayHelp Logic Module Ladder Diagram - PLC1 User Name: Description: L 11:05:30 Friday, October 3, 1997 Gxscre32 Figure 53: Adding the LOAD Symbol Programming and Commissioning—GX-9100 Software Configuration Tool for Windows 51 Note: If you select LOAD NOT, the symbol will look like the LOAD symbol with a slash through the L. The first element of subsequent rows or rows on subsequent pages may also be the RSR (Restart) instruction. The RSR instruction marks the place in the PLC program where execution will begin as long as there has been no power failure to the DX-9100 Controller. All rows and pages before the RSR instruction will only be executed when the DX-9100 Controller is powered up after a power failure. This feature allows the creation of a power-up routine starting in Row 1 of Page 1 and ending in the row before the RSR instruction. Only one RSR instruction may be defined. If no RSR instruction is defined, the PLC program will always begin at Row 1 on Page 1. Note: It is not possible to select a hot point if it is preceded by a blank column or if the row above the point is empty. 3. Continue to click on unused hot points and add instructions to the ladder diagram until you have completed your PLC program. The ladder diagram should look similar to the one in Figure 54: GX9100 - [Untitled - PLC1] File Edit View Action Controller Window DX LCD Display Help Logic Module Ladder Diagram - PLC1 User Name: Description: ( L ) L 11:05:30 Friday, October 3, 1997 Andblock Figure 54: Example of a PLC Ladder Diagram 52 Programming and Commissioning—GX-9100 Software Configuration Tool for Windows Creating Logic Blocks To create a logic block within a line, select LOAD or LOAD NOT to begin the block and ENDB to end the block. The letter B marks the end of the block. GX9100 - [Untitled - PLC1] File Edit View Action Controller Window DX LCD Display Help Logic Module Ladder Diagram - PLC1 User Name: Description: L L L L B ( ) 11:05:30 Friday, October 3, 1997 Fig56 Figure 55: Example of a Logic Block within a Line To create OR loops within logic blocks, select ORB and then LOAD or LOAD NOT. The OR block will begin at the LOAD or LOAD NOT instruction of the currently open logic block and end at the point where the ORB was entered. The block will automatically be completed with NOP instructions, which may subsequently be changed to AND instruction. Figure 55 shows an example of a logic block within a line. The elements in the second row form OR blocks. Programming and Commissioning—GX-9100 Software Configuration Tool for Windows 53 Add Associated Logic Variables to Instructions To assign an associated logic variable to each instruction: 1. Click on the center of the first PLC instruction. The intermediate menu showing all configured modules appears. It should similar to Figure 56: GX9100 - [Untitled - PLC1] File Edit View Action Controller Window DX LCD Display Help Logic Module Ladder Diagram - PLC1 User Name: Description: L L PLC List Box DX/XT I/O TS DCO LRS1-32 CLOCK SUPERV ( ) OK Cancel Delete 11:05:30 Friday, October 3, 1997 Gxscre33 Figure 56: Intermediate Menu for Associated Variables Note: An option is provided to DELETE an element, but this is only allowed for AND, and AND NOT instructions, because for all other instructions a change in the graphic representation would be necessary. 54 Programming and Commissioning—GX-9100 Software Configuration Tool for Windows 2. Select a module from the intermediate menu and click OK. For example, if you selected TS from the menu shown in Figure 56, the following dialog box appears: GX9100 - [Untitled - PLC1] File Edit View Action Controller Window DX LCD Display Help Logic Module Ladder Diagram - PLC1 User Name: Description: L ( PLC List Box L TS1EXS TS1OUT ) OK Cancel Delete 11:05:30 Friday, October 3, 1997 Gxscre39 Figure 57: All Logic Variables Under TS 3. Select one of the logic variables and click OK. If you had selected TS1OUT from the screen shown above, the ladder diagram would look like Figure 58. Programming and Commissioning—GX-9100 Software Configuration Tool for Windows 55 GX9100 - [Untitled - PLC1] File Edit View Action Controller Window DX LCD Display Help Logic Module Ladder Diagram - PLC1 User Name: Description: TS1OUT L ( ) L 11:05:30 Friday, October 3, 1997 Gxscre40 Figure 58: LOAD Symbol with Associated Variable TS1OUT 4. Continue to add associated variables to the remaining logic instructions. When you are finished, your diagram should look similar to Figure 59: GX9100 - [Untitled - PLC1] File Edit View Action Controller Window DX LCD Display Help Logic Module Ladder Diagram - PLC1 User Name: Description: TS1OUT L DCO1 L SSA LRS1 ( ) SSA 11:05:30 Friday, October 3, 1997 Gxscre41 Figure 59: Ladder Diagram with PLC Instructions and Associated Variables 56 Programming and Commissioning—GX-9100 Software Configuration Tool for Windows Saving and Exiting the PLC Diagram To save and exit the PLC diagram: 1. Click on the Save button on the toolbar, or select Save from the File menu, to save the current session in the DX configuration. 2. Double-click on the control box in the upper left corner of the window (or at the left of the menu bar if the window is maximized), or click on the close box in the upper right corner of the window (or at the right of the menu bar if the window is maximized), to leave the PLC ladder diagram and return to the main configuration window. Connecting and Disconnecting Modules Creating a Configuration This section describes how to make and remove logical connections between the source and destination points of the various modules. Connecting Modules Make connections in the following ways: • drag from one connection point to another • use the Connect option • enter the source point within a data window Programming and Commissioning—GX-9100 Software Configuration Tool for Windows 57 Using the Click-Drag Option GX9100 - [Untitled] File Edit View Action Controller Window Help AI1 AI2 AI3 AI4 AI5 AI6 AI7 AI8 DI1 DI2 DI3 DI4 DI5 DI6 DI7 DI8 Double-click on both modules to maximize them. AO1 AO2 AO9 AO10 AO11 OUT OUH AOH AOL AOF AO@ AOF@ DI DIC Place the bent arrow cursor on the source point. AO12 GX9100 - [Untitled] File Edit View ENL@ Action Controller Window INC@ DEC@ DI4 Help AO13 AO14 DO3 DO4 DO5 DO6 DO7 DO8 AI1 AI2 AI3 AI4 AI5 AI6 AI7 AI8 09:19:37 Tuesday, July 05, 1994 DI1 DI2 DI3 AO1 AO2 AO9 AO10 AO11 gxscre5 DI DIC DI5 DI6 DI7 DI8 File 09:19:37 Tuesday, July 05, 1994 OUT OUH AOH AOL AOF AO@ AOF@ ENL@ INC@ DEC@ AO12 Release the left mouse button. GX9100 - [Untitled] AO13 Edit View Action AO14 Controller Window Help DO3 DO4 DO5 DO6 DO7 DO8 AI1 AI2 AI3 AI4 AI5 AI6 AI7 AI8 DI1 DI2 DI3 DI4 Click and hold the left mouse button and drag the bent arrow to the destination point. AO1 AO2 AO9 AO10 AO11 gxscre5 Untitled Is the connection inverted? DI DIC Yes No DI5 DI6 DI7 DI8 OUT OUT AOH AOL AOF AO@ AOF@ ENL@ INC@ DEC@ Click "Yes" or "No" to choose whether you want an inverted connection (digital inputs only). AO12 AO13 AO14 GX9100 - [Untitled] File 09:19:37 Tuesday, July 05, 1994 The connection appears as a line between the two modules. Edit View Action AI1 AI2 AI3 AI4 AI5 AI6 AI7 AI8 DI1 DI2 DI3 DI4 DO3 DO4 DO5 DO6 DO7 DO8 Controller Window Help AO1 AO2 AO9 AO10 AO11 gxscre5 DI DIC DI5 DI6 DI7 DI8 OUT OUH AOH AOL AOF AO@ AOF@ ENL@ INC@ DEC@ AO12 AO13 AO14 DO3 DO4 DO5 DO6 DO7 DO8 09:19:37 Tuesday, July 05, 1994 gxscre5a Figure 60: Using the Click-Drag Method to Make Connections 58 Programming and Commissioning—GX-9100 Software Configuration Tool for Windows Using the Connect Option To use the Connect option: 1. Use the left mouse button to click on the module that contains the source point. 2. Click the right mouse button outside of the highlighted module. The pop-up module menu appears. 3. Select Connect from the module menu. Or, select Connect from the Edit menu. Or, press F5. The Module Connection dialog box appears containing source points for the selected module. Connect DI4 DIC4 OK CANCEL connect Figure 61: Module Connection Dialog Box 4. Choose a source point, then click OK. 5. Click on the destination module with the left mouse button. 6. Click outside the module with the right mouse button. The pop-up module menu appears. 7. Select Connect from the module menu. Or, select Connect from the Edit menu. Or, press F5. The module connection dialog box appears containing destination points for the selected module. Connect AO@ AOF@ ENL@ INC@ DEC@ OK CANCEL connect2 Figure 62: Destination Point Dialog Box Programming and Commissioning—GX-9100 Software Configuration Tool for Windows 59 8. Choose a destination point, then click OK. If applicable, a dialog box appears asking if the connection is inverted. Untitled Is the connection inverted? Yes No invert Figure 63: Inverted Connection Dialog Box 9. Click Yes or No. A line appears showing the connection between the two modules. GX9100 - Untitled File Edit View Action Controller DX LCD Display Help AO1 AO2 AO9 AO10 AO11 AI1 AI2 AI3 AI4 AI5 AI6 AI7 AI8 DI1 DI2 DI3 DI4 Window DI DIC DI5 DI6 DI7 DI8 OUT OUH AOH AOL AOF AO@ AOF@ ENL@ INC@ DEC@ AO12 AO13 AO14 DO3 DO4 DO5 DO6 DO7 DO8 11:05:30 Friday, October 3, 1997 Gxscre6 Figure 64: Example--Connected Modules Note: Once a destination point has been used, it will not appear in the destination point dialog box and new source points will not be able to connect to it. The only way to connect a new source point is to delete the old connection, then define a new one. 60 Programming and Commissioning—GX-9100 Software Configuration Tool for Windows Making Connections Within a Data Window To make a connection within a data window: 1. Use the left mouse button to click on the module that contains the destination point. 2. Click the right mouse button outside of the highlighted module. The pop-up module menu appears. 3. Select Data from the module menu, or Select Data from the Edit menu. The Module Data window appears. PID (PID1) - Data User Name OK Description Cancel Ena Shutoff: 0=N 0 Remote Setpoint Shutoff Out Level 0. Reference Variable--> --> 0 Ena Startup: 0=N Startup Out Level 100. Ena Symm Mode: 0=N 0 Proportional Band --> OFF Mode Control --> /DI1 Standby Control --> ExtForce Out Level 0. Reverse Action --> Ena PID to P: 0=N 0 External Forcing --> DI1 Remote Mode: 0=N 0 Output Bias --> Ena Off Trans: 0=N 0 Minimum WSP --> Maximum WSP --> Process Variable --> Data-2... Input-Tag... Output-Tag... Pidmodda Figure 65: Example Module Data Window 4. Select the data field (box) in the Module Data window corresponding to the desired connection. The blinking cursor appears in the box. Note: Only descriptions followed by an arrow (!) accept connection information. 5. Type an asterisk (*) in the box. A menu appears, listing the valid configuration modules for the selected field. Programming and Commissioning—GX-9100 Software Configuration Tool for Windows 61 PID [PID1 ] DX/XT I/O PM2TOTAL PM3PSYCHRO OK Cancel Delete VALIDCON Figure 66: List of Valid Configuration Modules 6. Select one of the valid configuration modules listed by double-clicking on it or by highlighting it and selecting OK. A menu of all valid outputs belonging to that module appears. PID [PID1 ] PM2TOT1 PM2TOT2 PM2TOT3 PM2TOT4 PM2TOT5 PM2TOT6 PM2TOT7 PM2TOT8 OK Cancel Delete VALIDOUT Figure 67: Valid Outputs 62 7. Select one of the outputs listed by double-clicking on it or by highlighting it and selecting OK. 8. If a logic output is selected, a dialog box appears and asks if you want an inverted connection. Answer appropriately. You are returned to the data window. 9. The name appears in the edit box. A line appears showing the connection between the two modules after exiting the data window. Programming and Commissioning—GX-9100 Software Configuration Tool for Windows To remove a block’s current connection, either use the scissors cursor (Figure 68) to cut the connection line at the destination block, or choose the Disconnect option, or delete the connection in the data window. Disconnecting Modules Using the Scissors Cursor GX9100 - [Untitled] File Edit View Action Controller Window Help AI1 AI2 AI3 AI4 AI5 AI6 AI7 AI8 DI1 DI2 DI3 DI4 AO1 AO2 AO9 AO10 AO11 OUT OUT AOH AOL AOF AO@ AOF@ ENL@ INC@ DEC@ DI DIC DI5 DI6 DI7 DI8 AO12 Place the cursor at the point where it turns into the scissors cursor. Click the left mouse button. AO13 AO14 GX9100DO3 - [Untitled] File 09:19:37 Tuesday, July 05, 1994 The AI1 AI2 AI3 AI4 AI5 AI6 AI7 AI8 DI1 DI2 DI3 DO4 Edit View Action Controller Window Help DO5 DO6 DO7 DO8 Untitled AO1 AO2 AO9 AO10 AO11 OUT Are you sure you want to DELETE this connection? OUT Click "Yes" to confirm that you AOH want to delete the connection. Yes No AOL AOF AO12 AO@ DI DI4 AOF@ DIC DI5 ENL@ GX9100 - [Untitled] DI6 INC@ File Edit View Action DEC@ Controller Window Help DI7 AO13 DI8 AO14 AI1 AO1 DO3 AI2 AO2 DO4 AI3 AO9 DO5 AI4 AO10 DO6 AO11 AI5 DO7 AI6 DO8 OUT AI7 09:19:37 Tuesday, July 05, 1994 OUT AI8 gxscre6 AOH DI1 AOL DI2 AOF DI3 AO12 DI AO@ DI4 AOF@ DIC connection is removed. DI5 ENL@ INC@ DI6 DEC@ DI7 AO13 DI8 AO14 DO3 DO4 DO5 DO6 DO7 DO8 09:19:37 Tuesday, July 05, 1994 gxscre8b Figure 68: Removing the Connection Using the Scissors Cursor Programming and Commissioning—GX-9100 Software Configuration Tool for Windows 63 Using the Disconnect Option To disconnect the modules using the Disconnect option: 1. Click on the destination module with the left mouse button. 2. Click outside the module with the right mouse button. The pop-up module menu will appear. 3. Select Disconnect from the module menu, or select Disconnect from the Edit menu, or press F4. The Disconnect dialog box appears showing all of the destination points from the selected module that are currently connected. Disconnect ENL@ OK CANCEL gxscre9 Figure 69: Destination Point Dialog Box 4. Choose the destination point you wish to disconnect, then click OK. A dialog box appears confirming that you want to delete the connection. Untitled Are you sure you want to DELETE this connection? Yes No gxscre9a Figure 70: Delete Confirmation Dialog Box 5. 64 Click Yes to confirm the deletion. The connection line is removed from the screen. Programming and Commissioning—GX-9100 Software Configuration Tool for Windows Using the Data Window To disconnect the modules using the data window: 1. Left-click on the module that contains the connection. 2. Right-click outside of the highlighted module. The pop-up module menu appears. Select Data from the module menu, or select Data from the Edit menu. The Module Data window appears. 3. Select (highlight) the entire name in the data field (box) that you want to delete, then press the Delete key, or select the data field (box) with the connection that you wish to delete, then press the asterisk (*) key. A menu appears, listing the valid configuration modules for the selected field. Select the Delete button. You are returned to the data window. Press Enter or select the OK button. Showing Connections There are three ways to show the module connections in detail: • Double-clicking connected modules reveals all the source and destination points of that module. Lines will appear between all connected source and destination points. • Under the data option of the module menu, a data window appears which contains the data for all the destination points and parameters of a module. • Selecting Show Connections in the View menu brings up a dialog box showing all source point connections for the selected module. Connections PID1 has the following output connections: WSP-AO@(AO14) HLD-DEC@(AO14) CMP-AOF@(AO14) OK gxscre9b Figure 71: Window Showing Connections Programming and Commissioning—GX-9100 Software Configuration Tool for Windows 65 Defining the Trend Log Module (for DX Versions 1.4, 2.4, 3.4, or Later) The Trend Log module provides 12 trend log channels, each recording data from either one analog item or from a set of 8 logic variables (logic variable byte). The trend can be used to provide data for Metasys Point History in DX controllers that are connected remotely (i.e., via dial-up) to the Metasys system, or for a local DX LCD Display. Metasys Point History (for DX Versions 1.4, 2.4, 3.4, or Later) When the DX controller is connected to a Metasys system by an NDM dialer and telephone lines, the trend data may be read whenever a connection is made by the Metasys system. The data is stored in the point history file of AI, AOS, and BI objects when they are mapped to the items being recorded. When the Metasys Point History option is selected for a trend log channel, only those items which can be mapped to Metasys objects are allowed, and the trend parameters are set by the GX-9100 tool to default values for the Point History feature in Metasys. You must link the Historical Trend Read Request (HTRR) logic variable to the DIAL request logic variable in a PLC module to initiate a dial-up connection when a trend record buffer is full. Since a DX Version 3.x cannot be connected to a Metasys system by the NDM dialer and telephone lines, trend logs cannot be configured for Metasys Point History in these versions. Configuration for DX LCD Display (for DX Versions 2.4 and 3.4, or Later) Trend channels that are not used for Metasys Point History are freely configurable. For analog items the sampling rate may be entered and the stored values may be either the average, maximum, or minimum values during the period, or the instantaneous value at the time of reading. Logic variables are recorded with a time and date stamp when there is a change of value. All channels may be displayed on the DX LCD Display. Adding the Trend Log Module Block To add the Trend Log module to the configuration: 66 1. Click on the Add PM button from the Edit menu. on the toolbar, or select Add PM 2. Select Trend from the Add PM menu. 3. Place the Trend Log module block on the screen by dragging it to the appropriate position, then click once to anchor it. You can move the module at any time by clicking and dragging it to a new position on the screen. Programming and Commissioning—GX-9100 Software Configuration Tool for Windows Defining the Trend Log Channels To define the Trend Log module channels: 1. Double-click on the Trend Log module block. The Trend Log Data window opens, as shown in Figure 72. GX9100 - [Untitled - Trend Data] File Edit Window Help Trend Log Data No. Meta.P.H 1 No 2 Yes 3 Yes 4 No 5 6 7 8 9 10 11 12 Item AI1 AI2 DI1..8 XT1DI1..8 Sample Mode Average Actual Logic Variables Logic Variables Sample Rate 120 Min 30 Min --- Synch. Read Req. Day 48 Hour 48 10 30 11:05:30 Friday, October 3, 1997 Fig72 Figure 72: Trend Log Data Window Note: The Trend Log Data table has 12 rows, each defining a channel. 2. Click with the right mouse button on the channel you want to configure and select Data from the pop-up menu that appears; or highlight the channel, then select Data from the Edit menu. The Data dialog box for the Trend Log channel appears, as shown in Figure 73. Data Tag Name * Metasys Point History OK Cancel Enter the Tag Name or * to select. Fig73 Figure 73: Data Dialog Box for Trend Log Channel Note: Metasys Point History is grayed-out and cannot be selected for a Version 3.x DX controller because it cannot be monitored remotely with an NDM dialer. Programming and Commissioning—GX-9100 Software Configuration Tool for Windows 67 3. Check the Metasys Point History box if required, then enter the desired Tag Name of the item to be recorded. Use an asterisk (*) for the Tag Name to select the item from a list of valid tag names. Click OK to continue to the next dialog box, which depends on what you entered for the Tag Name, as follows: • If you entered a specific tag name (e.g., AI1), the next dialog box is the appropriate Trend Data dialog box for the selected item. Skip to Step 7 in this procedure, which describes the Trend Data dialog boxes. • If you entered an asterisk (*), then a series of dialog boxes appear that allow you to select from item categories and sub-categories until you find the individual item that you want to add. Continue with the next step (Step 4) in this procedure. 4. If you entered an asterisk (*) in the Tag Name field of the Data dialog box (Figure 73), then a dialog box showing item categories appears, as shown in Figure 74. Select DX Input/Output Programmable Modules Internal Points OK Cancel Fig74 Figure 74: Select Item Category Dialog Box Note: The categories and items shown in the series of dialog boxes depend on the controller version and whether you selected Metasys Point History. 5. 68 Select a category by double-clicking on it, or by clicking on it to highlight it and then clicking OK. Another dialog box appears listing sub-categories of the category you chose in the previous dialog box. For example, if you chose DX Input/Output in Figure 74, the dialog box shown in Figure 75 appears. Programming and Commissioning—GX-9100 Software Configuration Tool for Windows Select Analog Input 1-8 Digital Input 1-8 Analog Output 1-2 DO Analog Source 3-8 Digital Output 3..8 XTn Analog Input 1-8 XTn Analog Output 1-8 XTn Digital Input 1..8 XTn Digital Output 1..8 Analog Output 9-14 OK Cancel Fig75 Figure 75: Select Subcategory Dialog Box 6. Select a subcategory by double-clicking on it, or by clicking on it to highlight it and then clicking OK. Another dialog box appears listing either additional sub-categories or individual items. For example, if you chose Analog Input 1-8, as shown in Figure 75, a dialog box listing individual points would appear, as shown in Figure 76. Select AI1 OK AI2 AI3 AI4 AI5 AI6 AI7 AI8 Cancel Fig76 Figure 76: Select Item Dialog Box Note: There may be several dialog boxes listing sub-categories before you reach the dialog box listing individual items (similar to the one shown in Figure 76). Repeat Step 6 until you find the item you want to add to the table. Refer to Appendix 3: Trend Log Items for a list of the tag names available in a Trend Log module. Programming and Commissioning—GX-9100 Software Configuration Tool for Windows 69 7. Select the item you want to add to the table by double-clicking on it, or by clicking on it to highlight it and then clicking OK. One of two Trend Data dialog boxes appears, depending on whether you selected an analog item (Figure 78) or logic variable set (Figure 79). Note: Additional memory points can be saved by using the following procedures: When selecting a logic variable, choose the byte that contains the required variable. All variables in the set are then available for Metasys Point History or for the DX LCD Display. Since a logic variable set is recorded when any one of its variables changes state, it is recommended that you assign LRS logic variable bytes to the trend log and then connect the source variables (the ones that you wish to trend) to the LRS variables in a PLC module. For example, if you want to trend TS1OUT, DO1, DO2, BI1, BI2, LRS18, LRS19 and LRS20, the following PLC logic would set LRS1–LRS8 with the values you want to trend. Ts1out1 LRS1 () DO1 LRS2 () DO2 LRS3 () BI1 LRS4 () BI2 LRS5 () LRS18 LRS6 () LRS19 LRS7 () LRS20 LRS8 () Example Figure 77: Trend Example Trend Data Tag AI1 Sampling Rate 30 Min Read Request 48 Samples Sampling Mode Actual OK Synchronization Hour Cancel fig78 Figure 78: Trend Data Dialog Box for an Analog Item 70 Programming and Commissioning—GX-9100 Software Configuration Tool for Windows Trend Data Tag --> DI1..8 Read Request 10 OK Samples Cancel Fig79 Figure 79: Trend Data Dialog Box for a Logic Variable Set 8. Enter the desired values in the data fields or select from the drop-down list boxes. Table 15 describes the fields, their possible values, and their default values. Table 15: Trend Data Entries and Options Dialog Field Possible Values Default (= Metasys Point History Setting) Sampling Rate* (period of time between records) 5, 10, 15, 20, 60 Sec** 1 to 1440 Min Analog Input: 30 Analog Output: 30 Units for Sampling Rate Sec (seconds) Min (minutes) Min Read Request*** (number of new samples to set HTRR) Analog: 0 to 61 Logic Variables: 0 to 30 Analog Input: 48 Analog Output: 48 Logic Variables: 10 Sampling Mode (analog value to record at end of each period) Actual Average Maximum Minimum Actual Synchronization (exact time of the start of trend recording) None Day (midnight 00:00:00) Hour (xx:00:00) Minute (xx:xx:00) Hour * Logic Variable bytes are read each second, but only recorded when there has been a change-of-state in at least one bit. ** When seconds are selected, the GX Tool automatically increases the entered value to one of the specified values, and gives an error if the value is over 60. *** A Read Request value of 0 disables the Read Request feature for the Item or Logic Variable. Note: If Metasys Point History was checked, the GX-9100 tool sets the trend parameters to appropriate default values and these values cannot be changed. 9. Click on OK to save the channel data and return to the Trend Log definition table. Programming and Commissioning—GX-9100 Software Configuration Tool for Windows 71 Saving and Exiting the Trend Log Definition Configuring the DIAL Function for Metasys Point History To save the Trend Log definitions and exit the Trend Log Data window: 1. Click on the Save button in the toolbar, or select Save from the File menu, to save the current session in the DX configuration. 2. Double-click on the control box in the upper left corner of the window (or at the left of the menu bar if the window is maximized), or click on the close box in the upper right corner of the window (or at the right of the menu bar if the window is maximized) to close the Trend Log Data window and return to the main configuration window. In any free line of a PLC module, add a LOAD element assigned to the logic variable HTRR (listed under DIAGNOSTIC), followed by a COS instruction and a SET element assigned to the logic variable DIAL (listed under SUPERV). If other logic variables have already been configured to set the DIAL variable, add the HTRR variable and the COS instruction as an ORB element (OR block) to the ladder diagram. An example is shown in Figure 80. GX9100 - [Untitled - PLC1] File Edit View Action Controller Window DX LCD Display Help Logic Module Ladder Diagram - PLC1 User Name: DIAL Description: Dial Control DI1 L DI2 L HTRR L COS DIAL SET COS 11:05:30 Friday, October 3, 1997 Fig80 Figure 80: Ladder Logic to Set DIAL from Trend Log For more information on this application, refer to the DX-9100 Configuration Guide or the NDM Configurator Application Note in FAN 636.4 or FAN 1628.4. 72 Programming and Commissioning—GX-9100 Software Configuration Tool for Windows Saving the Configuration To save a GX-9100 configuration, click the Save button on the toolbar or select Save from the File menu. The configuration will save under the current file name. Note: If you save a configuration while in Show Selected mode, the entire configuration does save. However, the next time you open the saved file, you will only see the selected view. To see entire configuration, select Show All from the View menu. If you are saving the configuration for the first time, the following window displays: File Save As File name: Folders: untitled.dxs c:\gx9100 config1.dxs config2.dxs timesup.dxs bldg3fl2.dxs c:\ OK Cancel Network... gx9100 Drives: List files of type: GX9100 Files (*.dxs) c: saveas Figure 81: File Save As Window To save a GX-9100 configuration under a different file name, select Save As from the File menu. Type in the new file name, and click OK. The configuration will be saved under the new name. Programming and Commissioning—GX-9100 Software Configuration Tool for Windows 73 Downloading to a DX Controller To download the configuration to the DX controller: Select Download from the Action menu. The following dialog box appears: Download Item Port OK DX, XT/XTM and Network DX and XT/XTM File DX COM1 XT/XTM COM2 Cancel Network Calibration Time Address 0 DX Password 0000 Download Figure 82: Download Dialog Box 1. Select the item you want to download it to and the Port you want to use for the download by clicking the radio buttons. Note: If downloading from the OWS, the port selected must be File. This creates a file with a .DXF extension. You can move the file from the GX-9100 directory (or from whatever directory it is in) to the Metasys directory under the System91 subdirectory. This is the default directory. Then it can be downloaded from a DX-9100 Device Object Focus window in the OWS. You can also download from any directory by typing in the full path in the Device Object focus download screen. 2. Enter the address of the controller in the Address data field to download the configuration. The address must be a number between 1 and 255. The address must be correct, even if saved to a file, since the OWS checks that the program address matches the DX address. If you selected XT/XTM as the item to be downloaded, no address is required (it is already stored in the configuration), and the Address field is grayed and cannot be selected. Note: If connected to the DX, the XT/XTM cannot be downloaded individually from the OWS. 74 Programming and Commissioning—GX-9100 Software Configuration Tool for Windows 3. For DX Versions 1.4, 2.4, 3.4, or later only: If the DX controller already has a configuration with a password, enter the number in the DX Password field. The download fails if the password number is incorrect. Note: If the global data password in the configuration being downloaded is different from the password in the controller, the password is changed in the controller. Also, the DX Password field only appears if the password protection feature is enabled in the GX9100.INI file (see Enabling Password Protection for the DX-9100 Download/Upload Dialogs (DX Version 1.4, 2.4, or 3.4) under Software Installation at the beginning of this guide). 4. Click on OK. The hourglass appears on the screen until the configuration has downloaded. Viewing Configurations Show Selected If your configuration is very complex, for clarity you may want to view only certain points and modules. To do this: 1. Select the points and modules you want to view by clicking on them while holding down the Ctrl key. (This allows you to select more than one point or module at a time.) 2. Select Show Selected from the View menu. 3. To see all points and modules on the screen, select Show All from the View menu. Programming and Commissioning—GX-9100 Software Configuration Tool for Windows 75 Trace The Trace feature makes all lines (connections) invisible except those connected to a selected module. This allows you to easily trace a path without other connections in the way. The following figure shows how the screen will look before using the Trace feature: GX9100 - Untitled File AI1 AI2 AI3 AI4 AI5 AI6 AI7 AI8 DI1 DI2 DI3 DI4 DI5 DI6 DI7 DI8 Edit View Action Controller Window DX LCD Display Help 8-CALC1 AO1 AO2 AO9 AO10 AO11 AO12 AO13 AO14 DO3 DO4 DO5 DO6 DO7 DO8 COMPRTR5 PID2 BIN-SEQ3 TOTAL4 AC0 DC0 PLC1 PLC2 PLC3 PLC4 PLC5 PLC6 PLC7 PLC8 LRS1-32 LRS33-64 EXD O s1 11:05:30 Friday, October 3, 1997 Tracesc2 Figure 83: Before Trace Example 76 Programming and Commissioning—GX-9100 Software Configuration Tool for Windows Follow these steps to trace the connections for the PID2 module: 1. First select the module that you wish to trace by clicking on it. 2. Select Trace from the View pull-down menu. All connections become invisible except for the connections of the selected module. The connections for that module remain visible for easy tracing. GX9100 - Untitled File AI1 AI2 AI3 AI4 AI5 AI6 AI7 AI8 DI1 DI2 DI3 DI4 DI5 DI6 DI7 DI8 Edit View Action Controller 8-CALC1 Window DX LCD Display Help AO1 AO2 AO9 AO10 AO11 AO12 AO13 AO14 DO3 DO4 DO5 DO6 DO7 DO8 COMPRTR5 PID2 BIN-SEQ3 TOTAL4 AC0 DC0 PLC1 PLC2 PLC3 PLC4 PLC5 PLC6 PLC7 PLC8 LRS1-32 LRS33-64 EXD OSI 11:05:30 Friday, October 3, 1997 Tracesc1 Figure 84: Module Selected for Easy Tracing Show User Names 3. To trace the connections path for another module, simply click on another module. To trace multiple modules at the same time, use Ctrl-click on each subsequent module. 4. To turn off the Trace function, simply select Trace from the View pull-down menu again. If you have defined user names for the configuration, you may want to view those names rather than the predefined point and module tags. To do this, select Show User Names from the View menu. To return to viewing point and module tags, select Show Tag Names from the View menu. Programming and Commissioning—GX-9100 Software Configuration Tool for Windows 77 Printing Configurations Setting Up Header and Footer Options To set up headers and footers for printing configurations: 1. Select Header/Footer from the File pull-down menu. The Header/Footer dialog box appears. Header/Footer Dialog Header OK Company Name Johnson Controls Top Left Top Middle Cancel Top Right Job Name Controller Page Branch Engineer Created on Page Options Every Page Only First Page Footer Bottom Left Printed on Bottom Middle Filename Bottom Right Branch headfoot Figure 85: Header/Footer Dialog Box 78 2. Fill in the Company Name edit box. 3. Select the desired field positions for the header and footer using the drop-down lists. The information for Job Name, Controller Name, Engineer, Branch, and Created on is entered in the Job Information screen. Refer to Defining Job Information in this document. Programming and Commissioning—GX-9100 Software Configuration Tool for Windows 4. An example of the header and footer styles is shown below. Note that a new configuration has default settings. The default Company Name is Johnson Controls. The default position for each header/footer field is shown in the example below. The header includes descriptors, like JOB NAME:, but the footer does not. Header Example: Johnson Controls JOB NAME: Test Job Branch: JC Toronto Controller Name: DX123987 Engineer: H.W.Schillack Page: 1 Creation Date: 95/05/09 Footer Example: Tuesday, May 9, 1995 DX123987.DXS JC Toronto HD&FT_EX Figure 86: Header and Footer Example 5. Select whether the header should appear on every page or only the first page by selecting the appropriate radio button (Figure 85). 6. Select OK if you are satisfied with the format, or Cancel to revert to the default settings. Programming and Commissioning—GX-9100 Software Configuration Tool for Windows 79 Previewing the Printed Configuration To view how the configuration will look when printed: 1. Select Print Preview from the File menu. The following dialog box appears: Print Items Selection Print Format Data Selection All Items Draft Data Graphical Selection Final Input Tags OK Cancel Output Tags Items (Listed below) Items X Layout Network Outputs ACO LABELS PMs XTs DCO INFO Inputs XT Labels EXD Calibration Outputs TS PLC Global Network Inputs OST PLC Code DX LCD Display Trend printopt Figure 87: Print Options 2. Select the options you want to preview by clicking on the radio buttons and check boxes. Table 16 describes some of the options in this dialog box. Table 16: Print Options Option Description Selection (You may select only one of the following.) All Items Prints items listed in the Items box, including module data, job information, calibration information, and global data. Graphic Selection Prints all items selected in the configuration layout. Items (Listed below) Prints all items with checked boxes in the Items box. Print Format (You may select only one of the following.) Draft Prints the configuration as it would be printed in draft mode (without page headers and footers). Final Prints the configuration as it would be printed in final mode (with page headers and footers). Data Selection (You may select more than one of the following.) 80 Data Includes data for every module with the configuration printout. Input Tags Includes a list of defined input-tags for every module with the configuration printout. Output Tags Includes a list of defined output-tags for every module with the configuration printout. Programming and Commissioning—GX-9100 Software Configuration Tool for Windows 3. Click OK. A screen similar to the following appears: GX9100 - [Untitled] Print... Next Page Prev Page Two Page Zoom In Zoom Out Close JOHNSON CONTROLS JOB NAME: xxxx CONTROLLER: xxxx BRANCH: xxxx DATE: yy/mm/dd ENGINEER: xxxx FILENAME xxxx AI1 AO1 AI2 AO2 AI3 AO9 AI4 AO10 AI5 AO11 AI6 AO12 AI7 AO13 AI8 AO14 DI1 DO3 DO4 DI2 DO DI3 DI4 OUH DI5 DO@ DO5 DI6 DO6 DI7 DO7 DI8 DO8 WEDNESDAY, AUGUST 03, 1994 UNTITLED PAGE 1 11:05:30 Friday, February 7, 1997 gxprint Figure 88: Print Preview 4. The page on the screen looks exactly like the printed document. You can zoom in to view half- and quarter-page views by clicking the Zoom In button. Click the Zoom Out button until you return to the full page view. To view two pages at a time, click the Two Page button. To return to the one-page view, click One Page. To view pages not displayed on the screen, click Next Page or Prev Page, or use the scroll bar. 5. If you decide you do not want to print the configuration at this time, click Close. If you decide to print the document, click Print. This will bring you to Step 3 in the regular Print Sequence section. Programming and Commissioning—GX-9100 Software Configuration Tool for Windows 81 Print Sequence To print a configuration: 1. Click the Print button on the toolbar, or select Print from the File menu. The following dialog box appears: Print Items Selection Print Format Data Selection All Items Draft Data Graphical Selection Final Input Tags OK Cancel Output Tags Items (Listed below) Items Layout Network Outputs ACO LABELS PMs XTs DCO INFO Inputs XT Labels EXD Calibration Outputs TS PLC Global Network Inputs OST PLC Code DX LCD Display Trend printopt Figure 89: Print Options Dialog Box 2. Select the print options you want (Table 16) and click OK. The following dialog box appears: Print Printer: OK Default Printer (HP LaserJet 4/4M Post on LPT1:) Cancel Print Range Setup... All Selection Pages From: 1 Print Quality: 600 dpi To: Copies: 1 Collate Copies print Figure 90: Print Dialog Box 82 Programming and Commissioning—GX-9100 Software Configuration Tool for Windows 3. Choose the print range by clicking on one of the radio buttons. Note: If you choose Page, you also need to enter the starting and ending page numbers in the From: and To: data fields. 4. Select the print quality from the drop-down list. A higher DPI (Dots Per Inch) number equals a better, but slower, printed copy. 5. Enter the number of copies you want in the Copies: data field. If you’re printing more than one copy, and you want each set of pages to print out in order, check the Collate Copies box. 6. If you need to change printer options, click the Setup button. Otherwise, click OK to print your configuration. Creating Tag Name ASCII Files The tag name file allows the user to create an ASCII text file for the current GX-9100 tool configuration file. This file can be modified offline using any text editor, and read back into any configuration file. The information contained in the tag file is job information, user name, description, and input and output tags for each defined input, output, and program module. In situations where multiple similar controller applications exist, it reduces the amount of repetitive typing by modifying and reusing a single file. To do this, use the Read User Names and Write User Names menu options in the File pull-down menu as described in the following section. Write User Names Once you have defined a configuration, all tags, and user-defined names, create an ASCII (text) file containing all tags and user names for that configuration: 1. While in the configuration from which you want to make the tag file, select Write User Names from the File pull-down menu. A Tag Name dialog box appears similar to the one below. Tag Name Dialog File name: *.tag Folders: c:\gx9100 c:\ gx9100 List files of type: Tag name files (*.tag) OK Cancel Network... Drives: c: Tagnamed Figure 91: Tag Name Dialog Box (Write User Names) Programming and Commissioning—GX-9100 Software Configuration Tool for Windows 83 2. Replace the asterisk (*) in the File Name box with the name you wish to give the .tag file. 3. Use standard Windows methods to select the drive and directory where you wish to place the file. The Network button only appears if you are on a network. If you need to change to a different server, select the Network button. The Network - Drive Connections dialog box appears. If you need additional assistance concerning using this screen, consult with your network administrator. 4. Select OK to save it. 5. The new .tag file can now be edited using any text editor and/or imported into another configuration as defined in the Read User Names section. A partial example of a typical .tag file is shown here. Following the equal signs (=), you can insert user-defined names. The names you enter become the User Names for the appropriate tags in the new configuration. Project Descriptions are limited to 50 characters per line. Tag names are limited to 8 characters, and tag descriptions are limited to 24 characters per line. [File] File=A:\AHU601.TAG [Job Information] Job Name=507 E. MICHIGAN Controller Name=AHU-601 Engineer=WARREN JOHNSON Branch=MILWAUKEE Project Description1= . . . Project Description5= [AI1] User Name=DA-T Description= * Output Tag AI=da-t AI%= AIH= AIL= OVR= UNR= [AIn] User Name=RM-T Description= [TS1] User Name= Description= * Input Tag TSOV@= TSON@= TSOF@= * Output Tag EXS= OUT= [TSn] User Name= . . . [LRSnn-mm] User Name= Description= * Output Tag LRSnn= etc. . . . typ_tag Figure 92: Partial Example of a Typical .TAG File 84 Programming and Commissioning—GX-9100 Software Configuration Tool for Windows Follow the instructions below to import the Tags and User Names into a configuration from a .tag file created from Write User Names. Read User Names 1. From within the configuration into which you want to import the tag file, select Read User Names from the File pull-down menu. A Tag Name dialog box appears similar to the one below. Tag Name Dialog File name: *.tag tagname1.tag tagname2.tag tagname3.tag List files of type: Tag name files (*.tag) Folders: c:\gx9100 c:\ OK Cancel Network... gx9100 Drives: c: Tagname2 Figure 93: Tag Name Dialog Box (Read User Names) 2. Use standard Windows methods to select the drive and directory containing the file. If you need to change servers, select the Network button. The Network - Drive Connections dialog box appears. 3. Select the desired tag file from the list in the left side box. Select OK. The tag and user-defined names are imported into the open configuration. Note: The user names change for the matching modules only. Creating DDL Files When the configuration is saved, two DDL files are also created. One has the extension .DMO and is a DDL Model File for mapping CS objects. This file is also used for Template Commissioning in HVACPRO. The other file has an extension of .DNC and is an NC DDL file with the hardware items AIn, DIn, AOn, and DOn mapped to appropriate Metasys objects. Programming and Commissioning—GX-9100 Software Configuration Tool for Windows 85 To select the items to be included in the DDL files: 1. Select DDL File Options from the File menu. The DDL File dialog box (Figure 94) appears. DDL File Options Selection System Name OK All Items Cancel System Items Listed Below Show only items with user name ITEMS DX XT Network AI DCO AI AI AO ACO AO BI BI LRS 1-32 BI BO LRS 33-64 BO PM Generate DDL On File Save fig94 Figure 94: DDL File Options Dialog Box 86 2. Select All Items or Items Listed Below by clicking on the radio buttons. If you select Items Listed Below, the items in the ITEMS box are enabled and can be selected. Select those items that you want to be included in the DDL files by clicking on their check boxes. The items can be further limited by checking the box “Show only items with user name.” 3. Enter the desired 8-character Metasys System Name. 4. By default, the DDL files are generated when you save the controller configuration. To disable the generation of DDL files, click on Generate DDL On File Save to remove the check mark. 5. Click on OK to save your selection. Programming and Commissioning—GX-9100 Software Configuration Tool for Windows Modifying Configurations You can access an existing configuration in two ways: Uploading a Configuration from the Controller • Upload an existing configuration from the controller. • Open a previously saved configuration file. To upload a configuration from the controller: 1. Select Upload from the Action menu. The Upload dialog box appears (Figure 95). Note: If upload is selected while PLC, Trend or DX Display definition windows are open, an error is displayed. Close all PLC windows associated with the current configuration. Close the Trend window or DX LCD Display definition window. Try again. Upload Item Port OK DX and XT/XTM COM1 DX COM2 Cancel XT/XTM Calibration Address 0 DX Password 0000 upload Figure 95: Upload Dialog Box 2. Select the item you would like to upload and the port to which the DX controller is connected by clicking on the radio buttons. 3. For DX Versions 1.4, 2.4, 3.4, or later only: Enter the password number of the configuration you are uploading in the DX Password field. The upload fails if the password number is incorrect. Note: The DX Password field only appears if the password protection feature is enabled in the GX9100.INI file (see Enabling Password Protection for the DX-9100 Download/Upload Dialogs (DX Version 1.4, 2.4, or 3.4) under Software Installation at the beginning of this document). Programming and Commissioning—GX-9100 Software Configuration Tool for Windows 87 4. Click on OK. Upload first checks whether the configuration in the tool matches the configuration in the controller (unless you are uploading a calibration). Upload DX checks only for DX elements and upload XT/XTM checks against XT1/XTM1 and its associated EXPs, if applicable. Upload DX and XT/XTM checks both. 5. If the check fails, the following dialog box appears: Config1 Modules do not match. Upload will overwrite the current configuration OK to continue? OK Cancel rusure Figure 96: Creating New Configuration 6. Select OK to continue uploading the configuration. The configuration will display on the screen when the upload is completed. Note: It is recommended that you save the current configuration before uploading as the current configuration on the screen will be replaced by the configuration uploaded from the controller. Opening a Configuration File If you have created and saved configurations before, you can open the saved files and modify them. To open a previously saved file: 1. Click on the Open button in the toolbar, or select Open from the File menu. The following dialog box appears: File Open File name: Folders: *.dxs OK c:\gx9100 config1.dxs config2.dxs timesup.dxs bldg3fl2.dxs c:\ gx9100 List files of type: Cancel Network... Drives: GX9100 Files (*.dxs) c: Open Figure 97: File Open Dialog Box 88 Programming and Commissioning—GX-9100 Software Configuration Tool for Windows 2. Select the configuration you want to modify from the File Name list. If the configuration you want does not appear in this list, you can search other directories by clicking on the folders in the Directories box, and you can access other drives by selecting them from the Drives drop-down list. 3. When you have selected the correct configuration file, click OK to open it. Modifying Inputs and Outputs Modifying Input/Output Configurations (AIs and DOs Only) To change the configuration of analog inputs and digital outputs: 1. Click on the AI or DO with the right mouse button to bring up its pop-up menu. 2. Click on Delete. The following message box appears: Config1 Are you sure you wish to DELETE this module? Yes No Fig98 Figure 98: Delete Confirmation Dialog Box Modifying Associated Data 3. Click Yes. This deletes the current input/output’s configuration and removes its double border, but does not remove the AI or DO from the screen. 4. Click on the AI or DO with the right mouse button again to bring up its pop-up menu. 5. Click on the new input/output type. The input/output will be reconfigured as the new type, and the double border will appear. To modify the data associated with inputs and outputs, follow the same procedure that you used to enter the data. Call up the data window, enter the new values in the data fields, and click OK to save the changes. Programming and Commissioning—GX-9100 Software Configuration Tool for Windows 89 Deleting Modules To delete a module: 1. Click on the module with the right mouse button to bring up its pop-up menu. 2. Click on Delete. The message box in Figure 98 appears. 3. Click on Yes to delete the selected module or No to cancel the operation. Modifying Modules Modifying Associated Data To modify the data associated with modules, follow the same procedure that you used to enter the data. Call up the data window, enter the new values in the data fields, and click on OK to save the changes. To change the module type, delete the module and configure a new module. Modifying PLC Modules Modifying Associated Logic Variables 90 To modify the associated logic variables in a PLC module’s ladder diagram: 1. Double-click on the PLC module block to open its ladder diagram. 2. Double-click in the middle of the instruction block to modify the associated logic variable. The intermediate menu for associated variables appear. 3. Choose a module from the intermediate menu and click OK. The list of that module’s variables appear. 4. Choose a variable from the list and click OK. The program prompts you to confirm the change. 5. Click Yes to confirm the change. The new associated variable appears above the instruction block. Programming and Commissioning—GX-9100 Software Configuration Tool for Windows Modifying Instruction Blocks To modify an instruction block: 1. Double-click on the PLC module block to open its ladder diagram. 2. Double-click the hot point of the instruction block you want to modify. A list of instructions appears. Note: Only instructions that do not affect the graphic representation of the ladder diagram can be changed. Other instructions may only be changed by erasing the PLC module (Edit--Clear) and re-entering the instructions. 3. Select a new instruction and click OK. The program prompts you to confirm the change. 4. Click Yes to confirm the change. The new instruction block appears in the diagram. Note that you have to re-assign an associated variable. Clearing the Ladder Diagram To clear the ladder diagram: 1. Double-click on the PLC module block to open its ladder diagram. 2. Select Clear from the Edit menu. The diagram is cleared. Note: The program does not prompt to confirm the clear command. Make sure you want to clear the diagram before executing this command or all data in that diagram is lost. If clear is selected by mistake, the original diagram can be recovered by closing the PLC window without saving the changes and then reopening the window. Programming and Commissioning—GX-9100 Software Configuration Tool for Windows 91 Modifying Module Numbers Edit a module’s number with the following procedure: 1. Click on the module with the right mouse button to bring up its pop-up menu. 2. Click on Change Module Number and the dialog box shown below appears. Change Module Number 1 OK Cancel changemod Figure 99: Change Module Number Dialog Box 3. Select the new module number in the list of available choices and click OK. The module appears with the new number. Note: When modifying the module number of an XT or XTM with an attached EXP, both the XT/XTM and EXP numbers change. Also, the names of the associated inputs and outputs change. Modifying Connections Adding New Connections To add new connections to an existing configuration, use the same procedure outlined in the Connecting and Disconnecting Modules Creating a Configuration section of this document. Deleting Connections To delete existing connections, use the same procedure outlined in the Connecting and Disconnecting Modules Creating a Configuration section of this document. Changing Connections To change existing connections, first disconnect the connection you want to change, then make the new connection. Use the same procedure outlined in the Connecting and Disconnecting Modules Creating a Configuration section of this document. Calibrating Analog Inputs and Outputs To calibrate analog inputs or outputs: 92 1. Upload the calibration values following the procedure in Uploading a Configuration from the Controller section of this document. Make sure you click on the radio button next to Calibration when you do the upload. Programming and Commissioning—GX-9100 Software Configuration Tool for Windows 2. Select Calibration from the Edit menu. The following dialog box appears: Calibration Inputs HIGH LOW AD Conversion 16417 3048 Preamplifier 16385 3073 AI1 Pass. Ref. 10368 AI2 Pass. Ref. Outputs VOLTAGE HIGH LOW CURRENT HIGH LOW AO1 3990 48 3980 48 6912 AO2 3957 48 3983 48 10370 6910 AO9 3980 48 3976 48 AI3 Pass. Ref. 10390 6920 AO10 3990 48 3990 48 AI4 Pass. Ref. 10380 6916 AO11 3985 47 AI5 Pass. Ref. 10385 6915 AO12 3970 45 AI6 Pass. Ref. 10378 6911 AO13 3986 50 AI7 Pass. Ref. 10380 6912 AI8 Pass. Ref. 10368 6912 AO14 3990 48 Clock Daily Adjust 0 OK Cancel Calibrat Figure 100: Calibration Dialog Box 3. Change the values in the edit fields to adjust the input or output. 4. Download the calibration values to the controller following the procedure in Downloading to a DX Controller. Make sure you select Calibration when you do the download. Note: If you want to save calibration data, you must create a file for each DX-9100 Controller as the calibration data for each controller will be different. Programming and Commissioning—GX-9100 Software Configuration Tool for Windows 93 94 Programming and Commissioning—GX-9100 Software Configuration Tool for Windows Configuring the DX LCD Display Refer to the GX-9100 for Windows Addendum–Configuring the DX LCD Display User’s Guide in FAN 636.4 or 1628.4. Programming and Commissioning—GX-9100 Software Configuration Tool for Windows 95 96 Programming and Commissioning—GX-9100 Software Configuration Tool for Windows Importing DOS GX-9100 Files If you have existing DX-9100 Controllers that have been programmed using a previous (DOS) version of the GX-9100, use the Import feature in the File menu to convert them to this version. 1. Select Import from the File pull-down menu. The Import dialog box appears. Import File name: Folders: *.gps OK c:\gx9100 fp011293.gps ver1tst3.gps c:\ Cancel Network... gx9100 List files of type: Drives: Old GX9100 Files (*.gps) c: Importol Figure 101: Import Dialog Box 2. Use standard Windows methods to select the proper drive, directory, and file to import. If you need to change the server, select the Network button. The Map Network Drive dialog box appears. If you need additional assistance concerning this screen, consult your network administrator. Map Network Drive Drive: D: OK Cancel Path: Reconnect at logon fig103 Figure 102: Map Network Drive Dialog Box 3. After highlighting the correct old file in the Import dialog box, select OK to convert it. Programming and Commissioning—GX-9100 Software Configuration Tool for Windows 97 4. If there is an existing configuration already in the GX-9100, and it has been modified, the following dialog box appears. If it has already been saved, the line, The changes are not saved! does not appear. GX9100 The changes are not saved! Import will overwrite the current configuration OK to continue? OK Cancel notsaved Figure 103: Changes Are Not Saved Dialog Box 5. If you select Cancel, the import procedure is aborted so you can save the existing job. If you select OK, the import process continues. 6. The file is converted into the updated format and loaded into GX-9100. When conversion is complete, the following dialog box appears: GX9100 Import is complete. OK importco Figure 104: Import Is Complete Dialog Box 7. 98 Select OK. You can then modify the configuration, if necessary, and save it as a new .DXS file. Programming and Commissioning—GX-9100 Software Configuration Tool for Windows Commissioning See the DX Commissioning Using the Point Template Program User’s Guide, located in the Programming and Commissioning section of the System 9100 Technical Manual (FAN 636.4 or 1628.4) for detailed commissioning procedures. Among the procedures described in the document are: • overriding, adjusting, and releasing points • obtaining information for one or many controllers • monitoring and graphing controller data • customizing which points are displayed, their names, units, and how they are grouped • using a Template File to build a DDL CS Model • an example Template File, with explanations Programming and Commissioning—GX-9100 Software Configuration Tool for Windows 99 100 Programming and Commissioning—GX-9100 Software Configuration Tool for Windows Troubleshooting When entering real numbers, the GX-9100 Software Configuration Tool for Windows accepts any value between -32750 and 32750. Numbers with a modulus greater than 2048 may be rounded up or down by up to 0.1 percent as shown in Table 17. Note on Ranges Table 17: Rounding Factors Range Rounding (+/-) 2049-4096 2 4097-8192 4 8193-16384 8 16385-32750 16 The rounding is due to the external communication bus protocol and does not compromise the precision of the internal control process. Common Error Messages The following are common error messages: The source and destination points do not match! • The source and destinations points are not of the same type (digital or analog). Choose a new source and/or destination point for this connection. The file could not be opened • The software could not find the file. Check whether the diskette is properly inserted in the diskette drive. • The software could not open the file; the file could possibly be corrupted. Use the backup file instead. Values entered in a data window are gone when you return. • You may have exited the window by clicking Cancel or pressing the <Esc> key before saving changes. Make sure to click OK to save changes before exiting data windows. Programming and Commissioning—GX-9100 Software Configuration Tool for Windows 101 A message appears when you exit a data window asking you to enter a number within a specific range; for example, Please enter a number between 1 and 360. • 102 When real and integer values are entered into a data window and you click OK, the GX-9100 tool checks the values before it saves the changes. If one of the values is outside of the allowed range, the program will display an error message defining the range of the point. When you click OK to close the error message, the value that needs to be changed will be highlighted. Change the value to one within the defined range and then click OK to exit the data window and save your changes. Programming and Commissioning—GX-9100 Software Configuration Tool for Windows Appendix 1: Source Points ACOn The current value of an analog constant set by a FMS, the GX Tool, SX Tool, or on the DX front panel. AFB A 1 when the DO PAT associated feedback value is not responding to changes in the DO PAT command value. AIn The current value of the analog input. AI%n The current value of the analog input in percent (%) of range. AIHn A 1 if the analog input is above its high limit and not below the high limit - limit differential. AILn A 1 if the analog input is below the low limit and not above the low limit + limit differential. AOFn A 1 when an analog output is being externally forced. AOHn A 1 when the analog output is equal to or above its high range. AOLn A 1 when the analog output is equal to or below its low range. BATLOW A 1 when the DX lithium battery needs to be replaced. DCOn The current value of a digital constant set by a FMS, the GX Tool, SX Tool, or on the DX front panel. DIn The current status of the digital input. DIAL When set to 1 by a set statement in the PLC, this causes the N2 Dialer to connect the N2 Bus to a FMS via telephone lines. The DIAL bit will be reset to 0 by the FMS when the telephone line connection is successful. DICn Toggles from 0 to 1 or 1 to 0 when the number of digital input transitions (counts) equals the prescaler. DOn The status of the digital output. DOnC A 1 when the FMS has commanded the digital output to be On. DOnE A 1 when the FMS has taken control of the digital output. DOFn A 1 when the digital output PAT or DAT is being externally forced. DOHn A 1 when the digital output PAT or DAT is at its defined high limit. Programming and Commissioning—GX-9100 Software Configuration Tool for Windows 103 104 DOLn A 1 when the digital output PAT or DAT is at its defined low limit. HTRR Historical Trend Read Request. A “1” when any trend log buffer has reached its Read Request limit. LRSn The logic result status of an OUT, OUTNOT, SET or RST statement in a PLC. (Refer to the PLC code to determine which number to use.) NAIn The analog numeric value that is received over the LONWORKS N2 Network. NDIn-m The digital value that is received over the LONWORKS N2 Network. NAIUn A 1 when the network analog shared value is no longer receiving data from the LONWORKS N2 Network. NDIUn A 1 when the network digital shared value is no longer receiving data from the LONWORKS N2 Network. OSnHEAT A 1 when Optimal Start module is in the Heating mode. OSnOUT A 1 when the Optimal Start module requires equipment to be On. It is the controlling output of an Optimal Start module to START/STOP heating or cooling equipment. OSnPRE A 1 while the Optimal Start module is in the Pre-conditioning mode (will turn Off at occupancy). OSnSTO A 1 when the Optimal Start module is in the Optimal Stop mode (will turn Off at vacancy - unoccupancy). OUHn A 1 when an analog or digital output is in Hold mode from either the DX front panel or FMS. OULn A 1 when the INC and DEC connections are both On in an analog output module (including PAT or DAT) and the output is locked. OUTn The value of the analog output (including PAT or DAT). OVRn A 1 when the value of the analog input is more than 5% above its normal range (overrange condition). PMnCMH A 1 when a control module’s output is equal to its output high limit. PMnCML A 1 when a control module’s output is equal to its output low limit. Programming and Commissioning—GX-9100 Software Configuration Tool for Windows PMnCMP A 1 when the control module’s WSP is being overridden by a FMS (Computer mode). PMnDISm A 1 when the output stage is disabled in a sequencer module. PMnEF A 1 when this control module is being externally forced. PMnFSSm A 1 when the totalized value of a totalization module is equal to the full scale limit of the channel. PMnHDA A 1 when the difference PV - WSP is larger than the high deviation alarm value. PMnHEAT A 1 when, in a symmetric control module, the PV is below the center of the symmetry band, and a 0 when above center; or a 1 when, in a dual control module, Loop 1 is active. PMnHHDA A 1 when the difference PV - WSP is larger than the high high deviation alarm value. PMnHLD A 1 when the program module is in the Hold mode, being overridden by the SX Tool or a FMS. PMnHLDm A 1 when the channel of the program module has been overridden (in hold) from an SX service module or a FMS. PMnLDA A 1 when the difference WSP - PV is larger than the low deviation alarm value. PMnLLDA A 1 when the difference WSP - PV is larger than the low low deviation alarm value. PMnLSm A 1 when the comparator module channel is at its comparison true logic state. PMnLSP The value of the local setpoint. (This value is changed when adjusting the WSP from the DX front panel.) PMnLSP1 The value of the local setpoint of Loop 1 of a dual control module. (This value is directly changed when adjusting the WSP1 from the DX front panel.) PMnLSP2 The value of the local setpoint of Loop 2 of a dual control module. (This value is changed when adjusting the WSP2 from the DX front panel.) PMnMCSm A 1 as long as the maximum cycles status timer for an output stage is active. PMnMNWS The value of the minimum working setpoint allowed for a control module. Programming and Commissioning—GX-9100 Software Configuration Tool for Windows 105 PMnMXWS The value of the maximum working setpoint allowed for a control module. PMnNCM The calculation result of a numeric module. PMnNCMm The calculation result of a channel of a numeric module. PMnNMH A 1 when the calculated output is equal to or greater than the numeric module high limit. PMnNMHm A 1 when the psychrometric numeric module output is equal to or greater than the high limit of the channel. PMnNML A 1 when the calculated output is less than or equal to the numeric module low limit. PMnNMLm A 1 when the psychrometric numeric module output is less than or equal to the low limit of the channel. PMnOCM The value of the PID control module output in percent; either a 1 or 0 for an On/Off control module. PMnOUT The analog value of the requested output load % (percent) of a sequencer. PMnOUTD The output difference between the required load minus the sum of the loads of stages that are On in an Sequencer mode. This can be used for Vernier control. PMnOUTS The analog value of the output sum of the loads of stages that are On in an sequencer module. PMnSOF A 1 when this control module is in the Shutoff mode, which occurs when enable shutoff = 1 and the FMS has commanded it On. PMnSTA A 1 when this control module is in the Startup mode, which occurs when enable startup = 1 and the FMS has commanded it On. PMnSTOm A 1 when the staged output of a sequencer module is requested to be On. PMnTDOm A 1 when the numeric timer channel output is On. PMnTIMm The numeric timer module timer value of each channel. It will be 0 when the channel is not triggered or the timer has expired; or it will be the number of seconds (or minutes, or hours) left as the timer decrements. PMnTOTm The totalized value of a totalization module channel; the number of events, runtime, or integration value. PMnWSP 106 The value of a control module working setpoint. Programming and Commissioning—GX-9100 Software Configuration Tool for Windows PMnWSP1 The value of the working setpoint of Loop 1 of a dual control module. PMnWSP2 The value of the working setpoint of Loop 2 of a dual control module. SLF A 0 when FMS is active, and returns to a 1 60 seconds after receiving the last command from the FMS. SOFF A 1 when the FMS has commanded the Shutoff mode. SSA A 1 when the FMS is active, and returns to 0 two hours after the last command from the FMS. STUP A 1 when the FMS has commanded the Startup mode. TSnEXS A 1 when a time schedule module has its extension enabled by a FMS or a DX front panel command. TSnOUT A 1 when the real time is currently between the start and stop times of an event of the time schedule module and the current day is specified for that event. UNRn A 1 when the value of the analog input is more than 5% below its normal range (underrange condition). XTnAIm The current value of the analog input from the XT. XTnAIHm A 1 if the analog input is above its high limit and not below the high limit - limit differential. XTnAILm A 1 if the analog input is below the low limit and not above the low limit + limit differential. XTnAOm The value of the analog output to the XT. XTnCOM A 1 when the extension module is not communicating (wrong address, bus line broken, or bus line overload). XTnDIm The current status of the digital input from the XT. XTnDOn The status of the digital output to the XT. XTnERR A 1 when the expansion module type does not match what was configured (i.e., configuring an XP-9102 and connecting an XP-9103 yields an error). XTnHARD A 1 when the expansion module is not connected or not responding (hardware fault). Programming and Commissioning—GX-9100 Software Configuration Tool for Windows 107 XTnOUHm A 1 when an analog or digital output is in Hold mode from either the DX front panel or FMS. XTnPWR 108 A 1 when the extension module detects a loss of power or loss of communication. The DX will reset this after a few seconds. Programming and Commissioning—GX-9100 Software Configuration Tool for Windows Appendix 2: Destination Points ALD@ The connection to disable alarm processing on analog inputs AI1-AI8. AO@ The numeric connection to control an analog output. AOF@ The connection to force an analog output to a specified value. DEC@ The connection to decrement an analog type output or sequencer module. While connection is a logic 1, the output will decrease at a rate dependent on the type of module. DISn@ A connection in a sequencer to disable the corresponding stage or set number. DO@ The connection to control a digital output. DOF@ The connection for forcing a digital output to a specified value. EF@ The connection to the external forcing point of control modules. ENL@ The connection to enable output limits of an analog type output (PAT and DAT included). FB@ The connection to the feedback of a PAT. Usually a signal from a potentiometer on the controlled device. FST@ The connection to set the sequencer module into fast step down mode. In@ Analog input connections to a programmable module. INC@ The connection to increment an analog type output or sequencer module. While connection is a logic 1, the output will increase at a rate dependent on the type of module. MNWS@ The connection to the minimum working setpoint of a control module. The WSP cannot be adjusted below this value. MXWS@ The connection to the maximum working setpoint of a control module. The WSP cannot be adjusted above this value. NAOn@ The numeric source of a Network Analog Output that is shared over the LONWORKS N2 Network. NDOn-m@ The digital source of a Network Digital Output that is shared over the LONWORKS N2 Network. Programming and Commissioning—GX-9100 Software Configuration Tool for Windows 109 110 OB@ The connection of an output bias value of a PID module. OB1@ The connection for Loop 1 of a dual PID output bias. OB2@ The connection for the Loop 2 of a dual PID output bias. OF@ The connection to the Off mode source point of a control module. OSnDA@ The connection to disable the adaptive action of an Optimal Start/Stop module. OSnDI@ The connection to disable the Optimal Start/Stop module. OSnOB@ The connection to the Off Setpoint Bias, which replaces the entered value when connected in an Optimal Start/Stop module. OSnOT@ The connection for the Outdoor Air Temperature sensor of an Optimal Start/Stop module. OSnSP@ The connection for the Optimal Start Zone Temperature setpoint. If connected, it replaces the entered setpoint. OSnTS@ The connection in an Optimal Start/Stop module for the time schedule that determines when the building is occupied. OSnZT@ The connection for the Zone Temperature sensor in an Optimal Start/Stop module. PB@ The connection to proportional band, which replaces the value PB if there is a connection. PV@ The connection to the process variable of a PID or an On/Off. RA@ The connection to the reverse action point of a control module. RHn@ The relative humidity sensor connections for psychrometric calculations. RS@ The connection to a remote setpoint, which is used in the calculation for the working setpoint. RSn@ The connection to the reset function of a totalization module channel (to reset to 0 and re-start) or timer module channel (to reset the output). Programming and Commissioning—GX-9100 Software Configuration Tool for Windows RS1@ The connection for Loop 1 of a dual PID or On/Off remote setpoint. RS2@ The connection for Loop 2 of a dual PID or On/Off remote setpoint. RV@ The connection to reference variable which is a multiplier in the calculation for the working setpoint. RV1@ The connection for Loop 1 of a dual PID or On/Off reference variable. RV2@ The connection for Loop 2 of a dual PID or On/Off reference variable. SB@ The connection to the stand by source point of a control module. SPn@ A setpoint connection for a comparator channel if a remote setpoint is desired, otherwise the entered value for the setpoint will be used. TMn@ The temperature sensor connections for psychrometric calculations. TSnOF@ A connection to externally force the output of a time schedule to Off. TSnON@ A connection to externally force the output of a time schedule to On. TSnEX@ A connection to the external extension override of a time schedule. Programming and Commissioning—GX-9100 Software Configuration Tool for Windows 111 112 Programming and Commissioning—GX-9100 Software Configuration Tool for Windows Appendix 3: Trend Log Items Table 18 below lists the analog items and logic variables that can be defined in a Trend Log module for Metasys Point History. On the Metasys system, the analog inputs are mapped to AI objects, the analog outputs to AOS objects, and the logic variables to BI objects. Table 19 lists the analog items and logic variables that can be defined in a Trend Log module for the DX LCD Display. Note: Since a logic variable set is recorded when any one of its variables changes state, it is recommended that you assign LRS logic variable bytes to the trend log and then connect the source variables (the ones that you wish to trend) to the LRS variables in a PLC module. DO 1 DO 2 (LRS1) (LRS2) (LRS3) DO 3 Fig u r1 0 6 Figure 105: Example of Assigning LRS Logic Variable Bytes Table 18: Trend Log Items for Metasys Point History DX Version Analog Items Logic Variables 1.4, 2.4, and Later AI1 to AI8 OUT1 to OUT8 ACO1 to ACO8 DI1..8 LRS1..8 LRS9..16 LRS17..24 LRS25..32 2.4 and Later Only OUT9 to OUT14 – Programming and Commissioning—GX-9100 Software Configuration Tool for Windows 113 Table 19: Trend Log Items for DX LCD Display 114 DX Version Analog Items Logic Variables 2.4, 3.4, and Later AI1 to AI8 OUT1 to OUT14 ACO1 to ACO8 XTnAI1 to XTnAI8 XTnAO1 to XTnAO8 PMnK1 to PMnK34 PMnOU1 to PMnOU8 PMnAX1, PMnAX2 DI1..8 LRS1..8 LRS9..16 LRS17..24 LRS25..32 LRS33..40 LRS41..48 LRS49..56 LRS57..64 DO3..8 DCO1..8 DCO9..16 DCO17..24 DCO25..32 XTnDI1..8 XTnDO1..8 AIH1..4 AIH5..8 AIL1..4 AIL5..8 XTnAIH1..4 XTnAIH5..8 XTnAIL1..4 XTnAIL5..8 PMnDO1..8 3.4 and Later Only NAI1 to NAI16 NDI1-1..8 NDI1-9..16 NDI2-1..8 NDI2-9..16 NDI3-1..8 NDI3-9..16 NDI4-1..8 NDI4-9..16 NDI5-1..8 NDI5-9..16 NDI6-1..8 NDI6-9..16 NDI7-1..8 NDI7-9..16 NDI8-1..8 NDI8-9..16 Programming and Commissioning—GX-9100 Software Configuration Tool for Windows Appendix 4: DX LCD Display Data Points Refer to the GX-9100 for Windows Addendum–Configuring the DX LCD Display User’s Guide in FAN 636.4 or 1628.4. Programming and Commissioning—GX-9100 Software Configuration Tool for Windows 115 116 Programming and Commissioning—GX-9100 Software Configuration Tool for Windows Appendix 5: Item Abbreviations 4-SEGM 4 Channel Segment Module (4 break points each) 8-CALC 8 Channel Calculator Module ACO Analog Constant AI Analog Input AO Analog Output AVERAGE Average Calculation Module BIN-SEQ Binary Code Sequencer CALC Calculation Module COMPRTR Comparator D-ONOFF Dual On/Off D-PID Proportional, Integral and Derivative Controller (2 Loops) DCO Digital Constant DI Digital Input DO Digital Output EXD Exception Days EXP Expansion Module (XP2) for XT or XTM LRS Logic Result Status MAXIMUM Maximum Select Module MINIMUM Minimum Select Module NAI Network Analog Input NAO Network Analog Output NDI Network Digital Input NDO Network Digital Output ONOFF On/Off OS Optimal Start/Stop PID Proportional, Integral and Derivative Controller PLC Programmable Logic Controller PM Programmable Module Programming and Commissioning—GX-9100 Software Configuration Tool for Windows 117 118 PSYCHRO Psychrometric SEGMENT Segment Module (17 break points) SELECT 4 Input Select Module SEQ Sequencer STA/STO Start/Stop TIMER 8 Channel Time Module TOTAL Totalization TS Time Schedule Module XT XT-9100 Extension Module (includes XP1) XTM XTM-905 Extension Module (includes XP1) (XTM-905 is not available in North America as of May, 1999) Programming and Commissioning—GX-9100 Software Configuration Tool for Windows Appendix 6: Comparison with the DOS Version Table 20: Comparison to the DOS Version DOS Version Command Windows Version Command (Menu Option and Keyboard Shortcut) INFO Edit -- Job Information PRINT File -- Print DOWNLD Action -- Download UPLOAD Action -- Upload SAVE File -- Save READ File -- Open NEW File -- New CALIBR. Edit -- Calibration REDRAW (No equivalent command -- screen automatically refreshes.) VERSION Controller -- DX Version 1.1, 1.2, 1.3 Controller -- DX Version 1.4 Controller -- DX Version 2.0, 2.1, 2.2 Controller -- DX Version 2.4 Controller -- DX Version 3.0, 3.1, 3.2 Controller -- DX Version 3.4 GLOBAL Edit -- Global data QUIT File -- Exit SOURCE Edit – Connect, or F5 key DATA Edit -- data DELETE Edit -- Delete CONN View -- Show Connections Toolbar Button or Mouse Action (where applicable) Click and drag the bent arrow from the source point to the destination point. Programming and Commissioning—GX-9100 Software Configuration Tool for Windows 119 120 Programming and Commissioning—GX-9100 Software Configuration Tool for Windows Appendix 7: Custom Home Page Syntax Refer to the GX-9100 for Windows Addendum–Configuring the DX LCD Display User’s Guide in FAN 636.4 or 1628.4. Programming and Commissioning—GX-9100 Software Configuration Tool for Windows 121 Notes 122 Programming and Commissioning—GX-9100 Software Configuration Tool for Windows Notes Programming and Commissioning—GX-9100 Software Configuration Tool for Windows 123 Notes Controls Group 507 E. Michigan Street P.O. Box 423 Milwaukee, WI 53201 124 www.johnsoncontrols.com FAN 636.4 System 9100 Technical Manual Release 5.04 Printed in U.S.A. Programming and Commissioning—GX-9100 Software Configuration Tool for Windows