1
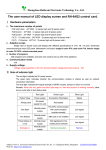
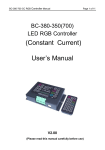
MISVC Software User Guide
Golden Motor Technology Co.,Ltd.
HPC Series Controllers Software User Guide
The MISVC software is the professional software package of K6, K9 series controllers, used
to debug controller parameters to meet different needs of users.
1. Software Installation
Debugging software is a name for the "MISVC.rar" compression package which doesn't need
to be installed. First, extract the compression package to any directory, and directly run
"MISVC-11-12-26.exe" file which is in "MISVC" folder.
2. USB Cable Connection
1). Connection between USB Cable and PC
Plug one end of the USB Cable into any USB port on the PC, if it is the first connection
between them, the PC will automatically discover the new hardware and install the driver, no need
to install any drivers manually (applies to Windows XP, Windows Vista and Windows 7 operating
systems), until the PC prompts "the newly installed hardware is ready to use".
2). Connection between USB Cable and Controller
The connection between USB cable and controller has two modes, one is on-line debugging
mode, another is off-line debugging mode.
(1) On-line Debugging Mode
Online debugging mode applies to the situation that the controller has been installed in the
vehicle and the peripheral wiring has been connected well.
Connection Method: connect one end of the 3-pin plug of the USB cable to the 3-pin plug of
the controller USB harness.
(2) Off-line Debugging Mode
Off-line debugging mode applies to the situation that the controller is not connected to any
peripheral wiring.
Connection Method: Connect the 23-pin plug of the USB cable to controller directly.
3. Methods of Modifying Controller Parameters
1). After connecting the controller and PC with USB cable, run "MISVC-11-12-26.exe"
debugging software, the vehicle key switch should be opened at on-line debugging mode.
1 / 12
Pic.1
If the dot next to the word "USB" at the lower left corner of host interface is green, and the
columns display data, as shown in pic.1, indicating a successful connection between the controller
and the PC, users can modify the parameters now.
Pic.2
If the dot next to the word "USB" at the lower left corner of the host interface is yellow, and
all columns display green bars, as shown in pic. 2, indicating no connection between the controller
and the PC, then please check the communication line.
2). Parameters Modification
Take modifying motor pole pairs as an example
2 / 12
Pic.3
Step 1: click "Motor", as shown in pic. 3.
Pic.4
Step 2: change the value in "Motor pole pairs" column to the current motor pole pairs, as
pic.4.
3 / 12
Pic.5
Step 3: Click" Update" after changing parameters, as pic. 5.
Pic.6
4 / 12
Pic.7
Step 4:
If pop-up "Setup Successed" , as pic.6, then indicate parameter modification succeed,
click the "OK" button in the dialog box, and restart the controller.
If pop-up "Setup Failed", as pic.7, then indicate parameter modification failed, click
the "OK" button in the dialog box, and repeat step 2.
Note:
(1) The parameters of the controller are set to the optimum values after a large number
of experimental test, generally, users do not need to change them. If users need to
change them at special circumstances, should be completed under our guidance.
(2) Click "Restore Factory Settings" can restore the original data at any time.
(3) After modifying, must restart the controller (first power off the controller, then
power on), then new parameters can take effect.
4. Software Interface and Controller System Parameters
1). Software Interface
The software interface is divided into three columns: Common Functions, Functional Tab
and Communication Indication. The data display area and alarm display field will be different in
accordance with different interfaces.
Common Functions Bar includes seven common functions and the Functional Tab Bar
includes all the features.
(1) <Monitor>Interface
Monitoring Interface for System Operation
5 / 12
Voltage(V)
Battery volt value, unit is V
Current(A)
Battery current value, unit is Amperes (A)
Controller Temp(℃) Controller internal temperature, in degrees Celsius
Motor Temp(℃)
Motor internal temperature, in degrees Celsius
Phase Current(A) The controller output single-phase current, that is motor
current, in amperes
Total Duration(Hr) Controller cumulative working time, unit is hour, cumulative
duration is 1 minute
(2) <Controller> Interface
Controller Setting
Bus max current (A) The max bus (battery) current, will run at 50% when
continuous runtime is more than Phase current runtime (S).
Phase current runtime (S) The runtime of max current, the max is 180 seconds.
6 / 12
Phase current (A) The max phase (motor) current, will run at 50% when
continuous runtime is more than Phase current runtime (S).
Voltage high shutdown (V) The controller will shut down when battery voltage is
higher than the set value, set it according to the highest
charging voltage +1 V.
50% speed limit voltage (V) Controller speed will be reduced to 50% if battery voltage is
less than the set value for 1 min, to prevent the battery
high-current discharge at low-voltage, set it according to 60
to 80% of the nominal value of the battery voltage
(according to the battery capacity discharge rate).
15% speed limit voltage (V) Controller speed will be reduced to 15% when battery
voltage is less than the set value for 1 min, to prevent the
battery moderate-current discharge at ultra low voltage, set
it according to 50 to 70% of the nominal value of the
battery voltage (according to the battery capacity discharge
rate), must less than the value of "50% speed limit voltage
(V)".
Voltage low shutdown (V) The controller will shut down when battery voltage is lower
than the set value, set it according to 50~70% of the
nominal value of the battery voltage (according to the
battery capacity discharge rate), must less than the value of
"50% speed limit voltage (V)".
Forward max speed (rpm) Motor forward speed limit
Reverse max speed (rpm) Motor reverse speed limit
Speed –I (%) Controller speed control loop I parameter controls, range is
1 to 99, the greater the value, the faster the reaction, the
smaller on the contrary, (should reduce this value if speed
fluctuations large, on the contrary increase it). When used in
cruise speed control, first adjust the parameter of P then the
I.
Speed –P (%) Controller speed control loop P parameter controls, range is
1 to 99, the greater the value, the faster the reaction, the
smaller on the contrary, (should reduce this value if speed
fluctuations large, on the contrary increase it). When used in
cruise speed control, first adjust the parameter of P then the
I.
Current –I (%) Controller current control loop I parameter controls, range
is 1 to 99, the greater the value, the faster the reaction, the
smaller on the contrary, (should reduce this value if
acceleration is too large, on the contrary increase it). When
used in pedal speed control, first adjust the parameter of P
then the I.
Current –P (%) Controller current control loop P parameter control, range is
1 to 99, the greater the value, the faster the reaction, the
7 / 12
smaller on the contrary, (should reduce this value if
acceleration is too large, on the contrary increase it). When
used in pedal speed control, first adjust the parameter of P
then the I
Acceleration (rpm/s) Acceleration limit, users do not need to set it.
(3) <Motor> Interface
Motor and DC Contactor Setting
Motor pole pairs
Motor pole pair numbers (pole pairs = number of poles / 2),
only affect display value of rotate speed, not the control of
the controller on the motor
Motor temperature limited
Motor temperature limit, if exceeding the temp limit,
controller output current will reduce 50% to protect the
motor.
Line contactor coil_PIN3
Control the voltage of bus DC contactor coil to be
consistent with the nominal value.
Fan contactor coil_PIN4
Control the voltage of fan/water cooling DC contactor coil
to be consistent with the nominal value.
Reverse contactor coil_PIN5
Controller reverse switch acts to control DC contactor coil
voltage to be consistent with the nominal value, users do
not need to set it.
BLDCM
Motor type is Brushless DC Motor
PMSM
Motor type is Permanent Magnet Synchronous Motor, users
do not need to set it.
ACIM
Motor type is AC Induction Motor, users do not need to set
it.
FWD degree
Forward Lead Angle, users do not need to set it.
REV degree
Reverse Lead Angle, users do not need to set it.
8 / 12
(4) <Accelerator>Interface
Accelerator Setting
Accelerator
Hall
Hall type accelerator, please refer to "HPC Series Controller User
Guide" for wiring method.
3-Wire Resistance
Resistance type accelerator, 3-wire, please refer to "HPC Series
Controller User Guide" for wiring method.
2-Wire Resistance
Resistance type accelerator, 2-wire, please refer to "HPC Series
Controller User Guide" for wiring method.
Adjust
Linearity adjust
Linearity, no adjustment on accelerator
Index adjust
Make index adjustment on accelerator
Initial(mv)
The minimum value used in the variation range of accelerator
Final(mv)
The maximum value used in the variation range of accelerator
Threshold(mv)
The accelerator exceeds the max variation range. To prevent
accelerator act automatically in case ground connection is bad or
disconnected.
(5) <Revise> Interface
Dedicated for manufacturer's test, users do not need to adjust it.
(6) <Battery> Interface
Battery Parameters Setting
9 / 12
Current of feed back (A)
Setting of energy feedback current (brake current), set it according
to the comfort degree of passengers in vehicle.
Voltage of feed back (V)
Setting of energy feedback voltage(brake voltage), set it according
to battery charging voltage.
(7) <Start> Interface
Controller Start Controls
Setup startup
Controller startup mode
Accelerator is zero
Startup when accelerator is zero
Neither
Startup when power on, without consideration of accelerator position.
Control mode
Torque control
The accelerator controls motor torque directly.
Power control
The accelerator controls motor power directly.
Speed control
The accelerator controls motor speed directly.
10 / 12
Auto hold
Start the program of Auto hold, users do not need to adjust it.
(8) <Vehicle> Interface
Parameters Setting about Vehicle
Direction way
Positive
Motor forward is the advancing direction
Reverse
Motor reverse is the advancing direction
Wheel diameter (cm)
Gear ratio
(9) <Test> Interface
Mainly used to check if the controller peripheral parts and harness work properly, a great
convenience for user's fault query.
11 / 12
Step1:Check the <FWD/REV> switch
Check the <FWD/REV> switch and wires.
Press the switch corresponding to the display.
Step2:Check the <brake> switch
Check the <brake> switch and wires. Press the
switch corresponding to the display.
Step3:Check the <high brake> switch
Check the <high brake> switch and wires. Press
the switch corresponding to the display.
Step4:Check motor position sensor
Check motor position sensor and wires. Turn
the motor corresponding to the display.
Step5:Check the Accelerator
Rotating accelerator to maximum ,three times
Check the Accelerator and wires.
Rotate accelerator to maximum, three times,
corresponding to the displayed value, click
<set> button to adjust the range of accelerator.
Step6:Check the contactor
Check the main contactor and wires. Click
<Test> button, the contactor should act
correspondently.
Note: Users do not need to adjust or set other interfaces.
12 / 12