1
USER GUIDE
RADDS
October 2014
Version 1
User Guide created by @mundsen
Max3dshop
http://max3dshop.org
USER GUIDE
ATTRIBUTION-NONCOMMERCIAL-SHAREALIKE 3.0 UNPORTED (CC BY-NC-SA 3.0)
ii
Table of Contents
1
2
USER GUIDE
Introduction ................................................................................................................................................................4
1.1 .... RADDS .....................................................................................................................................................................................4
Wiring and configuration ......................................................................................................................................5
2.1 .... Wiring diagram ..................................................................................................................................................................5
2.1.1 RADDS ..............................................................................................................................................................................................6
2.1.2 RADDS measurements ..............................................................................................................................................................7
2.1.3 RADDS + LCD.................................................................................................................................................................................8
2.1.4 RADDS + Arduino DUE..............................................................................................................................................................9
2.1.5 Power Supply Unit (PSU) ......................................................................................................................................................10
2.1.6 RADDS powered by 24V Power Supply .........................................................................................................................11
2.1.7 Stepper drivers and motors ................................................................................................................................................12
2.1.8 RADDS + Endstops...................................................................................................................................................................21
2.1.9 Connecting Extruder...............................................................................................................................................................22
2.2 .... Wiring sample (OrdBot Hadron printer) ............................................................................................................. 23
2.2.1 Setup ..............................................................................................................................................................................................23
2.2.2 OrdBot Axis .................................................................................................................................................................................24
2.2.3 RADDS OrdBot Wiring diagram .........................................................................................................................................25
3
2.2.4 Installation ..................................................................................................................................................................................26
Appendices/Notes ................................................................................................................................................. 27
iii
USER GUIDE
1 Introduction
1.1 RADDS
The RADDS-Board provides the following connectivity’s:
•
•
•
•
•
•
•
•
•
6 Steppers: e.g. 3 axis and 3 extruders (2 of the driver sockets are fitted with 2pin
strips)
6 High-current loads: e.g. 1 HeatBed, 3 HotEnds and 2 fans
SD-Card (micro-SD-slot onboard, optional external SD-slot)
Standard LCD (5V) with 4x20 characters (HD44780 compatible)
Rotating encoder (on LCD panel)
6 endstops
5 thermistors and a ADC
3 servo motors
I2C, SPI, CAN, DAC, RS232 and 8 digital-pins available via pin strips
Additional Features:
•
•
•
•
•
•
•
EEPROM
Control-LEDs for loads and operation voltage
Catch-diodes at the FETs
Car-fuses instead of thermo fuses
Operation with 24V possible (Diode D1 has to be replaced by three 4V,1.3W zenerdiodes )
Heatbed-current can be up to 15A without a heat sink
Premium screw terminals
RADDS
2 Wiring and configuration
2.1 Wiring diagram
5
RADDS
2.1.1
RADDS
6
RADDS
2.1.2
RADDS measurements
7
RADDS
2.1.3
RADDS + LCD
8
RADDS
2.1.4 RADDS + Arduino DUE
The Due has a 32-bit ARM core that can outperform typical 8-bit microcontroller boards.
The most significant differences are:
•
•
•
•
A 32-bit core.
CPU Clock at 84Mhz.
96 KBytes of SRAM.
512 KBytes of Flash memory for code.
Mount the RADDS board on the top of the Arduino DUE.
Use the USB Programming port when connecting the DUE to a computer for software
update or controlling the printer.
If you want more computer power, the RADDS board can be combined with an UDOO Quad
board
http://www.udoo.org/features/
9
RADDS
2.1.5
Power Supply Unit (PSU)
The motors plus single hotend take up to 5A or so, a heated bed typically takes 5A-15A. So
for a standard setup with heated bed, look to about 18-20A total which is about 220-240W
at 12V. For some setups, you might be able to use less power.
More about power supply: http://reprap.org/wiki/Power_Supply
Cables for power supply and heated bed:
16 AWG - PSU and Heated bed (from the PSU to RADDS Heated bed input and from the
RADDS heated bed output to the heated bed)
18 AWG – From PSU to Controller (powers the controller, lcd panel, stepper motors,
hotend..)
10
RADDS
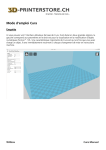
2.1.6 RADDS powered by 24V Power Supply
If you want to power RADDS by 24V the diode used in the default 12V setup have to be
replaced by three Zener diodes (4 V and 1.3W). The three zener diodes then reduces the
24V to 12V that can power the Arduino. It is important that you solder the zener diodes as
shown in the image.
The 12V to 24V modification is an option, but not recommended.
11
RADDS
2.1.7
Stepper drivers and motors
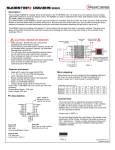
2.1.7.1 Stepper motor
Before you can connect the stepper motor to RADDS or Silencioso, you need some
information on the stepper motor you have.
Look at your motor, find its part number. Then Google it. Try to find a schematic or a datasheet that will indicate which wire goes to which pole. Note the colors that correspond to
each coil.
Wiring diagram for Wantai 42BYGHW609 stepper motor (from www.wantamotor.com).
If you can`t find the motor`s part number, you can use another method to find the motor`s
pole pairs.
When two wires for a pole (A +C or B+D) touch together it makes a closed circuit for that
pole and it gets harder to turn the stepper motor.
1. Try to turn the motor when no cables touch together – it should turn freely.
2. Touch two of the cables together – if the motor gets harder to turn, you have found a
pole pair. If not, try to touch two other cables together until the motor gets harder to
move.
3. When you have two cables together that makes it harder to turn the motor, you have
found a pole pair.
Note the colors for each pole pair (Pair 1 = 1A +1B, Pair 2 = 2A+2B)
12
RADDS
On the Wantai 42BYGHw609 the colors are:
1A = Black
1B = Green
2A = Blue
2B = Red
It does not matter if you swap the pole pairs. If the motor turns the wrong way, you can
reverse it in the configuration file.
13
RADDS
2.1.7.2
Micro stepping
A stepper motor always has a fixed number of steps. Microstepping is a way of
increasing the number of steps by sending a sine/cosine waveform to the coils inside
the stepper motor. In most cases, micro stepping allows stepper motors to run
smoother and more accurately.
Microstepping between pole-positions is made with lower torque than with fullstepping, but has much lower tendency for mechanical oscillation around the steppositions and you can drive with much higher frequencies.
If your motors are near to mechanical limitations and you have high friction or
dynamics, microsteps do not give you much more accuracy over half-stepping. When
your motors are 'overpowered' and/or you do not have much friction, then
microstepping can give you much higher accuracy over half-stepping. You can
transfer the higher positioning accuracy to moving accuracy too
Source: http://www.reprap.org/wiki/Stepper_motor#Micro_stepping
If you want to alter the micro stepping value on one or more axis, you have to set the correct
value. When using Silencioso, you set it using the dipswitches on the Silencioso and modify
the values in the configuration.h file
Each time you increase the stepping one level (sample: from 1/16 to 1/32) you have to
multiply the steps per unit value by two.
Sample – You are using 1/16 steps per unit and the value is 80 and want to use 1/32 steps
per unit.
If your steps per unit value is 80, you have to multiply 80 by two (2x80).
New steps per unit value = 160
14
RADDS
// #define DEFAULT_AXIS_STEPS_PER_UNIT
{78.7402,78.7402,200.0*8/3,760*1.1} // default steps per unit for Ultimaker
//#define DEFAULT_AXIS_STEPS_PER_UNIT {80,80,2560,107} // default steps
per unit for OrdBot 1/16
#define DEFAULT_AXIS_STEPS_PER_UNIT {160,160,5120,214} // default steps
per unit for OrdBot 1/32
This code sample is from Marlin.
The “default steps per unit for OrdBot 1/16” gives you the values for 1/16 micro stepping.
80, 80, 2560, 107
X-Axis = 80 steps/mm
Y-Axis = 80 steps/mm
Z-Axis = 2560 steps/mm
Extruder motor = 107 steps/mm (this is the setting for Bulldog Lite Extruder. You have to
find the correct setting for the extruder you use)
In the next code line, you find “default steps per unit for OrdBot 1/32”. This is the settings
when 1/32 microstepping are used. Here all values have been multiplied with two.
15
RADDS
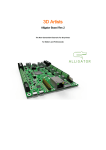
2.1.7.3 Set the micro stepping mode on RADDS 1.1
When you use stepper drivers like the A4988, DRV8825 (NOT WHEN USING EXTERNAL
DRIVERS LIKE SILENCIOSO) you have to set the micro stepping mode by cutting or
connecting the traces on the back of the RADDS board.
In this image, the traces have different colors to make it easier to find the correct traces.
A4988
MS1
MS2
L
L
H
L
L
H
H
H
H
H
RAPS128
MS1
MS2
MS3 STEP
1
L
L
L
1/2
H
L
L
1/4
L
H
L
1/8
H
H
L
1/16
L
L
H
1/32
H
L
H
1/64
L
H
H
1/128
H
H
H
In the table, you find the different stepping modes for the most used drivers.
L = Open trace, H = Closed trace (MS pin = 3,3V = default)
When using the DRV8825 the combinations HLH, LHH and HHH all gives 1/32 STEP
MS3
L
L
L
L
H
DRV8825
MS1
MS2
L
L
H
L
L
H
H
H
L
L
H
H
MS3
L
L
L
L
H
H
IMPORTANT you have to set the same stepping mode in the configuration.h file and update
the controller software.
16
RADDS
2.1.7.4
1Mounting stepper drivers like A4988, DRV8825 or stepper driver adapters
Silencioso stepper driver adapters used as a sample in this wiring diagram, but the other
drivers have the same pin labels.
Insert the stepper drivers/adapters (X, Y and Z) with the DIR pin in the upper right corner
(upside down)
Insert the stepper drivers/adapters (E1, E2 and E3) with the DIR pin in the lower left
corner.
The X, Y and Z motor cables have the black wire at the top
The E1, E2 and E3 wires have the red wire at the top
The Z and E3 have dual motor cable connections so you can connect two motors.
17
RADDS
2.1.7.5 Normal setup when using external stepper drivers like RRD Silencioso
This is the normal way to connect a Silencioso driver and motor.
18
RADDS
2.1.7.6 Dual Z stepper motor alternative 1 (dual Silenciosos)
Use this setup when the total current used by the two motors exceeds the current limit of
one Silencioso
19
RADDS
2.1.7.7
Dual Z stepper motor alternative 2
This is an option if the total current used by the two stepper motors are lower than the
Silencioso max current limit.
20
RADDS
2.1.8
RADDS + Endstops
As default there is no pins soldered in the +3.3V as they`re not needed when using
mechanical endstops.
Mechanical endstops:
Connect the mechanical endstops to the GND and Signal pins so they are normally closed
(push = open)
Hal-O endstops (magnetic):
IMPORTANT!!
When using electronic
endstops like the Hal-O,
only use endstop that have
max 3.3V out on the signal
pin
When using the Hal-O endstops you have to connect the + pin on the Hal-O to the +5V pin.
21
RADDS
2.1.9
Connecting Extruder
This image shows a normal direct drive extruder/hotend setup. If Bowden is used the setup
is almost the same, but there is a tube between the extruder and hotend.
Wiring:
-
Stepper motor to EXT1
Hotend Fan to FAN 1
Filament Fan to FAN 2
Thermistor to Thermistor 1
Heater to Heater 1
If you have more than one extruder, you must use EXT2, Thermistor 2 and Heater 2 (Hotend
Fan and Filament Fan to the same terminals as Extruder 1).
22
RADDS
2.2 Wiring sample (OrdBot Hadron printer)
2.2.1
Setup
OrdBot Hadron is a Cartesian Printer with separate X, Y and Z-axis.
•
•
•
•
•
•
•
•
•
•
•
•
•
•
OrdBot Hadron mechanical set
Arduino DUE + RADDS shield
RADDS LCD control panel
External Silencioso stepper drivers mounted on the stepper motors
Mechanical min and max endstops on X, Y and Z axis
Mk2B heated bed
Extruder
Hotend
Hotend fan (12v)
Filament fan (12v)
LED strip (12v) (to light up the print surface)
12V PSU
1/64 stepping on Z axis and Extruder
1/128 stepping on X and Y axis
23
RADDS
2.2.2
OrdBot Axis
24
RADDS
2.2.3
RADDS OrdBot Wiring diagram
25
RADDS
2.2.4
•
•
•
•
•
•
•
•
•
•
•
•
•
•
•
•
Installation
Upgrade the stepper motors with Silencioso stepper drivers (separate user guide)
Connect the RADDS shield onto the Arduino DUE board
Install the Silencioso stepper driver adapters (X, Y, Z and EXT1). Make sure the
orientation is correct.
Connect the RADDS LCD control panel
Connect the stepper motors. In this sample dual silenciosos are used for the dual Z
stepper motors (2.1.4.3)
Connect extruder motor to EXT1
Connect the hotend heater element to heater element output 1
Connect the hotend thermistor to thermistor input 1
Connect the hotend Fan to Fan 1 output
Connect the filament Fan to Fan 2 output
Connect the 12V LED strip to heater output 3
Connect HeatedBed thermistor to thermistor input 4
Connect HeatedBed 12V to the HeatedBed 12V output
Connect 12V from PSU to heated bed power input (right side)
Connect the main power input from the PSU to 12V input (left side)
Connect the USB cable to the programming port (the one in the lower left corner on
the DUE)
IMPORTANT – before you power on your printer for the first time, you must finish the software
setup.
Make sure all wiring is correct. If you have connected something the wrong way, you may
damage your electronics.
26
RADDS
3 Appendices/Notes
•
•
•
•
•
•
•
max3dshop: http://max3dshop.org/
RepRap RADDS wiki: http://reprap.org/wiki/RADDS
Martin Henschke: http://www.dr-henschke.de/RADDS_due.html
Arduino DUE: http://arduino.cc/en/Main/ArduinoBoardDue
Arduino software: http://arduino.cc/en/Main/Software
RADDS case for OrdBot: http://www.thingiverse.com/mundsen/designs
RADDS LCD Case: http://www.dr-henschke.de/LCD_Box.zip
27