1
User Guide
revision 1.5b – 02.2013
RooWifi
Important information and safety conditions
This user guide is permanently updated document. Any change in this document could be done without previous notification. You can find the last revision of this user guide in this website: http://www.roowifi.com. This device (RwRemote v2 or RooWifi) described in this user guide is a development board with Wi‐Fi interface IEEE Standard 802.11 compliant connectivity and mini‐din connector with UARL TTL communication developed by Carnlan Engineering (http://www.carnlan.com). This development board enables you to send SCI commands specified in this document: SCI protocol, the web server application in the embedded web server, roomba.xml, rwr.xml, roomba.cgi and the roomba.json files are examples of how to send commands to your iRobot Roomba in any platform without application installation needed to help software developers to make his own developments using these through the Wi‐Fi Interface. If use Gateway mode you are allowed to change the mode of the robot (safe, passive, full) specified in the SCI specification protocol. Be careful and be sure you understood the SCI specification until using this development board. Since you control the using RooWifi or RwRemote v2 described in this document you accept the responsibility of any damage caused on it, on the robot or any external device, furniture or object. As a development board once you connected this board to your robot the manufacturer of this development board and the manufacturer of the robot are not responsible of any damage caused on iRobot Roomba or other device where you connected the board. Use by your own risk. As an electronic circuit, some parts of the described device could be hot depending of the environment conditions like temperature or humidity when connected. Be sure don’t touch any component over the board when the board is plugged and be sure caching the board by the slim sides of the device (perpendicular to the component solder plane). If any furniture or object lets the robot passing or go under, we recommend to use virtual walls by iRobot around to disable passing under it when you do an action with the robot (Clean and Spot actions in Safe or Passive mode) to be sure that the development board described in this document could not be damaged or any other external component like the furniture, the object or the same robot. Disclaimer
This evaluation/development board is intended for use for ENGINEERING DEVELOPMENT, DEMONSTRATION, OR EVALUATION PURPOSES ONLY and is not considered by Carnlan.com or RooWifi.com to be a finished end‐product fit for general consumer use. Persons handling the product(s) must have electronics training and observe good engineering practice standards. As such, the goods being provided are not intended to be complete in terms of required design‐, marketing‐, and/or manufacturing‐related protective considerations, including product safety and environmental measures typically found in end products that incorporate such semiconductor components or circuit boards. This evaluation board/kit does not fall within the scope of the European Union directives regarding electromagnetic compatibility, restricted substances (RoHS), recycling (WEEE), FCC, CE or UL, and therefore may not meet the technical requirements of these directives or other related directives. 2
RooWifi
Content
RooWifi Features ........................................................................................................................... 4 Technical Features ........................................................................................................................ 4 Working Wi-Fi Modes ................................................................................................................... 5 Hotspot Mode ............................................................................................................................... 5 Home Wi-Fi Mode ......................................................................................................................... 5 Reconfiguration Mode (Transient)............................................................................................ 5 Operation By Flashing Led ......................................................................................................... 6 Restore Button............................................................................................................................... 6 Auto-Restore Function ................................................................................................................ 6 Multiplatform Interface .............................................................................................................. 7 Compatible Os And Devices....................................................................................................... 7 Installation Procedure ................................................................................................................. 8 Step-By-Step Configuration And Access ............................................................................... 9 Embedded Web Server .............................................................................................................. 10 User’s Remote .............................................................................................................................. 10 Driver’s Remote ........................................................................................................................... 11 Setup Wi-Fi Configuration ........................................................................................................ 11 Gateway Or Transparent Mode .............................................................................................. 13 Xml Sensor Files: Roomba.Xml & Rwr.Xml .......................................................................... 14 Roomba.Xml ................................................................................................................................ 14 Rwr.Xml......................................................................................................................................... 16 Json Sensor File: Roomba.Json ............................................................................................... 17 Accessible Urls For Ajax Request Commands ................................................................... 19 Checking The Connection From A Pc Or Mac ..................................................................... 20 Multiplatform Remote Control .............................................................................................. 21 Remote Control From Windows ............................................................................................. 21 Remote Control From Other Platforms ............................................................................... 21 Default Values.............................................................................................................................. 22 External Links ............................................................................................................................... 23 Contact Information ................................................................................................................... 23 3
RooWifi
RooWifi Features
Technical features
Power consumption: 200mA @ Roomba Battery Voltage ( 17V approx.)
iRobot Roomba interface:
o Physical Layer: MINI-DIN 7 PINS - PS/2.
o Application Layer: SCI iRobot Roomba Protocol in standalone mode or
defined by user’s software in Gateway Mode.
User Interface:
o Physical Layer: Wi-Fi IEEE 802.11b
o Application Layer:
Web Server through HTTP TCP Port (80) with authentication.
TCP Socket Server for client-server applications
o Supported Protocols and Standards:
XML: Read-only with data refresh of 500ms.
JSON: Read-only with data refresh of 500ms.
AJAX Request through GET Calls and text format output.
Operating Systems & Compatible devices:
o Android >=2.0
o iOs >=3.1
o Blackberry
o WebOs
o Windows Phone
o Linux
o MacOs
o Windows.
Wi-Fi 802.11 Interface
o IEEE Std. 802.11-compliant RF Transceiver
o IEEE Std. 802.11 b/g/n compatible
o ISM Band 2.400-2.484 GHz operation
o External antenna option with ultra-miniature coaxial connector
o Range: Up to 400m.
o Baud rate: 1 and 2 Mbps.
o Encryption: AES128.
o Supports 802.1x, 802.1u security:
Open for self-generation and external Wi-Fi connections
WPA-PSK Personal for external Wi-Fi connections
WPA2-PSK Personal for external Wi-Fi connections
o Radio regulation certification:
FCC for EUA
IC for Canada
ETSI for Europe
ARIB for Japan
4
RooWifi
Working Wi-Fi modes
RooWifi: The Wi-Fi Remote for Roomba has different working modes. Don’t
worry if you didn’t configure well the connection or if you changed your home router
or location. RooWifi is able to detect wrong configurations and it will restore itself to
default values.
RooWifi can work in two different states. Also has an extra transitory state
just for configuration.
Hotspot Mode
RooWifi generates his own Wi-Fi network (Ad-Hoc). This configuration mode
allows users to connect directly to the RooWifi. In this mode the device is totally
autonomous from other Wi-Fi network and doesn’t have Internet connection.
To be sure you are in this operation mode check if the LED blinks one time
every second.
Home Wi-Fi Mode
RooWifi is connected through a domestic/home Wi-Fi network with WPAPersonal or WPA2-Personal security key. This mode allows users several new ways to
connect to the device:
You can access to the RooWifi from outside your local network. So, users will be
able to control their robots from the Internet.
Control the robot from any device that has a web browser connected to the local
net.
To be sure you are working in this mode check if the LED blinks every three
seconds.
Reconfiguration Mode (transient)
RooWifi has a state that indicates when it is trying to configure itself and
connect to a domestic/home Wi-Fi network generated from a router. The LED will
blink faster, up to three times per second. This process can last up to 2.5 - 3 minutes.
If any error occurs during the process applying new router configuration, then
RooWifi will go back to the default configuration (HotSpot mode) and the Wi-Fi
configuration web page of the internal Web Server will show the possible issue
during the connection process at the bottom of configuration form. (See Embedded
Web Server).
5
RooWifi
Operation by flashing led
As explained in previous points RooWifi has a LED to show users in which
state the device is working on (referred to the Wi-Fi connection status).
In the following table find attach the different working modes looking at the
blinking frequency.
FLASHING LED
WORKING MODE
1 time per second
RooWifi is creating his own hotspot
network. This operation mode doesn’t
have internet connection.
3 times per second
RooWifi is connecting to your domestic
Wi-Fi. The RwRemote will retry the
connection during 2.5 minutes. If the
connection fails after this time, RooWifi
will create a Hotspot network.
Every 3 seconds
RooWifi has connected successfully to
the domestic Wi-Fi. The internet
connection will be dependent on the
router configuration.
Restore button
RooWifi enables you to restore the default Wi-Fi mode (Hot-Spot) manually if
any problem exists during the connection or other kind of issue (ex: Forgotten IP
address without DHCP).
To restore the default Wi-Fi parameters only need to push the button over
the RooWifi during 6 seconds. After this event will see how the Led is blinking 1 time
per second (the board is working in HotSpot mode). This procedure doesn’t change
the user/password properties of the webserver, only restore the network and the WiFi connection properties.
Auto-restore function
RooWifi detects when the connection is lost and after safety reconnections
time it restores to the default parameters.
6
RooWifi
Multiplatform Interface
RooWifi allows the developers to control the robot through different
interfaces or application services:
Embedded Web Server.
Socket Server / Gateway Mode.
Send Clean, Spot and Dock commands using URL through GET AJAX Requests.
Read sensors using XML or JSON files.
Compatible OS and devices
The on-board Embedded Web Server contains an optimized design to allow an
easy navigation using any device with LAN access and web browser. The following list
contains the most used devices tested with the Web Server Interface.
Smartphones and Tablets with iOS:
o iPhone 3GS, 4, 4S, 5.
o iPad, iPad 2, iPad3.
o iPod Touch 2.
Smartphones and Tablets with Android 2.0 o later *
Smartphones and Tablets with Windows Phone
Desktop, netbooks and laptops with Linux & MAC operating systems with
next web browsers:
o Mozilla Firefox (recommended).
o Google Chrome (recommended).
o Chromium.
o Opera.
Desktop, netbooks and laptops with Windows operating systems with
next web browsers (XP, Vista, Win 7, Win 8):
o Internet Explorer (version >=7)
o Mozilla Firefox (recommended)
o Google Chrome (recommended)
o Opera
o Apple Safari
* By default Android devices not allowed to connect to Ad-Hoc infrastructures, to do this first
connection needed to be Root (not recommended) or configure the device using a laptop, PC, Mac,…
After the home Wi-Fi network configuration process you could access to the device completely
7
RooWifi
Installation procedure
It’s important to follow the next steps to avoid making any short circuit when
connecting the RooWifi board through the PS/2 connector of your robot.
Connecting the board to the robot is very simple. Each Roomba (500 and 700
series) has a mini-din 7pin port used for SCI communications. It is usually located on
the top of the robot and sometimes protected with a cover. In 500 series the
connector is located under the cover at the top of the robot. In 700 series this
connector is located under the handle at the top of the robot too.
Each RooWifi board has a mini-din 7pin PS/2 connector to plug it directly to
your robot. See the pictures below to see the result.
500 series
700 series
Once the board is placed correctly the RooWifi board will start working in
HotSpot mode as default, if a connection to your Home Wi-Fi was set before the
RooWifi will start working in Reconfiguration Mode.
8
RooWifi
Step-by-Step Configuration and Access
We recommend use Google Chrome or Mozilla Firefox web browser due its load speed in
webpages coded with HTML5. Some routers can decrease the refresh speed when using
DHCP, so using Google Chrome will compensate this lack of time.
1. Connect RooWifi to the iRobot Roomba and wait until the LED blinks once each
second.
2. Search a Wi-Fi network named ROOMBA WR
3. Connect to the Wi-Fi and wait until the connection is properly done.
1. With mobile devices this step may take more time than when it is done from a PC
or laptop.
2. Check your IP address if isn’t 10.0.0.2, write manually these parameters: IP10.0.0.2, Gateway-10.0.0.1, and Netmask-255.255.255.0.
4. Open the web browser and:
1. Windows OS: Write the address http://roomba/ in your browser
2. Others: write the address http://10.0.0.1/ in your browser
3. User information:
i. User: admin
ii. Password: roombawifi
5. Wait until the web has been totally loaded and click on “Setup Wi-Fi
Configuration” of the main menu.
6. Configure the parameters of your Wi-Fi network. (Remember to disable the
option that enables an own Wi-Fi and be sure that all parameters are entered
correctly). Once all the parameters are entered Accept with the Save/Reboot
button and accept the popup dialog box. (We recommend DHCP checked for the
first connection)
If you choose the option to connect to RooWifi through another Wi-Fi:
Connect to your local Wi-Fi. Wait until the device LED stops blinking in little
intervals and starts doing it every 3 seconds.
a.
b.
NOTE: If after 3 minutes the LED starts blinking every 2 seconds some error occurred. In
this case the device will start again in default mode and you can start again with the first
step making sure that all entered parameters are correct.
Once you have configured your RooWifi it’s not necessary to follow the above steps if the
scenario doesn’t change anymore. This is possible because all the values are stored in the
internal ROM of the microcontroller.
9
RooWifi
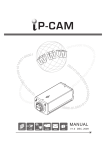
Embedded Web Server
Every RooWifi device has an onboard embedded web server. It allows
the user to control the robot actions
without any app installation and a
multiplatform graphic interface.
The Embedded Web Server
Interface
has
a
user/password
authentication. The default values are:
User: admin
Password: roombawifi
The Web Server contains three html
files and allow user to control your
robot and view in Real Time sensor
information. The Web GUI adapts the style sheet dynamically depending of the
device and the web browser of the user. All pages have an easy menu to access to the
other pages. The three mentioned pages are explained below:
User’s Remote
This page contains the basic controls for your robot keeping it in safe or passive
mode (See SCI Specs):
Clean Button: Push Clean button emulation.
Spot Button: Push Spot button emulation.
Dock Button: Dock Button emulation.
Mode Icon: Shows if any Socket Client is connected to the device (disabling
the buttons).
And all the sensor information captured from the SCI port of your robot. Adding
four easy fields summarizing the sensor information and specific value of every
sensor:
Obstacle and Virtual Wall detection.
Charging Status.
Battery Level.
10
RooWifi
Driver’s Remote
This page puts the robot in a mode
that enables the user to move the robot
with these actions:
Turn on Side Brush or Vacuum.
Turn left 15º, 45º or 90º.
Turn right 15º, 45º or 90º.
Drive forward.
Drive backward.
At the bottom of the web page you can
find the same buttons: Clean, Spot,
Dock and mode icon.
SetUp Wi-Fi Configuration
This is the most important page
to configure the Wi-Fi connection and
allow you to change the user and
password settings too.
To disable the authentication
accessing through HTTP you can leave
blank the user and pasword fields.
The
Network
connection
parameters configurable are:
Self-Wifi Network: If checked
the RooWifi will generate his
own Wi-Fi network. HotSpot
Mode.
SSID: Name of the Home Wi-Fi network or generated HotSpot Name
depending of the Self Wi-Fi Network checkbox.
Key Type: You can choose WPA-Personal, WPA2-Personal or Open. In HotSpot
mode only Open security key type is allowed.
Device Name: Name of the device for NBNS Microsoft networks. (See Remote
Control from Windows Chapter).
User/Password
MAC: MAC address of your device and SN of your RooWifi. Read-only
parameter.
DHCP ON: Enables DHCP protocol when connecting to a Home Wi-Fi network.
This checkbox disables the rest of IP addressing parameters.
11
RooWifi
IP: IP address in the network. The default value is the current IP address of
the device. If you are in DHCP mode and your IP is 192.168.1.10 this is the
value that appears in this field when loaded the page.
Gateway, Netmask, Primary DNS and Secondary DNS.
12
RooWifi
Gateway or Transparent Mode
RooWifi is an easy way to start developing applications to communicate with
a device using standard TCP / IP Sockets. User completely forgets about the physical
layer and accesses directly the robot through software developed (or not) by himself
to send the SCI commands.
When RooWifi module is working, it waits for a remote connection on TCP
port 9001 (independently of the connection status with web server). When the
connection is established, the web interface controls are disabled and the Wi-Fi
Remote module becomes a Gateway between application and your iRobot Roomba
like through the SCI interface directly.
Using the Gateway Mode, Wi-Fi Remote stops being Transparent only when it
detects a Wake-Up command.
From the user side, to make a Wake-Up command to the robot it just has to
send a unique Wake-up command. In this moment, the robot starts the process to be
able to receive the next commands.
Wi-Fi Remote uses an 115200 link to communicate with the iRobot Roomba. If this value has been
modified, be sure to reboot Roomba with the clean button or rebooting the Socket to let the iRobot
reconfigure the transmission rate automatically. (Read SCI Manual from iRobot).
Please read the SCI iRobot Specification because some specific SCI commands put the robot in idle
modes disabling the correct operation of Clean, Spot and Dock functions when the buttons are pressed.
If you want to manage your iRobot Roomba using the embedded web server remember to close the
TCP/IP Socket.
13
RooWifi
XML sensor files: roomba.xml & rwr.xml
RooWifi has an external accessible
file that allows developers the ability to
perform a reading of the various sensors
of the robot through an interpreter /
standard XML parser.
Different tags or fields are included in the XML files. Each tag defines a sensor
of the iRobot Roomba. The structure defines the request commands [142][0] were all
sensors are read. These files are named roomba.xml and rwr.xml that can be
accessed from the URL http:// Roomba_Wi-fi_Remote_IP/roomba.xml and http://
Roomba_Wi-fi_Remote_IP/rwr.xml
Remember that RooWifi requires user and password authentication. For this
reason leave these two fields in blank when configuring the device to use XML.
Otherwise the communication will be very slow or failed.
Given that the file is updated at the same time of execution, only two
simultaneous connections to roomba.xml and/or rwr.xml are allowed. This also
occurs when accessing through the web interface of the Roomba Wi-Fi Remote.
Important information: in order to balance the embedded workload and
create an efficient TCP/IP connection, when a connection to 9001 port is detected
(Transparent Mode or Gateway), the refresh process of these files is interrupted
(explained in Gateway/Transparent Mode).
roomba.xml
roomba.xml file is a read-only file and it is only updated with the value read
from the robot sensors. Sensors value is updated every 500ms and it does not
depend on the accesses or reads to the file (values are updated periodically). Note
this is an important data, see Angle and Distance dedicated section on the SCI iRobot
manual.
The fix part of the XML file structure is as shown below:
<response>
<r0>
<name>'Bumps Wheeldrops'</name>
<value> VALUE </value>
</r0>
<r1>
<name>'Wall'</name>
<value> VALUE </value>
</r1>
<r2>
<name>'Cliff Left'</name>
<value> VALUE </value>
</r2>
14
RooWifi
<r3>
<name>'Cliff Front Left'</name>
<value> VALUE </value>
</r3>
<r4>
<name>'Cliff Front Right'</name>
<value> VALUE </value>
</r4>
<r5>
<name>'Cliff Right'</name>
<value> VALUE </value>
</r5>
<r6>
<name>'Virtual Wall'</name>
<value> VALUE </value>
</r6>
<r7>
<name>'Motor Overcurrents'</name>
<value> VALUE </value>
</r7>
<r8>
<name>'Dirt Detector - Left'</name>
<value> VALUE </value>
</r8>
<r9>
<name>'Dirt Detector - Right'</name>
<value> VALUE </value>
</r9>
<r10>
<name>'Remote Opcode'</name>
<value> VALUE </value>
</r10>
<r11>
<name>'Buttons'</name>
<value> VALUE </value>
</r11>
<r12>
<name>'Distance'</name>
<value> VALUE </value>
</r12>
<r13>
<name>'Angle'</name>
<value> VALUE </value>
</r13>
<r14>
<name>'Charging State'</name>
<value> VALUE </value>
</r14>
<r15>
<name>'Voltage'</name>
<value> VALUE </value>
</r15>
<r16>
<name>'Current'</name>
<value> VALUE </value>
</r16>
<r17>
<name>'Temperature'</name>
15
RooWifi
<value> VALUE </value>
</r17>
<r18>
<name>'Charge'</name>
<value> VALUE </value>
</r18>
<r19>
<name>'Capacity'</name>
<value> VALUE </value>
</r19>
</response>
The main field for each sensor is called <rX>, where X represents the sensor
that is being monitored. Every tag <rX> specifies the name of the sensor by to fields:
<name> which contains the name given by the vendor, and <value>, which contains
the sensor value. This way the user can obtain the sensor information from the XML
file and doesn’t need to store all sensors hardcoded.
All <rX> sensors are listed inside a tag called <response>: Roomba Wi-Fi
Remote translates the answer to a block sensors frame that allows reading all
sensors at a time.
rwr.xml
This file contains the sensors values read through an information request to
the iRobot Roomba (same information that can be got from the file explained
before).
The difference is that in this case the information contained in <rX> tags
disappear (<name> and <value> fields are not used). In order to clarify the
differences between the two files, find below an example of rwr.xml file (compare it
to a Roomba.xml file).
<response>
<r0> VALUE </r0>
<r1> VALUE </r1>
<r2> VALUE </r2>
<r3> VALUE </r3>
<r4> VALUE </r4>
<r5> VALUE </r5>
<r6> VALUE </r6>
<r7> VALUE </r7>
<r8> VALUE </r8>
<r9> VALUE </r9>
<r10> VALUE </r10>
<r11> VALUE </r11>
<r12> VALUE </r12>
<r13> VALUE </r13>
<r14> VALUE </r14>
<r15> VALUE </r15>
<r16> VALUE </r16>
<r17> VALUE </r17>
<r18> VALUE </r18>
<r19> VALUE </r19>
</response>
16
RooWifi
JSON sensor file: roomba.json
JSON file is updated such the XML files: values are
refreshed every 500ms (interesting for measuring Distance
and Angle).
The file containing the information in JSON format
is roomba.json.
This file can be accessed from http://Roomba_Wi-fi_Remote_IP/roomba.json and
has exactly same roomba.xml data:
A structure called “response” with rX children.
One rX for each sensor has a field called “name” defining the iRobot SCI
specification.
The field “value” is the last updated value from the automated process of
Remote Wi-Fi for Roomba.
When a connection to 9001 port is detected (Transparent Mode or Gateway),
the refresh process of these files is interrupted (explained in Gateway/Transparent
Mode).
In the lines below you can find the structure of this file:
{
"response": {
"r0": {
"name": "Bumps Wheeldrops",
"value": "VALOR"
},
"r1": {
"name": "Wall",
"value": "VALOR"
},
"r2": {
"name": "Cliff Left",
"value": "VALOR"
},
"r3": {
"name": "Cliff Front Left",
"value": "VALOR"
},
"r4": {
"name": "Cliff Front Right",
"value": "VALOR"
},
"r5": {
"name": "'Cliff Right'",
"value": "VALOR"
},
"r6": {
"name": "Virtual Wall",
17
RooWifi
"value": "VALOR"
},
"r7": {
"name": "Motor Overcurrents",
"value": "VALOR"
},
"r8": {
"name": "Dirt Detector - Left",
"value": "VALOR"
},
"r9": {
"name": "Dirt Detector - Right",
"value": "VALOR"
},
"r10": {
"name": "Remote Opcode",
"value": "VALOR"
},
"r11": {
"name": "Buttons",
"value": "VALOR"
},
"r12": {
"name": "Distance",
"value": "VALOR"
},
"r13": {
"name": "'Angle'",
"value": "VALOR"
},
"r14": {
"name": "Charging State",
"value": "VALOR"
},
"r15": {
"name": "Voltage",
"value": "VALOR"
},
"r16": {
"name": "Current",
"value": "VALOR"
},
"r17": {
"name": "Temperature",
"value": "VALOR"
},
"r18": {
"name": "Charge",
"value": "VALOR"
},
"r19": {
"name": "Capacity",
"value": "VALOR"
}
}
}
18
RooWifi
Accessible URLs for AJAX Request commands
The device has and accessible URL able to
transmit using GET method the different robot
buttons as parameters and it returns an answer in
plain text depending on the operation result.
In IDLE state (without any connection to the
RooWifi’s Socket Server) you can emulate a push
button action using specific URL using GET
parameters to specify the button that you want to emulate.
With these URLs and the JSON or XML files you can make an easy App to
manage your robot without TCP connections, although we recommend the use of
sockets in the Gateway Mode to capture the data from robot’s sensors and control
and better performance.
http:// Roomba_Wifi_Remote_IP /roomba.cgi
The parameter of GET is button and all its values could be:
CLEAN: Emulates the Clean Button.
SPOT: Emulates the Spot Button.
DOCK: Emulates the Dock Button.
The result is shown as plain-text and depends on the action is done or not. If
the action is done the URL will print “1”, otherwise will print “0”. If the result is
negative (0) may be caused by an existing TCP connection or an error occurred.
In order to explain it clearer the calls to URL would be:
http:// Roomba_Wifi_Remote_IP /roomba.cgi?button=CLEAN
http:// Roomba_Wifi_Remote_IP /roomba.cgi?button=SPOT
http:// Roomba_Wifi_Remote_IP/roomba.cgi?button=DOCK
19
RooWifi
Checking the connection from a PC or MAC
RooWifi has an internal ICMP server. This allows the user check if the RooWifi
is connected properly. Just open your terminal and use the ping command. There are
two different ways to use the ping command:
>> ping <name_of_the_device>
>> ping <device_IP>
20
RooWifi
Multiplatform remote control
Remote control from Windows
RooWifi, the Wi-fi remote for Roomba has NBNS to make name addressing
through Windows Operating Systems.
Thanks to this property you can connect directly to the RooWifi interface
using directly the device name without the need of his IP. To be able to use this
feature follow the next steps:
1. Open your web browser.
2. In the navigation bar write: http://device_name/
a. NOTE: roomba is the default name of the device
3. Add this link to your favourites bar.
Remote control from other platforms
If you are not using a Windows Operating System the NBNS feature has no
effect if any special software was installed previously. In these cases follow the steps:
1. Open your web browser.
2. In the navigation bar write: http://ip_address_of_your_device/
3. Add this link to your favourites bar.
21
RooWifi
Default Values
Wi-Fi Mode:
Hot-Spot (Ad-Hoc) / own Wi-Fi: By default, RooWifi creates an own Ad-hoc
network. The RooWifi different configuration will be performed through a
web.
Wi-Fi Network Name:
ROOMBA WR.
Wi-Fi security:
Open (without authentication).
Wi-Fi security key:
None
NBNS Name:
roomba
Web server access parameters:
User: admin
Password: roombawifi
Network configuration:
o MAC:
Serial number.
This property is not modifiable.
o
o
o
o
o
DHCP Client:
Disabled.
IP Address:
10.0.0.1
Gateway:
10.0.0.2
Netmask:
255.255.255.0
Primary DNS:
80.58.61.250.
This property it’s only useful when the device is connected through the
Internet.
o
Secondary DNS:
80.58.61.254.
This property it’s only useful when the device is connected through the
Internet.
22
RooWifi
External Links
Official RooWifi: The Wi-Fi Remote for Roomba website:
http://www.roowifi.com
Blog for developers:
http://www.roowifi.com/category/developers/
Sample Codes using Getway Mode:
http://www.roowifi.com/category/developers/examples-applications/
Last news about RooWifi:
http://www.roowifi.com/category/roomba-wifi-remote-v2/
Youtube’s Channel:
http://www.youtube.com/channel/UCqqFfy31jJd7Hy5HDp2FWbA
RSS Feed:
http://www.roowifi.com/feed/
iRobot Roomba SCI specification manual:
http://www.irobot.com/images/consumer/hacker/roomba_sci_spec_manual.pdf
Contact Information
If you want to contact directly with us, please send an email to this email address:
[email protected]
23