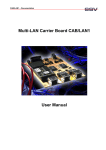
1
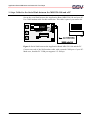
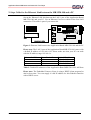
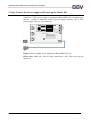
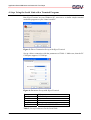
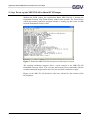
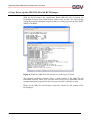
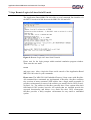
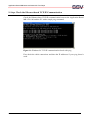
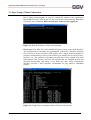
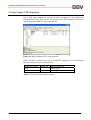
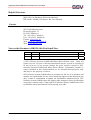
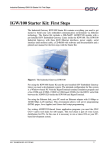
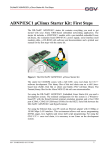
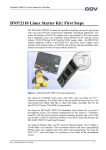
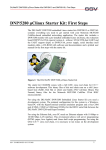
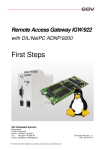
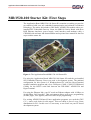
Application Board MB/1520-100 Starter Kit: First Steps
MB/1520-100 Starter Kit: First Steps
The Application Board MB/1520-100 Starter Kit contains everything you need to
get started to build your safe embedded communication environment via Ethernet
technology. The starter kit includes a DIL/NetPC ADNP/1520 module with a preinstalled SSV Embedded Gateway Linux, the MB/100 Carrier Board with three
RJ45 Ethernet interfaces, power supply, serial interface (null modem) cable, a
CD-ROM with software and documentation and a printed user manual for the first
steps with the starter kit.
Figure 1: The Application Board MB/1520-100 Starter Kit
For using the Application Board MB/1520-100 Starter Kit and the pre-installed
SSV Embedded Gateway Linux you need a development system. The minimal
configuration for this system is a Windows-based PC with the HyperTerminal
terminal emulation program and a free COM port (COM1, COM2 or USB-based
COMx) for the RS232 serial link between the DIL/NetPC ADNP/1520 and
HyperTerminal.
For using the Ethernet link, your PC needs an Ethernet adapter with 10 Mbps or
10/100 Mbps LAN interface. This environment allows web server programming
(HTML pages, Java Applets) and Linux shell script programming.
For writing ADNP/1520-based Linux application programs you need the GNU
C/C++ native tool chain for x86 targets. This tool chain is part of every Linux
distribution for PCs. In this case it is necessary to run Linux on your PC-based
development system.
SSV EMBEDDED SYSTEMS
1
Application Board MB/1520-100 Starter Kit: First Steps
The Application Board MB/1520-100 Starter Kit Key Features
The ADNP/1520 of the Application Board MB/1520-100 Starter Kit offers a preinstalled Embedded Gateway Linux. This operating system consists of two main
components: 1. the Linux kernel and 2. the root file system. The DIL/NetPC
ADNP/1520 Flash also offers a Flash Loader for downloading new versions of the
Linux kernel and the root file system. This in-system programming feature can be
used by a simple serial and Ethernet link between the development system and the
ADNP/1520.
•
DIL/NetPC ADNP/1520 with 133 MHz AMD 32-bit SC520 Low Power IA32 CPU, 64 Mbytes SDRAM and 16 Mbytes Flash
•
Embedded Gateway Linux pre-installed in ADNP/1520 Flash memory
•
MB/100 Carrier Board
•
1 * 10/100 Mbps Ethernet LAN Interface (LAN1: RJ45 Connector)
•
2 * 10 Mbps Ethernet LAN Interface (LAN2, LAN3: RJ45 Connector)
•
Reset Switch
•
Null modem Cable
•
Ethernet Cross-over Cable
•
110 VAC or 230 VAC to 5 VDC International Power Supply
•
CD-ROM with User Manual and Hardware/Programmers Manuals
•
Embedded Linux with Source
•
Remote Login via Linux Serial Console
•
Linux Remote Login with Telnet
•
Web Server Setup Sample
•
Many Source Code Samples
•
Power-up Support via E-Mail
SSV EMBEDDED SYSTEMS
2
Application Board MB/1520-100 Starter Kit: First Steps
1. Step: Cable for the Serial Link between the MB/1520-100 and a PC
Set-up the serial link between the Application Board MB/1520-100 and your PC.
Use a Null modem cable for this connection. This cable is part of your starter kit.
DIL/NetPC ADNP/1520
Figure 2: Serial Link between the Application Board MB/1520-100 and the PC
Connect one end of the Null modem cable with a unused COM port of your PC.
Make sure, that this PC COM port supports 115.200 bps.
SSV EMBEDDED SYSTEMS
3
Application Board MB/1520-100 Starter Kit: First Steps
2. Step: Cable for the Ethernet Link between the MB/1520-100 and a PC
Set-up the Ethernet LAN link between the LAN 1 port of the Application Board
MB/1520-100 and your PC. Use an Ethernet Cross-over cable for the first LAN
connection. This cable is part of your starter kit.
DIL/NetPC ADNP/1520
Figure 3: Ethernet Link between the Application Board MB/1520-100 and the PC
Please note: The LAN 1 port of the Application Board MB/1520-100 comes with
a default IP address of 192.168.0.126. Please make sure that your PC can work
with the IP address range 192.168.0.x.
Ethernet LAN Port
1
2
3
Linux Device Name
eth0
eth1
eth2
Default IP Address
192.168.0.126
192.168.1.126
192.168.2.126
Table 2: Default IP Addresses of the Application Board MB/1520-100 LAN Ports
Please note: The Embedded Gateway Linux is using a DHCP client program for
eth0 at boot time. You can supply a valid IP address for this Ethernet interface
with a DHCP server.
SSV EMBEDDED SYSTEMS
4
Application Board MB/1520-100 Starter Kit: First Steps
3. Step: Connect the Power Supply and Power-up the Starter Kit
Connect a 5 VDC power supply to Application Board MB/1520-100. Make sure,
that the + voltage is within the center of power supply connector. The 5 VDC
power supply is part of your starter kit.
Figure 4: Power Supply for the Application Board MB/1520-100
Please note: Make sure, that all cable connections a OK. Then power-up the
starter kit.
SSV EMBEDDED SYSTEMS
5
Application Board MB/1520-100 Starter Kit: First Steps
4. Step: Using the Serial Link with a Terminal Program
Run HyperTerminal on your Windows-PC, minicom or a similar simple terminal
emulation program on your Linux-based PC.
Figure 5: Direct Connection Set-up with HyperTerminal
Set-up a direct connection with the parameters of Table 1. Make sure, that the PC
COM port supports 115.200 bps.
Figure 6: Parameter Set-up with HyperTerminal
Parameter
Speed
Data Bits
Parity
Stop Bits
Protocol
Value
115.200 bps
8
Keine
1
No (Xon/Xoff, RTS/CTS or similar)
Table 2: Set-up Parameters for the Serial Link
SSV EMBEDDED SYSTEMS
6
Application Board MB/1520-100 Starter Kit: First Steps
5. Step: Power-up the MB/1520-100 without RCM Jumper
Without the RCM jumper, the Application Board MB/1520-100 is booting the
Embedded Gateway from Flash memory within some seconds. The first message
within the terminal emulation program window is coming up after some seconds
from the Embedded Getway Linux.
Figure 7: Watch the MB/1520-100 boot process with HyperTerminal
The terminal emulation program offers a serial console to the MB/1520-100
Embedded Gateway Linux. You can enter and execute Linux commands with the
terminal emulation program after the boot process finish’s and after a login.
Please see the MB/1520-100 Hardware Reference Manual for the location of the
RCM jumper.
SSV EMBEDDED SYSTEMS
7
Application Board MB/1520-100 Starter Kit: First Steps
6. Step: Power-up the MB/1520-100 with RCM Jumper
With the RCM jumper, the Application Board MB/1520-100 is booting the
Embedded Gateway from Flash memory within some seconds. The first message
within the terminal emulation program window is coming up from the DIL/NetPC
ADNP/1520 BIOS.
Figure 8: Watch the MB/1520-100 boot process with HyperTerminal
The terminal emulation program offers a serial console to the MB/1520-100
Embedded Gateway Linux. You can enter and execute Linux commands with the
terminal emulation program after the boot process finish’s and after a login.
Please see the MB/1520-100 Hardware Reference Manual for the location of the
RCM jumper.
SSV EMBEDDED SYSTEMS
8
Application Board MB/1520-100 Starter Kit: First Steps
7. Step: Remote Login via Linux Serial Console
The Application Board MB/1520-100 offers a serial command line interface via
the RS232-based serial link between the MB/1520-100 and a PC.
Figure 9: Remote Login via Linux Serial Console
Please wait for the login prompt within terminal emulation program window.
Then enter the user name
root
and press enter. After a login the Linux serial console of the Application Board
MB/1520-100 waits for your commands.
Please note: The MB/1520-100 Embedded Gateway Linux comes with BusyBox.
All command lines commands are implemented in BusyBox. BusyBox combines
tiny versions of many common UNIX utilities into a single small executable. It
provides replacements for most of the utilities you usually find in GNU fileutils,
shellutils, etc. The utilities in BusyBox generally have fewer options than their
full-featured GNU cousins; however, the options that are included provide the
expected functionality and behave very much like their GNU counterparts.
BusyBox provides a fairly complete environment for any small or embedded
system.
SSV EMBEDDED SYSTEMS
9
Application Board MB/1520-100 Starter Kit: First Steps
8. Step: Check the IP Address of your PC
Make sure that your PC is using the right IP address for the Ethernet-based
TCP/IP communication with the Application Board MB/1520-100. Use the IP
addresses 192.168.0.1 or 192.168.0.254 for your PC and 192.168.0.126 for the
Application Board MB/1520-100.
Figure 10: Windows-PC IP address check with ipconfig
Talk to your network administrator if you have problems with the IP address
understanding.
SSV EMBEDDED SYSTEMS
10
Application Board MB/1520-100 Starter Kit: First Steps
9. Step: Check the Ethernet-based TCP/IP Communication
Check the Ethernet-based TCP/IP communication between the Application Board
MB/1520-100 and the PC with a simple ping command.
Figure 11: Windows-PC TCP/IP communication check with ping
First check the cable connections and then the IP addresses if your ping doesn’t
work.
SSV EMBEDDED SYSTEMS
11
Application Board MB/1520-100 Starter Kit: First Steps
10. Step: Check the Application Board MB/1520-100 Web server
The Embedded Gateway Linux comes with a pre-installed embedded Web server
program. Please enter the following HTML lines with the help of the serial
command line interface:
cd /flash/www
cat > test.html
<html>
<head>
<title>Hello World!</title>
</head>
<body>
<h1> Hello World!</h1>
</body>
</html>
CTRL-D
(Stops the Linux cat command)
The Embedded Gateway Linux stores your HTML lines in the DIL/NetPC
ADNP/1520 Flash memory. The run a Web browser program. Enter the URL
http://192.168.0.126/test.html
for access the Application Board MB/1520-100 new Web page.
Figure 12: Check the Embedded Webserver with Internet Explorer
Please note: The Application Board MB/1520-100 default HTML pages and GIF
pictures are also located at /flash/www in the Application Board MB/1520-100
Flash memory. Please enter the URL
http://192.168.0.126
for access the Application Board MB/1520-100 default Web pages.
SSV EMBEDDED SYSTEMS
12
Application Board MB/1520-100 Starter Kit: First Steps
11. Step: Using a Telnet Connection
Run a Telnet client program on your PC with the IP address of the Application
Board MB/1520-100. You can use a Telnet session for remote entering Embedded
Gateway Linux commands. Please use the user name root for logging in.
Figure 13: Run the Windows Telnet client program
Please note: The MB/1520-100 Embedded Gateway Linux comes with BusyBox.
All command lines commands are implemented in BusyBox. BusyBox combines
tiny versions of many common UNIX utilities into a single small executable. It
provides replacements for most of the utilities you usually find in GNU fileutils,
shellutils, etc. The utilities in BusyBox generally have fewer options than their
full-featured GNU cousins; however, the options that are included provide the
expected functionality and behave very much like their GNU counterparts.
BusyBox provides a fairly complete environment for any small or embedded
system.
Figure 14: Using Linux commands within a Telnet client window
SSV EMBEDDED SYSTEMS
13
Application Board MB/1520-100 Starter Kit: First Steps
12. Step: Using a FTP Connection
Run a FTP client program on your PC with the IP address of the Application
Board MB/1520-100. You can use a FTP session for file exchange between the
Application Board MB/1520-100 and your PC.
Figure 14: Run a Windows FTP client program
Please use the user name gast or guest for the FTP logging in. See the following
table for valid user names and passwords.
FTP User Name
gast
guest
Password
guest
Home Directory
/home/gast
/home/guest
Table 3: FTP User Names and Passwords
SSV EMBEDDED SYSTEMS
14
Application Board MB/1520-100 Starter Kit: First Steps
Helpful Literature
MB/1520-100 Hardware Reference Manual
DIL/NetPC ADNP/1520 Starter Kit User Manual
Contact
SSV Embedded Systems
Heisterbergallee 72
D-30453 Hannover
Tel. +49-(0)511-40000-0
Fax. +49-(0)511-40000-40
E-Mail: [email protected]
Web: www.ssv-embedded.de
Web: www.dilnetpc.com
Notes to this Document (MB1520-100-FirstStepsE.Doc)
Revision
Date
1.00
07.05.2004
Name
First Version in English (Rev. 1.00)
KDW
© SSV Software Systems GmbH and Klaus-Dieter Walter 1999 – 2004. All
rights reserved. No part of this documentation may be copied or reproduced
in any form or by any means without the prior written consent of SSV
Software Systems GmbH and Klaus-Dieter Walter. Trademarks, brands, or
names included in this documentation are for identification purposes only
and may be the property of others.
SSV Software Systems GmbH makes no warranty for the use of its products and
assumes no responsibility for any errors which may appear in this documents nor
does it make a commitment to update the information contained herein. SSV
Software Systems GmbH retains the right to make changes to these specifications
at any time, without notice. Contact the SSV Software Systems GmbH sales office
to obtain the latest specifications before placing your order.
SSV EMBEDDED SYSTEMS
15