1
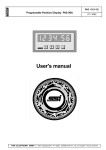
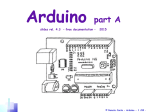
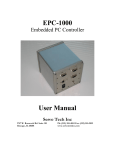
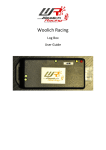
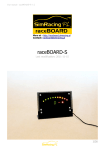
User Guide
EPC1000 Endless Polarization Controller
Novoptel GmbH
EIM-E
Warburger Str. 100
33098 Paderborn
Germany
www.novoptel.com
Revision history
Version Date
Remarks
Author
0.1.1
28.01.2012 Draft version
B. Koch
0.1.2
07.12.2012 Definition of averaging time exponent (ATE)
B. Koch
0.1.3
28.02.2013 Description of Detector Mode selection,
B. Koch
new section “External Error Signals”
0.1.4
20.12.2013 Support of ATE>11
B. Koch
0.1.5
12.03.2014 Harmonics (Bessel line) detection
B. Koch
Table of contents
Operation of the instrument using the front control panel ........................................... 4
Detection Mode ....................................................................................................... 4
Control Mode .......................................................................................................... 4
Dither Amplitude ..................................................................................................... 4
Control Gain ............................................................................................................ 4
Feedback Delay ...................................................................................................... 5
Averaging Time Exponent ....................................................................................... 5
Swap Channels ....................................................................................................... 6
Load/Save/Restore Settings ................................................................................... 6
External Error Signals ................................................................................................. 7
Verifying control by internal optical detector............................................................ 7
Operation of the instrument using Novoptel Software ................................................ 8
Installing the USB driver.......................................................................................... 8
Connect the instrument ........................................................................................... 8
Installing the Novoptel Software .............................................................................. 8
First steps with the Novoptel Software .................................................................... 8
Operation of the instrument using Matlab® .............................................................. 11
Access the USB driver .......................................................................................... 11
Transfer Protocol .................................................................................................. 11
USB registers ........................................................................................................ 12
Operation of the instrument using other programs ................................................... 13
Operation of the instrument using SPI ...................................................................... 14
Novoptel
3 of 14
EPC1000_UG_0.1.5.docx
Novoptel
EPC1000 User Guide
Operation of the instrument using the front control panel
Power the instrument with the provided power supply and switch it on. The controller
firmware provides a cyclic menu, which is shown on the LCD display. The menu
structure is
Welcome Screen
Control ON/OFF
Show Feedback Signal
Select Detection Mode (optional)
Select Control Mode
Set Dither Amplitude
Set Control Gain
Set Feedback Delay
Set Averaging Time Exponent (ATE)
Swap Channels
Save Settings
Load Settings
Restore Default Settings
The control buttons UP and DOWN let you to navigate through the menu. The control
buttons LEFT and RIGHT changes a selected setting.
Detection Mode
For the EPC units that provide different detection modes, two detector switches allow
to select a specific feedback signal, e.g. optical input detection or electrical input
detection.
Control Mode
This menu point lets you temporarily maximize the feedback signal. This is required
to determine the feedback signal range and calculate the optimum control gain.
Polarization tracking using signal maximization is not recommended.
Dither Amplitude
Small dither is recommended if error signal is of good quality. Large dither is needed
if error signal is noisy. Register determines percentage of nominal dither amplitude.
Default value is 0004h = 100%.
0000h = 50%
0001h = 62%
0002h = 75%
0003h = 87%
0004h = 100%
0005h = 112%
0006h = 125%
0007h = 150%
Control Gain
Optimum control gain depends on detector type, dither amplitude and feedback
signal range. Too low control gain reduces tracking speed, whereas a too high gain
increases tracking errors even at low polarization changing speeds.
For an interference detector which provides two minima, the optimum control gain
can be calculated by
Novoptel
4 of 14
EPC1000_UG_0.1.5.docx
Novoptel
EPC1000 User Guide
Gain = 100 / dither2 / signal_range,
where dither is the dither amplitude factor and signal_range is the difference between
maximum and minimum feedback signal divided by the full ADC range. For example,
at 100% dithering and a feedback signal, which uses half of the ADC range, the
optimum control gain is 100 / 1 / 0.5 = 200.
For intensity detectors (only one global minimum), 100 has to be replaced by 400 in
the above formula.
Feedback Delay
Error signal delay (deadtime, risetime), given as multiples of 20 ns. Default value
corresponds to optimum value for given error signal detector. Only external feedback
signals might require increasing the default value.
Averaging Time Exponent
Noisy or slow feedback signals may require averaging. The averaging time can be
set by increasing the averaging time exponent (ATE). Averaging time influences the
control time constant and hence the tracking speed:
Averaging Time
Exponent
Averaging Time
Control Time
Constant
Exemplary Tracking
Speed (rad/s)
0
1
2
3
4
5
6
7
8
9
10
11
12
13
14
15
16
17
0.08 µs
0.16 µs
0.32 µs
0.64 µs
1.28 µs
2.56 µs
5.12 µs
10.24 µs
20.48 µs
40.96 µs
81.92 µs
163.84 µs
327.68 µs
655.36 µs
1,310.72 µs
2,621.44 µs
5,242.88 µs
10,485.76 µs
1.1 µs
1.6 µs
2.5 µs
4.4 µs
8.3 µs
16 µs
31 µs
62 µs
123 µs
246 µs
492 µs
984 µs
1,967 µs
3,933 µs
7,865 µs
15,729 µs
31,458 µs
62,915 µs
40,000
27,692
17,143
9,730
5,217
2,707
1,379
696.3
349.9
175.3
87.78
43.92
21.97
10.99
5.49
2.75
1.37
0.69
Default value is ATE=0. This value is needed to achieve the specified endless
polarization tracking speed. The value ATE=11 will increase averaging time by a
factor of 2048 and the control time constant by a factor of ~900. Note that ATE
values > 11 are only supported by EPC firmware > 1.0.4.1.
Novoptel
5 of 14
EPC1000_UG_0.1.5.docx
Novoptel
EPC1000 User Guide
Swap Channels
Use the LEFT or RIGHT button to switch to the orthogonal polarization channel. Only
applicable with interference detectors.
Load/Save/Restore Settings
Settings can be saved in and loaded from a non-volatile RAM. Restore will apply the
factory settings.
Novoptel
6 of 14
EPC1000_UG_0.1.5.docx
Novoptel
EPC1000 User Guide
External Error Signals
Depending on configuration, the EPC supports external error signals. In case of
supported electrical external error signal, the unit will provide two SMA connectors at
the backside of the desktop case. The electrical error signal is differential, with a
typical common mode voltage of VCM=0.9 V. From rear view, the left connector is for
voltages V2≤VCM, the right connector is for V1≥VCM. Maximum ratings are 0V≤V1,2≤2V
and 0V≤V1–V2≤0.8V. Neglecting a small offset, the analyzed relative feedback signal
is proportional to the input voltage difference V1–V2:
V1, V2 [Volt]
1.4
V1
V2
1.2
1
0.8
0.6
0.4
0
0.2
0.4
0.6
0.8
1
Relative Feedback Signal
The use of a differential feedback signal is highly recommended. However, if control
has to be tested with a single ended signal, the connector for V2 can be terminated to
ground. Neglecting an offset, the analyzed relative feedback signal is then
proportional to the input voltage 0≤V1≤0.8V:
V1, V2 [Volt]
0.8
V1
V2
0.6
0.4
0.2
0
0
0.2
0.4
0.6
0.8
1
Relative Feedback Signal
Verifying control by internal optical detector
Desktop units of EPC with external electrical error signal also provide an optical
feedback input connector in order to enable function verification of the EPC
independent from the user supplied error signal. To do so, connect the optical
controller output to the optical input at the backside of the unit using a single mode
fiber patch cord. If the unit does not provide an internal PBS (Polarization Beam
Splitter), a PBS or polarizer has to be included in the light path externally. Optical
power at the optical feedback input should be <-10 dBm to avoid error signal overflow
unless otherwise specified.
Novoptel
7 of 14
EPC1000_UG_0.1.5.docx
Novoptel
EPC1000 User Guide
Operation of the instrument using Novoptel Software
The instrument communicates by a USB I.C.FT232R from FTDI (Future Technology
Devices International Limited, http://www.ftdichip.com).
The software is compiled on a Microsoft XP 32Bit system with .NET Framework 3.5
SP1 installed, but also tested with Windows 7 32 Bit and Windows 7 64 Bit.
Installing the USB driver
Execute the installation program of the provided USB driver (CDM20814_Setup.exe).
You will find more detailed information about the driver at
http://www.ftdichip.com/Support/Documents/InstallGuides.htm.
Connect the instrument
After the driver is installed successfully, connect PC and instrument using the
provided USB cable. Power the instrument with the provided power supply and
switch it on. Wait until Windows has recognized the USB device and shown an
acknowledgement message before proceeding.
Installing the Novoptel Software
Execute setup.exe in the folder EPC1000_GUI. Follow the instructions of the
installation dialogue.
First steps with the Novoptel Software
The software launches automatically after installation. If you want to launch the
software later manually, select Programs\Novoptel\EPC1000 from the Windows Start
Menu.
Select one of the attached instruments
If you have attached only one Novoptel polarization controller, the software
automatically selects this one. If you have attached more than one polarization
controller, select the desired instrument from the drop-down menu.
If the software is not able to connect to an instrument, it may be blocked by a
former program instance that has not been terminated correctly. In this case,
terminate the former program instance by the Windows task manager.
Subsequently, you can launch further instances of the software and connect
them to further instruments.
Novoptel
8 of 14
EPC1000_UG_0.1.5.docx
Novoptel
EPC1000 User Guide
Change Control Settings
Control value can be typed in the four fields shown below and applied by
clicking ‘X’. Current values are displayed beside the fields.
For parameter information, refer to the previous chapter.
Depending on the ordered detector type, two switches allow for switching
between different detector modes, e.g. interference detection, optical power
detection and external electrical error signal.
Detect Harmonics (Bessel Lines)
If supported by the connected EPC module, the software allows enabling the
harmonics detection mode. In this mode, selected harmonics (Bessel lines) in
the feedback signal will be analyzed and minimized instead of the feedback
signal itself. For detailed information about harmonics detection please refer to
Novoptel Application note 1: “Error signals for polarization control”.
For this mode, a new form will be opened to observe and modify appropriate
control parameters. It also shows the calculated error signal, e.g. the sum of
the weighted power in the analyzed harmonics instead of the pure ADC signal.
Novoptel
9 of 14
EPC1000_UG_0.1.5.docx
Novoptel
EPC1000 User Guide
The new form allows to enable a PWM signal, also described in Application
note 1, at the BNC output. The average powers in the three detected
harmonics are displayed. Detection of harmonics 1,2,3 or harmonics 2,3,4 can
be selected. For each of the two sets, suitable weights are being proposed. To
meet a specific transmitter configuration, the weights can be modified
manually or via predefined weight constraints. The weight constraint (0 1)
means that the weight for the lowest harmonic is zero. The weight constraint
(0.25 0.75) means that the weight for the highest harmonic is 3 times the
weight for the lowest harmonic, and so on.
Click on the button labeled “Set” to load the modified weights to the EPC.
Novoptel
10 of 14
EPC1000_UG_0.1.5.docx
Novoptel
EPC1000 User Guide
Operation of the instrument using Matlab®
The USB driver (CDM20814_Setup.exe) has to be installed on your system and the
polarization controller needs to be connected using a USB cable.
Access the USB driver
Matlab needs a header file like ftd2xx.h from FTDI to access the driver. In the
provided version matftd2xx.h, we have modified the data types to be compatible to
Matlab.
You will find help about communicating to a driver at
http://www.mathworks.com/help/techdoc/ref/loadlibrary.html
The different functions of the driver can be seen from the header file. Information
about each function is provided at
http://www.ftdichip.com/Support/Knowledgebase/index.html
Transfer Protocol
The polarization controller is controlled by reading from and writing to USB registers.
The register address line is 12 bits wide, while each register stores 16 bits. All
communication is initiated by the USB host, e.g. the Matlab program.
Writing to a register uses a 9 byte data packet. Each byte represents an ASCII-coded
character. The packet starts with the ASCII-character “W” and ends with the ASCIIcode for carriage return.
Send write data packet
„W“
A(2) A(1) A(0) D(3) D(2) D(1) D(0) ^CR
The 12 bit register address A is sent using 3 bytes, each containing the ASCIIcharacter of the hexadecimal numbers 0 to F which represents the 4 bit nibble. The
character of the most significant nibble is sent first. The 16 bit data, which should be
written into the register, is sent with 4 bytes using the same coding as the register
address.
Reading data from a register requires the host to send a request data packet to the
instrument. The packet starts with the ASCII-character “R”, followed by the register
address coded the same way as in write data packets.
Send request data packet
„R“
A(2) A(1) A(0) „0“
„0“
„0“
„0“
^CR
After receiving the request data packet, the instrument sends the requested data
packet to the host:
Novoptel
11 of 14
EPC1000_UG_0.1.5.docx
Novoptel
EPC1000 User Guide
D(3) D(2) D(1) D(0) CR
USB registers
For register information, please refer to EPC1000 Data Sheet.
Novoptel
12 of 14
EPC1000_UG_0.1.5.docx
Novoptel
EPC1000 User Guide
Operation of the instrument using other programs
The USB vendor http://www.ftdichip.com/Support/Knowledgebase/index.html
provides examples for USB access using other programs, for example LabVIEW®.
Novoptel
13 of 14
EPC1000_UG_0.1.5.docx
Novoptel
EPC1000 User Guide
Operation of the instrument using SPI
All control registers can also accessed by SPI. The SPI interface allows much faster
communication than USB. The SPI connector at the backside of the device provides
the following connection:
Connector
notch
SDI
GND
CS
SDO
GND SDCK
For SPI timing, please refer to EPC1000 Data Sheet.
Novoptel
14 of 14
EPC1000_UG_0.1.5.docx