1
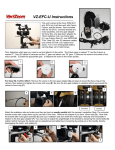
VZ-EFC Operating Instructions
Items included with the VZ-EFC: aluminum
bracket and motor assembly, one Canon
gear, one Fujinon Gear, two 10’ extension
cables, one control unit with LCD readout
and clamp, 7.2V Li-Ion rechargeable battery,
carrying bags, set of cable straps.
First, determine which gear you need to use and attach it to the motor. The Canon gear is
marked “C” and the Fujinon is marked “F”. 1) Loosen the tee-head screw and remove the
motor bracket from the stainless steel rod 2) Remove the screw in the center of the motor
spindle. 3) Install the appropriate gear. 4) Replace the screw in the motor spindle.
1
2
3
4
1
See the above pictures for an idea of how to attach the assembly to a standard Canon or
Fujinon lens, but please read the rest of the instructions before continuing.
-IF you have one of the smaller Fujinon lenses (Th16x5.5, S14x7.3, S16x7.3, S12x5,
A12x6.8), you will have to make one small change (see pictures below). The aluminum
bracket that screws onto the lens barrel (A) comes oriented to fit standard Canon and
Fujinon lenses, but to make it fit the smaller Fujinon lens you will have to remove it and
flip it around (note that one side of the bracket has a slightly smaller arc – this will be the
side facing the barrel of the smaller lens).
Loosen the black tee-head screw that fixes the bracket to the stainless steel rod and
slide the bracket off the rod (see picture 1 on previous page). Unscrew the black
knurled-head screw from the bracket until it comes out completely (A). Now insert the
screw from the other side, threading it in until it is captured (B). Mount the bracket on
the rod (with the smaller arc and screw tip facing the lens) and you will be ready to
attach the assembly to your lens.
Smaller arc
A
B
2
CONNECTION AND MANUAL OPERATION
Attach the motor bracket assembly to your lens, but leave the drive gear disengaged from the
focus ring. Connect the EFC control unit to the motor using the supplied extension cables, and
turn on the power by pressing the POWER button. The EFC control unit has three display
modes: ‘Volt’, ‘Mark’, and ‘Main’. The EFC must be set to ‘Main’ for operation. ‘Main’ is the
default mode when you turn on the power. Pushing the SCROLL button cycles you through
the three modes, but you want to be in ‘Main’ mode at this point.
Set the lens to “infinity” and turn the dial on the control unit so that the LCD reads “0” before
you engage the gear. You will notice that the individual arms of the motor bracket assembly
can be positioned by loosening the plastic tee-head screws. If your focus ring moves forward
when you turn it, position the gear so that it is near the front of the ridges on the focus ring. If
your lens has internal focus (i.e., the focus ring does not move forward), you can position the
gear in the in the middle of the focus ring. Once the gear has been mated to the focus ring,
you can turn the dial on the control unit to adjust the lens through the focal range (1300 to 0 on
the LCD readout).
If the motor does not turn the focus ring all the way, you can extend the range. The VZ-EFC
has a default range of 1300, but the range may be extended to 1740 or 1900. Press and hold
the SCROLL button while powering the unit. The display will show RANGE and either 1300,
1740, or 1900. Use the SCROLL button to select the desired range and press the SELECT
button to save.
The direction of movement for the motor can also be changed, if desired. “REVERSED” is the
default setting, and it is the setting that will work with the previously mentioned setup
instructions for the motor bracket. If you want to switch the motor direction, take that into
account when setting the up the motor bracket. To change the direction: Press and hold the
SELECT button while powering the unit. The display will show SIGNAL and either “Reversed”
or “Normal”. Use the SCROLL button to select the signal direction and press the SELECT
button to save. The “signal” and “range” configurations are saved in memory so you do not
have to set them each time you power the VZ-EFC.
The EFC’s default configuration is for “Reversed” signal direction and a range of 1300. To
reset these defaults, press and hold the SELECT and SCROLL buttons while powering the
unit. The display will show “Defaults Loaded” and then start normal operation.
PROGRAMMING FUNCTION
You can program up to 4 sequential focal marks. To program your marks, hit the SCROLL
button until you are in ‘Mark’ mode, and then hit the SELECT button. You will see “A” come
up, then turn the dial until you reach the desired focal point that you want to mark as “A”. Hit
the SELECT button to set the focal point. To mark “B”, hit SCROLL, adjust to the desired
position, and hit SELECT (and so on). However, you only need to program the number of
marks you desire. For example, if you only want to mark “A”, program it and hit SCROLL until
you reach “EXIT”, then hit SELECT (in this case, only mark “A” will show in the MAIN display
mode).
3
The marks are saved in memory and do not have to be programmed again each time the EFC
is powered. Once you hit “EXIT”, the control unit is back in operating mode. Hit the SELECT
button to shuttle between the marks in sequence. Hit the SCROLL button once to go back to
full range mode (manual). To erase a specific mark, you must SCROLL to ‘Mark’ mode, go to
the mark in question, turn the control knob to 0000 (fully counter-clockwise), and press the
SELECT button.
BATTERY CHARGING
You can check remaining capacity of the battery by pushing the button next to the row of
indicator LEDs. To charge the battery, first unplug the cable leading from the EFC control unit
housing. Next, plug the supplied AC adapter into the “Charging Interface Cable” and then plug
it into the battery. When the battery is fully charged, the indicator light on the charging
interface cable will turn green. A full charging usually takes a few hours. Note that the row of
indicator lights on the battery does not accurately reflect remaining capacity while the charger
is attached. The indicator lights only function normally when the charger is disconnected. You
should use the indicator light on the charging interface cable to determine when the battery is
fully charged (green light). NOTE: Do not attempt to remove battery from main unit.
Although the battery should last for many hours on a full charge, for extra runtime, note
that an additional VZ-B72 battery can be purchased and attached to the bottom of the
battery on the unit (‘double-stacked’ so that you can plug into the extra battery when
the first runs out).
AC POWER
It is possible to power the EFC directly from an AC outlet using an optional AC/DC adapter, but
it is necessary to first disconnect the battery from the EFC by unplugging the cable from the
side of the battery. You cannot have two power sources connected to the EFC at the same
time, otherwise DAMAGE MAY OCCUR. For information on the optional AC adapter for the
EFC, contact VariZoom directly.
NOTES
You should turn off the control unit when not in use. Do not expose the motor or control unit to
water or excessive heat.
The VZ-EFC is covered by a 2-year warranty (parts/labor) against defects in materials or craftsmanship. Please
keep your sales receipt for warranty verification. For technical assistance or repair, please call 888-826-3399.
4