1
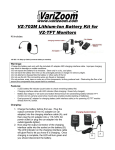
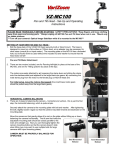
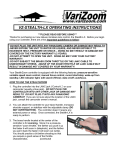
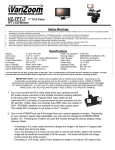
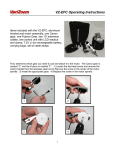
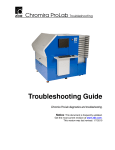
TOC F1
Operations Manual
-1-
General Description
The TOC F1 is a single channel wireless lens control system. The
system can be used on most broadcast or cinema lenses. The TOC F1 includes a
hand held controller/transmitter, rechargeable battery, lens drive motor,
single channel receiver, universal gear set, and battery charger
Major Components
Hand Unit
Motor
Battery Charger
Gear Set
Receiver
Battery
-2-
1. Setup
The TOC is provided with various gears to fit almost any broadcast or cinema lens.
Select the proper gear pitch for the proper lens ring. The gears can also be switched to
either side of the motor if needed.
Warning: If you are using the TOC with a servo powered lens, make absolutely sure
that the lens servo for the function you’re trying to control is always deactivated,
otherwise the lens servos can end up fighting the TOC motors resulting in severe
damage to either the lens or the TOC system. Please be aware that some “full auto”
modes may override the lens servo switches. Check with the lens or camera
manufacturer’s user manual to ensure that this won’t interfere.
POWERING THE RECEIVER: Only use a VariZoom-supplied cable to power the
TOC receiver. It is very important that you power the receiver with a maximum of
24VDC regulated (actual measured voltage – some nominal unregulated 24VDC
sources can actually go as high as 34VDC). The acceptable range for voltage is 1224 VDC – if you go higher, the unit will be damaged severely.
Also note that the voltage will affect the maximum motor speed. If you are
operating the receiver off a 12V battery the maximum motor rotation speed will be
about 96 RPM, whereas running the receiver off 24V the maximum motor rotation
speed will be around 150 RPM. This usually isn’t noticeable unless you’re using a
lens with a fairly large focus ring.
Before connecting power, mount the TOC motors onto 15mm or 19mm mattebox rods.
The motors can be mounted either vertically or horizontally.
Side view of
TOC motor
mounted
vertically
Dovetail
clamp position
example 1
Front view of
TOC motor
mounted
horizontally
Dovetail
clamp position
example 2
-3-
After the motor has been mounted on the rod, secure the gear against the proper lens ring
and tighten the dovetail clamp. Mount your TOC receiver and attach the antenna.
First plug the lens motor into TOC receiver (yellow to yellow)
Then plug power from camera into TOC receiver (red to red). Do not plug lens motor
into receiver while it is already powered up – this is called ‘hot swapping’ and it can lead
to minor malfunctions – always plug power into receiver LAST.
Now put the battery in the hand unit, attach the antenna and turn on the power by holding
down the power button for at least two seconds. All five LED lights on both the receiver
and the hand unit should now be solid orange.
1st & 2nd LED = connection to
hand unit; 3rd 4th & 5th LEDs =
signal strength meter
LEDs: 1st LED = connection to
receiver; 2nd LED = hand unit
transmitting; 3rd 4th & 5th LEDs =
signal strength meter
Assuming your lens has mechanical end stops (like most broadcast or cine lenses), the
TOC motors will calibrate most accurately in “Auto” mode. Note: If using a lens that
doesn’t have end stops (e.g., DSLR lenses), you must manually calibrate the lens
motors. This will be addressed in chapter 3. To execute auto calibration from the hand
unit, select “Calibrate” from the home menu, then select “Automatic”. The motor will
start moving automatically, and will also automatically stop once resistance is met. Do
not touch the lens motor during calibration. Also note that the power required to
move the lens rings properly may vary depending on the lens used. The system defaults
to 50% power and can be adjusted. (see page 8 for more details)
-4-
The lens motor will then move to the position at which the knob is set. The lens motor is
now ready for use, and will move according to the position of the knob on the hand
controller. Note: If you turn off power to the receiver, it will store the calibration set
in the last use. As long as you don’t move the motor or lens, the calibration will be
valid. If you have to move the motor and lens from their last position, recalibrate.
Basic Operation
The TOC has a touch screen that will allow for easy menu navigation. Most
operation will be done from this screen.
To reset the TOC parameters to their defaults, select “System” from the
home menu. Then select “Reset All”. It will then ask you to confirm. Select “OK”,
and then all parameters will be set to default. This only applies to lens/motor limits,
and motor speed/smoothing settings. Lens calibration is not affected by the system
reset.
The touch screen allows for easy adjustments and menu navigation. In the rare event that
the touch screen becomes unusable, there are five buttons on the top of the controller next
to the antenna (see below) that can be used as backup for navigation.
Menu Up
Enter
Return to Home screen
Menu Down
Power on/off
-5-
1. Home Screen
From the Home Screen, you can monitor the current lens position as well as enter the
Control, Calibrate, Setup, and System menu screens.
2. Control Menu
From the Control menu screen, you can set motor or
knob limits, reverse motor or knob response direction, and adjust smoothing.
To set a limit, simply move the knob to the where you want the limit, and tap the “set
limit” button. Once a limit is set, the “Set Limit” button will then read “Clear Limit”.
Tap this button to clear the limit.
Motor and knob response direction is changed by selecting the “Dir+” button located
under either “Motor” or “Knob”. This will change the button to be “Dir-“. Select it
again to change it back.
Smoothing is adjusted by selecting the “set” button next to the “smooth” indicator.
Adjust the “Lens Smoothing” to the desired smoothing level, then press “OK” Note: The
more smoothing you have, the more delay will show between motor and knob/slider
response.
Press the “
” button in the top left corner of the screen to return to the Home Screen.
-6-
3. Calibrate Menu
The Calibrate menu is where you will calibrate the motor to the
current lens that you are using. For all lenses that have stop points (most ENG and
cinema lenses), after you have mounted the motor to the lens tap the “Automatic” button,
and the motor will automatically move to both ends of the lens range, and then the lens is
calibrated. For lenses that don’t have stop points (most DSLR lenses), manual calibration
is required.
Tap “Manual” to enter the calibrate screen (as shown to the
left). Move the slider to the center position as indicated on the
screen – a center mark will appear and further instructions will
be shown on the screen. The slider will now be used to run
the motor until the first end point of the lens is reached. The
farther you move the slider, the faster the motor will go, so
when you get close to the stopping point, slow the motor down by moving the slider back
toward the center position – the motor stops moving when the slider is at the center
position. If you move the motor too far, you can reverse it by moving the slider in the
opposite direction past the center position – this will move the lens back (stop the motor
by returning slider to center position). When the first end point is reached on the lens, tap
the “OK” button. Now move the slider in the opposite direction to find the other end
point for the lens. Stop the motor at the correct end point for the lens, and tap the “OK”
button again. The lens motor is now calibrated, and you will automatically be returned to
the home screen
-7-
4. Setup Menu
The setup menu is where you can adjust power feedback,
Com Mode, Backlash compensation, and Controller input.
“Power Feedback” will allow you to adjust the motor output power during auto
calibration. Some lenses require more force to move the lens rings than others. If the
motor power is set too low, then the motor will not have enough force to push the lens
gear to its limits, and result in incorrect calibration. If the motor power is set too high,
the motor will exert too much force, and potentially slip off the lens ring, also resulting in
incorrect calibration. The system defaults to 50.1, and this is where it will return if the
“Reset All” button is pressed.
“Com Mode” will change how the hand unit will operate. Tap the button to change how
the hand unit will operate. “Wireless” will allow the hand unit and receiver to
communicate wirelessly. “Wired” will disable the wireless card on the hand unit, and
allow the hand unit and receiver to communicate through an optional communication
cable (that will also provide power to the hand unit, also allowing the hand unit to be
powered without a battery). “Upgrade will also disable the wireless card, as well as all
communication between the hand unit and receiver. This mode is only used when
making firmware upgrades, and requires a LEMO to serial cable.
“Motor Backlash” is used to compensate for backlash in the lens rings. Not all lenses
have backlash, and this is only necessary if the lens “lurches” when changing direction.
Backlash should be kept to a minimum unless necessary.
“Input Controller” simply allows you to switch between focus knob operation or iris
slider operation. Tap the button for the input controller that you wish to use. Most
operators will use the focus knob, but iris slider is available if you choose to use it.
-8-
5. System Menu
The system menu is where you can monitor battery output,
as well as adjust screen brightness, toggle LED’s on/off, or
reset all parameters if needed. If screen brightness is adjust
to 100, it will enter “daylight mode”, which will change the
color scheme to be more visible in extreme brightness.
6. Troubleshooting
A) –Knob is not responding:
Solution 1: Make sure the “Input Select” is set to “Knob” (page 8)
Solution 2: Disconnect power from hand unit and receiver, then reconnect
Solution 3: The knob limits and/or lens limits may have been set to “zero range” or
limited in one direction. Under the “Control” menu, check to see if any of the buttons
read “Clear Limit”, and tap the button to clear the limits.
Solution 4: Under the “System” menu, tap the “Reset All” button. This will clear all
limits.
Solution4: Check to make sure the lens motor didn’t get set to “zero” calibration while
being manually calibrated. Check this by re-calibrating the lens motor (see Chapter 5)
B) -General Malfunctions: The most common cause of malfunctions is ‘hot swapping’
the motors (i.e., plugging the motor (yellow plug) into the receiver while it is already
connected to its power source (red plug)) – Solution = Don’t hot swap the motors –
unplug and re-plug the power to the receiver (red plug) – in other words, always make
sure the motor is plugged in before the power.
C) -Auto Calibrate Mode not functioning properly:
Solution 1 = Using an AC adapter? If so, try switching to battery power.
Solution 2 = Unplug the power cable (red) and re-plug.
Solution 3 = Use Manual Calibrate Mode (page 7)
D) – After Calibrating, the motor does not reach all the way to end of the lens
rotation (i.e., it doesn’t hit ∞ or the nearest focal point):
Problem: The focus knob is not properly calibrated
Solution: You can calibrate the knob (and the slider) by accessing the hidden knob
calibrate menu. Enter the Calibrate menu and once there, depress the two right
mechanical buttons on the top of the unit (near the antenna) and while holding these,
press the single left mechanical button nearest the touchscreen. This should pull up the
-9-
calibrate knobs menu. Select knob for the focus knob and it will instruct you to turn the
knob all the way in both directions so it can calibrate the knob’s electrical range. Once
you’ve turned the knob all the way in both directions, press “OK”. You can do the same
calibration sequence with the slider if necessary.
E) -Motor Moves in Wrong Direction: Solution = Reverse the Motor/Knob (page 6)
F) –The “Motor” arrow is lagging behind the “Knob” arrow on the LCD: This is not
a problem - it is a feature. The higher the smoothing is set, the greater the lag will be.
G) –The Motor has stopped responding: If the red light on the side of the receiver is
fully illuminated with no green light, the motor has stalled.
Solution 1 = Try disconnecting and reconnecting power to the receiver.
Solution 2 = If that doesn’t work, you may need to disengage the motor from the lens
ring, move the lens ring to the middle of its range and cycle the power again. Re-engage
the motor to the lens ring and recalibrate – this should always solve the issue, but if this is
the only solution, you may want to consider turning the motor power down a bit.
Solution 3 = Check “Com Mode” under the “Setup” menu, and make sure that it is set to
“Wireless” if you’re trying to use it in wireless mode, or set to “Wired” mode if you’re
trying to use it in wired mode. Note: “Reset All” will default the Com Mode to be set
to Wireless.
H) – Motor Moves on its own or Unwanted Jitter in the motor movement – Turn the
backlash setting down and try turning up the smoothing level.
I) – Motor doesn’t seem to move fast enough to pull focus – First check to make sure
that the motor is calibrated to the lens that you are using, and make sure that the
smoothing is turned down. Also check the voltage that you’re using to power the
receiver. A lower voltage will result in a lower maximum rotation speed. See page 3 for
more details on this.
J) – Motors lose calibration or move after cycling receiver power – The receiver
stores the motor positions 2 seconds after the motors stop moving (it is done this way
by design). If the system is losing calibration / motors move after powering the receiver
off and on, it is because power was cut or lost before the receiver had time to store the
motor positions. Solution: Recalibrate the motors and don’t cut/lose power in the
middle of operating the TOC or immediately after operating (wait at least 2 seconds).
Warning: If you are using the TOC with a servo powered lens, make absolutely sure that
the lens servo for the function you’re trying to control is always deactivated, otherwise the
lens servos can end up fighting the TOC motors resulting in severe damage to either the
lens or the TOC system. Please be aware that some “full auto” modes may override the lens
servo switches.
More questions? Give us a call at 512-219-7722 or visit the website for updated
instruction manuals – www.varizoom.com
- 10 -