1
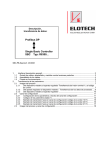
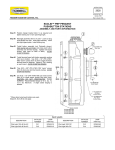
Operating Instructions Single SBC-Control Systems U:\SINGLE\Regler\SBC\Englisch\SBC_e_Version 2_6.doc Seite 1 von 13 Inhaltsverzeichnis 1 SBC 2.6 structuring ................................................................................ 3 2 SBC 2.6 display- and control elements................................................. 3 2.0 General ................................................................................................................................................ 3 2.1 Inputting Panel.................................................................................................................................... 3 2.2 Control Panel ...................................................................................................................................... 4 2.3 Drain function ..................................................................................................................................... 4 2.4 3 Alarm Panel and Display - Information ............................................................................................ 5 Parameter description SBC 2.6 ............................................................. 6 3.0 Working level ...................................................................................................................................... 6 3.0.1 Calling-up the working level ..................................................................................................... 6 3.0.2 Parameter description at working level................................................................................... 6 3.1 Parameter level ................................................................................................................................... 8 3.1.1 Calling-up the parameter level ................................................................................................. 8 3.1.2 Parameter description at parameter level ............................................................................... 8 3.2 Configuration level ........................................................................................................................... 10 3.2.1 Calling up the configuration level .......................................................................................... 10 3.2.2 Parameter description at configuration level ....................................................................... 10 4 Connecting diagram SBC 2.6............................................................... 12 5 Technical Data SBC2.6 ......................................................................... 13 Seite 2 von 13 1 1 SBC 2.6 structuring 2 1. Alarm and Information panel 2. Control panel 3. Inputting panel 3 2 SBC 2.6 display- and control elements 2.0 General At parameter level and configuration level, the values can only be changed after releasing parameter C1 at configuration level. For this purpose, parameter C1 must be set to OFF. 2.1 Inputting Panel 1. P-Taste 1 2 3 6 5 4 Change-over switch for accessing the individual processing levels: working level: parameter level: simultaneously push the „P“ key push „P“ and „ENTER“ keys Configuration level: keep „P“ and „ENTER“ keys depressed simultaneously for about 4s. 2. Acknowledgement -/ canceling-key (Enter) All alterations V and W must be confirmed! (Set- values and parameters) Seite 3 von 13 3. Value-alteration key For increasing set-and parameter-values 1 2 3 6 5 4 Attention! Confirm with "Enter ↵"! 4. Value-alteration key For reducing the set- and parameter-values Attention! Confirm with "Enter ↵"! 5. ON Button system “working”; pump and controls “active” 6. OFF key All systems "OFF", LED is alight, for as long as voltage supply is live 2.2 1 Control Panel 1. Display PROCESS 2 Display of pre-runt temperature's actual-value Display of parameter designation, when operating at working-, parameter- and configuration-level 2. Display SET Display of the current or programmed set-values Display of numerical values or parameter values when at working-, parameter- and configuration-level 2.3 Drain function The drain function is started by pressing simultaneously the P and 0 keys. Seite 4 von 13 Fault / Operational status 2.4 Alarm Panel and Display - Information 1 2 Cause Minimum level not made Limit-comparator outside band-spread limiting value execeeded 3 Pre-run temperature up to limiting value Heating switches OFF 4 Heating on 5 Cooling on 6 Temperature control unit ON Rectification / explanation Water: with manual filling: replenish with heat transfer medium. With automatic filling: Open cooling water supply, wait till filled. Oil: Fill or replenish with oil Not up to temperature, or outside band-spread (limit) Band-spread too narrow or limiting value made Turn OFF at working level, parameter AL, or set bandspread. Check set limiting value; insufficient heat dissipation by consumer subsequent to cooling by 5 K, heating comes ON again LED flashes when the temperature control unit is switched off via the pump after-run control. Seite 5 von 13 1 2 3 4 5 6 3 Parameter description SBC 2.6 3.0 3.0.1 Working level Calling-up the working level This is how the working level is accessed. Push button marked P Individual parameters are accessed by pushing the button marked P The PROCESS-display shows the parameter The SET-display shows the parameter value 3.0.2 Parameter description at working level Abbreviations: MR-start = Measuring range start (minimum –30°C) MR-end = Measuring range end (maximum +400°C) Parameter Set-values range Signifying des. start end AL OFF OFF, -99 OFF 100 MR-start MR-end OFF, 0 100 OFF, -99 100 MR-start MR-end OFF, 0 100 Alarm outputs selected. Alarm output programmed as signal contact max. OFFON. The setting-value corresponds to the alarm’s response value, relative to the setpoint-value. Alarm output programmed as limiting contact max OFFON. The setpoint-value corresponds to the absolute responsevalue of the alarm. Alarm output programmed as limit comparator OFF-ONOFF. The setpoint-value corresponds to the setpoint’s tolerance-value. Alarm output, programmed as signal contact max. ONOFF. The setting-value corresponds to the alarm’s response value, relative to the setpoint-value. Alarm output programmed as limiting contact max ONOFF. The setpoint-value corresponds to the absolute responsevalue of the alarm. Alarm output programmed as limit comparator ON-OFFON. The setpoint-value corresponds to the setpoint’s tolerance-value. Seite 6 von 13 SBC V2.6 X X X X X X X OFF, 0 Parameter 100 Set-values range Alarm output programmed as limit comparator ON-OFFON (with stand-by response). The setpoint-value corresponds to the setpoint’s tolerance-value. No alarm during initial start-up, until the input range is made. Signifying SBC V2.6 des. start end AP.I MR-start MR-end Ati OFF=0 40 Cti OFF, 10 900 Change time; evacuation / vacuum time on units with automatic mold draining. Setpoint -value corresponds to the compressedair assisted evacuation time or else the vacuumtime in seconds. X LS OFF on Turning the leak-stop mode ON and OFF ON means leak-stop mode turned ON OFF means leak-stop mode turned OFF X Programmed value corresponds to the response temperature of the inlet-temperature limitation. If up to end of measuring range is programmed, the value end of measuring range + 5 °C is displayed. Aquatimer: setpoint-value corresponds to the max. permissible filling cycles after 1 hour of operation. X X his parameter is displayed only with the 2C, t.95 and C.Oil operating mode selectedAL 2 OFF OFF, -99 OFF 100 Alarm output OFF. Alarm output programmed as signal contact max. OFF-ON. The setting value corresponds to alarm trip threshold relative to the setpoint. This parameter is displayed only with the 2C operating mode selected. niv Hand Auto Hand = manual filling of the unit Auto = automatical filling of the unit Auto not possible at heat transfer units with oil X Adr 1 255 Inputting of unit addressing. X If several units are operated by the same interface, different addresses must be input. Only for units with interface! Seite 7 von 13 X 3.1 Parameter level 3.1.1 Calling-up the parameter level How to get into the parameter level Push buttons P and ↵ simultaneously Individual parameters are accessed by pushing the button marked P The PROCESS-display shows the parameter The SET-display shows the parameter value 3.1.2 Parameter description at parameter level Parameter Set-values range Signifying SBC V2.6 Des. Start End hP OFF, 0.1 99.9 XP-Heating The control system’s proportional range X hd OFF, 1 200 TV-Heating in s. Derivative action time of the control system X hI OFF, 1 999 TN-Heating in s. Integral action (reset) time of the control system X cP OFF, 0.1 99.9 XP-Cooling The control system’s proportional range X cd OFF, 1 200 TV-cooling in s. Derivative action time of the control system X cI OFF, 1 999 TN-cooling in s. Integral action (reset) time of the control system X db OFF, 0.1 10.0 Switching hysteresis between heating and cooling This paramater is used for increasing the setvalue (switching point) for cooling by the value entered. That way, possibly too frequently occurring switching changes between heatingand cooling modes can be prevented. Simultaneous switching of heating and cooling can be ruled out generally. Settings are in °C. X Seite 8 von 13 Parameter Set-values range Signifying SBC V2.6 Des. Start End hC 1 240 Heating switch-cycle time in s. X cC 1 240 Cooling switch-cycle time in s. X The control element’s maximum switching frequency is determined with the assistance of the switch-cycle time. This is the period, during which the controller carries out one ON and one OFF switching action. We recommend the following settings: • Relay-setting outputs with downstream installed contactors; switching cycle > 10 s • Bi-stable voltage output ports for actuating Solid State Relays (SSR): Switch-cycle time 1 ... 10 s SPH SPL MB-end SPL MB-start SPH SCL OFF, 35 90 C-F C 0,1 F OPt OFF on Upper setpoint limitation in °C. Here the final value for the setpoint setting range can be selected. X Lower setpoint limit in °C. The start value of the setpoint adjustment range can be preselected here. X System Closed = system shut-off on units employable at > 90°C, the water system is shut-off to atmosphere. Selection °C, °F or 1/10 °C X Turning self-optimization ON and OFF. X ON = Self-optimization startet. The controller determines the optimum control parameters by closed-loop control. Sd h 0.5 10 Switching hysteresis for 2C mode Programmed value acts symmetrically to required value setting operating hours Seite 9 von 13 3.2 Configuration level 3.2.1 Calling up the configuration level How to get admitted to the configuration level: ↵ Setting keys P and simultaneously (about 4s), until LOC parameter appears in the PROCESS-display Individual parameters are accessed by pushing the button marked P The PROCESS-display shows the parameter The SET-display shows the parameter value 3.2.2 Parameter description at configuration level Parameter Set-values range Signifying SBC V2.6 Des. Start End LOC OFF PC Keyboard interlock • OFF= parameter values can be changed. • PC = Parameter level and configuration level barred. Parameters can only be viewed. X C.Co t.95 C.Oil Selection of operating mode t.95 = Temperature control units up to 90°C t.150 = Temperature control unit up to 150°C and higher 2C = Refrigerator C.Oil = Heat transfer units up to 300°C X C.AL OFF 7 Configuration of the alarm X • • • • • • • • OFF = Alarm has been turned OFF 1 = Signal contact OFF-ON 2 = Limiting contact OFF-ON 3 = Limit comparator OFF-ON-OFF 4 = Signal contact ON-OFF 5 = Limiting contact ON-OFF 6 = Limit comparator ON-OFF-ON 7 = Limit comp. with stand-by response Seite 10 von 13 Parameter Set-values range Des. Start End C.SA oP cL ASt 5 min 120 Signifying SBC V2.6 Configuration group interrupt • oP = n/c contact • cL = n/o contact X • X Aquatimer-Start-time (min) Aquatimer (filling-impulse-counter) becomes active following the time set in the "ASt". Previously not monitored random filling cycles. Renewed start of the "AST" time, following the On/Off. EMO OFF on Restart lockout after power reset • off = Restart lockout not active • on = Restart lockout active X Following a power reset, the control system stays turned OFF, to start with. Display "Info". "EMO" message – flashing. OF1 OFF, -100 100 Temperature correction of the internal temperature probe in °C X Pro OFF A Setting of the various interface protocols • OFF = interface mode turned OFF • A = Arburg-protocol active • E = Engel- protocol active X tty 20nA 422 Setting and preselecting the physical interface 422 = RS 485 - 4-wire 20nA = TTY 20mA current loop X PS1 0 999 The set parameters are stored by inputting a secret code. In preparation X C.60 OFF, 10 100 Release or locking of the software key pump timer control If the “0” key is pressed, it is cooled down to the set temperature and the device is switched off. • “OFF” = “OFF” key is locked • 10...100 °C = adjustable cut-out temperature X Seite 11 von 13 4 Connecting diagram SBC 2.6 Interface option! RS 485 GND RS 485 IN-B RS 485 IN-A TTY 20 mA + TTY 20 mA RS 485 OUT-B RS 485 OUT-A draining System closed/leak-stop Pump heating motor protection Level min Pt 100 control 0V St3 PIN 1 2 3 4 5 6 7 8 St1 PIN 17 15 16 Pilot contact - heating 13 14 filling 11 12 cooling 9 10 flow watchdog 7 8 Level max. 5 6 Pt 100 Temperature monitoring 3 4 1 2 24 V ST2 PIN Group alarm 3 2 1 Normally open contact Opener Two-way contact Seite 12 von 13 5 Technical Data SBC2.6 Power supply Actual value acquisition Inputs 24 Volt 0,1 A Pt 100 two-wire lead Resolution Data sampling Measuring range 0,1 K 0,1 s -30°C to +400°C 24 Volt Operating point Input current 11 Volt 2 mA Outputs 24 Volt 0,5 A 2 A max 4A SMD fuse Short-circuit-proof, suitable for inductive loads Relay 1 Two-way contact 250 VAC 3 A cos phi 1 Seite 13 von 13