1
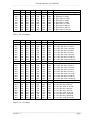
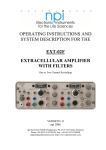
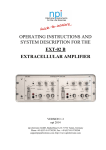
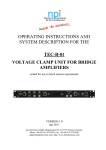
OPERATING INSTRUCTIONS AND SYSTEM DESCRIPTION FOR THE 8-CHANNEL EXTRACELLULAR AMPLIFIER SYSTEM FOR 2 TETRODES VERSION 1.1 npi 2010 npi electronic GmbH, Hauptstrasse 96, D-71732 Tamm, Germany Phone +49 (0)7141-9730230; Fax: +49 (0)7141-9730240 [email protected]; http://www.npielectronic.com Tetrode Amplifier User Manual _______________________________________________________________________________________________________________ Table of Contents 1. Safety Regulations .............................................................................................................. 3 2. EXT-T2 Amplifier / Filter .................................................................................................. 4 2.1. System Description...................................................................................................... 4 2.2. Description of the Front Panel..................................................................................... 4 2.3. Description of the Rear Panel...................................................................................... 6 3. Headstage............................................................................................................................ 7 4. Technical Data .................................................................................................................... 7 ___________________________________________________________________________ version 1.1 page 2 Tetrode Amplifier User Manual _______________________________________________________________________________________________________________ 1. Safety Regulations VERY IMPORTANT: Instruments and components supplied by npi electronic are NOT intended for clinical use or medical purposes (e.g. for diagnosis or treatment of humans), or for any other life-supporting system. npi electronic disclaims any warranties for such purpose. Equipment supplied by npi electronic must be operated only by selected, trained and adequately instructed personnel. For details please consult the GENERAL TERMS OF DELIVERY AND CONDITIONS OF BUSINESS of npi electronic, D-71732 Tamm, Germany. 1) GENERAL: This system is designed for use in scientific laboratories and must be operated by trained staff only. General safety regulations for operating electrical devices should be followed. 2) AC MAINS CONNECTION: While working with the npi systems, always adhere to the appropriate safety measures for handling electronic devices. Before using any device please read manuals and instructions carefully. The device is to be operated only at 115/230 Volt 60/50 Hz AC. Please check for appropriate line voltage before connecting any system to mains. Always use a three-wire line cord and a mains power-plug with a protection contact connected to ground (protective earth). Before opening the cabinet, unplug the instrument. Unplug the instrument when replacing the fuse or changing line voltage. Replace fuse only with an appropriate specified type. 3) STATIC ELECTRICITY: Electronic equipment is sensitive to static discharges. Some devices such as sensor inputs are equipped with very sensitive FET amplifiers, which can be damaged by electrostatic charge and must therefore be handled with care. Electrostatic discharge can be avoided by touching a grounded metal surface when changing or adjusting sensors. Always turn power off when adding or removing modules, connecting or disconnecting sensors, headstages or other components from the instrument or 19” cabinet. 4) TEMPERATURE DRIFT / WARM-UP TIME: All analog electronic systems are sensitive to temperature changes. Therefore, all electronic instruments containing analog circuits should be used only in a warmed-up condition (i.e. after internal temperature has reached steady-state values). In most cases a warm-up period of 20-30 minutes is sufficient. 5) HANDLING: Please protect the device from moisture, heat, radiation and corrosive chemicals. ___________________________________________________________________________ version 1.1 page 3 Tetrode Amplifier User Manual _______________________________________________________________________________________________________________ 2. EXT-T2 Amplifier / Filter 2.1. System Description The EXT-T2 module is an amplifier/filter with headstages for two tetrodes, A and B. The signals recorded from every single tetrode attached to the headstage are amplified and filtered, and linked to the BNC connectors OUTPUT 0 to OUTPUT 3 for every tetrode. Every OUTPUT is available at two BNC connectors. The GROUND plug provides system ground. Measurements are done is single-ended configuration against GND. 2.2. Description of the Front Panel Figure 1: front panel view of EXT-T2 (1) HEADSTAGE connector Connector for the HEADSTAGE of TETRODE A (2) OUTPUT 0…OUTPUT 3 connectors BNC connectors providing the amplified and filtered signals of tetrode A (3) GROUND connector Banana jack providing system ground (4) POWER ON LED LED indicating that POWER is switched ON (5) HEADSTAGE connector Connector for the HEADSTAGE of TETRODE B (6) OUTPUT 0…OUTPUT 3 connectors BNC connectors providing the amplified and filtered signals of tetrode A. Every channel has a single PCB with amplifier and filters. Amplification factors (200, 500; 1000) and corner frequencies of high pass (0.1, 0.3, 1 Hz) and low pass (500, 2k, 8k Hz) filter can be set internally at the PCB by DIL switches and a jumper (see also Table 1 and Table 2) for each channel separately. ___________________________________________________________________________ version 1.1 page 4 Tetrode Amplifier User Manual _______________________________________________________________________________________________________________ Jumper S1 S2 S3 S4 S5 S6 ON ON ON ON ON ON ON ON ON ON ON ON ON ON ON ON ON ON ON ON ON ON ON ON ON ON ON OFF ON ON OFF ON ON OFF ON ON ON ON OFF ON ON OFF ON ON OFF OFF OFF OFF ON ON ON ON ON OFF OFF OFF OFF OFF OFF OFF ON ON ON Setting (Amplification / Filtering) DC, gain 200, LP 8 kHz DC, gain 500, LP 8 kHz DC, gain 1000, LP 8 kHz DC, gain 200, LP 2 kHz DC, gain 500, LP 2 kHz DC, gain 1000, LP 2 kHz DC, gain 200, LP 500 Hz DC, gain 500, LP 500 Hz DC, gain 1000, LP 500 Hz Table 1: DC recordings Jumper S1 S2 S3 S4 S5 S6 Setting OFF OFF OFF OFF OFF OFF OFF OFF OFF ON ON ON ON ON ON ON ON ON ON ON ON ON ON ON ON ON ON OFF ON ON OFF ON ON OFF ON ON ON ON OFF ON ON OFF ON ON OFF OFF OFF OFF ON ON ON ON ON OFF OFF OFF OFF OFF OFF OFF ON ON ON HP 0,1 Hz, gain 200, LP 8 kHz HP 0,1 Hz, gain 500, LP 8 kHz HP 0,1 Hz, gain 1000, LP 8 kHz HP 0,1 Hz, gain 200, LP 2 kHz HP 0,1 Hz, gain 500, LP 2 kHz HP 0,1 Hz, gain 1000, LP 2 kHz HP 0,1 Hz, gain 200, LP 500 Hz HP 0,1 Hz, gain 500, LP 500 Hz HP 0,1 Hz, gain 1000, LP 500 Hz OFF OFF OFF OFF OFF OFF OFF OFF OFF OFF OFF OFF OFF OFF OFF OFF OFF OFF ON ON ON ON ON ON ON ON ON OFF ON ON OFF ON ON OFF ON ON ON ON OFF ON ON OFF ON ON OFF OFF OFF OFF ON ON ON ON ON OFF OFF OFF OFF OFF OFF OFF ON ON ON HP 0,3 Hz, gain 200, LP 8 kHz HP 0,3 Hz, gain 500, LP 8 kHz HP 0,3 Hz, gain 1000, LP 8 kHz HP 0,3 Hz, gain 200, LP 2 kHz HP 0,3 Hz, gain 500, LP 2 kHz HP 0,3 Hz, gain 1000, LP 2 kHz HP 0,3 Hz, gain 200, LP 500 Hz HP 0,3 Hz, gain 500, LP 500 Hz HP 0,3 Hz, gain 1000, LP 500 Hz OFF OFF OFF OFF OFF OFF OFF OFF OFF ON ON ON ON ON ON ON ON ON ON ON ON ON ON ON ON ON ON OFF ON ON OFF ON ON OFF ON ON ON ON OFF ON ON OFF ON ON OFF OFF OFF OFF ON ON ON ON ON OFF OFF OFF OFF OFF OFF OFF ON ON ON HP 1 Hz, gain 200, LP 8 kHz HP 1 Hz, gain 500, LP 8 kHz HP 1 Hz, gain 1000, LP 8 kHz HP 1 Hz, gain 200, LP 2 kHz HP 1 Hz, gain 500, LP 2 kHz HP 1 Hz, gain 1000, LP 2 kHz HP 1 Hz, gain 200, LP 500 Hz HP 1 Hz, gain 500, LP 500 Hz HP 1 Hz, gain 1000, LP 500 Hz Table 2: AC recordings ___________________________________________________________________________ version 1.1 page 5 Tetrode Amplifier User Manual _______________________________________________________________________________________________________________ Gain: amplification factor HP: corner frequency high pass filter LP: corner frequency low pass filter Figure 2: PCB of one amplifier, location of DIL switch and jumper 2.3. Description of the Rear Panel Figure 3: rear panel view of EXT-T2 (1) GROUND This connector is linked to the internal system ground which has no connection to the 19" cabinet (CHASSIS) to avoid ground loops (2) CHASSIS This connector is not linked to system ground and can be used for grounding the CHASSIS independently from system ground (3) IN / OUT SIGNALS TETRODE B Not connected (4) IN / OUT SIGNALS TETRODE A Not connected (5) POWER SUPPLY connector Connector for the wall POWER SUPPLY (12V…18V AC, 1A min.) (6) POWER ON switch Switch to turn POWER ON (upper position). ___________________________________________________________________________ version 1.1 page 6 Tetrode Amplifier User Manual _______________________________________________________________________________________________________________ 3. Headstage Figure 4: one headstage of the EXT-T2 Headstage Elements PEL Connector for the tetrode (see also Figure 5) REF Not connected GND Ground connector 1 2 3 4 5 Ground connector (GND) Channel 1 connector (CH0) Channel 3 connector (CH2) Channel 4 connector (CH3) Channel 2 connector (CH1) Figure 5: tetrode connector 4. Technical Data Input resistance: Output: >1012 , range ±1 V gain (x200, x500, x1k), selectable by DIL switch Headstage Size: Output range: ±12 V into 1 k / ±1 V into 50 load 500, 2k, 8k Hz, selectable by DIL switch DC, 0.1, 0.3, 1, selectable by DIL switch 12…18 V AC, 1 A min.; wall power supply 19” rackmount cabinet, 19” (483 mm), 10” (250 mm), 1.75” (44 mm) 70 x 26 x 26 mm Holding Bar: length: 150 mm; diameter: 8 mm. Low pass filter: High pass filter: Power requirements: Dimensions: ___________________________________________________________________________ version 1.1 page 7