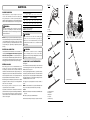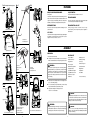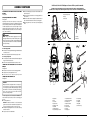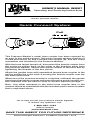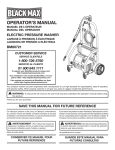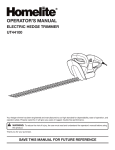
1
Cleaning To clean the tank: 1. Dump debris out. 2. Wash tank thoroughly with warm water and mildsoap. 3. Wipe out with dry cloth. OWNER’S MANUAL Operating and Servicing Instructions Storage Before storing your vac, the dust tank should be emptied and cleaned. TROUBLESHOOTING Problem Vac will not pick up dirt Cause 1. Clogged filter 2. Clogged hose 3. Air leak Possible Solution 1. Clean or replace filter (follow instructions on page 19) 2. Remove hose and clear debris. 3. Make sure power head is securely attached to dust tank. Vac will not run 1. No electricity 1. Make sure electrical outlet has voltage. (A qualified electrician may need to be contacted). Please read these instructions carefully before using your electric pressure washer. Let us help you put your pressure washer together or answer any questions, call: 1-800-321-1134 (USA & Canada) www.dirtdevil.com For quick reference, please record your product information below. MODEL #:________________________ MFG. CODE:_ _____________________ (Mfg. code located on the data plate) Your product has been engineered and manufactured to our high standard for dependability, ease of operation, and operator safety. When properly cared for, it will give you years of rugged, trouble-free performance. WARNING: To reduce the risk of injury, the user must read and understand the operator’s manual before using this product. LIMITED WARRANTY/GARANTIE LIMITÉE To the consumer, Royal Appliance Mfg. Co. warrants this pressure washer to be free of defects in material or workmanship commencing upon the date of the original purchase. Refer to the data plate label on your pressure washer for the length of warranty and save your original sales receipt to validate start of warranty period. If the pressure washer should become defective within the warranty period, we will repair or replace any defective parts free of charge. The complete machine must be delivered prepaid to any ROYAL® Authorized Sales & Warranty Service Station. Please include complete description of the problem, day of purchase, copy of original sales receipt and your name, address and telephone number. If you are not near a Warranty Station, call the factory for assistance at USA & Canada: 1-800-321-1134. The warranty does not include unusual wear, damage resulting from accident or unreasonable use of the pressure washer. This warranty does not cover unauthorized repairs. This warranty gives you specific legal rights and you may also have other rights (Other rights may vary from state to state in the USA). SAVE THIS MANUAL FOR FUTURE REFERENCE 20 ©2010 All Rights Reserved • Part#961127004 R1 • 6/10 MAINTENANCE TABLE OF CONTENTS Pressure Washer Introduction & Quick Connect System.......................................................................................................... 2 Important Safety Instructions....................................................................................................................... 3 Specific Safety Rules and Symbols........................................................................................................... 4-5 Electrical................................................................................................................................................. 6 Features................................................................................................................................................. 7 Assembly............................................................................................................................................. 7-8 Operation............................................................................................................................................9-10 Maintenance.......................................................................................................................................... 11 Troubleshooting..................................................................................................................................... 12 Filter Your filter should be cleaned often to maintain peak vac performance. NOTE: The filter is made of high quality material designed to stop small particles such as sawdust. Handle the filter carefully when removing to clean or installing a new filter. Do not tear the filter during removal or installation if your intent is to reuse the filter. Easy to Replace Filter 1. Extend the retainer band around the plastic posts on the lid. 2. Remove filter bag off the filter cage. 3. Place the replacement filter on the filter cage until open end touches bottom of lid. 4. Release the retainer band from the plastic post on the lid, holding the filter bag secure to the lid. 5. Make sure the retainer band is positioned on the filter bag covering the black printed line. Reference Figures..............................................................................................................................13-15 Wet/Dry Vac Filter Bag Important Safety Instructions..................................................................................................................... 16 Features............................................................................................................................................... 17 Operation..........................................................................................................................................17-18 Lid Maintenance.......................................................................................................................................... 19 Retainer Band Plastic Post Troubleshooting..................................................................................................................................... 20 introduction Motor Housing (upside-down) This product has many features for making its use more pleasant and enjoyable. Safety, performance, and dependability have been given top priority in the design of this product making it easy to maintain and operate. QUICK CONNECT SYSTEM Pull IMPORTANT: To avoid damage to the fan and motor, always reinstall the filter before using the vac for dry material pick-up. Take the dirty filter to a disposal container and gently brush away small dirt particles that may be adhering to the filter material. IMPORTANT: After cleaning, check the filter for tears or small holes. Do not use a filter with holes or tears in it. Even a small hole can allow a lot of dust to come out of your vac. Replace it immediately. Installation A B This Pressure Washer’s metal hose coupler has been replaced by an easy to use quick connect. The quick connect system consists of a male end nozzle (A) and a female end coupler (B), and will come assembled and attached to the Pressure Washer. With the hose faucet turned off, disconnect the female coupler from the nozzle by pulling back on the collar in the direction away from the pressure washer. Secure the female coupler to the hose end by tightening the threads of the two pieces. Attach the garden hose with assembled female hose coupler to the unit by pulling the collar back & moving the female coupler over top the male end nozzle. When use of the pressure washer is complete, unthread the garden hose from the female coupler and leave the entire quick connect system attached onto the unit for easy-to-access onboard storage. Note: Any other reference to the metal hose coupler later in the manual should be substituted with the included quick connect system that is explained above. 2 Before installing the filter on the vac, clean the area of the lid so that the retainer band will seal the bag against the lid and stop small particles from bypassing the filter bag. If the filter is clean and not damaged, replace it on the filter cage. If it cannot be reused, place a new filter over the filter cage. Replace the retainer band around the filter. Make sure the retainer band is positioned on the filter, and the filter completely covers the filter cage. Also, make sure the edges of the filter are completely secured under the retainer band. WARNING: Do not remove the filter cage and float. The float prevents liquid from entering the impeller and damaging the motor. The cage prevents fingers from touching the moving impeller. 19 Vacuuming Liquids 1. Removal of the filter is highly recommended for wet pickups. 2. This wet/dry vac is equipped with a float mechanism which will rise automatically to cut off the airflow when the liquid in the drum reaches a predetermined level. When this happens, turn off vac, unplug the power cord, and empty the dust drum. You will know that the float has shut the airflow off because the suction ceases and the motor noise becomes higher in pitch, due to increased motor speed. The liquid capacity may vary with the rate of pickup. 3. Be sure to replace filter after wet pickup. Never pick up dry debris without the filter properly installed. IMPORTANT: To reduce the risk of damage to the vac, do not run motor with float in raised position. Filter Retainer Band PRESSURE WASHER important safety instructions Stay alert and exercise control. Watch what you are doing and use common sense. Do not operate product when you are tired. Do not rush. WARNING: Read and understand all instructions. Failure to follow all instructions listed below may result in electric shock, fire, and/or serious personal injury. Filter Type: F55 Float In Raised Position WARNING: Never leave vac running while unattended. Do not operate the product while under the influence of drugs, alcohol, or any medication. Keep the area of operation clear of all persons, particularly small children, and pets. WARNING: Don’t overreach or stand on unstable support. Keep proper footing and balance at all times. When using this product basic precautions should always be followed, including the following: Follow the maintenance instructions specified in this manual. READ ALL INSTRUCTIONS BEFORE USING THIS PRODUCT Emptying the Tank 1. Place vac squarely on a stable surface, such as ground, floor, bench, etc. 2. Remove the power head assembly of the wet/dry vac by pulling outward on the latches located on each side of the vac. Lift off the motor housing assembly. 3. Dump the tank contents into the proper waste disposal container. WARNING: This product is provided with a ground fault circuit interrupter built into the power cord plug. If replacement of the plug or cord is needed, use only identical replacement parts. To reduce the risk of injury, close supervision is necessary when a product is used near children. WARNING: Risk of injection or injury – Do not direct discharge stream at persons. Be thoroughly familiar with controls. Know how to stop the product and release pressure quickly. SAVE THESE INSTRUCTIONS ground fault circuit interrupter protection To reduce the risk of injury from accidental starting, unplug power cord before emptying the tank. Blowing Feature Your vac contains a blowing feature. It has the capability to blow away dirt and other debris. It is excellent to use to blow dirt and debris out of garages or off patios and driveways. Follow the steps below to use your vac as a blower. 1. Locate blower port of your vac. 2. Insert one end of the 4 foot x 1-1/4 inch hose into the blower port. 4. Turn vac “ON”and you are ready to use your vac as a blower. WARNING: CAUTION: Always wear safety when using it in a noisy area. eyewear complying with ANSI Z87.1 (or in Canada CSA Z94.3) when using as a blower. To reduce the risk of hearing damage, wear ear protectors when using the vac/blower for extended hours or when using it in a noisy area. WARNING: extension cords See Figure 1. Use only extension cords that are intended for outdoor use. These extension cords are identified by a marking “Acceptable for use with outdoor appliances; store indoors while not in use.” Use only extension cords having an electrical rating not less than the rating of the product. Do not use damaged extension cords. Examine extension cord before using and replace if damaged. Do not abuse extension cord and do not yank on any cord to disconnect. Keep cord away from heat and sharp edges. Always disconnect the extension cord from the receptacle before disconnecting the product from the extension cord. Always plug the extension cord into a GFCI protected outlet. This pressure washer is provided with a ground fault circuit interrupter (GFCI) built into the plug of the power supply cord. This device provides additional protection from the risk of electric shock. Should replacement of the plug or cord become necessary, use only identical replacement parts that include GFCI protection. servicing of a double-insulated appliance In a double-insulated product, two systems of insulation are provided instead of grounding. No grounding means is provided on a doubleinsulated product, nor should a means for grounding be added to the product. Servicing a double-insulated product requires extreme care and knowledge of the system, and should be done only by qualified service personnel. Replacement parts for a double insulated product must be identical to the parts they replace. A doubleinsulated product is marked with the words “DOUBLE INSULATION” or “DOUBLE INSULATED.” The symbol may also be marked on the product. To avoid the possibility of the tool plug getting wet when using an extension cord, arrange a “drip loop” in the cord connecting the pressure washer to the extension cord. The “drip loop” is that part of the cord below the level of the connector which prevents water travelling along the cord and coming in contact with the connection. If the plug does get wet, DO NOT unplug the cord. Disconnect the fuse or circuit breaker that supplies power to the tool, then unplug and examine for presence of water in the connection. CAUTION: To avoid injury to bystanders, keep them clear of blowing debris. WARNING: To reduce the risk of electrocution, keep all connections dry and off the ground. Do not touch plug with wet hands. Wear a dust mask if blowing creates dust which might be inhaled. 18 3 FEATURES SPECIFIC SAFETY RULES Know your product. Read the operator’s manual care-fully. Learn the machine’s applications and limitations as well as the specific potential hazards related to this product. Avoid dangerous environment. Don’t expose to rain. Keep work area well lit. Do not abuse the cord. Never use the cord to carry the product or to disconnect the plug from an outlet. Keep cord away from heat, oil, sharp edges, or moving parts. Replace damaged cords immediately. Damaged cords increase the risk of electric shock. To reduce the risk of injury, keep children and visitors away. All visitors should wear safety glasses and be kept a safe distance from work area. Use right product. Don’t force product or attachment to do a job it was not designed for. Don’t use it for a purpose not intended. 2 11 1 10 9 3 8 Ground Fault Circuit Interrupter (GFCI) protection should be provided on the circuit(s) or outlet(s) to be used for the product. Receptacles are available having built-in GFCI protection and may be used for this measure of safety. Dress properly. Do not wear loose clothing, gloves, neckties, or jewelry. They can get caught and draw you into moving parts. Rubber gloves and nonskid footwear are recommended when working outdoors. Also wear protective hair covering to contain long hair. To reduce the risk of electric shock, this product has a polarized plug (one blade is wider than the other) and will require the use of a polarized extension cord. The plug will fit into a polarized extension cord only one way. If the plug does not fit fully into the extension cord, reverse the plug. If the plug still does not fit, obtain a correct polarized extension cord. A polarized extension cord will require the use of a polarized wall outlet. This plug will fit into the polarized wall outlet only one way. If the plug does not fit fully into the wall outlet, reverse the plug. If the plug still does not fit, contact a qualified electrician to install the proper wall outlet. Do not change the equipment plug, extension cord receptacle, or extension cord plug in any way. Do not operate the equipment while barefoot or when wearing sandals or similar lightweight footwear. Wear protective footwear that will protect your feet and improve your footing on slippery surfaces. Exercise caution to avoid slipping or falling. A lways wear eye protection with side shields marked to comply with ANSI Z87.1. Following this rule will reduce the risk of serious personal injury. Use only recommended accessories. The use of improper accessories may cause risk of injury. Make sure your extension cord is in good condition. When using an extension cord, be sure to use one heavy enough to carry the current your product will draw. A wire gauge size (A.W.G.) of at least 14 is recommended for an extension cord 25 feet or less in length. If in doubt, use the next heavier gauge. The smaller the gauge number, the heavier the cord. An undersized cord will cause a drop in line voltage resulting in loss of power and overheating. Check damaged parts. Before further use of the product, a guard or other part that is damaged should be carefully checked to determine that it will operate properly and perform its intended function. Check for alignment of moving parts, binding of moving parts, breakage of parts, mounting, and any other conditions that may affect its operation. A guard or other part that is damaged must be properly repaired or replaced by an authorized service center to avoid risk of personal injury. WARNING: Use outdoor extension cords marked SW-A, SOW-A, STW-A, STOW-A, SJW-A, SJTW-A, or SJTOWA. These cords are rated for outdoor use and reduce the risk of electric shock. Never leave product running unattended. Turn power off. Don’t leave product until it comes to a complete stop. Keep the motor free of grass, leaves, or grease to reduce the chance of a fire hazard. Inspect extension cords periodically and replace if damaged. Keep handles dry, clean, and free from oil or grease. Follow manufacturer’s recommendations for safe loading, unloading, transport, and storage of machine. Never direct a water stream toward people or pets, or any electrical device. Keep product dry, clean, and free from oil and grease. Always use a clean cloth when cleaning. Never use brake fluids, gasoline, petroleum-based products, or any solvents to clean product. Check the work area before each use. Remove all objects such as rocks, broken glass, nails, wire, or string which can be thrown or become entangled in the machine. Before starting any cleaning operation, close doors and windows. Clear the area to be cleaned of debris, toys, outdoor furniture, or other objects that could create a hazard. Do not use acids, alkalines, solvents, flammable material, bleaches, or industrial grade solutions in this product. These products can cause physical injuries to the operator and irreversible damage to the machine. Do not use product if switch does not turn it off. Have defective switches replaced by an authorized service center. WARNING: High pressure jets can be dangerous if 4 1. Switch 2. Vacuum Port 3. Hose 4. Dusting Brush 5. Wide Accessory Tool 6. Crevice Tool 7. Tank 8. Latch 9. Blower Port 10.Power Cord 11.Handle 7 4 5 6 Assembling of Components Connection of the hose with the vacuum cleaner Insert one end of the hose into the air inlet of the vacuum cleaner for vacuuming. To use the unit as a blower instead insert one end of the hose into the blower port If you want to take the hose off, pull to remove it from the air inlet or blower port. Connection of hose with accessories First connect the hose to the unit, next attached the desired accessory to the available hose end. Assembling and dismantling of the tank Unlatch both the front & rear latches of the motor housing from the tank, then pull up on the handle of the unit. Assembly or removal of the filter Fit the filter over the float cage & secure with the retainer band. To remove, first remove the retainer band, then remove the filter from covering the float cage. Important: Make sure the filter is completely covering the filter cage; there are no gaps between the filter & thelid. It is very important to assy filter properly to reduce the risks of leaks and possible damage to the vacuum. OPERATION Vacuuming Dry Materials 1. The filter must always be in correct position to reduce the risk of leaks and possible damage to vac. Make sure that the filter is completely covering the filter cage and that the retainer band is as close to the lid as possible. Make sure there are no gaps between the filter and the lid. (See illustration). It is very important to assemble the filter to the cage without allowing any possible leaks or tears. Any leaks will allow the picked up media to be blown out of the blower port and back into the surrounding environment. 2. To maintain peak performance of your vac when picking up small debris such as sawdust, it may be helpful to empty the dust drum and clean or replace the filter at more frequent intervals. NOTE: The filter should be dry to pick up dry material. If you use your vac to pick up dry debris when the filter is wet, the filter will clog quickly and be very difficult to clean.In case the filter gets wet, replace it before continuing dry pickup. 17 SPECIFIC SAFETY RULES Wet/dry vac important safety instructions Keep hair, loose clothing, fingers, and all parts of body away from openings and moving parts. Do not pick up anything that is burning or smoking, such as cigarettes, matches, or hot ashes. Do not use without dirt container and filters in place. Turn off all controls before unplugging. Look on your vacuum cleaner and follow all label and marking instructions. Use extra care when cleaning on stairs. To avoid personal injury or damage, and to prevent the cleaner from falling, always place cleaner at bottom of stairs or on floor. Do not place cleaner on stairs or furniture, as it may result in injury or damage. Do not use to pick up flammable or combustible liquids, such as gasoline, or fine wood sandings, or use in areas where they may be present. Keep the vacuum cleaner on the floor. Only the hand-held vacuum cleaners may be set on furniture. Vacuum cleaner must be in the upright position to lift the rotating brush off the carpet when doing above floor cleaning. Brushroll continues to turn while product is turned on and handle is in the upright position. To avoid damage to carpet, rugs, and flooring, avoid tipping cleaner or setting it on furniture, fringed area rugs, or carpeted stairs during tool use. Do not use an extension cord with this vacuum cleaner. Store the vacuum cleaner indoors. Put the vacuum cleaner away after use to prevent tripping accidents. Operate cleaner only at voltage specified on date plate on back of cleaner. To reduce the risk of electric shock, do not expose to rain or allow liquid to enter motor compartment. Store indoors. Do not use with a torn filter or without the filter installed except when vacuuming liquids as described in this manual. Dry debris ingested by the impeller may damage the motor or be exhausted back into the air. When using as a blower: Direct air discharge only at work area. Do not direct air at bystanders. Keep children away when blowing. Do not use blower for any job except blowing dirt and debris. Do not use as a sprayer. Wear safety eyewear. To reduce the risk of eye injury, wear safety eyewear. The operation of any utility Vac or blower can result in foreign objects being blown into the eyes, which can result in severe eye damage. THIS PRODUCT IS INTENDED FOR HOUSEHOLD USE ONLY. IF USED COMMERCIALLY, WARRANTY IS VOID. IMPORTANT SAFETY INSTRUCTIONS SAVE THESE INTRUCTIONS! When you use an appliance, basic precautions should always be followed, including the following: READ ALL INSTRUCTIONS BEFORE USING THE APPLIANCE. ALWAYS FOLLOW THESE SAFETY INSTRUCTIONS. BRING VACUUM CLEANER TO UPRIGHT POSITION WHEN USING THE HOSE AND ATTACHMENTS. DO NOT LEAVE VACUUM CLEANER UNATTENDED WHEN PLUGGED IN. REGULARLY CHECK THE FILTER TO CLEAN OR REPLACE. WARNING: FULLY ASSEMBLE CLEANER BEFORE OPERATING. WARNING: DO NOT USE SHARP OBJECTS TO CLEAN OUT THE HOSE SINCE THEY COULD CAUSE DAMAGE. WARNING: THIS PRODUCT CONTAINS CHEMICALS KNOWN TO THE STATE OF CALIFORNIA TO CAUSE CANCER, BIRTH DEFECTS OR REPRODUCTIVE HARM. WARNING: TO REDUCE THE RISK OF FIRE, ELECTRIC SHOCK OR INJURY: Do not leave appliance when plugged in. Unplug from outlet when not in use and before cleaning or servicing. Do not allow to be used as a toy. Not intended for use by children age 12 and under. Close supervision is necessary when used near children. To avoid injury or damage, keep children away from product, and do no allow children to place fingers or other objects into any openings. Use only as described in this manual. Use only manufacturer’s recommended attachments and products. Do not use with damaged cord or plug. If appliance is not working as it should, has been dropped, damaged, left outdoors, or dropped into water, return it to a service center for inspection. Call 1-800-321-1134 for the nearest service center. Do not pull or carry by cord, use cord as handle, close a door on cord, or pull cord around sharp edges or corners. Do not place product on cord. Do not run appliance over cord. Keep cord away from heated surfaces. Do not unplug by pulling on cord. To unplug, grasp the plug, not the cord. Do not handle plug or appliance with wet hands. Do not put any objects into openings. Do not use with any opening blocked; keep free of dust, lint, hair, and anything that may reduce air flow. Do not use sharp objects to clean out hose as they can cause damage. subject to misuse. The jet must not be directed at persons, animals, electrical devices, or the machine itself. Hold the handle and wand securely with both hands. Expect the trigger handle to move when the trigger is pulled due to reaction forces. Failure to do so could cause loss of control and injury to yourself and others. Keep the motor away from flammables and other hazardous materials. Save these instructions. Refer to them frequently and use them to instruct other users. If you loan someone this product, loan them these instructions also. Check bolts and nuts for looseness before each use. A loose bolt or nut may cause serious motor problems. before storing, allow the motor to cool. When servicing use only identical replacement parts. Use of any other parts may create a hazard or cause product damage. Only use cold water. Make sure minimum clearance of 3 feet is maintained from combustible materials. Connect pressure washer only to an individual branch circuit. SYMBOLS The following signal words and meanings are intended to explain the levels of risk associated with this product. SYMBOL SIGNAL MEANING DANGER: Indicates an imminently hazardous situation, which, if not avoided, will result in death or serious injury. WARNING: Indicates a potentially hazardous situation, which, if not avoided, could result in death or serious injury. CAUTION: Indicates a potentially hazardous situation, which, if not avoided, may result in minor or moderate injury. CAUTION: (Without Safety Alert Symbol) Indicates a situation that may result in property damage. SAVE THESE INSTRUCTIONS 16 5 Fig. 10 ELECTRICAL DOUBLE INSULATION Fig. 12 B **Ampere rating (on product data plate) Double insulation is a concept in safety in electric power tools, which eliminates the need for the usual threewire grounded power cord. All exposed metal parts are isolated from the internal metal motor components with protecting insulation. Double insulated products do not need to be grounded. 0-2.0 2.1-3.4 Cord Length WARNING: The double insulated system is intended to protect the user from shock resulting from a break in the product’s internal insulation. Observe all normal safety precautions to avoid electrical shock. 3.5-5.0 5.1-7.0 7.1-12.0 12.1-16.0 Wire Size (A.W.G.) A 25' 16 16 16 16 14 14 50' 16 16 16 14 14 12 100' 16 16 14 12 10 — **Used on 12 gauge - 20 amp circuit. NOTE: AWG = American Wire Gauge WARNING: Keep the extension cord clear of the working area. Position the cord so that it will not get caught on lumber, tools, or other obstructions while you are working with a power tool. Failure to do so can result in serious personal injury. NOTE: Servicing of a product with double insulation requires extreme care and knowledge of the system and should be performed only by a qualified service technician. For service, we suggest you return the product to your nearest authorized service center for repair. Always use original factory replacement parts when servicing. ELECTRICAL CONNECTION WARNING: This product has a precision-built electric motor. It should be connected to a power supply that is 120 volts, AC only (normal household current), 60 Hz. Do not operate this product on direct current (DC). A substantial voltage drop will cause a loss of power and the motor will overheat. If the product does not operate when plugged into an outlet, double-check the power supply. Check extension cords before each use. If damaged replace immediately. Never use the product with a damaged cord since touching the damaged area could cause electrical shock resulting in serious injury. GROUND FAULT CIRCUIT INTERRUPTER ExTENSION CORDS See Figure 2. The Ground Fault Circuit Interrupter (GFCI) on this unit will reset to ON when plugged in. In the event of a ground fault, press the RESET button to restore power. This GFCI guards against the hazards of ground fault currents. An example of ground fault current is the current that would flow through a person who is using an appliance with faulty insulation and, at the same time, is in contact with an electrical ground such as a plumbing fixture, wet floor, or earth. When using a power tool at a considerable distance from a power source, be sure to use an extension cord that has the capacity to handle the current the product will draw. An undersized cord will cause a drop in line voltage, resulting in overheating and loss of power. Use the chart to determine the minimum wire size required in an extension cord. Only round jacketed cords listed by Underwriter’s Laboratories (UL) should be used. When working outdoors with a product, use an extension cord that is designed for outside use. This type of cord is designated with “WA” or “W” on the cord’s jacket. Before using any extension cord, inspect it for loose or exposed wires and cut or worn insulation. It is possible to tie the extension cord and power cord in a knot to prevent them from becoming disconnected during use. Make a knot, then connect the plug end of the power cord into the receptacle end of the extension cord. This method can also be used to tie two extension cords together. GFCI plugs do not protect against short circuits, overloads, or shocks. NOTE: To ensure readiness for use, press the TEST button each time you connect the pressure washer to the power supply. To test: Depress the TEST button. This should cause the RESET button to pop out. To restore power, depress the RESET button. Perform this test monthly to ensure proper operation of the GFCI. 6 A- Trigger B- Lock-outlever Fig. 11 A Fig. 13 B* A C* D* A- Nozzlecleaningtool A- Variablefanspraywand B- Rotarybrush* C- Wedgebrush* D- Turbowand* (*Inselectmodelsonly) 15 Fig. 4a Assembly instructions and process: Fig. 8 Fig. 5 A Accessories shelf FEATURES BACK KNOW YOUR pressure washer Screw B ON/off switch This switch turns the pressure washer on and off. See Figure 3. The safe use of this product requires an understanding of the information on the tool and in this operator’s manual as well as a knowledge of the project you are attempting. Before use of this product, familiarize yourself with all operating features and safety rules. B trigger handle The trigger handle has a gripping surface that provides added control of the spray wand and helps reduce fatigue. detergent tank Accessories Shelf Assembly A The pressure washer is equipped with a GFCI plug to guard against the hazards of ground fault currents. This plug does not protect against short circuits, overloads, or shocks. B B Handle grip A- Trigger handle B- Variable spray wand Upper left handle Upper right handle Fig. 6 ASSEMBLY Upper Handle Assembly Fig. 4c UNPACKING FRONT Upper Handle Assembly A b A- Hose inlet B- High pressure hose C - Hex nut Do not use this product if any parts on the Packing List are already assembled to your product when you unpack it. Parts on this list are not assembled to the product by the manufacturer and require customer installation. Use of a product that may have been improperly assembled could result in serious personal injury. Fig. 7 Assembly for Upper Handle Fig. 9 D On FRONT Fig. 4d A n Inspect the product carefully to make sure no breakage or damage occurred during shipping. WARNING: Do not attempt to modify this product or create accessories not recommended for use with this product. Any such alteration or modification is misuse and could result in a hazardous condition leading to possible serious personal injury. BACK A Spray wand lower WARNING: Spray wand upper and lower assembly *In select models only n If any parts are damaged or missing, please call 1-800-321-1134 for assistance. B C Handle Upper Left Handle Upper Right Screws (10) Nozzle Cleaning Tool Operator’s Manual Wedge Brush* Rotary Brush* Turbo Wand* n Do not discard the packing material until you have carefully inspected and satisfactorily operated the product. Off Spray wand upper Pressure Washer High Pressure Hose Trigger Handle Accessory Shelf Variable Fan Spray Wand Detergent Tank (2) Spray Wand Holder Upper Spray Wand Holder Lower Garden Hose Coupler Handle Grip WARNING: A- Detergent B- Detergent tank C. Detergent tank switch FRONT PACKING LIST This product requires assembly. n Carefully remove the product and any accessories from the box. Make sure that all items listed in the packing list are included. C c Screws Pulling the trigger releases a stream of water for high pressure cleaning. The lock-out provides protection against unauthorized use. GFCI Plug Fig. 4b Screws trigger with lock-out Remove the cap from the detergent tank to add detergent to the pressure washer. A- High-pressure extension hose B- Pressure washer outlet C - Garden hose coupler D- Pressure washer water inlet 14 A- On/off switch. Turn counter-clockwise to turn on. WARNING: Do not connect to power supply until assembly is complete. Failure to comply could result in accidental starting and possible serious personal injury. If any parts are damaged or missing do not operate this product until the parts are replaced. Use of this product with damaged or missing parts could result in serious personal injury. 7 See this section for all of the figures referenced in the operator’s manual. ASSEMBLY CONTINUED ASSEMBLING THE HANDLE AND SPRAY WAND HOLDER See Figure 4. If the screen is damaged, do not use the machine until the screen has been replaced. If the screen is dirty, clean it before connecting the garden hose to the machine. With the hose faucet turned completely off, attach the metal coupler to the water inlet and turn clockwise to securely tighten. Attach the garden hose to the metal coupler and tighten by hand. INSTALLING/REMOVING SPRAY WANDS See Figure 5. Depending on the model, there may be up to 4 spray wands included with the pressure washer. The variable fan spray wand produces a flat spray and has a low-to-high pressure adjustment. The turbo spray wand* produces a pencil jet spray. For higher intensity cleaning use the wedge brush*. The rotary tool* has a water-generated rotary brush, that can be used for a variety of uses. (*some models only) Consulter l’encart afin d’examiner toutes les figures mentionnées dans le manuel d’utilisation. Consulte esta sección para ver todas las figuras a las que se hace referencia en el manual del operador. Fig. 1 Fig. 2 A- Pressurewasherpowercord B- Driploop C - Extensioncord B A A C WARNING: NEVER change nozzles without engaging the lock-out on the trigger handle and never point the wand at your face or at others. The quick-connect feature contains small springs that could eject the nozzle with some force. Failure to heed this may cause personal injury. A- Testbutton B- Resetbutton B Fig. 3 O To install spray wand: FRONT BACK K P N Q Push the end of the spray wand into the trigger handle and rotate clockwise to secure. Pull on the spray wand to be certain it is properly secured. To remove spray wand: Turn off the pressure washer and shut off the water supply. Pull trigger to release water pressure. Push in on the spray wand and rotate clockwise to remove. S* H H M T* CONNECTING HIGH PRESSURE HOSE TO TRIGGER HANDLE See Figure 6. Place the hex nut over the hose inlet on the trigger handle. Using a wrench, securely tighten the hex nut. Pull on the hose to be certain it is properly secured. E E H A B J CONNECTING THE GARDEN HOSE See Figure 7. CAUTION: Always observe all local regulations when connecting hoses to the water main. Some areas have restrictions against connecting directly to public drinking water supply to prevent the feedback of chemicals into the drinking water supply. Direct connection through a receiver tank or backflow preventer is usually permitted. I L D F G The water supply must come from a water main. NEVER use hot water or water from pools, lakes, etc. Before connecting the garden hose: Uncoil the garden hose. NOTE: There must be a minimum of 10 feet of unrestricted garden hose between the water intake and the garden hose faucet or shut off valve (such as a “Y” shut off connector). Run water through the garden hose for 30 seconds to clean any debris from the hose. Inspect the screen in the water intake. A- Triggerhandle B - Trigger C - Lock-outlever D- Highpressurehose E - Detergenttank1and2 F - On/Offswitch G- Variablefanspraywand H- Spraywandholderupperandlower 8 I - Pressurewasherwaterinlet J- ElectricalcordwithGFCIplug K - Nozzlecleaningtool L- Detergenttankselectdial M- AccessoryShelf N- Gardenhosecoupler O- HandleGrip P - Handleupperright 13 R* Q- Handleleftupper R- TurboWand* S- RotaryBrush* T- WedgeBrush* (*Inselectmodelsonly) C operation TROUBLESHOOTING Problem Pressure washer does not start when trigger is depressed Possible Cause Power cord not connected to power source Connect the power cord to a live 120V AC, 60 Hz AC receptacle. Switch is off Turn switch on. GFCI is tripped Press reset button on the GFCI plug. House/shop circuit breaker is tripped Pump doesn’t produce pressure Machine doesn’t reach high pressure No detergent Reset house/shop breaker. Make sure pressure washer is connected to an individual branch circuit only. If using an extension cord, make sure it is heavy enough to carry the current of the pressure washer. Inadequate water supply Provide adequate water flow. Spray wand leaks Check connections and / or replace wand. Nozzle is clogged Clean nozzle. Pump is faulty Contact authorized service center. Air in line Squeeze trigger on spray wand to remove air from line. Water inlet filter is clogged or dirty Remove the water inlet filter, rinse with warm water, then replace in unit. WARNING: Check garden hose for kinks, leaks and blockages. O-ring needs replacing 12 Attach variable spray wand and set to (-) Replace o-ring. If this does not correct the problem, contact your authorized service center to purchase a new wand. Do not run the pump without the water supply connected and turned on. Connect the garden hose. Turn the garden hose on then squeeze the trigger to relieve air pressure. Once a steady stream of water appears, release the trigger. After ensuring the On/Off switch is in the OFF ( O ) position, connect the pressure washer to the power supply. Press the reset button on the pressure washer’s plug to make sure the unit is ready for operation. WARNING: Never direct a water stream toward people or pets, or any electrical device. Failure to heed this warning could result in serious injury. Turn ON ( I ) on the switch to start the motor. To stop the motor, release the trigger and turn OFF ( O ) on the switch. Applications adding detergent to the pressure washer Water supply is inadequate or clogged caution: WARNING: Check garden hose for kinks, leaks, and blockages. Add additional detergent to tank. See Figure 9. Do not use any attachments or accessories not recommended by the manufacturer of this product. The use of attachments or accessories not recommended can result in serious personal injury. Water supply is restricted Detergent tank is empty starting and stopping the pressure washer Always wear eye protection with side shields marked to comply with ANSI Z87.1. Failure to do so could result in objects being thrown into your eyes resulting in possible serious injury. Replace with 3/4 in. garden hose. Open water source full force. The pressure washer pump has been filled with sufficient lubricant at the factory and is maintenance free. You do not need to check or add lubricant to the pump before initial use. Do not allow familiarity with the product to make you careless. Remember that a careless fraction of a second is sufficient to inflict serious injury. Diameter of garden hose is too small Not enough inlet water pump lubricant WARNING: You may use this product for the purposes listed below: Cleaning boats, motorcycles, outdoor furniture, grills, house siding, patios, steps, decks, walkways, driveways Wrong nozzle is attached Wand leaks Solution NOTE: The pressure washer may be on and the sytem may have pressure even when the pump and/or motor cannot be heard running. Always use caution around the pressure washer. WARNING: Hold the trigger handle securely with both hands. Expect the trigger handle to move when the trigger is pulled due to reaction forces. Failure to do so could cause loss of control and injury to yourself and others. See Figure 8. Use only detergents designed for pressure washers; household detergents, acids, alkalines, bleaches, solvents, flammable material, or industrial grade solutions can damage the pump. Many detergents may require mixing prior to use. Prepare cleaning solution as instructed on the solution bottle. Disconnect pressure washer from power supply. Place pressure washer upright on a flat surface. Remove cap from detergent tank. Press detergent release button and remove tank from unit. Pour detergent into tank. NOTE: Use a funnel, if needed, to prevent accidental spilling of the detergent outside the tank. If any detergent is spilled during the filling process, make sure the unit is cleaned and dried before proceeding. Return detergent tank to unit and be sure it is properly put back into position. Reinstall cap. Select the detergent tank to be used. using the trigger and lock-out See Figure 10. For greater control and safety, keep both hands on the trigger handle at all times. Pull back and hold the trigger to operate the pressure washer. Release the trigger to stop the flow of water through the nozzle. To engage the lock-out: Push the lock-out button to the left on the trigger until it snaps into place. To disengage the lock-out: Push the button to the right on the trigger. For the most effective cleaning, the nozzle end of the spray wand should be between 8 in. and 24 in. from the surface to be cleaned. If the spray is too close it can damage the cleaning surface. 9 operation CONTINUED USING the NOZZLE OPERATING THE PRESSURE WASHER See Figure 13. The nozzle has an adjustable spray pattern. Before starting any cleaning job, determine the best setting for the job. The following chart offers some general guidelines. NOTE: Always try nozzles in an inconspicuous area first. Spray Wand Variable Spray Type Fan spray (+) See Figure 12 . Use only detergents designed for pressure washers. Many detergents may require mixing prior to use. Prepare cleaning solution as instructed on the solution bottle. To clean: n Pour detergent in the left or right detergent tank. Application n Install the variable fan spray wand. For general purpose or large surfaces • General cleaning of dirt, mud, and grime • Removing light mildew stains • Removing algae and bacteria build-up from pools • Rinsing surfaces in preparation for painting n Apply detergent at low pressure (- setting on the spray nozzle). n Start the pressure washer select left or right detergent tank and spray the detergent on a dry surface using long, even, overlapping strokes. To prevent streaking, do not allow detergent to dry on the surface. To rinse: nSelect middle position for detergent tanks and using the variable fan spray wand, adjust the spray to the high pressure setting (+). Soap spray For all detergent applications (-) NOTE: The pressure washer does not dispense detergent when on the high-pressure setting. nSpray away from the rinsing surface for approximately 10 seconds to allow any remaining detergent to be flushed from the line. WARNING: NEVER change nozzles without engaging the lock-out on the trigger handle and never point the wand at your face or at others. The quick-connect feature contains small springs that could eject the nozzle with some force. Failure to heed this may cause personal injury. n Start at the top of the area to be rinsed and work down, overlapping the strokes. moving the pressure washer n Turn off the pressure washer and shut off the water supply. Pull trigger to release water pressure. To move the pressure washer: n Turn the pressure washer off. Point nozzle in a safe direction and pull trigger to release water pressure. n Engage the lock-out on the trigger handle by pushing the trigger lock button to the right. n Tilt the machine toward you until it balances on the wheels then roll the machine to the desired position. n Push the nozzle into place in the spray wand. Rotate clockwise to secure the nozzle in the spray wand. To disconnect a nozzle from the trigger handle once the cleaning job is complete: n Turn off the pressure washer and shut off the water supply. Pull trigger to release water pressure. MAINTENANCE nozzle maintenance WARNING: See figure 13. Excessive pump pressure (a pulsing sensation felt while squeezing the trigger) may be the result of a clogged or dirty nozzle. n Unplug the pressure washer. When servicing, use only identical replacement parts. Use of any other parts may create a hazard or cause product damage. n Turn off the pressure washer and shut off the water supply. Pull trigger to release water pressure. WARNING: Always wear eye protection with side shields marked to comply with ANSI Z87.1. Failure to do so could result in objects being thrown into your eyes, resulting in possible serious injury. n Remove the spray wand from the trigger handle. n Using a garden hose, flush debris out of nozzle by back flushing (running the water through the nozzle backwards or from the outside to the inside). WARNING: Before inspecting, cleaning or servicing the machine, shut off engine, wait for all moving parts to stop, disconnect unit from power supply, and pull trigger to release water pressure. Failure to follow these instructions can result in serious personal injury or property damage. n Reconnect the spray wand to the trigger handle. n Turn on the water supply. STORING the pressure washer GENERAL MAINTENANCE Store in a dry, covered area where the weather can’t damage it. It is important to store this product in a frost-free area. Always empty water from all hoses, the pump, and the detergent container before storing. Avoid using solvents when cleaning plastic parts. Most plastics are susceptible to damage from various types of commercial solvents and may be damaged by their use. Use clean cloths to remove dirt, dust, oil, grease, etc. NOTE: Use of a pump saver will give you better performance and increase the life of the machine. WARNING: caution: Do not at any time let brake fluids, gasoline, petroleumbased products, penetrating oils, etc., come in contact with plastic parts. Chemicals can damage, weaken or destroy plastic which may result in serious personal injury. The use of a pump protector is recommended to prevent cold weather damage during storage over the winter months. Only the parts shown on the parts list are intended to be repaired or replaced by the customer. All other parts should be replaced at an authorized service center. n Push in on the spray wand and rotate clockwise to remove. VARIABLE FAN SPRAY WAND The variable fan spray wand can be used to create different spray patterns, from a full fan spray to a direct stream spray. When using the fan spray, begin with the lowest pressure and adjust to higher pressure, spraying far enough from the material being cleaned to avoid damaging the surface. 10 NOTE: Never point the spray wand at your face. n Using the provided nozzle cleaning tool, free any foreign materials clogging or restricting the nozzle. 11 OWNER’S MANUAL INSERT Operating and Servicing Instructions Please read these instructions carefully before using your electric pressure washer. Quick Connect System Pull A B This Pressure Washer’s metal hose coupler has been replaced by an easy to use quick connect. The quick connect system consists of a male end nozzle (A) and a female end coupler (B), and will come assembled and attached to the Pressure Washer. With the hose faucet turned off, disconnect the female coupler from the nozzle by pulling back on the collar in the direction away from the pressure washer. Secure the female coupler to the hose end by tightening the threads of the two pieces. Attach the garden hose with assembled female hose coupler to the unit by pulling the collar back & moving the female coupler over top the male end nozzle. When use of the pressure washer is complete, unthread the garden hose from the female coupler and leave the entire quick connect system attached onto the unit for easy-to-access onboard storage. Note: Any other reference to the metal hose coupler later in the manual should be substituted with the included quick connect system that is explained above. Let us help you put your pressure washer together or answer any questions, call: 1-800-321-1134 (USA & Canada) www.dirtdevil.com SAVE THIS INSERT FOR FUTURE REFERENCE ©2010 All Rights Reserved • Part#961127004 R0 • 6/10