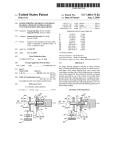
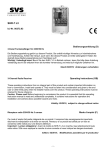
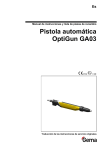
1
A PASSION FOR PERFECTION
IKR 251
Compact Cold Cathode Gauge, FPM sealed
BG 5151 BEN (2011-01)
Operating Instructions
VACUUM
In all communications with Pfeiffer Vacuum, please specify the information given
on the product nameplate.
Validity
Compact
Cold Cathode
Gauge
Product Identification
Pfeiffer Vacuum, D-35614 Asslar
Typ:
No:
F-No:
V
W
This document applies to products with the following part numbers
PT R25 500
(DN 25 ISO-KF flange)
PT R25 501
(DN 40 ISO-KF flange)
(DN 40 CF-F flange)
PT R25 502
The part number can be taken from the product nameplate.
We reserve the right to make technical changes without prior notice.
Intended Use
The Compact Cold Cathode Gauge IKR 251 has been designed for vacuum
-9
-2
measurement in a pressure range of 2×10 … 1×10 mbar.
The IKR 251 can be used with a Pfeiffer Vacuum measurement unit for Compact
Gauges or with another evaluation unit.
Functional Principle
Over the whole measurement range, the measuring signal is output as a logarithm
of the pressure.
If functions with a cold cathode ionization measurement circuit (according to the
inverted magnetron principle).
2
BG 5151 BEN
(2011-01)
IKR 251
Contents
Product Identification
Validity
Intended Use
Functional Principle
2
2
2
2
1 Safety
1.1 Symbols Used
1.2 Personnel Qualifications
1.3 Safety Information
1.4 Liability and Warranty
4
4
4
4
5
2 Technical Data
6
3 Installation
3.1 Vacuum Connection
3.1.1 Removing the Magnet Unit (Only for Gauges With CF Flanges)
3.2 Power Connection
3.2.1 Use With a Pfeiffer Vacuum Measurement Unit
3.2.2 Use With Another Evaluation Unit
9
9
10
11
11
11
4 Operation
13
5 Maintenance
5.1 Cleaning the Gauge / Replacing Parts
5.1.1 Disassembling the Gauge
5.1.2 Cleaning the Gauge
5.1.3 Reassembling the Gauge
5.1.4 Adjusting the Gauge
5.2 What to Do in Case of Problems
14
14
15
16
16
17
18
6 Removing the Gauge From the Vacuum System
18
7 Returning the Product
19
8 Accessories
19
9 Spare Parts
20
10
20
Disposal
Appendix
A: Measuring Signal vs. Pressure
B: Gas Type Dependence
21
21
23
For cross references within this document, the symbol (→ XY) is used, for
references to other documents, the symbol (→ [Z]).
BG 5151 BEN
(2011-01)
IKR 251
3
1 Safety
1.1 Symbols Used
DANGER
Information on preventing any kind of physical injury.
WARNING
Information on preventing extensive equipment and environmental damage.
Caution
Information on correct handling or use. Disregard can lead to malfunctions or
minor equipment damage.
1.2 Personnel Qualifications
Skilled personnel
All work described in this document may only be carried out by persons who
have suitable technical training and the necessary experience or who have been
instructed by the end-user of the product.
1.3 Safety Information
•
Adhere to the applicable regulations and take the necessary precautions for the
process media used.
Consider possible reactions between the materials (→ 7) and the process
media.
Consider possible reactions of the process media due to the heat generated by
the product.
•
Adhere to the applicable regulations and take the necessary precautions for all
work you are going to do and consider the safety information in this document.
•
Before you begin to work, find out whether any vacuum components are contaminated. Adhere to the relevant regulations and take the necessary precautions when handling contaminated parts.
DANGER
DANGER: magnetic fields
Strong magnetic fields can disturb electronic devices like heart
pacemakers or impair their function.
Maintain a safety distance of ≥10 cm between the magnet and the
heart pacemaker or prevent the influence of strong magnetic fields by
antimagnetic shielding.
Pass on the safety information to other users.
4
BG 5151 BEN
(2011-01)
IKR 251
1.4 Liability and Warranty
Pfeiffer Vacuum assumes no liability and the warranty becomes null and void if the
custodian or third parties
•
disregard the information in this document
•
use the product in a non-conforming manner
•
make any kind of changes (modifications, alterations etc.) to the product
•
use the product with accessories not listed in the corresponding product
documentation.
The custodian assumes the responsibility in conjunction with the process media
used.
Gauge failures due to contamination or wear and tear, as well as expendable parts
(e.g. seals), are not covered by the warranty.
BG 5151 BEN
(2011-01)
IKR 251
5
2 Technical Data
Admissible temperatures
Storage
Operation
Bakeout
Relative humidity
Use
-40 °C … +65 °C
+5 °C … +55 °C
+150 °C (without electronics unit and
magnetic shielding)
max. 80% at temperatures ≤+31 °C
decreasing to 50% at +40 °C
indoors only
altitude up to 2000 m (6600 ft)
Measurement range (air, N2)
Accuracy
2×10⁻⁹ … 1×10⁻² mbar
Reproducibility
≈±5%
-8
-3
in the range 1×10 … 1×10 mbar
Gas type dependence
→ Appendix B
Adjustment
The gauge is adjusted at the factory
and requires no maintenance.
Degree of protection
Maximum pressure (absolute)
IP 40
10 bar
only for inert gases <55 °C
≈±30%
in the range 1×10⁻⁸ … 1×10⁻³ mbar
Supply
DANGER
The gauge may only be connected to supply or measurement units
that conform to the requirements of a grounded protective extra-low
voltage (SELV). The connection to the gauge has to be fused.1)
Voltage at the gauge
15.0 … 30.0 VDC (max. ripple 1 Vpp)
Power consumption
≤2 W
1)
≤1 AT
Fuse
The minimum voltage of the power supply must be increased proportionally to the
length of the measuring cable.
Voltage at the supply unit with
maximum cable length
16.0 … 30.0 VDC (max. ripple 1 Vpp)
Electrical connection
Cable
Maximum cable length
Operating voltage
(in the measuring chamber)
Operating current
(in the measuring chamber)
1)
6
Hirschmann compact connector
type GO 6, 6 pins, male
5 poles plus screening
100 m (0.25 mm² conductor)
150 m (0.34 mm² conductor)
500 m (1.0 mm² conductor)
≤3.3 kV
≤500 µA
Pfeiffer Vacuum measurement and control units for Compact Gauges fulfill
these requirements.
BG 5151 BEN
(2011-01)
IKR 251
Output signal (measuring signal)
Voltage range
Relationship voltage-pressure
Error signals
Output impedance
2×10 Ω
Normal load
100 kΩ
Minimum load
10 kΩ, short-circuit proof
pressure dependent
<10 ms
≈ 1s
Response time
-6
p > 10 mbar
-8
p = 10 mbar
Gauge identification
5.1 kΩ resistor referenced to supply
common → Figure 2
Grounding concept
→ Figure 2
Vacuum flange-measurement
common
Supply common-signal common
PT R25 500 (DN 25 ISO-KF)
≈ 0 V … ≈ +10.5 V
logarithmic, increase 1 V / decade
(→ Appendix A)
<0.5 V (no supply)
Materials exposed to the vacuum
Feedthrough isolation
Internal seals
Flange
Measuring chamber
Anode
Ignition aid
Internal volume
connected via 10 kΩ
(max. voltage differential
with respect to safety
±50 V
with respect to accuracy ±10 V)
conducted separately; differential
measurement recommended for cable
lengths ≥10 m
ceramic (Al2O3)
FPM75
stainless steel (1.4104)
stainless steel (1.4104)
Mo
stainless steel (1.4310/AISI 301)
≈20 cm³
Dimensions [mm]
101
Weight
BG 5151 BEN
(2011-01)
IKR 251
28
55
20
VACUUM
ø 63,5
DN 25 ISO-KF
18
Compact
ColdCathode
Gauge
VACUUM
700 g
7
PT R25 501 (DN 40 ISO-KF)
PT R25 502 (DN 40 CF-F)
Materials exposed to the vacuum
Feedthrough isolation
Internal seals
Flange
Measuring chamber
Anode
Ignition aid
Internal volume
ceramic (Al2O3)
FPM75
stainless steel (1.4306/AISI 304L)
stainless steel (1.4104)
Mo
stainless steel (1.4310/AISI 301)
≈20 cm³
Dimensions [mm]
18.5
28
55
20
VACUUM
ø 63,5
DN 40 CF-F DN 40 ISO-KF
101.5
Compact
ColdCathode
Gauge
VACUUM
24
107
Weight
8
700 g (DN 40 ISO-KF flange)
950 g (DN 40 CF-F flange)
BG 5151 BEN
(2011-01)
IKR 251
3 Installation
3.1 Vacuum Connection
Caution
Caution: vacuum component
Dirt and damages impair the function of the vacuum component.
When handling vacuum components, take appropriate measures to
ensure cleanliness and prevent damages.
The gauge can be mounted in any orientation. However, it should be mounted so
that any particles present cannot penetrate into the measuring chamber (→ 13).
See "Technical data" (→ 6 ff.) for space requirements.
Procedure
n
Remove the protective cap.
The protective cap will be
needed for maintenance work.
o
Make the flange connection.
When making a CF flange connection, it
can be advantageous to temporarily
remove the magnet unit
(→ section 3.1.1).
DANGER
DANGER: overpressure in the vacuum system >2.5 bar
KF flange connections with elastomer sealing rings (e.g.
O-rings) cannot withstand such pressures. Process media can
thus leak and possibly damage your health.
Use sealing rings provided with an outer centering ring.
DANGER
DANGER: overpressure in the vacuum system >1 bar
If clamps are opened unintentionally injury can be caused by
catapulted parts.
Use the type of clamps which can only be opened and closed
by means of a tool (e.g. hose clip clamping ring).
BG 5151 BEN
(2011-01)
IKR 251
9
DANGER
The gauge must be electrically connected to the grounded
vacuum chamber. The connection must conform to the requirements of protective connection according to EN 61010:
•
CF flanges fulfill this requirement
•
For gauges with KF flanges, use a conductive metallic
clamping ring.
WARNING
WARNING: electric arcing
Helium may cause electric arcing with detrimental effects on the
electronics of the product.
Before performing any tightness tests put the product out of
operation and remove the electronics unit.
3.1.1 Removing the Magnet
Unit (Only for Gauges
With CF Flanges)
Tools required
Procedure
•
Allen wrench AF 1.5
•
Open-end wrench AF 7
n
o
p
Unfasten the hexagon socket set screw (1) on the side of the electronics
unit (2) (→ Figure 1).
Remove the electronics unit.
Unfasten the hexagon head screw (3) on the magnet unit (4) and remove
the magnet unit.
Caution
The magnetic force and the tendency to tilt make it more
difficult to separate the magnet unit and the measuring chamber
(7).
q
r
s
t
10
Make the flange connection between the gauge and the vacuum system.
Remount the magnet unit and lock it with the hexagon head screw (3).
Carefully mount the electronics unit (2).
Push the electronics unit up to the mechanical stop and lock it with the
hexagon socket set screw (1).
BG 5151 BEN
(2011-01)
IKR 251
2
3
4
7
1
Figure 1
3.2 Power Connection
•
3.2.2 Use With Another
Evaluation Unit
Procedure
BG 5151 BEN
(2011-01)
IKR 251
Secure the cable at the
gauge with the screw.
VACUUM
If the gauge is used with a
Pfeiffer Vacuum measurement
unit for Compact Gauges, a
corresponding connection cable
is required (→ 19).
Compact
Cold Cathode
Gauge
3.2.1 Use With a
Pfeiffer Vacuum
Measurement Unit
The gauge can also be operated with other evaluation units. In this case, an
individual connection cable must be made.
For cable lengths up to 10 m (with a conductor cross-section of 0.34 mm2), the
measuring signal can be read directly between the positive signal output (pin 2)
and the supply common (pin 5) without the degree of accuracy being lowered. For
longer measurement cable lengths, we recommend a differential measurement
between the signal output and the signal common (pin 3) (as a result of the voltage
drop along the supply cable ground lead, the common mode signal is approx. 1.0 V
at the maximum permissible cable length).
n
Prepare the connector
(Ordering number
→ 19).
11
o
Solder the connection cable according to the diagram.
10
10
5.1 k
2
V
3
–
1
4
+
–
5
10k
+
6
Figure 2:
Power connection
Pin 1
Pin 2
Pin 3
Pin 4
Pin 5
Pin 6
identification
signal output
(measuring signal)
signal common
supply
supply common
screen
3
2
4
5
1
6
Connector, soldering side
WARNING
The supply common (pin 5) and screen (pin 6) must be
connected to the supply unit with protective ground.
Incorrect connection, incorrect polarity, or inadmissible supply
voltages can damage the gauge.
p
Reassemble the connector.
q
Plug in the connector.
VACUUM
12
Compact
Cold Cathode
Gauge
Secure the cable on the gauge
with the screw.
BG 5151 BEN
(2011-01)
IKR 251
4 Operation
As soon as the required voltage is applied, the measuring signal is available
between pins 2 and 3. (→ Appendix A for the relationship between the measuring
signal and the pressure).
The green lamp on the gauge
indicates the operating state:
Supply voltage present.
No supply voltage.
Caution
Turn on the gauge only at pressures <10-2 mbar to prevent excessive
contamination.
If you are using a Pfeiffer Vacuum measurement unit for Compact
Gauges with at least two gauge connections, the cold cathode gauge
can be controlled, for example, by a Pirani gauge.
Gas type dependence
The measuring signal depends on the type of gas being measured. The curves are
accurate for dry air, N2, O2 and CO. They can be mathematically converted for
other gases (→ Appendix B).
If you are using a Pfeiffer Vacuum measurement unit for Pfeiffer Vacuum Compact
Gauges, you can enter a calibration factor to correct the measurement value
displayed (→ of that measurement unit).
Ignition delay
An ignition delay occurs when cold cathode gauges are switched on. The delay
time increases at low pressures and is typically:
-7
10 mbar ≈ 0.1 minute
-8
10 mbar ≈ 1 minute
-9
2×10 mbar ≈ 5 minutes
Contamination
Gauge failures due to contamination or wear and tear, as well as expendable parts
(e.g. seals), are not covered by the warranty.
Gauge contamination is influenced by the process media used as well as any
existing or new contaminants and their respective partial pressures. Continuous
-4
-2
operation in the range of 10 mbar ... 10 mbar can cause severe contamination
as well as reduced up-time and maintenance cycles. With constantly low pressures
-6
(< 1×10 mbar), the gauge can be operated for more than one year without
cleaning (cleaning the gauge → 16).
In general, contamination of the gauge leads to deviations of the measured values:
•
In the low pressure range (p < 1×10⁻³ mbar), the pressure indication is usually
too low (as a consequence of the contamination of the cold cathode system). In
case of severe contamination, instabilities can occur (layers of the measuring
chamber peel off). Contamination due to isolating layers can even lead to a
complete failure of the discharge.
Contamination can to a certain extent be reduced by:
•
geometric protection (e.g. screenings, elbows) against particles that spread
rectilinearly
•
mounting the flange of the gauge at a place where the partial pressure of the
pollutants is particularly low.
Special precautions are required for vapors deposited under plasma (of the cold
cathode measuring system). It may even be necessary to temporarily switch of the
gauge while vapors occur.
BG 5151 BEN
(2011-01)
IKR 251
13
5 Maintenance
Gauge failures due to contamination or wear and tear, as well as expendable parts
(e.g. seals), are not covered by the warranty.
DANGER
DANGER: contaminated parts
Contaminated parts can be detrimental to health and environment.
Before you begin to work, find out whether any parts are contaminated. Adhere to the relevant regulations and take the necessary precautions when handling contaminated parts.
5.1 Cleaning the Gauge /
Replacing Parts
DANGER
DANGER: cleaning agents
Cleaning agents can be detrimental to health and environment.
Adhere to the relevant regulations and take the necessary precautions
when handling and disposing of cleaning agents. Consider possible
reactions with the product materials (→ 7).
Tools / material required
14
•
Allen wrench AF 1.5
•
Allen wrench AF 3
•
Open-end wrench AF 7
•
Pliers for circlip
•
Polishing cloth (400 grain) or Scotch-Brite
•
Tweezers
•
Cleaning alcohol
•
Mounting tool for ignition aid
•
Ignition aid
•
FPM seal (11) for anode feedthrough
BG 5151 BEN
(2011-01)
IKR 251
5.1.1 Disassembling the Gauge
2
3a,b,c
1
4
6
5
7
8a
8
10a
9
10
11
12
Figure 3
Procedure
n
o
p
Remove the gauge from the vacuum system (→ 18).
Unfasten the hexagon socket set screw (1) on the side of the electronics
unit (2) (→ Figure 3).
Remove the electronics unit.
Caution
The cover of the electronics unit cannot be removed.
q
Unfasten the hexagon head screw (3) on the magnet unit (4) and remove
the magnet unit.
Caution
The magnetic force and the tendency to tilt make it more
difficult to separate the magnet unit and the measuring chamber
(7).
r
s
t
Remove the circlip (5) as well as the polarity insert (6) from the measuring
chamber.
Remove the four (or two) hexagon socket screws (8) incl. lock washers (8a)
on the back of the measuring chamber.
Carefully remove the following items in this order: pressure piece (9),
complete anode (10), FPM seal (11) incl. support ring (12).
The parts can now be cleaned or replaced.
BG 5151 BEN
(2011-01)
IKR 251
15
5.1.2 Cleaning the Gauge
Procedure
n
Using a polishing cloth rub the inside walls of the measuring chamber and
the polarity insert to a bright finish.
Caution
The sealing surfaces must only be worked concentrically.
o
p
Rinse the measuring chamber and the polarity insert with cleaning alcohol.
Allow both to dry.
Cleaning or replacing the anode:
n
o
Remove the old ignition aid (10a) with tweezers (→ Figure 3).
Using a polishing cloth rub the anode pin to a bright finish.
Caution
Do not bend the anode. Do not carry out mechanical work on
the ceramic part.
p
q
r
s
Rinse the anode with cleaning alcohol.
Allow the anode to dry.
Insert a new ignition aid (10a) into the mounting tool.
Carefully press the anode (clean or new) centered and parallel to the tool
axis into the ignition aid and insert it to a depth of approx. 15 mm. The final
positioning is established after the anode is installed.
Anode
Ignition aid
Mounting tool
5.1.3 Reassembling the Gauge
Procedure
n
o
p
16
Insert the FPM seal (11) with the support ring (12) centered into the
measuring chamber. The sealing surface, seal, and ceramic part must be
clean (→ Figure 3).
Carefully insert the anode (10) incl. ignition aid (10a) into the measuring
chamber.
Carefully place the pressure piece (9) on the measuring chamber and
tighten it uniformly with the four (or two) hexagon socket screws (8) incl.
lock washers (8a) until the stop position is reached.
BG 5151 BEN
(2011-01)
IKR 251
q
r
s
t
Position the ignition aid (10a) by pushing the mounting tool over the anode
pin until the mechanical stop is reached.
Remove the particles in the measuring chamber with dry nitrogen (be
careful to hold the measuring chamber with the flange pointing downwards).
Slide the polarity insert (6) into the measuring chamber up to the
mechanical stop.
Place the circlip (5) snugly fitting on the polarity insert.
Caution
Visually check that the anode pin is centered over the middle
hole of the polarity insert (max. eccentricity = 0.5 mm).
u
If possible perform a leak test (leak rate <10-9 mbar l/s).
WARNING
WARNING: electric arcing
Helium may cause electric arcing with detrimental effects on the
electronics of the product.
Before performing any tightness tests put the product out of
operation and remove the electronics unit.
v
w
Mount the magnet unit (4) and lock it with the hexagon head screw (3).
Carefully slide the electronics unit (2) on the magnet unit until the
mechanical stop is reached.
Fasten the electronics unit (2) by means of the hexagon socket set
screw (1).
DANGER
Due to missing ground connection in conjunction with missing
or not correctly tightened hexagon socket set screw (1) dangerous contact voltage will occur.
5.1.4 Adjusting the Gauge
BG 5151 BEN
(2011-01)
IKR 251
The gauge is factory-calibrated and requires no maintenance. It must be replaced
in the event of a defect (→ 20).
17
5.2 What to Do in Case of
Problems
Problem
Possible cause
Correction
Measuring signal
continually < 0.5 V and
green lamp is OFF.
No supply voltage.
Turn on the power
supply.
Measuring signal
continually < 0.5 V and
Supply voltage too low.
Increase the supply
voltage (→ 6).
green lamp is ON
Electronics unit defective.
Replace the electronics
unit (→ 6).
Measurement signal
continually in the range of
Vacuum chamber pressure –
< 2×10⁻⁹ mbar.
0.5 ... 1.8 V (underrange).
Gas discharge has not
ignited.
Wait until the gas discharge ignites
(≈ 5 minutes at a
-9
pressure of 10 mbar).
Measuring signal unstable.
Gauge contaminated.
Clean the gauge
(→ 16).
6 Removing the Gauge From the Vacuum System
DANGER
DANGER: contaminated parts
Contaminated parts can be detrimental to health and environment.
Before you begin to work, find out whether any parts are contaminated. Adhere to the relevant regulations and take the necessary precautions when handling contaminated parts.
Caution
n
Deactivate the gauge.
o
Unplug the connector.
VACUUM
Procedure
18
Compact
Cold Cathode
Gauge
Caution: vacuum component
Dirt and damages impair the function of the vacuum component.
When handling vacuum components, take appropriate measures to
ensure cleanliness and prevent damages.
BG 5151 BEN
(2011-01)
IKR 251
p
Detach the gauge from the
vacuum apparatus.
q
Place the protective cap.
7 Returning the Product
WARNING
WARNING: forwarding contaminated products
Products returned to Pfeiffer Vacuum for service or repair should, if
possible, be free of harmful substances (e.g. radioactive, toxic, caustic
or microbiological). Otherwise, the type of contamination must be
declared.
Adhere to the forwarding regulations of all involved countries and forwarding companies and enclose a completed contamination declaration *).
*)
Form under www.pfeiffer-vacuum.net
Products that are not clearly declared as "free of harmful substances" are decontaminated at the expense of the customer.
8 Accessories
Ordering number
Cable for connection to Pfeiffer Vacuum
measurement unit for Compact Gauges
3m
6m
10 m
Socket Hirschmann GO 6 WF,
6 contacts, angled, female
Magnetic shielding
BG 5151 BEN
(2011-01)
IKR 251
PT 44 850-T
PT 448 251-T
PT 448 252-T
B 470 7283 MA
PT 443 155-X
19
9 Spare Parts
Always include the following information with your spare parts order:
•
Type of product
•
Manufacturing number according to nameplate
•
Position, description, and ordering number according to spare parts list
The following parts are available as spare parts sets:
Pos.
Description
Ordering number
Maintenance set, consisting of:
1× support ring
1× O-ring FPM75 10.82 × 1.78
3× ignition aid
1× O-ring FPM75 3.69 × 1.78
(not used with IKR)
BN 846 239-T
Repair set, including:
1× support ring
1× O-ring FPM75 10.82 × 1.78
1× anode, complete
3× ignition aid
BN 846 252-T
12
11
10
10a
Set of ignition aids, including:
10× ignition aid
BN 845 995-T
10a
Mounting tool for ignition aid
BG 510 600
Electronics unit IKR 251
BN 846 461-T
Measuring system, complete
DN 25 ISO-KF flange
DN 40 ISO-KF flange
DN 40 CF-F flange
BN 846 462-T
BN 846 463-T
BN 846 464-T
Exchange gauge
(return defective gauge to Pfeiffer Vacuum)
DN 25 ISO-KF flange
DN 40 ISO-KF flange
DN 40 CF-F flange
PT R25 500-A
PT R25 501-A
PT R25 502-A
12
11
10a
2
3a,b,c
1
4
6
5
7
8
8a
10a
9
10
11
12
2
10 Disposal
WARNING
N
20
WARNING: substances detrimental to the environment
Products, operating materials etc. may have to be specially disposed
of.
For environmentally compatible disposal, please contact your nearest
Pfeiffer Vacuum Service Center.
BG 5151 BEN
(2011-01)
IKR 251
Appendix
A:
Measuring Signal vs.
Pressure
Conversion formulae
p = 10U-c
where
Conversion curves
U = c + log10 p
⇔
p
U
c
[mbar]
[V]
10.5
[µbar]
[V]
7.5
[Torr]
[V]
10.625
[mTorr]
[V]
7.625
[micron]
[V]
7.625
[Pa]
[V]
8.5
[kPa]
[V]
11.5
U Measurement signal
p
Pressure
c, d Constant (dependent
on pressure unit)
valid in the range
-9
-2
2×10 mbar < p < 1×10 mbar
-9
-3
1.5×10 Torr < p < 7.5×10 Torr
-7
2×10 Pa < p < 1 Pa
Pressure p
1E+00
Pa
1E–01
1E–03
Torr
1E–05
1E–06
overrange
1E–04
underrange
mbar
sensor error
1E–02
1E–07
1E–08
1E–09
1E–10
0.0 0.5 1.0 1.5 2.0 2.5 3.0 3.5 4.0 4.5 5.0 5.5 6.0 6.5 7.0 7.5 8.0 8.5 9.0 9.5 10.0 10.5
Measuring signal U [V]
BG 5151 BEN
(2011-01)
IKR 251
21
Conversion table
Measuring
signal U [V]
< 0.5
0.5 ... 1.8
1.8
2.5
3.5
4.5
5.5
6.5
7.5
8.5
8.5 ... 10.5
22
[mbar]
-9
2.0×10
-8
1.0×10
-7
1.0×10
1.0×10⁻⁶
-5
1.0×10
-4
1.0×10
-3
1.0×10
1.0×10⁻²
Pressure p
[Torr]
Sensor error
Underrange
1.5×10⁻⁹
-9
7.5×10
-8
7.5×10
7.5×10⁻⁷
-6
7.5×10
-5
7.5×10
-4
7.5×10
7.5×10⁻³
Overrange
[Pa]
2.0×10⁻⁷
-6
1.0×10
-5
1.0×10
1.0×10⁻⁴
-3
1.0×10
-2
1.0×10
0.1
1.0
BG 5151 BEN
(2011-01)
IKR 251
B:
Gas Type Dependence
Indicated pressure (gauge calibrated for air)
p (mbar)
Luft / Air
O2
CO
Ar N2 H2
4
Xe Kr
2
10
-3
8
6
4
2
10-4
8
6
4
2
10-5
8
6
4
2
10
-6
8
6
4
2
10-7
10-7
2
4
6 10-6
2
4
6 10-5
2
4
6 10-4
2
4
6 10-3
2
4
6 10-2
peff (mbar)
Indication range below
10-5 mbar
In the range below 10-5 mbar, the pressure indication is linear. For gases other
than air, the pressure can be determined by means of a simple conversion formula:
peff = K × indicated pressure
where
gas type
K
air (N2, O2, CO)
Xe
Kr
Ar
H2
Ne
He
1.0
0.4
0.5
0.8
2.4
4.1
5.9
These conversion factors are average values.
Caution
A mixture of gases and vapors is often involved. In this case, accurate
determination is only possible with a partial pressure measurement
instrument, e.g. a quadrupole mass spectrometer.
BG 5151 BEN
(2011-01)
IKR251.oi
23
A PASSION FOR PERFECTION
Leading. Dependable.
Customer Friendly.
Pfeiffer Vacuum stands for innovative and custom
vacuum solutions worldwide. For German engineering art,
competent advice and reliable services.
Ever since the invention of the turbopump, we've
been setting standards in our industry. And this claim
to leadership will continue to drive us in the future.
You are looking for a
perfect vacuum solution?
Please contact us:
Germany
Pfeiffer Vacuum GmbH
Headquarters
Tel.: +49 (0) 6441 802-0
[email protected]
Great Britain
Pfeiffer Vacuum Ltd.
Tel.: +44 1908 500600
[email protected]
Austria
Pfeiffer Vacuum Austria GmbH
Tel.: +43 1 894 17 04
[email protected]
Benelux
Pfeiffer Vacuum GmbH
Sales & Service Benelux
Tel.: +800-pfeiffer
[email protected]
India
Pfeiffer Vacuum India Ltd.
Tel.: +91 40 2775 0014
[email protected]
Sweden
Pfeiffer Vacuum Scandinavia AB
Tel.: +46 8 590 748 10
[email protected]
China
Pfeiffer Vacuum
(Shanghai) Co., Ltd.
Tel.: +86 21 3393 3940
[email protected]
Italy
Pfeiffer Vacuum Italia S.p.A.
Tel.: +39 02 93 99 05 1
[email protected]
Switzerland
Pfeiffer Vacuum (Schweiz) AG
Tel.: +41 44 444 22 55
[email protected]
France
Pfeiffer Vacuum France SAS
Tel.: +33 169 30 92 82
[email protected]
Korea
Pfeiffer Vacuum Korea Ltd.
Tel.: +82 31 266 0741
[email protected]
United States
Pfeiffer Vacuum Inc.
Tel.: +1 603 578 6500
[email protected]
www.pfeiffer-vacuum.net
Original: German BG 5151 BDE (2011-01)
bg5151ben