1
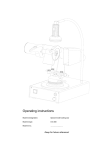
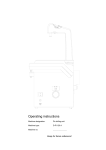
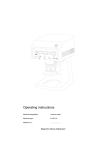
Operating instructions
Machine designation:
Special model-cutting-saw
Machine type:
S-G 330 D
Machine no.:
.......................
Keep for future reference!
Dear customer,
Thank you for the confidence you have placed in us by purchasing this special model-cuttingsaw.
For this unit to be of service to you for many years to come, please take the time to read these
operating instructions carefully, especially before using the unit for the first time.
Contents
1 Safety ...................................................................................................................................... 2
1.1 Intended use .................................................................................................................. 2
1.2 Possible dangers ........................................................................................................... 2
1.3 Approved operators ....................................................................................................... 2
1.4 Safety measures at site of operation ............................................................................. 2
1.5 Marking of safety references contained in these instructions......................................... 2
2 Initial/setting into operation.................................................................................................. 3
2.1 Unpacking the special model-cutting-saw...................................................................... 3
2.2 Initial/setting into operation ............................................................................................ 3
2.3 Brief description of the unit and identification of the unit components ........................... 4
3 Operation ................................................................................................................................ 5
3.1 Changing/inserting diamond saw blade ......................................................................... 5
3.2 Electric control mechanism ............................................................................................ 6
3.3 Sawing with the S-G 330 D............................................................................................ 6
4 Cleaning/maintenance........................................................................................................... 6
4.1 Cleaning the diamond saw blade ................................................................................... 6
5 Electrical fuse protection ...................................................................................................... 7
6 Technical data ........................................................................................................................ 7
7 Warranty conditions .............................................................................................................. 8
8 EC declaration of conformity ................................................................................................ 9
S-G 330 D - 22.02.2002 / Vers.: 1
1
1 Safety
1.1 Intended use
The S-G 330 D special model-cutting-saw is intended for use in dental laboratories for high
processing precision when cutting segments (stumps) out of models of different plaster-like
materials.
Dusts, which are generated while sawing, must be extracted by a dust removal installation
specifically designed for this type of unit.
Unauthorized modifications and additions are not permitted for safety reasons!
1.2 Possible dangers
−
−
−
−
−
−
The bottom side of the model should be ground flat and even. Its circumference should be
roughly adapted to the right angle of the clamping claws so that it can be securely fastened
between them on the model holder plate. Make sure the model is fastened evenly between
the three claws. It should never be fastened between two claws only! If not sufficiently
fastened the model can be thrown out of the model holder and the saw blade destroyed.
The tool should only be operated with the saw blade guard mounted and with the safety
screen screwed on. The course of the saw blade (when sawing) should only be watched
through the safety screen, as projected parts could lead to serious injuries.
Keep a sufficient safety distance of several centimeters away from the saw blade.
The rotating saw blade should be inserted with slight pressure into the model. The saw
should not be switched off while the blade is still inside the saw notch. Never insert the saw
blade into the saw notch while the blade is not rotating. This way you can prevent the saw
blade from jamming.
Before maintenance work, cleaning and/or repair work you should switch the unit off at the
main switch and disconnected from the mains supply (i. e. the mains plug should be pulled).
Before accessing any of the incorporated electric components, the unit should be
disconnected from the mains supply!
1.3 Approved operators
The operator of the machine should make sure that the operating instructions are accessible to
the operating personnel. The operator should make sure that they have been read and fully
understood by the operating personnel. Only then should they be allowed to operate the
machine.
1.4 Safety measures at site of operation
The installation surface should be flat and stable according to the weight of the special modelcutting-saw.
Make sure by endorsing appropriate corporate instructions and control mechanisms that the pin
drilling workplace always complies with the pertinent accident prevention regulations.
1.5 Marking of safety references contained in these instructions
Note
Refers to tips and other particularly helpful pieces of information.
Caution
Refers to particular ways of operation or handling, the non-adherence of which can lead
to malfunctioning, damages or other kinds of trouble.
Danger
Refers to dangerous situations, in which injuries can occur.
2
S-G 330 D - 22.02.2002 / Vers.: 1
2 Initial/setting into operation
2.1 Unpacking the special model-cutting-saw
1.
2.
3.
Caution
4.
5.
Put the carton onto a flat surface.
Remove the upper packaging material.
Press the packaging material away from the device and grasp the lower edge of the device.
Do not lift the saw by the motor out of the carton!
The unit (weight = 17 kg) should be lifted by two people out of the carton.
Check the accessories:
−
−
−
−
−
−
−
−
−
−
−
Documentation
Saw blade guard...............................................................................................no. 330 D0 241
Plexiglass safety screen ...................................................................................no. 330 D0 249
Model table .......................................................................................................
no. 330
D0 003
2 wooden supports for cleaning stone ..............................................................no. 330 D0 503
Cleaning stone..................................................................................................no. 330 D0 501
Diamond blade .................................................................................................no. 330 D0 510
Double offset screwdriver (2 mm) for Allen screws...........................................no. 330 D0 556
Double offset screwdriver (3 mm) for Allen screws...........................................no. 330 D0 557
Straight pin (diameter 4 mm) ............................................................................no. 330 D0 588
Magnifying glass (for units with illumination).....................................................no. 330 D0 001
2.2 Initial/setting into operation
(See fig. 1, page 3)
1.
2.
3.
4.
5.
6.
7.
Remove transport protection by loosening Phillips screw in sheet steel floor. Insert the shorter
screws attached to the transport protection. Keep transport protection for later use.
Insert diamond blade (see section “3.1“).
Establish connection to mains supply (230 volts/50 Hz) with mains connection cable (28).
Connect suction powered to socket (15).
Connect suction hose (diameter 40 mm) to connection nozzle (14).
For further details concerning the electrical control of the unit see section “3.2“.
For further details concerning sawing with the S-G 330 D see section “3.3“.
14 Suction connection nozzle
(diameter 40 mm)
15 Socket for suction
28 Mains
supply
cable
(230 volts/50 Hz)
Fig. 1: Rear view
S-G 330 D - 22.02.2002 / Vers.: 1
3
2.3 Brief description of the unit and identification of the unit components
The special model-cutting-saw consists of a base frame into which the electronic system of the
unit is incorporated and onto which a magnetic plate is fixed. A powerful flange motor is
attached to the saw carriage, which directly drives the saw blade. It can be easily moved
vertically via a double-column guidance.
The model table is fastened to the magnetic plate by energizing the magnet.
On the rear side of the unit the suction connection nozzle is located with a diameter of 40 mm
together with a socket for the necessary extraction unit.
When activated a rapid-action stop device quickly brings the flange motor with the saw blade to
a standstill.
The hand lever lowers the saw blade vertically onto the model.
Fig. 2: Front right view
1
2
3
4
5
6
7
8
9
10
11
12
4
Cold lamp
Limit stop
Locking nut for limit stop
Motor
Saw blade guard
Plexiglass safety screen
Multifunction switch
Saw lever
Magnetic plate
Main switch
Saw carriage
Plexiglass suction nozzle, adjustable
13
16
17
18
19
20
21
22
23
25
26
27
Suction nozzle
Diamond blade
Knurled nut (for clamping)
Clamping screw for illumination
Clamping lever
Model table
Base frame
Start switch (two-hand safety circuit)
Push-button for magnet
Switch for light ON (white)
Switch for light OFF (red)
Lamp fastening
S-G 330 D - 22.02.2002 / Vers.: 1
3 Operation
3.1 Changing/inserting diamond saw blade
(See fig. 2, page 4, and fig. 3, page 5)
1.
2.
Insert cross pin (48) into cross hole (41) and loosen screw (47) with double offset screw driver
3 mm), while applying counteracting force to cross pin.
Remove Allen screw (47), pressure disk (46), plastic disk (45), diamond blade (44) and steel
disk (43). The diamond blade (44) is not assembled at works.
When inserting the saw blade you should always make sure that the support surfaces of all
parts concerned are free of dirt.
Note
3.
4.
5.
6.
7.
8.
Danger
9.
Insert steel disk (43).
Insert diamond blade (44).
Insert plastic disk (45).
Slide pressure disk (46) onto driver pins (42).
Insert cross pin (48) into cross hole (41) and slightly tighten screw (47) with double offset screw
driver (3 mm) while applying counteracting force to cross pin so that the diamond blade - with
the spindle jammed - can just about be turned. Continue to turn the diamond blade a few times.
This way possibly existing unevenness can be eliminated and you achieve an optimum degree
of true running.
Now thoroughly tighten screw (47) while applying counteracting force to cross pin (48).
Cross pin (48) may only be inserted into the cross hole (41) when changing saw blades.
Afterwards it must be removed immediately.
Screw the saw blade guard (5) with the plexiglass safety screen (6). The saw blade guard is not
assembled at works.
40 Saw spindle
41 Cross hole
42 2 driver pins
(marked offset)
43 Steel disk (hardened; thickness:
1.5 mm)
44 Diamond blade
45 Plastic disk (thickness: 0.3 mm)
46 Pressure disk
47 Allen screw (3 mm)
48 Cross pin (diameter: 4 mm)
fig. 3: Inserting diamond blade
S-G 330 D - 22.02.2002 / Vers.: 1
5
3.2 Electric control mechanism
(See fig. 2, page 4)
−
Set main switch (10) to “ON“.
−
The saw carriage stop (brake built into saw carriage (11)) is deactivated pressing the
multifunction button (7) so that the saw carriage (11) can be moved.
If the magnetic push-button (23) is pressed (green light lights up), magnet (9) is actuated and
the suction starts. Motor (4) goes into ready position.
Motor runs only when you additionally press switch (7) and start switch (22) (two-hand safety
circuit).
To break magnet power supply press push-button (23) again. The green light also
extinguishes..
−
−
−
3.3 Sawing with the S-G 330 D
(See fig. 2, page 4)
1.
2.
3.
4.
5.
6.
7.
8.
9.
10.
11.
12.
Set main switch (10) to “ON“.
Magnet push-button (23) must be off (green light off).
Press multifunction switch (7). This deactivates the “saw carriage stop“.
Now use the saw lever (8) to move the saw carriage (11) right up to the top.
Place model table (20) onto the magnetic plate (9). The model should be ground so that it is
completely within the clamping claws and lies absolutely level on the model support plate.
Fasten the model securely with the knurled nuts (17).
Open clamping lever (19).
Lower saw carriage (11) until the saw blade is just above the model.
Establish the sawing position of the model.
Press the magnet push-button (23). Green lamp lights up. Model table base is securely
fastened. Suction is activated.
Tighten clamping lever (19) securely. The model is now securely fastened.
Move plexiglass suction nozzle (12) as close as possible to the model.
Press multifunction switch (7) and start switch (22) (safety two-hand circuit). Saw blade starts to
rotate!
Caution
Do not start to saw into the model by continuously lowering the sawing lever until the rotation
speed of the saw blade is sufficiently high.
Note
The limit stop (2), which is delivered upon request, serves as an individual limit along the path
of the saw carriage from down to up. The limit stop (2) is fastened with the locking nut (3).
Danger
Clogging of the grit heats up the diamond blade while sawing. This in turn leads to an
expansion of the blade edge thus causing the blade to flutter. Fluttering is a permanent twisting
of the blade edge, thus causing the material to fatigue and eventually break.
The same effect can be seen when exerting too much pressure onto the saw blade when
sawing very hard materials. In such a case it is very important to lift the diamond blade several
times out of the sawing notch so that it can cool down in the meantime.
4 Cleaning/maintenance
4.1 Cleaning the diamond saw blade
The grit of the diamond blade can be cleaned of plaster after lengthy periods of use by
proceeding as follows:
1.
2.
Note
6
Put the cleaning stone (100x24x12 mm) included in the delivery into water until it is fully
absorbed with water.
Clamp the cleaning stone in-between the wooden supports (45x12x12 mm) in the model table
so that you can cut off a thin slice.
Cutting through the wet cleaning stone cleans the diamond grit.
S-G 330 D - 22.02.2002 / Vers.: 1
5 Electrical fuse protection
(See fig. 4, page 7)
−
The mains connection (28) is fuse protected with two main fuses (29) (2x 10 A/T).
−
The secondary winding (transformer) is fuse protected with a fuse for feeble currents (30) (10
A/TT).
The primary winding (transformer) is fuse protected with a fuse for feeble currents (31) 4 A/T
located in the sheet steel flooring.
−
Note
The socket (15) for the suction unit is also fuse protected with two main fuses (29).
Explanation: T = inert
14 Suction connection for nozzle
Diameter 40 mm
15 Socket for suction
18 Adjusting screw for illumination
27 Lamp holder
28 Mains supply cable
(230 volts/50 Hz)
29 Main fuse (2x 10 A/T)
30 Fuse for feeble currents (10
A/TT) for secondary winding
31 Fuse for feeble currents (4 A/T)
for primary winding
32 4 unit feet
Fig. 4: Rear view
6 Technical data
Machine designation
: Special model-cutting-saw
Machine type
: S-G 330 D
Overall dimensions
: Width 355 mm, (with setting screw for illumination)
Depth 390 mm,
Height 300 mm (without illumination).
Electrical connection
: 230 volts/50 Hz
Overvoltage category
: II
Power consumption
: max. 300 watts
Speed
: 8,000 rpm
Sawing thickness (saw blade)
: 0,3 mm
Sawing depth
: approx. 25 mm
Saw blade
: 75 mm (outer diameter), diamond blade
Suction nozzle
: 40 mm (outer diameter)
Stroke
: 75 mm
Electrical fuse protection
: 2x 10 A/T (mains connection)
Electrical fuse protection
: 4 A/T
(primary winding - transformer)
Electrical fuse protection
: 10 A/TT
(secondary winding - transformer)
Weight
: approx. 17 kg.
S-G 330 D - 22.02.2002 / Vers.: 1
7
7 Warranty conditions
This device conforms to the current safety regulations and was subjected to extensive
testing before leaving the works.
We grant a 12 months guarantee, in which we are obliged to carry out all repairs
resulting from material or fabrication faults free of charge.
The warranty expires if repairs are not carried out by specialized dealers or by us.
Replacements for reasons covered by the guarantee do not lead to an extension of the
original guaranty period.
Normal wear and tear or damages resulting from incorrect operation are not covered by
the terms of warranty.
In order to be able to provide you with a comprehensive service we ask you to fill out the
guarantee return form (attached at the beginning of these instructions) and send it to us
by fax or letter (window envelope).
Fax no.: 0 71 81/ 73 13 9
-------------------------------------------------------------------------------------------------------------Fold here for window envelope ----
Copy
Guarantee return form
Machine
designation:
Special model-cutting-saw
Machine type:
S-G 330 D
Machine no.:
Date of purchase:
Dealer/store:
Maschinenbau
Harnisch+Rieth GmbH & Co.
Postfach 1260
From:
D-73644 Winterbach
Date/signature:
8 EC declaration of conformity
as stipulated by the EC directive for machines
89/392/EEC, Appendix II A
We herewith declare that due to its design the machine specified below is in conformity with the
basic safety and health requirements of the EC directives.
In the event of modifications of the machine not approved by us this certificate looses its
validity.
Name of the manufacturer
Address of the manufacturer
Machine designation
Machine type
:
:
:
:
Harnisch+Rieth
Küferstraße 14-16, 73650 Winterbach
Special model-cutting-saw
S-G 330 D
The following pertinent EC directives were applied:
EC machine directive (89/392/EEC), corresponding to 9. GSG regulation of 12.05.93
EC low voltage directive (73/23/EEC), corresponding to 1. GSG regulation of 11.06.79
EC EMC directive (89/336/EEC), corresponding to EMC law of 09.11.92
Following harmonizing standards were applied:
DIN EN 292
: Machine safety.
DIN EN 61 010-1
: Safety regulations for electric measuring, controlling and laboratory devices.
DIN EN 55 014
: Interference suppression of electrical apparatus and installations.
DIN EN 55 104
: Electromagnetic compatibility, noise resistance requirements (category I).
A technical documentation is available.
The operation instructions belonging to the machine are also available.
Director of the Quality Control Department
Winterbach, 06th September, 1995
S-G 330 D - 22.02.2002 / Vers.: 1
9