1
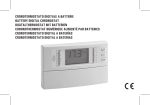
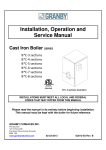
GB
Operating instructions
1.
List of contents
2
2.
Brief description
3
2.1
Elementary operator control
4
3.
Installation
5
3.1
Connecting up
6
3.2
Fitting / replacing the batteries
4.
Setting the time / date
7-8
4.1
Setting summertime / wintertime
10
4.2
Interrogating the current time
11
5.
Temperature levels
12
5.1
Changing temperature levels
13
6
Overview of programmes and operating modes 14
6.1
Factory programme P1
15
6.2
Factory programme P2
16
6.3
Factory programme P3
17
6.4
Factory programme P4
18
6.5
Selecting factory programme P1 - P4
19
9
6.6
Selecting / reading the user-defined programme 20
6.6.1
Entering a user-defined programme 21 - 22
6.6.2
COPY function
23
1.
List of contents
2
6.7
AUTO mode
24
6.8
TEMP 3 mode
25
6.9
TEMP 2 mode
25
6.10
TEMP 1 mode
25
6.11
PARTY mode
26
6.12
HOLIDAY mode
27
7.
System settings
28
7.1
Parameter settings
29
7.2
Heating cycle - CDF value (cyclic duration factor) 30
7.3
Heating cycle - setting the CDF value
31
7.4
Elapsed-hour meter
32
7.5
RESET
33
7.6
Recalling the factory settings
34
7.7
Electronic interlock
35
7.8
Air-conditioning system
36
8.
Technical data
37
9.
Problems and remedies
38
10.
Cleaning and maintenance
39
11.
Service addresses
39
12.
Alphabetical subject-index
13.
Overview
40
41 - 42
Shaded grey area is designed for end-user instruction
GB
Example: Factory program P1 - weekly overview
Monday
Tuesday
Wednesday
Thursday
Friday
Saturday
Sunday
2. Brief description
With its various programs and setting facilities,
the famoso 2000 digital chronostat always ensures a comfortable room temperature.
The chronostat contains the following:
4 factory programmes
The factory programmes are oriented to the
calendar week and have been adapted to suit
different ways of life.
4 user-defined programmes
The 4 factory programmes can be edited to suit
your specific requirements.
AUTOmatic mode
The chronostat operates in accordance with one
of the four factory programmes or the userdefined programme in this mode.
3 continuous temperature modes
A single temperature is assigned to each of the
continuous temperature modes. The programmed
temperature is maintained until another mode is
selected.
HOLIDAY mode
This mode remains active for the specified number of days and then returns to the previously selected programme.
PARTY mode
Switches to temperature level 3 (factory setting:
21 °C) for a three-hour period.
The battery-powered chronostat can be removed
from its stand and programmed easily on a table
or from the comfort of an armchair. Simply replace the chronostat on its stand when you have
finished programming (refer to Page 5).
When entering the time for a change in temperature, please remember that the heating system
requires a certain amount of time to adjust the
temperature to the set value.
3
GB
2.1 Elementary operator control
4
Your chronostat has been installed and the
installation technician has programmed the
programme of your choice to suit your specific
requirements. Proceed as follows if you wish to
change the temperature temporarily:
The display shows the current room temperature
TEMP+
TEMP-
Press the button on the display once and read
the programmed temperature
Display for the set room temperature
TEMP+
TEMP-
Press the button on the display and enter
the desired temperature
Times for the change in temperature
The temperature specified by the
programme is reactivated with the next
temperature change.
GB
1
2
3
4
Ø max. 3,5 mm
3. Installation
5
The chronostat must be fitted / installed with
an appropriate amount of care by a suitably
qualified electrician / technician.
Switch the heating system off before
commencing installation!
Check and make sure that the connecting
wires are not live.
Refer to Page 28 for the system settings
Lift the chronostat off the stand
Undo the screws
Remove the protective housing
Be careful not to damage the clips
Guide the connecting leads through the cutouts in the stand
Mount the stand on a firm surface or a flush
type box
GB
3.1 Connecting up
6
The chronostat must be fitted / installed with
an appropriate amount of care by a suitably
qualified electrician / technician.
Strip the ends of the connecting wires carefully and connect up as shown on the circuit
diagram
Contacts 3 - 4 closed =
heating / coolingmode
Replace the protective housing
Be careful not to damage the clips
Tighten the screws
GB
3.2 Fitting / replacing the batteries
7
Lift the famoso 2000 chronostat off the stand
Remove the retaining strap
Insert the batteries
Battery type: LR 6 / AA (two)
(use only alkaline batteries)
Replace the retaining strap, inserting the
spring-loaded side first
Replace the chronostat on its stand - it must
latch into place.
Conduct a RESET after fitting the batteries
(after fitting for the first time only).
GB
3.2 Fitting / replacing the batteries
8
Appears on the display
Replace the batteries as soon as possible or
the chronostat may cease to work properly.
Data is stored for approx. 2 minutes when
replacing the batteries
Refer to Page 7
Note: The unit measures the battery voltage
when the heating / cooling system is switched
on / off. The battery indicator will not change if
the heating / cooling system is not switched
on or off.
GB
4. Setting the time / date
9
Press the TIME button once
The time appears on the display
When setting for the first time during summertime, press the +/-1h button once
+1h appears on the display
TIME+
TIME-
DAY
Press the button and set the current time
Press the button and set the day of the week
The days of the week are displayed in the
following format:
1=Mo, 2=Tu, 3=We, 4=Th, 5=Fr, 6=Sa, 7=Su
Confirm the entered data:
Press the TIME button once
The unit returns to its AUTOmatic programme
sequence.
GB
4.1 Setting summertime / wintertime
10
Press the +/-1h button and set summertime /
wintertime
Displayed indicator
(+1h displayed for summertime; no indicator
appears on the display during wintertime
(normal time)
Please make sure that +1h is displayed
during summertime.
GB
4.2 Interrogating the current time
TIME
11
Press the TIME button 1x
TIME
flashes on the display
The current time appears on the display
The current day of the week appears on the
display
The display returns to its original state
automatically if no buttons are pressed
for approx. 8 seconds
AUTO
Press the AUTO button
The units returns to its automatic
programme sequence
GB
12
5. Temperature levels
Factory setting
Setting range
TEMP 3
21° C
18° C ... 35° C
TEMP 2
17° C
14° C ... 20° C
TEMP 1
5° C
5° C ... 16° C
Note:
The temperature measuring range is between
0°C ... 40°C. If the temperature is outside this
range, --:-°C will appear on the display
instead of a temperature value.
GB
5.1 Changing temperature levels
AUTO
13
Press the AUTO button and select a
temperature level
TEMP 3 21° C
TEMP 2 17° C
TEMP 1
5° C
(Factory settings)
The display starts flashing
The programmed temperature appears on the
display
TEMP+
TEMP-
AUTO
Press the button and alter the temperature
Press the AUTO button AUTO = automatic programme sequence
Note:
Program the temperatures so that TEMP 3 is
always higher than TEMP 2 and TEMP 2 is
always higher than TEMP 1.
GB
Factory programmes P1 - P4
The factory programmes are oriented to the calendar week and have been adapted to suit different
ways of life. They can be altered according to
specific requirements.
4 user-defined programmes
The 4 factory programmes can be edited to suit
your specific requirements.
6 operating modes:
AUTOmatic mode
The chronostat operates in accordance with one of
the four factory programmes or the user-defined
programme in this mode.
3 continuous temperature modes
A single temperature is assigned to each of the
TEMP 3, TEMP 2 and TEMP 1 modes. The programmed temperature is maintained until another
mode is selected or the unit is switched off.
PARTY mode
Switches to temperature level 3 (factory setting:
21°C) for a three-hour period.
HOLIDAY mode
This mode remains active for the specified number
of days and then returns to the previously selected
programme.
6. Overview of programmes and operating modes 14
Factory programme
P1
Page 15
Factory programme
P2
Page 16
Factory programme
P3
Page 17
Factory programme
P4
User-defined programme
Page 18
Page 20
AUTO mode
Page 24
TEMP 3 mode
Page 25
TEMP 2 mode
Page 25
TEMP 1 mode
Page 25
PARTY mode
Page 26
HOLIDAY mode
Page 27
GB
6.1 Factory programme P1
15
Factory program P1 is a daytime and
evening programme, i.e. the programme has
been designed in such a way that a constant,
comfortable temperature prevails during
the day and in the evening.
Changing the time and temperature:
Example with factory settings for the
temperature levels
TEMP 3 = 21° C
TEMP 2 = 17° C
Monday to Thursday
from 6:00 - 22:00 h TEMP 3
from 22:00 - 6:00 h* TEMP 2
*(the following morning)
Friday
from 6:00 - 23:00 h TEMP 3
from 23:00 - 6:00 h* TEMP 2
*(the following morning)
Saturday and Sunday
from 7:00 - 23:00 h TEMP 3
from 23:00 - 7:00 h* TEMP 2
*(the following morning)
GB
6.2 Factory programme P2
16
Factory programme P2 is a full-time working
day programme, i.e. the programme has
been designed in such a way that a constant,
comfortable temperature prevails at breakfasttime, in the evening and all day at the
weekend.
Changing the time and temperature:
Example with factory settings for the temperature levels
TEMP 3 = 21° C
TEMP 2 = 17° C
Monday to Friday
from 6:00 - 9:00 h
TEMP 3
from 9:00 - 17:00 h TEMP 2
from 17:00 - 22:00 h TEMP 3
from 22:00 - 6:00 h* TEMP 2
*(the following morning, 7:00 h on Saturday)
Saturday and Sunday
from 7:00 - 23:00 h TEMP 3
from 23:00 - 7:00 h* TEMP 2
*(the following morning, 6:00 h on Monday)
GB
6.3 Factory programme P3
17
Factory programme P3 is a working day
programme, i.e. the programme has been
designed in such a way that a constant,
comfortable temperature prevails at breakfasttime, at lunchtime, in the evening and all day
at the weekend.
Changing the time and temperature:
Example with factory settings for the
temperature levels
TEMP 3 = 21° C
TEMP 2 = 17° C
Monday to Friday
from 6:00 - 8:00 h TEMP 3
from 8:00 - 11:00 h TEMP 2
from 11:00 - 14:00 h TEMP 3
from 14:00 - 17:00 h TEMP 2
from 17:00 - 22:00 h TEMP 3
from 22:00 - 6:00 h* TEMP 2
*(the following morning, 7:00 h on Saturday)
Saturday and Sunday
from 7:00 - 23:00 h TEMP 3
from 23:00 - 7:00 h* TEMP 2
*(the following morning, 6:00 h on Monday)
GB
6.4 Factory programme P4
18
Factory programme P4 is a weekend house
programme, i.e. the programme has been
designed in such a way that a constant,
comfortable temperature prevails during the
second half of the day on Friday and all day
at the weekend.
Changing the time and temperature:
Example with factory settings for the
temperature levels
TEMP 3 = 21°C
TEMP 2 = 17°C
TEMP 1 = 5°C
Monday to Thursday
TEMP 1 24 hours a day
Friday
from 12:00 - 18:00 h TEMP 2
from 18:00 - 23:00 h TEMP 3
from 23:00 - 6:00 h* TEMP 2
*(the following morning)
Saturday
from 6:00 - 23:00 h
from 23:00 - 6:00 h*
*(Sunday)
TEMP 3
TEMP 2
Sunday
from 6:00 - 23:00 h
TEMP 3
from 23:00 - 12:00 h* TEMP 1
*(Friday)
GB
6. 5 Selecting factory programme P1 - P4
19
Press the P 1 - 4 button
Select the factory programme of your choice
The selected factory programme appears on
the display
The display returns to its original state automatically if no buttons are pressed for approx.
8 seconds
GB
1.
2.
6.6 Selecting / reading the user-defined programme 20
The user-defined programme is a modified factory
programme. Let us assume that you wish to read
or modify factory programme P1, for example.
Press the P 1 - 4 button
and select factory programme P1
Press the PROG. button 1x
1 = Monday appears on the display
TIME
Keep the TIME button pressed until the
first time 6:00 appears
TIME
Keep the TIME button pressed until the
second time 22:00 appears, etc.
Press the PROG. button 1x
2 = Tu appears on the display, etc.
Times for temperature changes
To terminate selection / reading:
press the TIME button -
GB
Note:
The shortest interval between two changes
in temperature must be 1 hour. Up to 8 temperature changes are permitted in any one
day. --:-- appears on the display if you
attempt to enter more than 8 changes.
6.6.1 Entering a user-defined programme
21
Monday to
Thursday
Friday
Saturday and
Sunday
Example:
Adapt the programme (P1) to suit your requirements in the following manner: you wish to
lower the temperature to 17°C for the whole
day on Wednesday.
Press the P1 - 4 button until P1 appears on
the display
Press the PROG. button 3x
3 = We appears on the display
TIME
Keep the TIME button pressed until the
display stops automatically at 6:00 h
(temperature change)
The time of the temperature change is displayed
TEMP-
Press the TEMP. button 1x
The arrow moves to the bottom row of little
boxes = TEMP 2 = 17°C
The top row of boxes disappears.
Wednesday
The heating system adjusts the temperature to 17°C
until the next temperature change the following morning.
Thursday
To terminate your inputs:
press the TIME button
GB
6.6.1 Entering a user-defined programme
22
Monday to
Thursday
Friday
Saturday and
Sunday
Example:
Adapt the programme (P1) to suit your requirements in the following manner: you wish to
lower the temperature to 17 °C between
12:00 h and 17:00 h on Friday.
Press the P1 - 4 button until P1 appears on
the display
Press the PROG. button 5x
5 = We appears on the display
TIME
TEMP-
TIME
TEMP+
TIME
TEMP-
Keep the TIME button pressed until the time
12:00 h appears on the display
Press the TEMP. button 1x
The arrow moves to the bottom row of little
boxes = TEMP 2 = 17 °C
Part of the top row of boxes disappears.
Keep the TIME button pressed until 17:00 h
appears on the display
Press the TEMP. button 1x
The arrow moves to the top row of little boxes
= TEMP 3 = 21 °C
Keep the TIME button pressed until 23:00 h
appears on the display
Press the TEMP. button 1x
The arrow moves to the bottom row of little
boxes = TEMP 2 = 17 °C
To terminate your inputs:
press the TIME button 1x
GB
6.6.2 COPY function
23
Example:
You have programmed day 1
If you wish to adopt the same daily programme for subsequent days, press the
COPY button
COPY day 1 to day 2 - COPY to day 3,
etc.
The selected day appears on the display
Note:
Bear in mind that the last temperature
programmed for the copied day continues
to apply until a different temperature is
programmed on one of the following days.
Always check the entered programme day
by day, as described in Page 20.
Press the TIME button
The unit returns to its automatic programme
sequence.
GB
6.7 AUTO mode
24
The chronostat operates in accordance with
one of the four factory programmes or the
user-defined program in this mode.
AUTO Press
the AUTO button
Display
Selected mode
AUTO flashes on the display
GB
6.8 TEMP 3 mode
25
6.9 TEMP 2 mode
6.10 TEMP 1 mode
A single temperature is assigned to each of
the continuous temperature modes. The programmed temperature is maintained until another mode is selected.
AUTO Press
the AUTO button and select a
temperature level TEMP3 21 °C
TEMP2 17 °C
TEMP1 5 °C
(Factory settings)
Display
Selected mode
Example:
TEMP 3 flashes on the
display
Display
Shows the set temperature
Example:
21.0 °C
The current room temperature is displayed
after approx. 8 seconds
If you wish to return to the automatic
programme sequence:
AUTO press the AUTO button until AUTO starts
flashing on the display
GB
6.11 PARTY mode
26
Switches to temperature level 3 (factory setting: 21 °C) for a three-hour period.
Press the PARTY button 2x
PARTY
PARTY starts flashing on the display
The programmed room temperature appears
on the display
TEMP+
TEMP-
Press the ... button and enter the desired
temperature
The current room temperature is displayed
after approx. 8 seconds
The unit returns to the automatic programme
sequence after 3 hours in PARTY mode
If you wish to terminate PARTY mode
prematurely:
AUTO press the AUTO button
The unit returns to the automatic programme
sequence
GB
6.12 HOLIDAY mode
27
This mode remains active for the specified
number of days and then returns to the
previously selected programme.
HOLI
DAY
Press the HOLIDAY button 3x
HOLI
DAY
starts flashing on the display
The first day of the holiday period appears
on the display
Example:
Press the HOLIDAY button 1x
= 2 days holiday
HOLI
DAY
TEMP+
TEMP-
Press the ... button and select the temperature
(not possible when OFF, refer to Page 28)
Holiday mode continues running for the
specified number of days
To terminate HOLIDAY mode prematurely:
the AUTO button
The unit returns to the automatic programme
sequence
AUTO press
GB
HEAT
COOL
TEMP 1
OFF
PROP
ON / OFF
7. System settings
28
The necessary settings must be specified
on site when the system is put into operation for the first time.
You can use the system settings to adapt the
chronostat to suit your specific requirements.
Refer to Page 29 for information concerning
inputs (Parameter settings)
Factory settings
Heating or cooling mode
The set value for temperature 1 is active
(factory setting 5 °C provides protection
against freezing)
The system is switched off if TEMP 1 is active
in AUTOmatic or continuous temperature
mode. The same applies to HOLIDAY mode.
There is no protection against
freezing.
Proportional control response
Simple control response
(similar to that of a bimetal controller)
GB
7.1 Parameter settings
29
Press the SYS. button 1x
The active system settings start flashing.
The display returns to its original state
automatically if no buttons are pressed for
approx. 8 seconds
PROP
Press the PROP button and change the settings
Example: switchover between proportional
and simple control response
Display
PROP
Display
ON/OFF
To terminate programming:
press the TIME button 1x
GB
Recommended settings
Setting
Direct electric heating
1 or 2
Supplementary electric bathroom
radiator
2 or 3
Single-room control system
3 or 4
with electrically operated radiator valves
(hot-water heating)
Small to medium-sized rooms
Single-room control system
4 or 5
with electrically operated radiator valves
(hot-water heating)
Medium to large rooms
Wall-mounted gas-fired boiler for
single-storey heating systems
4 or 5
Free-standing gas-fired boiler or oilfired boiler for larger living modules
Setting
1
Cycle time
1 x ON - 1 x OFF
in minutes
4
2
4, 5 or 6
3
4
5
6
8,5 13
17
21 25,5
7.2 Heating cycle - CDF value (cyclic duration factor)
30
The heating cycle setting is used for adaptation to the controlled system. This is affected
by the following:
– room size
– type of heating
(convector heaters, single-storey heating
systems)
– installation location
– temperature controller/thermostat
The setting range extends from 1 to 6.
If the temperature in a room changes too dramatically, e.g. as a result of ventilating, then
the cycle may be terminated prematurely or
the system may be switched on again.
If the difference in temperature within a room
is too great, the system does not switch ON
and OFF sufficiently frequently, i.e. a lower
CDF value must be selected.
If the system switches too often, a correspondingly higher CDF value must be selected.
Factory setting: CDF = 4
(4x 4 min. 15 s = 17 min.)
GB
7.3 Heating cycle - setting the CDF value
31
Press the SYS. button 2x
The display returns to its original state automatically if no buttons are pressed for approx.
8 seconds
TEMP+
TEMP-
Press the ... button and change the settings
Setting
1
Cycle time
1 x ON - 1 x OFF
in minutes
4
2
3
4
5
6
8,5 13 17 21 25,5
To terminate programming:
press the TIME button
GB
7.4 Elapsed-hour meter
32
Press the SYS. button
The display returns to its original state automatically if no buttons are pressed for approx.
8 seconds
The display shows the full hours during which
the heating / cooling system was switched on.
RES
Press the RES button to reset to 0000
To terminate programming:
press the TIME button
GB
7.5 RESET
33
Press the RES. button
The chronostat reverts to a defined operating
state and resets the current time to Monday
20:00 h.
Refer to Page 9 for information concerning
setting the time / date
GB
7.6 Recalling the factory settings
34
This function recalls factory programmes
P1 - 4 and the factory settings for the
temperature levels and resets the current
time to Monday 20:00 h.
It also erases all user-defined settings.
Press the PROG. button and keep it pressed
Press the RES. button
Release the RES. button
Release the PROG. press down key until
20:00 h appears in the display
Refer to Page 9 for information concerning
setting the time / date
Refer to Page 15 for information concerning
selecting factory programmes or
Refer to Page 21 for information concerning
entering a user-defined programme
GB
7.7 Electronic interlock
35
The electronic interlock prevents unintentional
or unauthorized modifications to the programmes. The temperature can be changed
slightly by +/- 3 degrees. It is also possible to
interrogate the current time.
Press the SYS. button 1x
Press the +/-1h button 1x
Enable - repeat the procedure
The display indicates interlock on/off
GB
7.8 Air-conditioning system
36
If the unit is used in cooling mode, the temperature ranges are subject to the following limits:
Cooling mode
Factory setting
Setting range
TEMP 3
32° C
27° C ... 35° C
TEMP 2
27° C
24° C ... 29° C
TEMP 1
23° C
15° C ... 26° C
Note:
In cooling mode, the air-conditioning system is
switched on the least number of times with
TEMP 3 (highest temperature). The air conditioner cools to the greatest extent with TEMP 1.
This factor has been taken into consideration
in factory programs P1 - 4 by swapping
TEMP 3 and TEMP 1 over compared with
heating mode. OFF cannot be set in cooling
mode (refer to Page 28)
GB
Dimensions H x W x D (mm) 134 x 81 x 33
Weight
approx. 200 g
Operating voltage
battery, type 2x LR 6 / AA
Switching capacity:
- resistive load
- inductive load
cos ϕ 0.6
5 A / 250 V~
1 A / 250 V~
Switching output
floating
Switching contact
1 changeover contact
Ambient temperature
- 5°C to + 45 °C
Class of protection
II
Accuracy
typ 2.5 s / day at + 25 °C
Reserve power
2 min. to replace the batteries
Battery life
1 year
Shortest switching period:
- daily program
- weekly program
1h
1h
Programmable every
15 min.
Switching preselection
yes
8. Technical data
37
Switching state display and operating modes:
Heating mode
Flame symbol
Cooling mode
Fan symbol
Automatic mode
AUTO
Continuous mode
TEMP 1, TEMP 2 or TEMP 3
Party mode
PARTY
Holiday mode
HOLIDAY
Type of installation
Surface-mounted
Type of connection
Screw-type terminals,
each 2.5mm2
Temperature
Heating control range
+ 5°C to + 35°C
Temperature
Cooling control range
+ 15°C to + 35°C
Protection against freezing TEMP 1 setting
(factory setting: 5°C)
Differential temperature gap +/- 0.25 at 0.4 K *
Feedback
Electronic
Degree of protection
IP 20
* Greater fluctuations are possible as a result of the
heating system and the heated room.
GB
Problem:
1. Operator control restricted at low voltage,
i.e. whenever the battery symbol appears
on the display. It is no longer possible to
activate factory programs. Data entered
during programming is not stored.
2. It is not possible to edit data
3. It is not possible to set the value for the
temperature level
4. The heating system takes too long to reach
the set temperature
5. The heating system switches too frequently
6. The wrong key has been pressed or
incorrect values have been entered during
programming.
9. Problems and remedies
38
Remedy:
1. Replace the battery
2. The interlock is active
Page 7
Page 35
3. Select values within the setting range Page 12
4. Check that the correct CDF value
has been entered
Page 31
5. Check that the correct CDF value
has been entered
Page 31
6. Cancel the operation:
Press the TIME button or the AUTO button
on the display to start again
GB
10. Cleaning and maintenance
39
Use a dry cloth to clean the unit.
Never use any caustic cleaning agents.
11. Service addresses
Grässlin GmbH & Co. KG
FEINWERKTECHNIK
Postfach 1232
D-78104 St. Georgen/Schw.
Telephone ++49(0)7724/933-0
Telefax
++49(0)7724/933-240
GB
Key word
page
Arrow buttons
41
AUTO automatic programme sequence
42
Basic programmes
03
Batteries
07
Brief description
03
Buttons
41
CDF value
30 - 31
Cleaning and maintenance
39
Clips
05
Connections
06
Continuous temperatures
25
Control elements
41
Control response
28
COOL
42
Cooling mode´
28
COPY
23
Copy function
23
Cycle times
30
Diagram
06
Display
42
Displays
42
Elapsed-hour meter
32
Electronic interlock
35
Elementary operator control
04
Entering / editing programmes
2
Entering the date
09
Erasing settings
34
Factory programmes
15 - 18
Factory settings
12 / 14 / 34
Faults
38
HEAT
42
40
12. Alphabetical subject-index
Key word
Heating mode
Heating systems
HM
HOLIDAY mode
Holiday mode
Installation
Interrogating the time
List of dealers
Mounting
Overview
Parameters
PARTY mode
Power supply
Problems and remedies
Protection against freezing
RES
RESET
Room temperature
Service
Setting the time
Stand
Summertime
System settings
Technical data
TEMP
Temperature levels
TIME
Time setting
User-defined programme
Wintertime
page
28
30
42
27
27
05
11
39
05
41 - 42
29
26
07
38
12 / 28
33 / 42
33
42
39
09
05
10
28
37
42
12
42
09
20
10
GB
13. Overview / control elements
TIME
41
Setting the current time
Confirming inputs
+/- 1h
Setting and changing over between
summertime and wintertime
PROG.
Recalling, reading and editing
the programme
P 1-4
Selecting the factory programmes
SYS.
System settings, Page 28
RES.
Reset to a defined operating state,
time Mo 20:00 h
Setting the temperature / time
Selecting temperature level /
system setting
Setting the temperature / time
Selecting temperature level
Resetting the elapsed-hour meter
Selecting the operating mode:
TEMP 1, TEMP 2, TEMP 3, AUTO,
COPY
System settings
Interrogating the current time
Selecting the PARTY and
HOLIDAY modes
System settings
Selecting the times for temperature
changes
GB
Switching programme in hours
Current temperature level
Temperature / time / prog.
Summertime
Changing the required value
13. Overview / displays
HEAT
Heating mode
COOL
Cooling mode
TIME +
Set the assignment of the TIME button
TEMP+
Set the assignment of the TEMP button
1234567
Indicates the current day of the week
TEMP 3
TEMP 3 mode selected
TEMP 2
TEMP 2 mode selected
TEMP 1
TEMP 1 mode selected
AUTO
Factory programme or user-defined programme running
COPY
Enter the assignment of the COPY button user-defined programme, Page 23
OFF
System setting, Page 28
TIME
Current time
PARTY
PARTY mode, Page 26
HOLIDAY
HOLIDAY mode, Page 27
PROP
System setting, Page 28
ON/ OFF
System setting, Page 28
HM
Elapsed-hours indicator, Page 32
TIME -
Set the assignment of the TIME button
TEMP-
Set the assignment of the TEMP button
RES
42
RESET, Page 33
Battery status / battery replacement, Page 7
Cooling mode on/off
Heating mode on/off
GB
Subject to technical
modifications.
Status 8/97
Se reservan posibles
modificaciones técnicas
(a fecha 5 / 97)
WA-EKF 3631/06.98/S:MMS/D:Bau/80.10.0813.7/97/00782