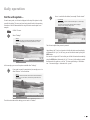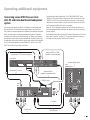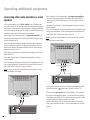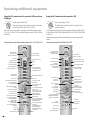
1
Operating instructions TV 233–32892.020 Individual Edition Contents Remote control - TV functions Control unit Connections to rear panel Welcome Integrated features Scope of delivery Transporting Installation options Note on the LCD screen Cleaning Disposal Remove the protective foils For your safety First installation Remote control Connection Handling the fabric hose Use of the binders Using the common interface module Switching on Automatic programming Directing DVB-T antenna Daily operation Switching on/off Changing stations Basics about the menu operation For the info system ... For the index ... Setting the sound Picture settings Direct control on TV set Operating modes – TV How the coloured keys work in TV mode Show status display Calling the index Call additional functions Call timer overview Select picture format Move picture up/down TV menu DVB subtitles Removing the CI module Inserting a new CI module Installing new DVB software Image+ Operating modes – PIP Selecting the station of the PIP picture Interchanging PIP picture/TV picture Functions in the PIP menu -2 3 4 5 6 6 6 6 6 7 7 7 7 8 9 9 9 10 10 10 10 11 12 12 12 13 14 15 16 17 17 17 18 18 18 18 19 19 19 19 19 20 21 21 21 22 23 23 23 24 Setting the PIP type Operating modes – EPG Using the EPG Selecting providers and stations Data capture Operating modes – Teletext Page selection with the coloured keys Displaying teletext pages Programme timer recordings Operating modes – Digital Recorder About the Digital Recorder system Settings for the Digital Recorder Switching Digital Recorder continuous operation on/off Setting recording capacity/quality TV viewing with time shift Interruption Switching to the live picture Fast forward and rewind Highlight function Archive recording Immediate recording Timer recording The Delete Manager Archive playback Call the DR archive Setting bookmarks Playing highlights Slow motion Hiding sections of the recording Deleting bookmarks Copying recordings from the archive Locking/unlocking a movie (parental lock) Operating modes – Radio Operating additional equipment Login and connect equipment Assignment of digital audio inputs and outputs HDMI (DVI) connection VGA/XGA connection Component video connection Operating other Loewe devices with the RC3 remote control Rotating the TV set What to do, if ... Technical data General data Electrical data Accessories Service Codelist RC3 / Lista de códigos RC3 24 25 25 26 26 27 27 27 28 29 29 31 31 31 33 33 33 34 34 36 36 37 39 40 40 40 41 42 43 43 44 45 47 48 48 50 53 53 54 55 57 58 60 60 61 62 63 64 Remote control - TV functions Control LED for programming the remote LED DVD TV STB VCR Change-over switch for operating of TV, VCR, DVD recorder/player or Set Top Box Switch on/off - on standby Sound off/on -Set Call timer list Picture menu on/off Sound menu on/off -List REC-MENU Menu "Additional functions" on/off Radio on/off (1 RADIO Set picture format Electronic Programme Guide (EPG) on/off abc def ghi jkl mno pqrs tuv wxyz AV PIP Select station directly /in the menu: enter numbers or letters Call AV selection PIP on/off (picture in picture) Status display on/off /in the menu: hide menu Open index /in the menu: info texts on/off DVD-AV EPG Show/hide menu Teletext on/off -M SC DI P+ P+/P– Select station up/down V–/V+ Volume down/up OK V– for PIP: Position of the PIP picture / in the menu: select/set Red button: Call the DR archive Green button: Standard settings for picture/sound V+ Station list on /in the menu: confirm/call P– C- Blue button: programme info off/on RD SE CA T SV Yellow button: previous station TITLE Jump forward/Fast forward Playback/Set bookmark/Play highlights Jump back/Rewind/Replay Immediate recording Freeze picture/Pause (Start viewing with time shift) Stop (live picture) (1 Radio only for DVB reception if broadcast by the station 3- I N D I V I D U A L Control unit Display: standby = operation = operation without screen display = (radio mode, EPG data capture or timer recording) Call the menu, in the menu: up The mains switch is located in the middle of the rear side of the set. Switch TV set on/off to standby Station down, in the menu: left (1 Radio on/off (back to TV mode), switching on the radio from standby in the menu: down (1 -4 Radio only for DVB reception, provided the station broadcasts this. Otherwise, switch over to an audio input. Station up, in the menu: right DR+ Display DR+ : DR+ = Digital Recorder integrated, but not active (no recording, no play) DR+ = Digital Recorder active (timeshift or archive playback) DR+ = Digital Recorder active (archive recording) Connections to rear panel Common Interface Headphone connection S-VHS connection (AVS) (i.e. for camcorders) Video input (AVS) Audio input right Audio input left ANT -S AT 13/18 V /350 mA ANT -TV /80 mA 89374.003 5V AV 1 AV 2 ( RGB / Y UV ) AUDI O I N C L R SD/HD-COMPONENT IN C b/ P b Y C r/ P r AUDIO OUT L R AUDI O D IGIT AL IN OUT 220-240V~ 50/60 Hz HDTV/P C I N HDMI ( DVI ) VGA/XG A SE RV IC E Center Audio input (analogue) Antenna/cable PIP tuner or satellite antenna (Sat tuner 1) (1 Antenna/cable analogue/digital (tuner 1) Audio input left/right (analogue) Satellite antenna (Sat tuner 2) (2 Euro-AVsocket 1 Audio output left/right (analogue) Rotating stand control Euro-AVsocket 2 Socket for power cable Component video inputs (Cb/Pb–Cr/Pr–Y) Service socket VGA/XGA input Antenna output PIP tuner connect to tuner 1 HDMI (DVI) input Digital audio output Digital audio input (1 (2 Digital satellite tuner can be retrofitted. Digital twin satellite tuner can be retrofitted. 5- Welcome Thank you! Transporting At Loewe, we combine the highest standards of technology, design and user friendliness. This applies equally for TV, video and accessories. Your new Individual Edition TV set from the limited special edition “crystallized with Swarovski” is ideally equipped for the TV standard of the future “HDTV” (High Definition Television). With its high-resolution screen and the future-proof digital interfaces HDMI, you have the option to view HD content with excellent picture quality. It therefore carries the European quality mark ”HD ready”. Digital TV is steadily spreading via terrestrial reception, in the cable network and via satellite. Loewe supplies sets equipped with DVB-T and DVB-C. A digital satellite tuner (DVB-S) can be retrofitted. The DVB integrated within the TV set is operated via the TV set menus using the remote control. We have designed this TV set so that it is easy to operate by using menus. Information about settings in menus is shown automatically; this enables you to understand the context quickly. You will find the answers to many of your technical queries in the index of your TV. If you want to operate the TV, you can access functions directly from the index. This saves you from having to read through detailed operating instructions and is the reason why this operating manual only explains the most important operating steps. Only transport the unit in an upright position. Hold the set by the top and bottom edges of the housing. The LCD screen is made of glass and/or plastic and may break if not handled carefully. Should the LCD screen become damaged or should the liquid crystal begin to leak, then it is imperative you wear rubber gloves when removing the set. Should the liquid come in contact with your skin, thoroughly rinse with water immediately. Integrated features The maximum equipment is described in these operating instructions. Menu contents may differ from the ones shown, depending on how your TV is equipped. You can display how your set is equipped in the “Integrated features“ index (press the INFO button in the TV mode if no menu is displayed; the “Integrated features“ menu item is also displayed in the index before the initial letter A). Scope of delivery • • • • • • • • • -6 LCD-TFT TV set Mains Cable RC3 remote control with 2 batteries Motorized rotating table stand mounted Marketing and service card Fabric hose 3 binders Screen cleaner set These operating instructions Installation options As a motorized rotating desktop unit Use the stand included in delivery. As a wall-mounted unit • Wall Holder WM54, Loewe order no. 65498A00. As a free-standing unit • Screen Floor Stand, Loewe order no. 65496B00. • Screen Paravent, Loewe order no. 65494B00. As an individual mounting solution • Screen Lift, Loewe order no. 65486B00. • Screen Ceiling Mount, Loewe order no. 65492B00. Welcome Note on the LCD screen Remove the protective foils The TV set with an LCD screen you have purchased meets the highest quality requirements and has been tested for pixel errors. Despite the utmost caution in production of the displays, it cannot be totally ruled out that some of the pixels might be defective for technological reasons. Please understand that such effects cannot be considered a unit defect as defined by the warranty as long as they are within the limits specified by the standard. Pull the protective foils slowly and carefully off the inlays (see fig.). Cleaning Use only a soft, clean, damp cloth to clean the TV set, the screen and remote control (do not use any caustic or abrasive cleaning agents). Use the cleaning cloth and cleaning agent included for this purpose. Note: The front screen may only be removed by a specialist dealer even in case of dirt on the inside. Disposal Packing and box You have chosen a long lasting technical product of very high quality. We have paid a fee to authorised recyclers who will collect the packing from your dealer for disposal, pursuant to domestic regulations. Nevertheless, we recommend you to keep the original box and packing material for optimum protection if you have to transport the set. The set Attention: The EU directive 2002/96/EC regulates the proper way to recycle, handle and utilise used electronic devices. Hence, all used electronic devices are to be disposed of separately. Please do not dispose of this set in the normal household rubbish. You may return your used set free of charge at designated recycling centres or at your specialist dealer whenever you purchase a new, comparable set. You can find out more about recycling (also for countries outside the EU) from your local government. 7- For your safety For your safety and to avoid unnecessary damage to your TV set, please read and observe the following safety instructions: • This TV set is designed exclusively for reception and reproduction of video and audio signals. • This equipment is designed for domestic and office environments and must not be used in rooms with high humidity (e.g. bathroom, sauna) or high concentrations of dust (e.g. workshops). If the equipment is used in the open air, ensure that it is protected against moisture (rain, drips, splashes, sprayed water or dew). Do not place any containers filled with liquids or lit candles on top of the TV. High levels of moisture and concentrations of dust cause leakage currents in the equipment, which can lead to danger of electric shock or fire. The manufacturer‘s warranty is only valid for use in the specified permissible environment. • If you have moved the TV set out of the cold into a warm environment, leave it standing for about an hour since condensation 10 cm may form. • This equipment must only be connected to a mains power supply which has the same voltage and frequency as that specified on the rating plate; use the power cable provided. Incorrect voltages can damage the equipment. 10 cm 10 cm . • Like all electronic equipment, your TV needs air for cooling. Obstruction of the air circulation can cause fires. Therefore the air vents on the back must always be kept free. Please do not place newspapers or cloths on/over the TV. -8 If the TV is placed in a cabinet or on a shelf, leave at least 10 cm at the sides and 10 cm at the top to ensure sufficient air circulation. Position the set so that it is not exposed to direct sunlight and additional heating from radiators. • Prevent any metal parts, needles, paper clips, liquids, wax or the like from getting into the TV set through the air venting slits in the rear panel. This can lead to short-circuits and possibly to fire. If something should get into the inside of the TV set, pull out the plug immediately and notify customer service. • Never remove the back of the TV set yourself. Repair and servicing of your TV set should only be carried out by authorised TV technicians. • Place the TV set on a level, firm base. The set should not protrude at the front when installing in cabinets or shelves. Only use original accessories if possible, e.g. Loewe wall holders and stands. Never let children handle the TV unattended. Do not allow children to play in the immediate vicinity of the TV, they could knock, shift or pull it over and injure someone. Never leave the TV on unsupervised. • Do not install the TV where there may be vibrations. Vibrations can lead to material stress. • Pull out the power and antenna cables during thunderstorms. Surge voltages caused by lightning strikes can damage the TV through the antenna system and the mains. Also remove the antenna and mains plugs in long periods of absence. • The mains plug of the TV set must be easily accessible so that the set can be disconnected at any time. • Lay the mains cable in such a way that it will not be damaged. The power cable may not be kinked or laid over sharp edges, not stood on and not exposed to chemicals, the latter also applies to the device as a whole. A mains cable with damaged insulation can lead to electric shocks and is a fire risk. • When removing the mains plug, pull the plug housing and not the cable. The wires in the plug could be damaged and cause a short circuit the next time it is plugged in. The rating plate is located on the rear panel next to the connections. First installation Remote control Connection Batteries Power mains To insert or change the batteries, press on the arrow. Slide the battery compartment cover downwards and remove it. Insert LR 03 alkaline-manganese batteries (AAA) and ensure that the + and - ends are positioned correctly. Remove the cover for the connections. Connect the TV set to a 220-240V/50- 60 hertz power outlet. Plug the small plug of the mains cable into the mains socket on the rear of the TV set; plug the large mains plug into a mains socket. + Antennas Plug the antenna plug of your antenna/cable system or the room antenna for DVB-T into the ANT-TV socket (Tuner 1). + Then push the cover back on from the bottom. Note on disposing batteries The batteries provided contain no harmful materials such as cadmium, lead or mercury. Regulations concerning used batteries stipulate that batteries may no longer be thrown out with the household rubbish. Deposit any used batteries free of charge into the designated collection containers set up at commercial businesses. ANT-TV 220-240V~ 50/60 Hz ANT-SAT * Setting up the remote control for operating the TV DVD VCR TV STB Set the rotary switch to “TV“ TV R How to operate other equipment is described as of page 55. If the reception conditions are good, then a room antenna may be used for DVB-T. Passive and active room antennas are available on the market. The power is supplied for an active antenna via the antenna connection. For automatic programming or in "TV Menu – Connections – Antenna DVB – Antenna DVB-T," the distribution voltage (5 volts) is to be set correspondingly. It may be practical to use a nondirectional antenna. If the location is outside the normal transmitting range, then a unidirectional antenna may also be used to improve the reception quality. You can find out more on the digital stations that can be received in your area at your specialist dealer. 9- First installation If a Digital Satellite Tuner 2 has been retrofitted, then connect one antenna cable each, for example from the antenna switch or from the twin LNC, to both SAT sockets. Handling the fabric hose Use the fabric hose included to lay the mains cables, antenna cables or cables from other electronic components systematically; then lead the hose with the cables to the connection boxes. This provides you with an elegant solution when laying cables. The diameter of the fabric hose increases when you push it together lengthwise (see illustration). This makes it easier for you to push through cables with plugs. Use of the binders 1. Make sure the TV set is switched off with the mains switch on the set. 2. First push the smartcard into the CI module as far as it will go. Insert it so that the side with the golden contact chip faces the side of the module printed with the supplier‘s brand logo. Printed arrows indicate how to insert the card. Also follow the installation instructions included with the smartcard. 3. Slide the CI module (1 carefully into the slot with the contact side facing the front. The logo on the common interface module should be visible. Make sure the module is not twisted in the process. Do not use force. When the module locks, the eject button is pressed outwards. The CI module and the smartcard are not included in the scope of delivery of this set; you can usually obtain them at your specialist dealer. (1 Replace the connection cover on the TV set. - 10 Eject button CI module Switching on Press the mains switch, the red indicator on the set now lights up (standby mode). ) The enclosed binders are intended to bind the connecting cables together and fix the cables to the mount of the table stand (see figure). By pressing on the closure of the binder, it can be opened again. In order to be able to receive encrypted digital stations, the common interface module (CI module) and the smartcard both have to be inserted into the corresponding slot of your TV set. You can purchase the CI module and smartcard at your specialist dealer. You can find the slot on the back of your TV set, see the illustration on page 5. COMMON INTERFACE If a Digital Satellite Tuner 1 has been retrofitted, connect your satellite antenna system to the ANT-SAT socket. Using the common interface module Contact side Plug the antenna into the antenna input of the PIP tuner and connect the PIP tuner output with the ANT-TV socket (Tuner 1). See illustration on page 5. Switch on the set using the switch integrated in the indicator. The green indicator on the set now lights up (for further operating options see page 12). First installation Automatic programming Automatic programming of the TV set is started the first time you switch it on. Follow the menus. OK OK By pressing in one of the arrow directions, you can choose the settings ... ... and confirm your settings by pressing OK. You then go to the next menu. Back to the previous menu. 1. First you have to select the menu language. 2. By pressing the OK button, you can call the menu “Connect antenna cables(s)". If you want to receive digital stations via satellite, then choose “DVB-S“ - confirm using the yellow Initial installation coloured key. If you also want to Connect antenna cable(s) receive digital terrestrial stations Antenna cable(s) for: to antenna socket(s): Antenna/cable (analogue) ANT TV (DVB-T), then select “DVB-T“. Also DVB-T ANT TV select “Antenna/cable (analogue)" DVB-C ANT TV DVB-S ANT SAT - this way the standard analogue Connect/disconnect Proceed Back stations can also be searched for and saved. If you can receive digital stations from the cable network, then select “DVB-C“ using the yellow coloured key. 3. For the country-specific station sorting and for presettings for DVB-T and DVB-C, enter the location at which the TV set is operated. 4. If you have selected “DVB-T“, you then reach the menu “Antenna DVB-T“. If you use an active antenna, then select “yes (5V)”. 5. If you have selected „DVB-C“, you generally leave the symbol rates and modulation types unchanged. If other symbol rates are used in your cable network for broadcasting, enter the values with the numeric buttons of the remote control. If only one symbol rate is used, enter the same value for both symbol rates. If other modulation types are used for broadcasting in your cable network, select them in the menu. If only one modulation is used, select „none“ for modulation type 2. If necessary, ask your specialist dealer about the necessary settings for your cable network. 6. In the “Select satellite installation“ menu, make the selection that corresponds to your satellite antenna installation. Note: If you have any questions on how your satellite antenna installation is configured and on the antenna settings, consult your antenna installer or your specialist dealer. 7. Select the satellite the antenna is directed at, such as ASTRA1. OK If you only receive one satellite ... 8. In the following menu, specify whether the station search should take place in the high and low band (“Yes“) or only in the low band (“No“). Note: For most satellites, a station search is required in both bands. 9. For the low band and high band, the standard frequencies 9750 MHz (9.75 GHz) and 10600 MHz (10.6 GHz) are preset. If your satellite antenna is equipped with an LNC (LNB) with a divergent oscillator frequency, specify the corresponding frequency for low and high band respectively. Note: The correct display of the received frequencies in the “TV menu – Settings – Stations – Manual adjustment“ depends upon this setting. 10. You should receive a picture with sound with the settings previously made (only for ASTRA 1 and HOTBIRD). Then press OK. 11. In the “Pre-programming“ menu, select the factory-set pre-programming to programme the satellite stations quickly. To ensure all stations that can be currently received are searched for and saved, select “No“ at this point. Symbol rates: The standard symbol rates 22000 and 27500 are preset. If you would like to receive stations with different symbol rates, specify the corresponding values here using the numeric buttons on your remote control. 12. Press OK to obtain an overview of the settings with which the automatic programming is to take place. 13. Press the OK button again and the station search will start. The TV set searches for, sorts and saves all the TV stations that can be received, according to your settings and the antennas connected. 14. When the TV stations are saved, you will receive a corresponding message. 15. Press the OK button and the set then searches for the radio stations. 16. The TV set searches for, saves and sorts all radio stations which can be received with your antenna system. 17. Then log on your video equipment, decoder and audio system using the connection wizard and connect these to the TV according to the connection diagram displayed. If you want to connect other equipment later, you can find information as of page 48. You can repeat the initial installation at any time, e.g. after moving house. Call the index using the INFO button (in the TV mode, if no menu is opened). Select the index item “Repeat initial installation“ (you will find this listed separately before the letter A). Press OK to start the initial installation. Station sorting You can change the station sorting that was carried out automatically later at any time, see “TV menu – Settings – Stations – Change stations“. 11 - First installation Daily operation Directing DVB-T antenna Switching on/off If you use a room antenna to receive one or more DVB-T stations that have picture and sound interference, then you should change the location of where the antenna is set up. To help you direct your antenna or to help you determine the most suitable location to set up the antenna, your TV set has a display for the signal quality C/N and the signal strength Level. Consult your specialist dealer to find out which channels and frequency bands (VHF or UHF) are used to broadcast the digital TV stations in your area. On any one channel, several digital stations are broadcast. Your TV is equipped with an eco-standby power supply unit. On standby, the power consumption drops to low power. If you want to save even more electricity, switch the set off with the mains switch. However, please bear in mind that EPG data (electronic programme guide) will be lost and programmed timer recordings will not be performed by the TV. ) Select a TV channel 1. Call the “TV menu“ via the MENU button. 2. Use to select “Settings“, then use to select the menu line underneath. 3. Select “Stations“, then use to select the menu line underneath. TV menu Settings Stations Manual adjustment INFO Parental lock ... Timer functions END Language Manual adjustment Signal source Channel Frequency Name Bandwidth C/N 96 DVB-T E 05 177.50 MHz Test 7 MHz Level 99 ) 4. Select “Manual adjustment“ and call the menu using OK Switching off If the TV set is switched on, you can switch it to standby using the blue ON/OFF button on the remote control or by using the indicator field on the set. The red lamp on the TV set lights up. If the orange indicator lights up, a timer recording is being made, EPG data is being captured or radio operation without screen display is active. Switching on the TV set From standby, it is best to switch the set back on using the blue On/Off button or by using the numeric buttons of the remote control (0 – 99). Or use the switch integrated in the indicator on the set. The green indicator on the TV set lights up. DVB-C Antenna/cable (analogue) OK Or switch on the TV set with OK, you can then see the station list and select a station. END - 12 RADIO Switch on the radio With the RADIO button on the remote control or: Switch on radio using R on the control ring of the TV set. ) 5. For digital stations, select “Signal source – DVB-T“. 6. Use the numerical buttons to specify the corresponding channel number. Depending on the channel selected and country, the system automatically sets the corresponding bandwidth of 7 or 8 MHz. You should only change the bandwidth under special circumstances - if the channel raster in your area is different from the standard. When you receive a digital station, the system displays the signal quality C/N via a bar/numeric value and the signal strength via Level. The antenna‘s direction or position is best when the largest values possible are displayed (long bar) for the signal quality and signal strength. 7. Direct the antenna so that the largest numerical value/bar size is reached. 8. If no signal is found in the channel set, you can start the frequency search run by pressing the blue button within the band selected (VHF or UHF). 9. Check the other channels one after another on which digital stations are broadcast terrestrially in your area. For the weakest station, direct the antenna so that the maximum numerical value/bar size is achieved. 10. After you position or direct the antenna, we recommend to search for all the stations using the “Search wizard“ (TV menu – Settings – Stations – Search wizard). If you switch off the TV set using the mains switch on the set, the indicator no longer lights up. If the TV set is switched off via the mains switch, you have to switch it into the standby mode first via the mains switch and then switch it on using one of the above mentioned methods. Daily operation Changing stations ... via the station list ... with the P+/P- buttons on the remote control V- P+ ( OK V+ OK Use OK to call the station list. Stations up/down P– When changing, the station display is visible for a few seconds. 41 ZDF Eifellandschaft Language/sound selection 21:00 – 21:45 If additional languages are broadcast with DVB stations, then the set displays the language/sound selection under the station display. Call the language/sound selection by using the green coloured key and select using . 0 OK ... with the numeric buttons of the remote control 1 digit stations Press buttons 0 -9 for one second, and the station changes instantly. Or press button 0 – 9 briefly, the station then changes after 2 seconds (the station changes immediately when only 9 stations are saved). pqrs long abc pqrs short short long abc pqrs tuv all short 2- and 3-digit stations After briefly pressing the first numeric button(s), keep the last numeric button pressed for one second, the station then changes immediately. Or press all numeric buttons briefly, the station then changes after 2 seconds (the station changes immediately if up to 99 or 999 stations are saved). 4 digit stations Press the four numeric buttons briefly, the station then changes immediately. Select the station (if possible, the selected station will be displayed as a small picture) or ... AV ... The set has a dynamic memory with 1680 station memory locations. If up to 9 stations are stored, you only need to enter one digit; up to 99 stations, two digits are needed; up to 999 stations, three digits are needed (refer to the station list to see how many stations have been stored). Station list Numerical COMP. IN 6 3SAT HDMI/DVI 7 S–RTL VGA 8 N–TV AVS 9 DSF DVD 10 TM3 VCR 11 PRO7 0 VIDEO 12 RTL 2 OK 1 ARD 13 WDR 3 2 ZDF 14 BR 3 SAT.1 15 HR 4 RTL 16 MDR 3 5 VOX 17 N 3 21:00 - 21:45 Eifellandschaft OK Switch to ... END Scan stations ... 9 Select station Change stations Change sorting wxyz OK ... select with numeric buttons call selected station Blue coloured key: sort alphabetically/according to bouquets/ numerically Station list COMP. IN HDMI/DVI VGA AVS DVD VCR Alphabetical CNN INT. CAM DELUXE DSF EUROSPRT ARD BR-ALPHA BR3 a OK HOT HR KIKA 21:00 - 21:45 Eifellandschaft OK Switch to ... Scan stations ... z Select letter Change stations Change sorting END For an alphabetical display: Enter letters with the numeric button (like on a mobile phone keypad), select with and call with OK. For bouquet display (sorting according to broadcasting chains, only for DVB stations): Enter bouquet number, select with and call with OK. Digital DVB-T stations are indicated by T , DVB-C stations by C and DVB-S stations by S . Encrypted stations are additionally indicated by . Ask your specialist dealer about decoders or the use of a CI module and a smartcard for the reception of encrypted stations. 13 - Daily operation Basics about the menu operation TV menu Sound Bass 6 Menus are called via the MENU button or via the button for special menus and can be hidden by using these buttons or by using the END button. The menu is displayed in the bottom section of the screen. At the top, you can see additional information for the menu point selected. In the menus, navigate by using the cursor . You can make settings by using . When you exit the menu, the settings are adopted. Set the bass tones by using OK If you want to make other sound settings, move up with to “Bass“ and select with , e.g. “more...". You can also move up further to “Sound“ by using and select other settings in the TV menu (such as, picture settings). Bass TV menu Sound more ... Bass ... use OK TV menu Sound Loudspeaker sound Stereo TV menu Sound Auto volume off OK TV menu Sound Treble - 14 Connections Settings TV menu Sound Bass 6 off END Auto vo , e.g. “Auto volume“ and ... INFO AV audio signal ... Maximum volume END Balance INFO END INFO END on to select “on“ and activate the auto volume. TV menu Sound Auto volume on Call the Sound menu directly. INFO Call the Picture menu directly. Quick calls for Image+, teletext subtitles, personal text pages, headphone volume, scan stations and to move the picture up and down. END Green coloured key: Call standard settings for picture and sound. , e.g. INFO END P+ more ... To set the bass tones, use underneath. Headphone sound Apart from the TV menu shown here, other menus can be opened in TV mode as follows: more ... Bass INFO Headphone volume ... Press the END button to hide the menu. END or OK; you will then In the sound settings, also select the function with “Bass“ (for increasing or reducing the bass tones). Treble OK Recording ... END Use OK Settings INFO Select the sound function below with see a list of the sound settings. TV menu Sound Treble 4 OK Connections END Select the function in the TV menu, e.g. “Sound“ (for sound settings). Use to move the menu points displayed on the right into the dark blue field; use to move the menu points displayed on the left. Picture OK Recording Sound ... Treble to select the auto volume option. TV menu Sound Auto volume off INFO END INFO OK Select the sound setting using OK sound TV menu Picture Picture adjustment . Use OK to call additional sound settings. OK Picture Here you can adjust among other things: Contrast, colour, brightness, picture adjustment, sharpness, picture format. END OK Example of the menu operation We shall demonstrate how to navigate with the menus using the TV menu as an example. You can see which buttons you can use in the dark blue field on your TV set. Open TV menu (in TV mode). MENU INFO V– or OK to select the setting bar OK P- V+ Using the volume control, you can also open other sound settings, such as Sound via, Sound adjustment, Sound effects and Loudness. The key or OK must be pressed for the duration of the volume display for this. Daily operation For the info system ... OK Call the TV menu. OK Select “Settings“. to select the line below, for example “Search wizard“. Search wizard Use this menu to search for stations automatically once certain settings have been made. If you want to search for stations with other than the displayed settings, select the "Change settings" menu. For each menu point, an info text is displayed at the top of the picture to help you with the setting. This saves you from having to refer back to the operating instructions. We shall demonstrate this using the station search option as an example: MENU Use TV menu Settings Stations Search wizard Settings Here, you can search for the stations automatically or manually as well as set the menu language, timer functions, parental lock, on-screen displays, etc. INFO Manual adjustment END Change stations The info text explains how you are to proceed. ections TV menu Settings Stations END INFO Picture Sound Recording Conne ... In this example, you can see the options available after “Settings“. OK If you want to search for new stations, for example, use select “Stations“ in the line below. Upon delivery, the TV set is configured so that the info texts are always displayed (Automatic info “yes“). In this case, you can hide the info texts by using the INFO button. You can also configure the TV set so that you call the info texts when needed by using the INFO button (Automatic info “no“). You can find the setting to switch the automatic info option on or off via “TV menu under Settings – Miscellaneous – On-screen displays – Automatic info – yes/no“. to Stations The menu contains the automatic station search and the manual station setting. You can re-sort stations, enter and change station names and delete stations. TV menu Settings Stations Search wizard INFO Parental lock Timer functions ... Language END Mi The info text indicates which settings you can make in “Stations“. 15 - Daily operation For the index ... For example, you want to have the TV set switch off automatically: Select the index item “Switch off“ – “Automatic“. Using the index, you can access many operational functions directly. You can also find a great deal of information on technical terms about television. Before the alphabetical sorting, you can find the menu language option, the list of features integrated into the TV set and the repeat initial installation option. You can set your TV set to switch off to stand-by mode once or every day at a given time. Call the index in the TV mode (without any other on-screen displays). INFO Index Switch off Automatic Manual Symbol rate* Teletext Activate Character set FLOF OK Activate a ... z Select letter You can select your language for operating the TV set. Index Language Integrated features Repeat initial installation * Access code Active window (PIP) Automatic channel programming (ACP) AV (Audio/Video) OK Activate Previous/next letter P+ a ... z Select letter P– Page Ç/È OK OK OK END Previous/next letter P+ P– Page Ç/È Use the OK button to call “Switch off“ – “Automatic“. Switch off today only If you want your TV set to switch off once automatically (to stand-by mode) select "yes" and enter the time. END Info on the index item selected is visible at the top of the picture. If the OK symbol is displayed in the line selected, you can use the OK button to access the menu directly and carry out settings or selections. This is how to select the index item: Enter the first letter using the numeric buttons on the remote control (like on a mobile phone keypad); or abc ... wxyz use or OK to go to the previous/next letter, P+ V- OK V+ use P+/P– to scroll up or down through the pages P– OK - 16 and use to go from line to line. TV menu Settings Timer functions Switch off today only no INFO Switch off daily ... One-time reminder END Wake The corresponding menu “Timer functions“ is displayed (in the TV menu – Settings). You can now choose between “Switch off today only“ and “Switch off daily“ and enter the time. Daily operation Setting the sound Picture settings Open the Picture menu Volume and other frequently used sound settings Picture Picture adjustment normal P+ OK (Setting the volume V+ Volume 24 P- OK by using OK or OK, you can call other sound settings ... Volume 24 OK OK OK Sound adjustment and select using Sound effects use for the related selection/setting ... normal Sound adjustment Pop ... and use Sound effects Classic Loudness V Speech no to make the selection/setting there. Sound off/on INFO END to set/select. Direct control on TV set On page 4, you can find illustrations of the control unit located on the set. Switching station on the TV set Station up: with + on the control ring Station down: with – on the control ring Switching the radio on/off or switching over to the radio Sound off; Sound on: Press button again or adjust volume. Press R to switch the radio on or off. Sound off Additional functions via the menu Sound on In the radio or TV operating modes, you can make settings for Volume, Brightness, Contrast, Picture format and Stations. “Service” is intended for the customer service department. Other sound settings: Call the Sound menu Sound Treble 4 use M to call the menu INFO Bass and use END more ... g mode use to select the sound function to be set and use the related selection ... INFO Sound Bass 6 OK END more ... Picture settings: Picture adjustment, Contrast, Colour, Sharpness. Under “more ...", you can find settings for Brightness, Image+, Picture format, Move picture up/down, Auto format and Film quality improvement DMM. ) Sound adjustment allows you to adjust the sound characteristics to the station‘s sound. The Sound effects settings allow you to expand a Dolby Pro Logic Signal to a virtual surround signal by using “Dolby Virtual“; by using “Panorama“, you can enhance the foundation of the stereo sound virtually for the loudspeakers. OK ... and use OK Sound adjustment normal Sharpness Picture Colour 6 Loudness ... Volume Colour use to select the picture function to be set and use for the related selection ... ... ) V– INFO Contrast ... for END to select/set. Sound settings: Treble and bass. Different menu items are displayed depending on the connected audio device (AURO, hi-fi amplifier). Under “more ..." you will find the sound selection for loudspeakers and headphones, auto volume, headphone volume, AV audio signal, maximum volume and balance. Direct control on TV set Volume 24 Brightness Contrast Picture format Stat use – or + to select the function to be set Direct control on TV set Operating mode TV Volume Brightness Contrast Picture fo use R for the related setting/selection Direct control on TV set Volume 18 use – or + to set/select. Use M to move one level up; you can use – or + to select other functions. 17 - Operating modes – TV TV In initial installation and daily operation, the TV set is in TV mode. This is also the case when none of the other modes of operation, such as EPG, Teletext, PIP or Radio, have been selected. Each of these operating modes has a separate menu with separate functions for the coloured keys. Call the menu via the MENU button. For the status display, the DVB station providers may offer additional selection options for each station. Thus, the corresponding colour key or the TEXT button is displayed: Red: channel selection for multi-channel providers. Green: language/sound selection. Yellow: time selection. How the coloured keys work in TV mode Blue: protection of minors. Red: Call the DR archive (Digital Recorder). TEXT Green: Call personal settings/factory settings for picture and sound, save picture and sound settings as personal settings. Standard settings pict./sound OK Call up personal settings OK INFO Call up factory settings END Store as per Activate Yellow: call last station viewed. You can switch back and forth quickly between two stations using this button. Blue: call programme info. 1 ARD Eifelland DVB subtitles. If you press one of the coloured keys during the status display or you press the TEXT button, the related selection menu is displayed. The status display subtitles refer only to the “DVB subtitles“ and are not provided by all stations. The options you see depend on the particular station (many stations broadcast subtitles via teletext). The status display is displayed automatically when a new programme begins with options different to the previous one. Notes: • In the sound mode, Mono! means that you have switched manually from stereo to mono, for example. • The selection menus are only available as long as the status display is displayed. You can call them again at any time by pressing the END button on your remote control. 14:30 - 15:15 Calling the index INFO Programme info Detailed info END 14:43 OK Detailed info (teletext) Calling the index You can select your language for operating the TV set. Programme preview (t Show status display END Show/hide status 1 ARD Eifellandschaft 14:30 - 15:15 Stereo 14:42 Alarm time 20:00 Sleep timer 23:00 Language/sound selection In the line above, you can see the name of the station and the sound mode. Displayed below are additional options (Time, Sound mode, Alarm time and Sleep timer) that can be selected in the “TV menu – Settings – Miscellaneous – Onscreen displays“. - 18 Index Language Integrated features Repeat initial installation * Access code Active window (PIP) Automatic channel programming (ACP) AV (Audio/Video) OK Activate Previous/next letter P+ a ... z Select letter P– Page Ç/È You can find more information on the index on page 16. OK END Operating modes – TV Call additional functions TV menu Select additional functions such as Image+, Teletext subtitles, Personal teletext pages, Headphone volume, Scan stations and to move the picture up and down. Teletext subtitles ... Personal teletext pages Call timer overview If timer recordings have been programmed, you will see when which station is recorded here. Timer list Fri 12.09./14:12 12.09. 18:00-18:30 3SAT Die Köchin, die Putzfrau und d TEXT Detail New recording Change Delete END INFO Select picture format The TV set sets the best picture format automatically when Auto format is switched on. If you want to set a different format, press this button until the desired format is selected or select the format with . Picture format 16:9 4:3 Panorama Cinema Zoom You can switch the panorama picture over to distortion-free representation on your TV set. Dark margins are then visible on the left and right of the picture. Switching over: Keep the M button on the set pressed, at the same time press the ”Picture format” button on the remote control briefly. Resetting: Press the same button combination again. Move picture up/down OK Call up the TV menu TV menu Picture Picture adjustment INFO Sound ... Recording Connections END Settings END INFO Additional functions Image+ off MENU To make picture subtitles visible, you can use to move the picture up or down with the picture formats “Panorama“, “Cinema“ and “Zoom“. You will find a description of the picture and sound settings on page 17. The TV menu offers other options for recording, connections and settings of the TV set. For a recorder that is logged in, you can find the following menus in the “Recording“: Recording wizard - to programme new timer recordings • Via EPG • Via teletext • Manual You will find further information about timer recording on page 49. Timer list Here you will find a list of programmes programmed for recording. You can change the recording data or delete programmed recordings and programme new recordings. Pre-record time and Post record time For recordings without VPS/PDC, set a lead and lag time here so that the programme is fully recorded despite any slight differences in the time. Under “Connections“ you will find the following functions: New devices/modifications (connection wizard) The connection wizard helps you connect and log in additional equipment such as video recorders, DVD players/recorders, camcorders/digital cameras, pay TV decoders, equipment with component signals and digital HDMI/DVI signals. Antenna DVB • Antenna DVB-T • Antenna DVB-S (1 You can find more information on pages 11 and 12. Digital Link Plus Transmission of the station data from the TV set to the video/DVD recorder if a recorder with Digital Link Plus is connected. Miscellaneous (connections) • Set AV norm for the connections manually (if it is not recognised automatically). • “Assign audio digital signals“ to one of the AV sockets. • “Allow switching voltage“ to display the signals of the connected device immediately on the screen via Euro AV during playback. • RGB insertions at AV2 to play back RGB signals at all station storage locations. • Select decoder stations and set sound encoding. (1 only for sets with DVB-S 19 - Operating modes – TV Under “Settings“ you will find the following functions: Stations Here you can search for and store new stations automatically or manually. With “Change stations“, you can rearrange and delete the stations and change station names. • Search wizard • Manual adjustment • Change stations Parental lock You can lock the TV “immediately“, “daily“ for a certain period of time or “agerelated“ for DVB programmes with age restrictions. Here, you determine the PIN to enter if you want to watch locked programmes. Timer functions You can have your TV switch off at pre-programmed times or wake you/remind you with radio or TV. If you are not present at the time, a safety prompt makes sure the TV switches off again after 5 minutes. • Switch off today only • Switch off daily • One-time reminder • Wake up Mon-Fri • Wake up Sat • Wake up Sun • Wake up with • Wake up signal volume Language If “your“ menu language is not set, you have to select the “Language“ menu in a language that you do not understand. Therefore here is a simple way to set the right menu language: 1. Press the INFO button (index), select the first listing (this is above A). 2. Call the language selection by pressing the OK button. 3. Now select the desired language and confirm it by pressing the OK key. 4. Hide the menu again with the END button. Miscellaneous (settings) On-screen displays You can set the duration and position of the station and status display, define the content of the status display and switch the automatic info texts on or off: • On-screen display time • On-screen display position • Programme title • Sound mode • Time • Alarm time • Sleep timer • Automatic info Time and date If you receive teletext, the set registers the time and date. These are required for timer recordings, timer functions and EPG. If you do not receive teletext, then you have to enter the date and time; you should not switch off the set using the mains switch since the settings will then be lost. DVB character set • Western European • Polish DVB subtitles If the station provides DVB subtitles, then you can have the TV display them permanently or suppress their display. You can also select between subtitles “for translation“ or “for the Hearing Impaired“. 1. Call the “TV menu“ via the MENU button. 2. Select the “Settings“ line and confirm using OK. 3. Select the “Miscellaneous“ line and confirm using OK. 4. Select the “DVB subtitles“ line and confirm using OK. DVB subtitles Subtitles off for impaired hearing for translation - 20 OK END INFO Note: If you have selected “Subtitles off“, then the set generates an on-screen display when subtitles are available. By using the END button, you can open the status display and you can display the subtitles again by using the TEXT button. • Call the status display by pressing the END button, if it is not yet displayed. • When the status display is visible, press the TEXT button. Select the desired language and confirm using OK. The presetting changes for the current programme. • Which subtitle languages can be selected depends on the provider. • The automatic shortlist is determined by the menu language and the selection made in the “DVB subtitles” settings menu. • By pressing the END button, you can hide the menu again. DVB software Update of DVB software via satellite (1. DVB subtitles • Subtitles off • Subtitles for the Hearing Impaired • Subtitles as translation for foreign language programmes • Standard. Rotate TV Individual Edition sets are equipped with a Motor Unit at the factory. You can find out more on page 57. (1 only for sets with DVB-S Operating modes – TV Removing the CI module Searching for new software 1. Switch the TV set off with the mains switch. 2. Remove the cover from the back of the set on the upper left. 3. Press the eject button at the module slot; the module is unlocked. 4. Remove the module from the set. If you want to carry out a manual search for new software, proceed as follows: 2. Confirm the “Settings” using OK. CI module COMMON INTERFACE Inserting a new CI module 1. Call the TV menu using the MENU button. After you insert a new CI module and switch the TV set on, the following dialogue is displayed: Autom. station search Your TV set has detected a new CI module. This requires a station search for all new receivable stations. After you press the OK button, the system starts the wizard to carry out the automatic station search. Check the proposed search parameters and let the set search for new stations. 3. Confirm the “Miscellaneous” using OK. 4. Select “DVB software” and press OK. Update digital TV software Current version: V3.x.x You can search for a new software version with OK. 5. If you start the search using OK, the set checks if there is a new software version available. 6. If there is a new version available, the set generates an on-screen message. Update digital TV software Current version: V3.x.x Calling the CI module menu Here you can call up information on the inserted common interface module and the smartcard. To do this, use the MENU button to call the TV menu, select the line “Settings”, “Miscellaneous” and then the entry “CI module - xxx” (in place of “xxx” stands the name of the provider which is output by the smartcard. The content of this menu depends on the particular supplier of the CI module. Note: This menu is only available for digital stations. Installing new DVB software To ensure your DVB-S receiver is always performing at the state of the art, newly developed software versions are made available from time to time; these are broadcast via satellite and can be automatically installed on your set (only possible via ASTRA1). Software is recognised automatically The set can determine whether a new software version is available. This occurs at night when your EPG is automatically updated. For this, your TV set has to remain in the standby mode (do not switch off using the on/off button on the set). If a new software version has been found, the set will indicate this with an onscreen message the next time the set is switched on: You can decide whether or not you want to download the new software. Confirm using OK, so that the new software can be loaded and installed via satellite. Continue as set out in the “Downloading software” section. New version: V3.1.0 Downloading software 1. If you press OK in the dialogue above, you can decide whether you want to download the new software immediately, when you switch off the set or not at all. We recommend you always carry out the update of the digital software. This is the only way to ensure your set is always up to date. 2. If you do decide to update, the software is initialised on your set and you are informed of the status with a grey bar. Do not switch your set off during this time. This process may take up to one hour. You will be informed when the process is completed. 3. After the software is updated, you will be asked to switch your TV set off and back on again using the on/standby switch. If the update was not carried out, you will be asked several times when you switch on the set whether you want to carry out this update. 21 - Operating modes – TV Image+ Image+ demo mode Image+ is a picture improvement specially developed by Loewe, which delivers a sharper, lifelike and colour-fast picture richer in detail and contrast. Image+ menu In order to show the way Image+ works, a "Demo mode" is integrated. In "Demo mode", the current picture is divided into two parts. The left half of the picture is shown in “normal“ mode, the right half in the Image+ optimised mode. Image+ off Image+ on Call the menu “Additional functions“. INFO Additional functions Image+ off OK Use on OK END Personal teletext pages to move to the corresponding selection/setting ... Additional functions Image+ off and use OK INFO END INFO END Demo to select/set and use ... Additional functions Image+ on OK Teletext subtitles ... OK off The demo mode can be closed by pressing on any button on the remote control. Demo Activate to activate. In the Image+ menu, the functions Image+ “on“, “off“ and “Demo“ can be set. The Image+ settings can also be opened via the “Picture“ menu. Open the Picture menu. Picture Picture adjustment normal OK Use ghtness Colour Sharpness more ... to go to “more...“ and select with OK. Picture Image+ on INFO Picture format ... Move picture up/down Select/set as described in the Image+ menu. The standard setting at delivery of the set is Image+ “on“. - 22 END INFO Contrast ... END Auto for Operating modes – PIP Picture in picture (PIP) Select the station of the TV picture (main picture) Your Individual Edition set is equipped with two TV cable tuners which enable picture in picture displays. But you can also use picture in picture with a retrofitted digital satellite tuner or when playing back from a video recorder or DVD player (AV-PIP). The following PIP displays are possible: Main picture analog – PIP picture analog, Main picture digital – PIP picture analog, Main picture analog – PIP picture digital, Main picture digital – PIP picture digital. For “Split screen," the PIP picture is displayed on the right side of the screen. Both pictures share the screen in two equal halves. For the “Small PIP” setting, a small picture is displayed in the TV picture. The green bar/frame indicates that the control commands have an effect on the PIP picture. The white bar/frame means that the control commands have an effect on the main picture. Use the green coloured key to switch between the PIP picture and the main picture, for example to change stations. The frame or bar between the pictures is green for the time being. PIP Show/hide PIP picture PIP picture as freeze picture The bar/frame has to be green. If not, press the green coloured key. If you press the red coloured key, the PIP picture freezes. Press again - moving picture. The bar/frame has to be green. If not, press the green coloured key. Then select the station as usual. Der Wilde Westen 41 ZDF Eifellandschaften 21:00 – 21:45 PIP scan in the PIP picture The bar/frame has to be green. If not, press the green coloured key. Start scanning the stations using the blue coloured key. The bar/frame turns blue. The stations now change automatically. Stop scanning the stations by using the blue coloured key. The bar/frame turns green again. Interchanging PIP picture/TV picture Selecting the station of the PIP picture 1 ARD The bar/frame has to be white. If not, press the green coloured key. Then select the station as usual. 21:15 – 22:15 The bar/frame has to be green. If not, press the green coloured key. Interchange the pictures by using the yellow coloured key. 1 ARD 41 ZDF Der Wilde Westen Eifellandschaften 21:15 – 22:15 21:00 – 21:45 23 - Operating modes – PIP Functions in the PIP menu Position of the PIP picture In the PIP menu, you can set the PIP type (small picture or split screen) and the position of the small picture. MENU OK Call the PIP menu (PIP must be active, green bar/frame). mall PIP TV menu Settings PIP Type Split screen INFO Move the PIP picture with the arrow keys to a corner of the TV picture. In this case, the frame around the PIP picture has to be green, and there should not be any other displays visible on the screen. END Sm Setting the PIP type Switch to split screen: You can have the PIP picture displayed as a small PIP or split screen. You can have the PIP picture displayed on the right hand side of the screen. Both pictures share the screen in two equal halves. You will see a coloured vertical bar between the pictures. Switch to small PIP: OK Select “Type” and then “Small PIP”. MENU OK TV menu Settings PIP Type Small PIP INFO Select “Type” and then “Split Screen”. END Split screen For the small PIP, you will see a coloured frame around the PIP picture. - 24 Call the PIP menu (PIP must be active, green frame) mall PIP TV menu Settings PIP Type Split screen INFO END Sm Operating modes – EPG EPG - Programme guide EPG is an electronic programme guide. With this system, you can easily find the programmes that interest you (sorted according to day, time, station and topic). You can mark programmes and programme recordings. Depending on whether you are receiving analogue stations by cable/antenna or digital stations, you will have different programme guides. A wizard is activated the first time you use EPG (not with DVB) which guides you through the necessary settings. Then run the data capture (see next page). When receiving digital terrestrial and digital satellite stations, you may find that two identical EPG data are displayed in the “EPG (DVB)" menu for one station. If you call the EPG menu in the EPG mode by using the MENU button, then select “Station selection," you can select the duplicate station and deactivate it by using OK). You have direct access to the selection lines above to pre-select the day, the time, the station and the topic. Blue coloured key: Call Select date/time/stations/topics Using the EPG EPG Date Time Stations Topics Switch EPG on/off EPG (Electronic Programme Guide) Fri 10.09./14:14 Fri 10.09. now soon 14:00 15:00 16:00 17:0 all all OK 13:20-14:15 Kabel 1 Die Waltons 13:30-14:15 H3 ARD-Buffet 13:55-14:20 Kinderkan Blaubär & Blöd (37) 14:00-14:15 ZDF heute - in Deutschland 14:00-15:00 RTL Das Strafgericht 14:00-15:00 Sat 1 Zwei bei Kallwass 14:00-15:00 Pro7 Das Geständnis - Heute s... 14:00-14:30 N3 DAS! ab 2 14:00-14:20 WDR Die kleinen Strolche (10) Familienserie - Sturzflug Date Time Stations Topics 24 Kabel 1 TEXT P+ P– Detail Page Ç/È OK 0 ... 9 View Select time Record Select date, ... , topics END MENU The programme guide menu is divided into two areas: at the top, you can make the settings for the programme list (date, ..., topics); on the bottom, the programme list is displayed. Use the blue coloured key to switch between the two areas to make your selections. All programmes currently running are listed initially in the programme list. With the buttons, select the programme you want to watch and switch over with the OK button. Brief information is shown below the programme list for some programmes. If more detailed information is available, you can call it using the TEXT button. Use P+/P– to scroll up or down through the pages of the programme guide. In the selection lines for date and time above, you will see the time change when scrolling; when you scroll further, the date also changes. When the “Time” line is selected, you can enter the time as of which the programmes are to be displayed; use the numeric buttons on your remote control to do this. Always enter four digits, such as 0900 for 9 a.m. If programmes are displayed which have not yet started, you can mark these with the OK button. The TV set then switches automatically to this station at the given time. 24 Kabel 1 EPG (Electronic Programme Guide) Fri 10.09./14:14 Sat 11.09. Sun 12.09. Mon 13.09. 06:00 all all 06:00-06:20 ZDF Die Blobs 06:00-06:30 RTL Wunderbare Jahre 06:00-06:25 Kabel 1 Dennis 06:00-06:25 N3 Extra en español (5) 06:00-06:30 BR Goal. Speak English, Play Football 06:00-06:30 WDR Lokalzeit Südwestfalen 06:00-07:10 SuperRTL Infomercials 06:00-07:10 Kinderkan Reif für die Dodo-Insel (25) 14:00-14:20 9LIVE Reisetraum Comedyserie - Kandidaten mit gewissen Fehlern END Change to programme list MENU Use to select the menu line for the date, time, stations or topics. Use to select within the menu line. If, for example, you are looking for the next news, select today’s date, “Soon“ under Time, “All“ under Stations and “News“ under Topics. Then you get a list of all news programmes in the programme list below. Date Time Stations Topics 24 Kabel 1 EPG (Electronic Programme Guide) Fri 10.09./14:14 Fri 10.09. soon all News Show Hobby Sport Child Kn 15:00-15:15 Das Erste Tagesschau um drei 15:00-15:05 hr-fernse hessen aktuell 15:00-15:15 ZDF heute - Sport 16:00-16:05 SÜDWEST Baden-Württemberg Aktuell 16:00-16:15 Das Erste Tagesschau um vier Nachrichten - News END Change to programme list MENU If you want to mark one of these news programmes, return to the programme list using the blue coloured key, select the desired news programme by using and mark this by using OK. 25 - Operating modes – EPG In front of the programme’s title, the system places an ✓ . This station is switched later to this programme when the set is switched on. If the TV is off, it switches on again automatically at the beginning of the marked programme if this has been set in the EPG menu. If you are out, a security prompt prevents the TV set staying on unattended. Before leaving the upper selection lines using the blue coloured key, select a specific line. If you have switched back to the programme list, you can change this menu line using without having to leave the programme list. Programming recording for recorders The programme marked using the buttons can be prepared for recording by pressing the red coloured key. In the following menu, confirm the timer data or change them as required. Then a red dot is set in front of this programme in the EPG programme list as an identification (if the timer data is being transferred to the recorder, no red dot is set). If you select this programme, you can delete it from the timer using the red coloured key (if the timer data has been transferred to a recorder, the timer has to be deleted there). EPG menu MENU Call EPG menu EPG menu Select provider INFO OK Station select Timer list You will find the following settings in the EPG menu: • Select provider • Station selection • Timer list • Switch on TV when marked Data capture END Switc • Data capture Selecting providers and stations If you want to change the provider for analogue TV reception (the station which transmits EPG data) to have other stations evaluated, you can do this under “Select provider”. Select “Select provider” and call this menu using OK. If the station you want to switch to is not listed in the “Select provider” list, then use the yellow coloured key to start the automatic search for stations with EPG data. This takes a while. Or, if you know the station that transmits EPG data, press the blue coloured key to compile manually. Select the provider in the station list and adopt it by using OK and return to the provider selection using . Select the provider in “Select provider” and adopt it using OK. Then a station list search is performed. The stations offered by the provider are displayed in a list. - 26 If you want certain stations to be omitted from the programme guide, you can select and deactivate these via Station selection. Call the station selection by using the blue coloured key. First, all stations are marked with the ✓ symbol so that their data is displayed in the programme guide (precondition: provided EPG data is broadcast for the respective station). Stations indicated by E are analogue terrestrial/cable stations, stations indicated by T are DVB-T stations, stations indicated by C are DVB-C stations and stations indicated by S are DVB-S stations. These stations are available for evaluation in the programme guide. Select the stations you want to omit from the programme guide one after another and deactivate each one by using OK. The ✓ symbol is removed. Data capture After these settings or after each time the set is switched off using the mains switch, the data must first be collected, before switching on the set. To do this, select the station you have defined as a provider and leave the TV set switched on for about one hour or switch the set to the standby mode. After about two minutes in standby mode, the indicator on the set turns orange. The data acquisition begins and lasts about 1 hour. When data acquisition is terminated, the indicator turns red again. The data are also automatically captured between 2 a.m. and 5 a.m. when the TV is switched to standby. A prerequisite for data capture is that „Data capture“ is „on“ (for DVB + analogue) in the EPG menu. Note: If the TV set is switched off using the mains switch or the mains plug is pulled out, all EPG data are lost. If, for example, you cannot receive any analogue EPG providers or if you only use DVB, you should set the data capture to “on (only for DVB)". Switch on TV when marked You can have the TV switched on automatically from standby at the beginning of the marked programme. If you are not present at the time, a safety prompt makes sure the TV switches off again after 5 minutes. Operating modes – Teletext Teletext OK In Multiple pages scroll using . You can see which multiples pages can be called in the bottom menu line. Teletext transmits information such as news, weather, sports, programme previews and subtitles. TEXT – Teletext on/off INFO 100 100 ARD-Text 10.09.04 ARD TEXT Teletext im Ersten 14:14:42 Index > 101 Bulmahn: Bildung statt Eigenheim . . . . . . . . Wird auch der Nahverkehr teurer? . . . . . . . . Australien: Keine Zugeständnisse . . . . . . . . Tote bei Zugunglück in Schweden . . . . . . . . 120 121 122 532 OK Call the TOP table The TOP table is a general list of teletext. You can only call the table for stations that use the TOP operating system. Bulmahn: Bildung statt Eigenheim . . . . . . . . Wird auch der Nahverkehr teurer? . . . . . . . . Australien: Keine Zugeständnisse . . . . . . . . TOP table Tote bei Zugunglück in Schweden . . . . . . . . + Many stations use the TOP operating system, some use FLOF (e.g. CNN). Your TV supports both these systems. The pages are divided into topic groups and topics. After switching on the teletext, up to 3,000 pages are stored for fast access. – OK Green: on to the next page (not in FLOF) abc pqrs Enter the page number directly Displaying teletext pages AV Stop self-turning pages (HOLD) wxyz Zoom page: top part - bottom part - normal size (press button several times) PIP TV picture on/off (Split Text) Yellow: to the next topic (only in TOP and FLOF) Blue: to the next topic group (only in TOP and FLOF) View 100 100 ARD-Text 10.09.04 ARD TEXT Teletext im Ersten Other page selection options: OK Select one page number specified on the page by using (Page Catching) Formel 1: Schumacher erneut vorne . . . . . . . 213 Tagesschau . . 110/112 Kultur. . . . . . . . . 500 Wetter. . . . . . . . . . . 170 Gesellschaft . . . 530 Sport. . . . . . . 200/600 Lotto/Toto . . 666 TV Guide . . . 300/400 Wirtschaft. . . . . . 700 Internet: www.ard-text.de Inhalt tagesschau Page selection OK View – OK + END + Seitenauswahl Use to select the topic group. Select the topic column using . Select the topic with and display page with OK. Page selection with the coloured keys Red: back to the previously seen page (not in FLOF) 120 121 122 532 Übersicht Wetter Tennis: Haas unterliegt Hewitt . . . . . . . . . . . . 204 tagesschau Vorhersage OK erneut vorne . . . . . . . 213 WetterFormel 1: Schumacher Städte Sport 1 Regional TV Guide Reisen Kultur. . . . . . . . . 500 Tagesschau . . 110/112 ARD heute Wetter. . . . . . . . . . . int. 170Städte Gesellschaft . . . 530 ARD morgen BiowetterLotto/Toto . . Sport. . . . . . . 200/600 666 FS-Sendungen TV Guide . . . 300/400 Wirtschaft. . . . . . 700 TV Guide 2 Internet: www.ard-text.de more . . . Inhalt tagesschau Tagesschau . . 110/112 Kultur. . . . . . . . . 500 Wetter. . . . . . . . . . . 170 Gesellschaft . . . 530 Sport. . . . . . . 200/600 Lotto/Toto . . 666 TV Guide . . . 300/400 Wirtschaft. . . . . . 700 Internet: www.ard-text.de Inhalt tagesschau Page selection The coloured bars (in TOP) or the coloured writing (in FLOF) in the next to the last line show you which coloured keys you can use to scroll to topic groups and topics. Zeitplan Fußball 1 2 3 4 5 6 7 8 9 10 11 12 Call contents page 100 Tennis: Haas unterliegt Hewitt . . . . . . . . . . . . 204 Formel 1: Schumacher erneut vorne . . . . . . . 213 – + 14:14:42 Index > 101 Bulmahn: Bildung statt Eigenheim . . . . . . . . Wird auch der Nahverkehr teurer? . . . . . . . . Australien: Keine Zugeständnisse . . . . . . . . Tote bei Zugunglück in Schweden . . . . . . . . 120 121 122 532 Tennis: Haas unterliegt Hewitt . . . . . . . . . . . . 204 Formel 1: Schumacher erneut vorne . . . . . . . 213 Tagesschau . . 110/112 Kultur. . . . . . . . . 500 Wetter. . . . . . . . . . . 170 Gesellschaft . . . 530 Sport . . . . . . . 200/600 Lotto/Toto . . . . 666 TV Guide . . . . 300/400 Wirtschaft . . . . 700 Internet: www.ard-text.de Inhalt tagesschau Page selection – + call. 27 - Operating modes – Teletext Programme timer recordings A video and/or DVD recorder must be connected and logged in in the connection wizard. Call the programme pages of the current station in teletext mode using the Direct recording button . Scroll to the teletext page in which the programme to be recorded is listed if necessary. Select the programme you want to record by with and confirm with the OK button. For “Timer data," select the VCR or DVD recorder and whether you want to record once or a series of times. Confirm with OK. Teletext menu MENU Display teletext menu 100 100 ARD-Text 10.09.04 ARD TEXT Teletext im Ersten 14:14:42 Index > 101 Bulmahn: Bildung statt Eigenheim . . . . . . . . Wird auch der Nahverkehr teurer? . . . . . . . . Australien: Keine Zugeständnisse . . . . . . . . Tote bei Zugunglück in Schweden . . . . . . . . 120 121 122 532 Tennis: Haas unterliegt Hewitt . . . . . . . . . . . . Formel 1: Schumacher erneut vorne . . . . . . . 204 213 Tagesschau . . 110/112 Kultur. . . . . . . . . 500 Wetter. . . . . . . . . . . 170 Gesellschaft . . . 530 Sport. . . . . . . 200/600 Lotto/Toto . . 666 TV Guide . . . 300/400 Wirtschaft. . . . . . 700 Menu Internet: www.ard-text.de cording Settings Newsflash Inhalt tagesschau Personal text pages INFO Reveal END Re ... Here you will find functions such as • “Newsflash”, this is an on-screen display of the latest messages (e.g. page 111). • “Reveal” concealed information, e.g. VPS pages in the station preview pages. • Programme wizard for recording via teletext. In the settings, you will find menus to define the station preview pages, subtitle pages and personal text pages, and menus to set the character set selection as well as HiText graphics. - 28 Digital Recorder – About the Digital Recorder system Your Loewe TV set is equipped with a Digital Recorder that includes a hard disk. You can use this to record and playback picture and sound from TV programmes, like with a VCR or DVD recorder. However, the possibilities of the Digital Recorder are for more versatile than those of a VCR or DVD recorder: TV viewing with time shift The Digital Recorder always records the TV programme currently playing (if the continuous operation is switched on). • Time shift You can stop a TV programme at any time and continue playing it later with a time shift. The maximum time shift may be set to 2 hours. The recording starts again from the beginning and the old content is deleted every time you switch stations. • Fast navigation by jumping Jump backwards and forwards in the movie at the press of a button. The jump distance is adjustable. In addition, the special Loewe function ”Smart jump“ ensures that for each change in jump direction the jump distance is cut in half. This way you can feel your way quickly to a certain spot in the time shift playback. • Fast forward and rewind You can fast forward and rewind at three different speeds in the programme you are viewing with time shift. • Slow motion You can watch the programme you are viewing with a time shift at four different slow motion speeds. • Subsequent archive recording You can also decide to copy the whole TV programme into the Digital Recorder‘s archive at the end of a TV programme you have been watching with a time shift. • Setting bookmarks During a football match, for example, you can flag goals or exciting scenes. For this, the time-shift recording is converted into an archive recording. For later playback, you can play bookmarks as highlights. 30 seconds before and after the set bookmark are played. Digital Recorder archive You can record movies you want to watch later in the Digital Recorder‘s archive. The archive holds between 20 and 100 hours of movies, depending on the recording quality set. If EPG or teletext data are available, the Digital Recorder stores the title and additional information about each programme in the archive. You start playing your recordings from the archive. If bookmarks were set, these recordings are flagged accordingly. You can then start playback so that the bookmarks are played as highlights. Select your favourite programme comfortably from the EPG or teletext for recording and watch the programmes later from the Digital Recorder‘s archive. An automatic delete manager always ensures there is sufficient recording space for new movies. • Sort titles You can have the programmes displayed chronologically or in alphabetical order. This way you can quickly find the movie you want to watch. • Edit titles You can change the title of a programme in the archive, if necessary. • Parental lock Protect archive recordings from unauthorised access by using the parental lock. • Delete protection Set the delete protection for a movie to prevent it from being deleted automatically by the Delete Manager. • Co py Set the delete protection for a movie to prevent it from being deleted automatically by the Delete Manager. • Replay function For instance, if you see a football match as live picture, you can jump back 40 seconds at the push of a button and watch the scene again. You see the live picture at the same time in a PIP picture. 29 - Digital Recorder – About the Digital Recorder system Archive recording You can playback a recorded programme from the archive at the same time as recording a TV programme into the archive. You can also play the same programme you are currently recording with a time shift. During archive recording, you can also watch another programme. • Immediate recording Record interesting programmes straight into the archive with the record button. You can also transfer programmes you have watched with a time shift to the archive at the end of the programme without losing what you have already recorded. • Timer-controlled Select your favourite programme comfortably from the EPG or teletext for recording. The Digital Recorder records up to 50 timer recordings - even in your absence. Watch the programmes later from the Digital Recorder‘s archive. • Serial recording Use the serial recording tolerance setting to avoid recording a serial more than once when it is broadcast more than once a day. The serial is only recorded if it begins within a given time interval (start time + serial recording tolerance). • Time shift TV with archive recording If you have programmed recording and come home later, you can watch the movie with a time shift while the rest is still being recorded. Archive playback All the recorded programmes can be selected in the archive and played. During archive playback, another programme can be recorded into the archive. • Fast forward and rewind Fast forward and rewind the movie at three different speeds. • Slow motion Watch the playback at four different slow motion speeds. • Fast navigation by jumping Jump backwards and forwards in the movie at the press of a button. The jump distance is adjustable. In addition, the special Loewe function ”Smart jump“ ensures that for each change in jump direction the jump distance is cut in half. This way you can feel your way quickly to a certain spot of the recording. - 30 • Bookmarks To find interesting scenes in a movie later, you can manually set bookmarks. In addition, there also are automatically set bookmarks every time a broadcast is changed. You can jump to each of the bookmarks at the press of a button in succession. • Playing highlights For recordings with manually set bookmarks, you can limit the playback to the highlights. You then see the scenes 30 seconds before and after the set bookmarks. If there is more than one bookmark, the highlights are played one after the other. • Cut/Hide functions Cut out superfluous sections before and after a recorded programme. Set hiding marks around uninteresting sections to watch a movie without interruptions or to archive it on VCR/DVD-R. Limitations during PIP operation If on the main screen you see the live picture and you open the PIP picture, generally the background recording for time-shift TV is ended and deleted. With archive recording and time shift TV, there may be limitations on the stations which you can select for the PIP picture. Digital Recorder – Settings for the Digital Recorder You can use the Digital Recorder with the values set at the factory initially. In this case, please continue reading on page 33. However, you should change the settings later to adjust the Digital Recorder to meet your own requirements. In the process, you can determine the recording quality and the recording capacity of the hard disk for analogue TV signals, you can set the Digital Recorder continuous operation for viewing with a time shift, the maximum time shift, the jump distance, Smart jump and the serial recording tolerance. You can adjust the settings in the Digital Recorder menu, which is a sub-menu of the DR archive. Call the archive with the red coloured key. DR archive 27.08. 3Sat 28.08. ARD AVO-Session Basel 2002 Fußball-WM Deutschland-Polen 21:30 - 22:00 Kultursendung TEXT P+ P– MENU Detail Page Ç/È Setting recording capacity/quality For signals from analogue terrestrial/cable stations, set the recording quality to very high, high, medium or standard. Signals from DVB stations are recorded directly, and therefore always at high quality. In the list above, you can see the recording capacity still available for the Digital Recorder (call up with the INFO button if necessary). Select a higher quality if you intend to copy the programme to a VCR or DVD recorder. The factory default setting for the recording quality is ”high“. OK Mark the ”Recording quality“. OK For the setting, mark the menu line below. Recording quality To record analogue stations you can set the recording qualtity, which alters the recording capacity. The following applies if recordings are only made from analogue sources: free capacity 49:42 hrs OK View OK Edit/protect Delete/copy Sort alphabetically Foe recording quality: very high high medium standard END INFO MENU y high Call the Digital Recorder menu with the MENU button. OK Digital Recorder menu DR continuous operation on INFO Recording quality ... END OK Mark ”Digital Recorder continuous operation“. OK For the setting, mark the menu line below. medium standard END very Select the recording quality. INFO This time indicates the maximum possible time between the time shift picture and the live picture without losing any of the programme. It may be between 30 minutes and 2 hours. The factory default setting is ”60 min“. You can trace the programme back for this time. If you stop the programme for longer than the set time, the TV set switched to the playback mode. OK Mark ”Maximum time shift“. OK For the setting, mark the menu line below. END 30 min off OK Select ”on“ or ”off“. INFO Setting maximum time shift Recording takes place on a constant basis with the Digital Recorder continuous operation ”on“. You can then watch TV with a time shift at any time. Only archive recordings and archive playback are possible in the ”off“ mode. The factory default setting is the ”on“ mode. OK Digital Recorder menu Recording quality high Maximum time shift In Switching Digital Recorder continuous operation on/off Digital Recorder menu DR continuous operation on remaining recording capacity: approx. 13:50 hrs. approx. 21:50 hrs. approx. 32:50 hrs. approx. 65:40 hrs. Digital Recorder menu Maximum time shift 60 min INFO 90 min END 120 min Select the time. 31 - Digital Recorder – Settings for the Digital Recorder Inform about hidden sections Setting serial recording tolerance For the archive playback, you can hide parts of the recording so that these parts are skipped when you play the recording later or copy it to a recorder. When you reach the start of a hidden section during playback, the system informs you of this and you can undo the hide setting. The factory default setting for this is ”yes“. To avoid recording a serial episode more than once when it is shown several times a day, a tolerance time must be entered. The serial is then only recorded when it starts within the start time ± serial recording tolerance. A serial tolerance of ± 30 minutes is the factory default setting. OK Mark ”Inform about hidden sections“. OK For the setting, mark the menu line below. no OK Digital Recorder menu Inform about hidden sections yes INFO For viewing with a time shift and for the archive playback, you can set a jump distance (in minutes) to jump forwards or backwards comfortably in the movie with the drive buttons or . Or you can switch the jump distance off so that jumping is not possible (”no“). The factory default setting is 2 minutes jump distance. OK Mark ”Jump distance“. OK For the setting, mark the menu line below. AV OK For the setting, mark the menu line below. Digital Recorder menu Serial recording tolerance 0 ... +–30 min (0 – 60) AV Setting the jump distance no Mark the ”Serial recording tolerance“ menu item. END Select ”yes“ or ”no“. Digital Recorder menu Jump distance yes, 02 min (0 – 15) 0 OK INFO Setting pre-record time and post record time You can set a pre-record and post record time for timer recordings made without VPS. This reduces the risk of parts of the programme not being recorded because it starts earlier and/or finishes later. There is no factory default setting for the prerecord time; the factory default setting for the post record time is 5 minutes. MENU Call the TV menu in the TV mode. OK Mark the ”Recording“ menu item. OK Mark for the menu line below. OK Mark ”Pre-record time“ and ”Post record time“. END TV menu Recording Pre-record time 00 min (0 – 15) Switching Smart jump off/on By using an intelligent jump function, you can quickly and easily feel your way to a certain point in the recording (with a time shift or in the archive). After each change in direction when jumping, the jump distance is cut in half. Refer to the next page for more information on the application. The factory default setting has Smart jump switched on. OK Mark ”Smart jump“ OK For the setting, mark the menu line below. no OK - 32 Select ”yes“ or ”no“. Enter the time with the numeric buttons on the remote control (always enter two digits for 01 to 60 minutes). ...9 Enter the time with the numeric buttons on the remote control (always enter two digits for 01 to 15 minutes). Digital Recorder menu Smart Jump yes END INFO 9 INFO END AV INFO 0 ... END 9 Enter the time with the numeric buttons on the remote control (always enter two digits for 01 to 15 minutes, and for the post record time 01 to 60 minutes). Digital Recorder – TV viewing with time shift The Digital Recorder continuous operation is switched on as the factory default setting. The TV programme you are watching is recorded automatically. In DR continuous operation the DR+ display lights green. If the DR continuous operation is switched off, the DR+ display lights up white. Note: Programmes with copy protection (e.g. Macrovision) cannot be watched with a time shift for legal reasons. Jumping If a jump distance has been set, you can quickly jump while viewing with a time shift by briefly pressing the drive buttons in the jump distance set; this enables you to jump past uninteresting sections quickly. jump forwards ... Interruption 10 3Sat You want to interrupt a programme to answer a phone call, for example. Press the Pause button . 10 3Sat 21:45 - 22:15 21:15 21:48 21:15 21:45 - 22:15 Eifellandschaft 21:45 - 22:15 Eifellandschaft 21:48 23:15 DR archive Press the Pause button again or the Play button 21:45 - 22:15 . Eifellandschaft 21:48 23:15 Now you will see the TV programme with a time shift from exactly the point in time you first pressed the Pause button. The Play symbol appears in place of the Pause symbol. 21:48 23:15 Smart jump The Smart jump function is included to enable fast and easy access to a certain place within the programme which has been recorded with a time shift. The factory default setting has Smart jump switched on. When Smart jump is switched on, the jump distance is cut in half after each change in the jump direction while jumping. The playback symbol You want to carry on watching the programme at the end of the phone call. 21:15 10 3Sat END Continue (Viewing with time shift) 10 3Sat 23:15 ... or backwards 23:15 The TV picture freezes and the Digital Recorder display appears. Above, you can see the station number and name, and if EPG or teletext data are available the start and end of the current programme and its title. The time at which the time shifted recording begins is displayed in front of the bar. The time at which the time shift memory will be completely full is shown after the bar. The grey bar indicates how much of the available recording time has been used up. The time displayed inside the bar is the time at which the Pause button was pressed. 21:15 Eifellandschaft 21:50 Eifellandschaft DR archive 10 3Sat 21:45 - 22:15 21:15 is yellow when the Smart jump function is active. For instance, you are looking for the beginning of a programme. In this case, press the button several times to jump back (pre-set jump distance). If you have jumped past the beginning of the programme, jump in the opposite direction. Briefly press the button . This jump in the opposite direction is only carried out for half the jump distance. Now jump forward using until you see the beginning of the programme. If you have jumped past the beginning of the programme, jump back using . In the process, the jump distance is cut in half again. By cutting the jump distance in half when changing the jump direction, you can feel your way up close to a particular section. The pre-set jump distance is used again if you jump more than three times in the same direction or if the Digital Recorder display disappears. Switching to the live picture Press the Stop button . You will then see the live picture of the programme. 33 - Digital Recorder – TV viewing with time shift Fast forward and rewind 10 3Sat 21:15 You can fast forward and rewind at three different speeds during time-shifted TV viewing or archive playback. No sound is audible during winding. 10 3Sat Press the Fast Forward 10 3Sat 21:15 21:45 - 22:15 or Rewind button a little longer. Eifellandschaft 21:44 23:15 Increase speed: press again briefly. 21:15 10 3Sat 21:45 - 22:15 Eifellandschaft 21:48 23:15 21:45 - 22:15 21:15 Eifellandschaft 21:56 23:15 Playback begins automatically upon reaching the end of the recording. You are about 2 seconds behind the live picture or when rewinding at the beginning of the time-shifted recording. Press the Play button when you reach the point from which you want to continue watching. 10 3Sat 21:45 - 22:15 21:15 Eifellandschaft 21:56 23:15 If Pause is active (freeze picture) you can play (forward only) at four slow-motion speeds. No sound is audible during slow motion. Press the Pause button 21:45 - 22:15 21:15 . Eifellandschaft 21:48 Press the Play button bookmark. little longer in order to set the The time-shifted recording that is already active in the background is converted into an archive recording. Every time the Play button is pressed down again a little longer, a new bookmark is set. Note: If no programme info is available from teletext or EPG, the “Recording duration” menu appears after pressing the Play button for the first time. Select the desired recording duration and confirm using OK. Recordings that include manually set bookmarks can be played as highlights. The chapter ‘Archive playback’ describes how this works on page 41. For example, you would like to watch interesting scenes or goals in sports programmes again straight away. This is possible if you are viewing a live picture. Briefly press the Rewind button 21:45 - 22:15 to repeat the scenes. 20:15 - 22:15 Fußball WM: Deutschland-Polen 20:46 22:15 23:15 The set jumps back 40 seconds into time-shift mode. The playback flag is yellow (Smart jump active). If the Smart jump took you back too far, you can jump forward 20 seconds with the Fast forward button . Briefly press the Fast Forward button . Eifellandschaft 21:49 Increase speed: Press the Fast Forward button - 34 23:15 For example, you want to flag interesting scenes and goals of sports programmes in order to watch them again when playing the recording. You can set bookmarks while your are watching the live picture or viewing with a time shift. 20:15 DR archive 21:15 Eifellandschaft 21:50 The speed increases every time you press the button until eventually switching back to the initial speed. 1 ARD 10 3Sat 21:45 - 22:15 23:15 Replay function Slow motion forwards 10 3Sat Eifellandschaft 21:50 Highlight function The speed increases every time you press the button until eventually switching back to the initial speed. 10 3Sat 21:15 21:45 - 22:15 23:15 several times briefly. The live picture is displayed at the same time as small PIP. This PIP picture can be closed by pressing the PIP button without having to leave the time-shifted playback. Terminate the replay function with the Stop button . Now you see the live picture again. Digital Recorder – TV viewing with time shift Converting a time-shifted recording into an archive recording You can convert the programme you are currently recording with a time shift into an archive recording. During the archive recording, the bar showing the recording progress is red and the ”REC” message is shown for a current archive recording. When the programme to be recorded is selected, press the Play button to show the Digital Recorder‘s display. Press the Record button. Recording duration (min.) OK current programme OK confirm OK OK INFO 30 60 90 120 180 240 END 10 3Sat ??? If you want to transfer the current programme to the archive, mark ”current programme“ (only if EPG or teletext data are available) or mark one of the given times or mark ”???“ and enter the recording duration with the numeric buttons on the remote control and confirm with OK. If the beginning of the programme was recorded, it is adopted from the beginning, otherwise from the point in time you switched over to this station. This way you can also decide to transfer a recording to the archive at the end of the programme. The whole programme is still transferred to the archive, providing it was already recorded. You can also transfer a programme which has already finished to the archive. Just rewind to the programme you want to archive and start recording with ”current programme”. The ”Timer data“ menu is displayed. 21:45 - 22:15 21:15 OK confirm REC 23:15 You can switch over to a different station during an archive recording, providing your TV set has another tuner. The recording process is continued. To switch back to the station you are currently recording, press the play button . You can also switch off the TV set into the stand-by mode. The recording process is continued. Status display when recording with a time shift and for archive recording When you call the status display, the recording progress bar is displayed. END Press the END button to show the status display. Display with time shift: 10 3Sat 21:45 - 22:15 21:15 Timer data 22:00 SAT1 Recorder Station Date Recording time VPS Recording type Eifellandschaft 21:50 Eifellandschaft 21:48 23:15 Time shift: 12:48 min 22:01 echt wahr! DR 0049 SAT1 03.08.2005 22:00 until 22:45 no once only Display with live picture during an archive recording: DVD-REC Lock movie set delete protection 10 3Sat 21:45 - 22:15 21:15 END INFO If the DVB subtitles are switched on continuously (see page 36, chapter ”Recording with DVB subtitles“), you see the item ”DVB subtitles (yes/no)“ instead of the ”VPS“ menu item. Here, you can switch the DVB subtitles off for the current recording. Note: If you want to record a programme without DVB subtitles (”DVB subtitles“ – ”no“), the time-shifted recording that has been running until now is stopped and deleted. The archive recording starts after you have confirmed the timer data with OK. Check the other timer data, change them if necessary and then confirm with OK. Eifellandschaft 22:02 REC 23:15 Live picture 22:02 Display with time shift during an archive recording. 10 3Sat 21:15 21:45 - 22:15 Eifellandschaft 21:48 REC 23:15 Time shift: 12:48 min 22:01 For archive recording, the progress bar is red; otherwise it is grey. The DR+ display changes from green to red with the start of an archive recording. 35 - Digital Recorder – Archive recording Immediate recording Watching other stations during archive recording You can start archive recording with the Record button, as described above. The system starts recording from the station you are currently watching. Start immediate recording Recording duration (min.) OK current programme OK confirm OK OK INFO 30 60 90 120 180 240 END ??? Mark ”current programme“ (only if EPG or teletext data are available) or mark one of the given times or mark ”???“ and enter the recording duration with the numeric buttons on the remote control and confirm with OK. If the DR continuous operation is switched off, recording begins after pressing the OK key button (in this case there is no transfer of the beginning of the programme as described previously). The ”Timer data“ menu is displayed. If the DVB subtitles are switched on continuously (see chapter ”Recording with DVB subtitles“ on this page), you see the item ”DVB subtitles (yes/no)“ instead of the ”VPS“ menu item. Here, you can switch the DVB subtitles off for the current recording. Note: If you want to record a programme without DVB subtitles (”DVB subtitles“ –”no“), the time-shifted recording that has been running until now is stopped and deleted. The archive recording starts after you have confirmed the timer data with OK. Check the other timer data, change them if necessary and then confirm with OK. The DR+ display lights red with the start of an archive recording. Note: Programmes with copy protection (e.g. Macrovision) cannot be watched with a time shift for legal reasons. Setting bookmarks during archive recording During immediate recording or a running timer recording, you can set bookmarks at interesting sections (press the Play button somewhat longer). You will see the message “Bookmark set!”. This enables you to find this part of the recording quickly during playback. You can set up to 15 bookmarks. In addition, bookmarks are set at the beginning and the end of every broadcast automatically. Viewing with time shift during archive recording As laid out in the chapter ”TV viewing with time shift,“ you can interrupt the programme with the Pause button . The recording process is continued. You can end the interruption by pressing the Pause button or the Play button . You are now viewing the archive recording with a time shift. Jumping, fast forwarding and rewinding and slow motion all work as laid out for the time-shifted TV viewing. Back to the live picture – press the Stop button once. - 36 After you have started the recording, you can switch to another station, providing your TV set has another tuner. The recording process is continued in the background. To switch back to the station you are currently recording, press the play button . If your TV set does not have another tuner, you cannot switch to another station. The station is blocked during recording. Viewing another movie from the archive during archive recording After you have started the recording, you can also watch a programme you have already recorded. To do this, call the DR archive with the red coloured key. Select the programme and start the playback with the OK button. The recording process is continued in the background. Switching off the TV set during recording You can switch off the TV set during recording. Of course, only into the stand-by mode, not with the mains switch. The indicator on the TV set lights orange. The recording process is continued in the stand-by mode. Stop recording early If you want to terminate an active archive recording ... Press the Stop button OK OK Stop recording END Continue recording confirm with the OK button. The recording process is ended. The material recorded up to now is saved on the hard disk and may be played back via the DR archive. You can also end a running recording by deleting the entry in the timer list. You can find more information on this on page 39. Recording with DVB subtitles Switch on the DVB subtitles. To find this setting, go to TV menu - Settings - Miscellaneous - DVB subtitles. Select DVB subtitles ”for translation” or “for the Hearing Impaired” here. You cannot switch to another station during an archive recording. Subtitles of analogue Teletext cannot be recorded. When playing the recording, the subtitles cannot be hidden or the language selection changed. Note: Leave the DVB subtitles switched off if you usually do not use them or they are not broadcast. Only by doing this will you have the possibility to switch to another station during an archive recording. Digital Recorder – Archive recording Timer recording Programming a timer recording with the EPG As with a VCR, you can make timer recordings with the Digital Recorder. The Digital Recorder is of course much more comfortable to handle. You can programme the timer using the EPG, teletext or manually. You can programme up to 50 timer recordings. If you have programmed timer recordings, the TV set may only be switched off into the stand-by mode. Do not switch the TV set off with the mains switch and do not pull the mains plug from the power outlet. If you do, then the timer recording will not take place. If a timer recording is made in standby mode, the indicator on the TV set lights orange and the DR+ display lights red in addition. EPG OK Call EPG Mark the desired programme. EPG (Electronic Programme Guide) Fri 10.09./20:48 Fri 10.09. 22:00 23:00 00:00 01:00 02:00 03:00 all all 22:00 VOX Zurück in die Vergangenheit 22:00 ZDF WISO 22:00 BR3 Immer weiter, immer höher und dann? OK 22:00 SAT1 echt wahr! 22:00 RTL Gute Zeiten, schlechte Zeiten 22:05 MDR Mach dich ran 22:15 ARD Tagesschau 22:15 HR3 Tagesschau 22:15 NDR Tagesschau Familienserie - Sturzflug Date Time Channels Topics 16 SAT 1 Programmed timers for the Digital Recorder are displayed in the timer list. Call timer overview TEXT P+ P– Timer overview Detail Page Ç/È OK 0 ... 9 Memorize select time Record Date, ... , topics END MENU Press the red coloured key to programme the programme as a timer recording. The Record dialogue box opens. Fri 24.08./14:12 27.08. 23:45-00:45 3SAT AVO-Session Basel 2002 New recording Change Delete END INFO Completed timer recordings of the Digital Recorder are shown in the DR archive. red coloured key: Call the DR archive. DR archive 27.08. 3Sat 28.08. ARD AVO-Session Basel 2002 Fußball-WM Deutschland-Polen 21:30 - 22:00 Kultursendung TEXT P+ P– Detail Page Ç/È free capacity 49:42 hrs OK View Edit/protect Delete/copy Sort alphabetically OK END INFO MENU Timer data 22:00 SAT1 Recorder Station Date Recording time VPS Recording type OK confirm echt wahr! DR 0049 SAT1 03.08.2005 22:00 until 22:45 no once only Lock movie set delete protection DVD-REC END INFO You can programme serial recordings in the menu line ”Recording type”. The timer then searches for the serial in the station set every day. Please see the instructions for setting the serial recording tolerance on page 32. You can lock the recording with the parental lock by pressing the green coloured key and with the yellow coloured key you can protect the recording from being deleted automatically. If the DVB subtitles are switched on continuously (see page 36, chapter ”Recording with DVB subtitles“), you see the item ”DVB Subtitles (yes/no)“ instead of the ”VPS“ menu item. Here, you can switch the DVB subtitles off for the current recording. Check the other timer data, change them if necessary and then confirm with OK. A red dot is set in front of the title of the programme in the EPG. If a programme is already marked with a red dot, you can delete the programmed timer by pressing the red coloured key (the red dot disappears). 37 - Digital Recorder – Archive recording Programming a timer recording via analogue teletext Programming a timer recording manually Call the station on which you want to make a timer recording. TEXT Call the timer list. Call the teletext. Timer overview Fri 02.08./22:12 03.08. 09:15-10:15 3SAT da capo 03.08. 22:00-22:45 SAT1 echt wahr! Press the Record button. The first programme preview page is displayed. Select the programme page containing the programme you wish to record with the green coloured key. OK TEXT Select the time when the programme begins with the arrow buttons . 08.00 09.00 09.05 09.15 10.15 10.50 12.30 – Recording wizard Via EPG anders fernsehen Spanien - Sprache, Land und Leute (3/13) Türkei - Sprache, Land und Leute (16/26) Alpenpanorama Zeit im Bild Lyrik für alle da capo . . . . . . . . . . . . . . . 305 Max Reger: Träume am Kamin Das Einsiedler Welttheater Lesen! . . . . . . . . . . . . . . . . 306 07.30 + TV Heute 2 Select programme New recording Change Delete OK Select ”Manual” with the arrow buttons (VPS) OK Via teletext (VPS) OK Recording wizard Manual OK confirm Lock movie set delete protection INFO END . Via teletext Recording wizard Please specify the station you want to record from. Wetter Reise OK Record Manual 0 1 2 3 4 5 DVD-REC OK 0 END ... 9 COMP. IN HDMI/DVI VGA AVS AV2 AV1 VIDEO ARD ZDF SAT.1 RTL VOX Numerical OK Proceed Select station INFO OK Check the timer data, change them if necessary and then confirm with OK. You can lock the recording with the parental lock by pressing the green coloured key and with the yellow coloured key you can protect the recording from being deleted automatically. If the DVB subtitles are switched on continuously (see page 36, chapter ”Recording with DVB subtitles“), you see the item ”DVB Subtitles (yes/no)“ instead of the ”VPS“ menu item. Here, you can switch the DVB subtitles off for the current recording. Check the other timer data, change them if necessary and then confirm with OK. - 38 END Start programming with OK. Press OK to programme the programme as a timer recording. Timer data 09:15 3Sat da capo Recorder DR Station 0010 3Sat Date 03.08.2005 Recording time 09:15 until 10:15 VPS yes Recording type once only INFO Manual Via EPG OK Station selection OK END INFO Press the red coloured key to programme a new recording. 301 301 3satText O3.O9.O3 22:12:42 Programm Heute in 3sat Mittwoch, 03. September 06.55 07.00 Detail OK Select the station to be recorded ... ... and adopt with OK. 6 7 8 9 10 11 12 13 14 15 16 17 3SAT S–RTL N–TV DSF TM3 PRO7 RTL 2 WDR 3 BR HR MDR 3 N3 Change sorting END Digital Recorder – Archive recording Deleting programmed timer entries The ”Timer data” menu is displayed. Use this function in the timer list if you want to delete recordings already programmed or end a running timer recording. Timer data ✳✳:✳✳ ARD - - - Recorder DR Station 0001 ARD Date 03.08.2005 Recording time ✳✳:✳✳ until ✳✳:✳✳ VPS no Recording type once only OK confirm Lock movie set delete protection Call timer list DVD-REC OK Timer overview Fri 24.08./14:12 27.08. 23:45-00:45 3SAT AVO-Session Basel 2002 END INFO In the ”Recorder” menu line, select ”DR” for Digital Recorder with the arrow buttons . For ”VPS”, select whether or not VPS is to be used (if it is available). Enter the date and the recording time for the timer recording with the numeric buttons on the remote control. Select under recording type whether you want to make a recording once only, daily, Mon-Fri or weekly. You can lock the recording with the parental lock by pressing the green coloured key and with the yellow coloured key you can protect the recording from being deleted automatically. If the DVB subtitles are switched on continuously (see page 36, chapter ”Recording with DVB subtitles“), you see the item ”DVB Subtitles (yes/no)“ instead of the ”VPS“ menu item. Here, you can switch the DVB subtitles off for the current recording. Confirm the timer data with OK. Mark the timer to be deleted New recording Change Delete END INFO press the yellow coloured key to delete the timer data OK Confirm delete Abort delete END INFO OK confirm with OK. The letters of a timer currently active are red. In this case, the recording is stopped. The Delete Manager The Delete Manager always makes sure there is enough memory space on the hard disk for new recordings.. When the capacity of the hard disk is almost exhausted, the old recordings are deleted. Recordings which you have marked with a delete protection are not deleted by the Delete Manager. You can delete these recordings manually. Setting and cancelling delete protection, see page 44. To avoid loss of data, we recommend you to copy important recordings onto video tape or a writable DVD. Delete the recordings from the Digital Recorder after copying. Loewe is not liable for data loss on the Digital Recorder’s hard disk. 39 - Digital Recorder – Archive playback You can find a directory of your recordings in the DR archive. You can start playback, delete or copy recordings and call the timer from this list. Via ”Edit/protect,” you can change the name of an archive entry and activate or deactivate a delete protection. Call the DR archive Call the DR archive (red coloured key). Setting bookmarks While playing an archive recording, you can set bookmarks by pressing the Play button for a little longer. If the drive display does not appear, you will see the “Bookmark set!“ message. A small bookmark symbol is set above the bar for the playback. You can set up to 15 bookmarks. This makes these places easy to find later. Set bookmark (press button for a little longer) free capacity 49:42 hrs AVO-Session Basel 2002 Fußball-WM Deutschland-Polen OK Archive 03.08. 00:00 Der Wilde Westen 00:05 Bookmark ➝ DR archive 27.08. 3Sat 28.08. ARD 00:59 Highlights Bookmark ➝ Setting another bookmark Detail Page Ç/È OK Archive 03.08. View Edit/protect Delete/copy Sort alphabetically MENU You can switch between alphabetical and chronological sorting with the blue coloured key. The bar (on the right in the overview) shows you how much of the recording has been watched. The bar is empty for recordings which have not been watched; recordings which have been watched entirely have a bar filled completely; partially watched recordings have a bar which is filled for the parts already watched. If other programme data are available from the EPG or teletext, these are shown below the archive list for the entry just marked. Other information about the recording can be called with the TEXT button, if this is offered. OK 00:12 Bookmark Hint: Set a bookmark at the end of an uninteresting passage to skip over it quickly or to hide that section later. Jumping to bookmarks Show the drive display during archive playback. Archive 03.08. 00:00 Archive 03.08. 00:00 Der Wilde Westen 00:05 Der Wilde Westen 00:59 Highlights Bookmark ➝ Bookmark backward (red coloured key) ➝ in front of the bar. . Press the Play button . You will find further information on playing highlights on the following page. Der Wilde Westen 00:00 Bookmark ➝ 00:00 Recordings with manually set bookmarks are flagged with You can use the highlight playback for these. - 40 Bookmark ➝ 00:59 Bookmark ➝ Archive 03.08. Select a recording flagged with 00:59 Highlights 00:05 Bookmark Playing highlights from the DR archive OK Der Wilde Westen 00:01 Bookmark forward (blue coloured key) Press the OK button to start playback. Archive 03.08. 00:59 Bookmark ➝ Highlights Automatically set bookmarks are grey. Manually set bookmarks are blue. Bookmark Select a recording with the arrow buttons. Bookmark 00:00 00:00 Playing from the archive OK Der Wilde Westen END INFO ➝ P+ P– ➝ TEXT Kultursendung ➝ 21:30 - 22:00 00:59 Highlights Bookmark ➝ Additionally, a bookmark is set at the beginning and end of the broadcast automatically which you can jump to with the red and blue coloured keys. Digital Recorder – Archive playback Playing highlights If there are manually set bookmarks in the current playback, they can be played as highlights one after the other automatically. 30 seconds before and after the set bookmark are played. The highlights are numbered chronologically and displayed consecutively, i.e. the playback always starts with highlight 1 again. The playing of highlights can be terminated by pressing the Stop button . Show the drive display. Archive 28.08. 00:00 Fußball-WM Deutschland-Polen 00:01 Bookmark 00:59 ➝ END oder Highlights Bookmark ➝ Press the Play button for “Highlights”. Archive 28.08. 00:00 Highlight 1 00:59 ➝ Highlight Fußball-WM Deutschland-Polen 00:09 Highlights stop Highlight ➝ Start playing highlights. As long as this drive display is shown, you jump to the next highlight with the blue coloured key and to the previous highlight with the red coloured key. You can also jump to the next highlight by pressing the Play button again. This function is also available if no drive display is shown. Pressing the Stop button ends playing the highlights. For instance, you are searching for the beginning of the section where a portion of the recording is to be hidden. In this case, for example, press the button several times to jump forward (pre-set jump distance). If you have jumped past the desired part of the recording, jump in the opposite direction. Briefly press the button . This jump in the opposite direction is only carried out for half the jump distance. Now press to jump back out of the area that is to be hidden. If in the process you jump past the place where you want to start the hide process, then jump forward using . In the process, the jump distance is cut in half again. By cutting the jump distance in half when changing the jump direction, you can feel your way up close to a particular section. The pre-set jump distance is reinstated if you jump more than three times in the same direction or if the Digital Recorder display disappears. Fast forward and rewind You can fast forward and rewind at three different speeds during archive playback. No sound is audible during winding. Press the Fast Forward Archive 03.08. Jumping 00:00 If a jump distance has been set, you can jump by briefly pressing the drive buttons . 00:00 00:00 Highlights 00:59 Bookmark ➝ Archive 03.08. 00:00 00:00 Highlights Der Wilde Westen 00:59 Der Wilde Westen 00:34 00:59 00:59 Bookmark ➝ Smart jump Press the Play button when you reach the point from which you want to continue watching. Archive 03.08. 00:00 Bookmark Der Wilde Westen 00:35 ➝ The Smart jump function is included to enable fast and easy access to a certain place within the recording which is currently being played. The factory default setting has Smart jump switched on. When Smart jump is switched on, the jump distance is cut in half after each change in the jump direction while jumping. The playback symbol 00:59 00:19 Archive 03.08. Der Wilde Westen 00:23 ➝ Bookmark 00:19 Der Wilde Westen ... or backwards Archive 03.08. Der Wilde Westen The speed increases every time you press the button until eventually switching back to the initial speed. 00:25 ➝ Bookmark button a little longer. Increase speed: press again briefly. jump forwards ... Archive 03.08. or Rewind Highlights 00:59 Bookmark ➝ You will see a freeze picture when you reach the end of the recording. When rewinding reaches the beginning, the Digital Recorder switches to playback mode. is yellow when the Smart jump function is active. 41 - Digital Recorder – Archive playback Pause (freeze picture) Deleting parts of the recording Switch to freeze picture with the Pause button . Archive 03.08. 00:00 You can delete parts of an archive-recording up to the beginning and up to the end. Der Wilde Westen 00:19 Press the Pause button during archive playback at the point from which you want to delete up to the beginning or end of the archive recording. 00:59 DR archive Delete/hide To continue playback press the Play button Pause button again . or press the Archive 03.08. 00:00 00:59 DR archive Slow motion Delete/hide Now press the yellow coloured key for ”Delete/hide”. If Pause is active (freeze picture) you can play (forward only) at four slow-motion speeds. No sound is audible during slow motion. Press the Pause button Archive 03.08. 00:00 Archive 03.08. 00:00 . Delete from here to the beginning with the red coloured key, from here to the end with the green coloured key. 00:59 Delete/hide Archive 03.08. 00:00 00:00 Der Wilde Westen OK 00:19 00:59 OK Increase speed: Press the Fast Forward button several times briefly. 00:00 Archive 03.08. 00:00 00:23 Der Wilde Westen 00:59 00:59 Abort delete Confirm deletion with the OK button or cancel it with the red coloured key. Der Wilde Westen 00:00 DR archive 00:59 00:32 Confirm delete 00:00 Der Wilde Westen Der Wilde Westen 00:19 Archive 03.08. The speed increases every time you press the button until eventually switching back to the initial speed. Archive 03.08. 00:59 Set hiding start Delete bookmark Der Wilde Westen 00:19 Briefly press the Fast Forward button . Archive 03.08. Der Wilde Westen 00:19 Delete from here to start Delete from here to end DR archive - 42 Der Wilde Westen 00:19 00:40 Delete/hide In our case, 19 minutes were deleted so that the remaining length of the recording is only 40 minutes. Digital Recorder – Archive playback Hiding sections of the recording Deleting bookmarks You can hide sections of an archive recording. For future playback and when transferring to a DVD or video recorder, the hidden sections are skipped. You can delete all manually set bookmarks. Bookmarks that were set automatically at the beginning and the end of a broadcast cannot be deleted . Manually set bookmarks are blue, automatically set bookmarks are grey. During the archive playback, press the Pause button place you want to begin hiding. During archive playback, press the Pause button . Der Wilde Westen 00:00 Archive 03.08. 00:19 00:59 DR archive Delete/hide 00:00 Archive 03.08. 00:19 00:59 Set hiding start Delete bookmark 00:00 Der Wilde Westen 00:59 Set hiding start Delete bookmark Delete the manually set bookmarks with the blue coloured key. 00:59 Set hiding end Cancel hiding Continue playing by pressing the Pause button button . 00:00 Der Wilde Westen 00:19 Hide 00:19 Archive 03.08. 00:00 Delete from here to start Delete from here to end Set the beginning of the hidden section with the yellow coloured key. Archive 03.08. 00:59 Delete/hide Now press the yellow coloured key for ”Delete/hide”. Der Wilde Westen Delete from here to start Delete from here to end Der Wilde Westen 00:19 DR archive Now press the yellow coloured key for ”Delete/hide”. Archive 03.08. 00:00 or the Play Der Wilde Westen Archiv 03.08. 00:00 Lesezeichen Hide 00:24 Continue playing by pressing the Pause button button . 00:59 Set hiding end Cancel hiding or the Play Der Wilde Westen 00:59 00:24 ➝ Archive 03.08. at the Lesezeichen ➝ Automatically set bookmarks are not deleted. Note: In addition, you have the option of deleting the bookmarks via ”DR archive – delete/copy“. See page 45. Press the yellow coloured key when you want to end hiding. Archive 03.08. 00:00 00:24 ➝ Bookmark Der Wilde Westen Highlights 00:59 Bookmark ➝ You will see a line above the bar that indicates the hidden section of the recording. If you start playback again before the beginning of the hidden section, the hidden section is skipped. If ”yes” is set in the Digital Recorder settings for ”Inform about hidden sections,” you will see the message ”Hidden area was skipped!”. You can then show the hidden section again permanently by pressing the blue coloured key. 43 - Digital Recorder – Archive playback Copying recordings from the archive Deleting recordings from the archive This is simple with a Loewe VCR or DVD recorder equipped with Digital Link or Digital Link Plus and with units from other manufacturers equipped with a similar system (according to protocol 50). Call the DR archive (red coloured key). DR archive 19.08. 3Sat 27.08. 3Sat 28.08. ARD 03.09. ZDF Call the DR archive (red coloured key). DR archive 19.08. 3Sat 27.08. 3Sat 28.08. ARD 03.09. ZDF P+ P– Detail Page Ç/È da capo AVO-Session Basel 2002 Fußball-WM Deutschland-Polen echt wahr! OK TEXT OK View Edit/protect Delete/copy Sort alphabetically DR archive Delete/copy 19.08. 3Sat 27.08. 3Sat 28.08. ARD 03.09. ZDF DR archive Delete/copy 19.08. 3Sat 27.08. 3Sat 28.08. ARD 03.09. ZDF MENU P+ P– OK OK OK Detail Page Ç/È OK Mark (several entries possible) Delete entry Copy entry END INFO OK Select the recording to be copied. Confirm with OK, select others if necessary and confirm with OK. Titles to be copied are displayed in blue. Press the blue coloured key for ”Copy“. DR archive copy 03.09. ZDF Recorder Station Date Recording time VPS Recording type echt wahr! DVD-REC DR archive 03.08.2005 09:15 no once only Switch recorder to AUX! confirm OK OK Edit/protect Delete/copy Sort alphabetically END INFO MENU free capacity 48:42 hrs da capo AVO-Session Basel 2002 Fußball-WM Deutschland-Polen echt wahr! OK Detail Page Ç/È OK Mark (several entries possible) Delete entry Copy entry END INFO Select the recording to be deleted. Confirm with OK, select others if necessary and confirm with OK. Titles to be deleted are displayed in blue. Press the yellow coloured key for ”Delete entries”. OK To confirm the deletion, press OK again. The recording is deleted. The DR archive is displayed again. OK VCR DR archive 19.08. 3Sat 27.08. 3Sat 28.08. ARD free capacity 49:42 hrs da capo AVO-Session Basel 2002 Fußball-WM Deutschland-Polen OK END INFO Select the recorder in the Copy menu and change the recording date and time if necessary and confirm with OK. The DR archive is displayed again. You will see a red dot in front of the bar for the programmed copying for which an entry is also made in the timer list. - 44 View OK TEXT P+ P– OK Press the yellow coloured key for ”Delete/copy”. free capacity 48:42 hrs da capo AVO-Session Basel 2002 Fußball-WM Deutschland-Polen echt wahr! Detail Page Ç/È END INFO Press the yellow coloured key for ”Delete/copy”. TEXT OK free capacity 48:42 hrs P+ P– TEXT free capacity 48:42 hrs da capo AVO-Session Basel 2002 Fußball-WM Deutschland-Polen echt wahr! TEXT P+ P– Detail Page Ç/È OK View Highlights The movie has been removed from the DR archive. Edit/protect Delete/copy alphabetisch ordnen END INFO MENU Digital Recorder – Archive playback Deleting bookmarks DR archive Edit/protect 19.08. 3Sat 27.08. 3Sat 28.08. ARD 03.09. ZDF Call the DR archive (red coloured key). DR archive 19.08. 3Sat 27.08. 3Sat 28.08. ARD 03.09. ZDF free capacity 48:42 hrs da capo AVO-Session Basel 2002 Fußball-WM Deutschland-Polen echt wahr! free capacity 48:42 hrs da capo AVO-Session Basel 2002 Fußball-WM Deutschland-Polen echt wahr! OK OK Detail Page Ç/È TEXT P+ P– OK Rename Parental lock set delete protection END INFO TEXT P+ P– Detail Page Ç/È OK View Edit/protect Delete/copy Sort alphabetically END Press the yellow coloured key for “Delete/copy”. DR archive Delete/copy 19.08. 3Sat 27.08. 3Sat 28.08. ARD 03.09. ZDF OK free capacity 48:42 hrs da capo AVO-Session Basel 2002 Fußball-WM Deutschland-Polen echt wahr! OK OK Detail Page Ç/È P+ P– OK OK Mark (several entries possible) Delete bookmark Delete entry Copy entry OK END Press the OK button for ”Rename“. Underneath the first letter of the title, you will see a line which indicates the current input position for the letter. Enter the letters in sequence using the numeric buttons on the remote control (like on a mobile phone keypad). OK TEXT Select the title to be changed. INFO MENU Conclude the entry with OK. Locking/unlocking a movie (parental lock) INFO Select the recording for which you want to delete the bookmarks. Recordings with manually set bookmarks are flagged with in front of the bar. Confirm with OK, select others if necessary and confirm with OK. The selected titles are displayed in blue. If there are manually set bookmarks ... ... press the green coloured key for “Delete bookmark”. You can lock movies that your children are not permitted to view, for instance. Viewing is only possible if the secret code is entered. Call the DR archive (red coloured key). DR archive 19.08. 3Sat 27.08. 3Sat 28.08. ARD 03.09. ZDF free capacity 48:42 hrs da capo AVO-Session Basel 2002 Fußball-WM Deutschland-Polen echt wahr! OK All of the manually set bookmarks are deleted. Automatically set bookmarks are not deleted. TEXT Changing the title of a recording P+ P– Call the DR archive (red coloured key). DR archive 19.08. 3Sat 27.08. 3Sat 28.08. ARD 03.09. ZDF TEXT P+ P– Detail Page Ç/È free capacity 48:42 hrs View OK View Edit/protect Delete/copy Sort alphabetically END INFO MENU Press the green coloured key for "Edit/protect". da capo AVO-Session Basel 2002 Fußball-WM Deutschland-Polen echt wahr! OK Detail Page Ç/È Edit/protect Delete/copy Sort alphabetically Press the green coloured key for ”Edit/protect”. OK DR archive Edit/protect 19.08. 3Sat 27.08. 3Sat 28.08. ARD 03.09. ZDF free capacity 48:42 hrs da capo AVO-Session Basel 2002 Fußball-WM Deutschland-Polen echt wahr! OK END INFO MENU TEXT P+ P– Detail Page Ç/È OK Rename Parental lock set delete protection END INFO 45 - Digital Recorder – Archive playback OK Mark the title that is to be locked or released. Setting/cancelling delete protection Press the green coloured key for ”Parental lock“. The system requests you to enter your secret code. To prevent important recordings being deleted automatically by the Delete Manager, you should set a delete protection. Cancel the delete protection again after copying to a video cassette or DVD. Parental lock Access code ✳✳✳✳ Please enter PIN pqrs wxyz abc tuv Call the DR archive (red coloured key). 0 ... 9 DR archive 19.08. 3Sat 27.08. 3Sat 28.08. ARD 03.09. ZDF Enter your secret code with the numeric keys of the remote control. The DR archive opens again. Press the green coloured key for ”Lock movie“. DR archive Edit/protect 19.08. 3Sat 27.08. 3Sat 28.08. ARD 03.09. ZDF free capacity 48:42 hrs TEXT P+ P– da capo AVO-Session Basel 2002 Fußball-WM Deutschland-Polen echt wahr! Detail Page Ç/È free capacity 48:42 hrs da capo AVO-Session Basel 2002 Fußball-WM Deutschland-Polen echt wahr! OK View Edit/protect Delete/copy Sort alphabetically Detail Page Ç/È P+ P– OK Rename Unlock movie set delete protection END INFO MENU Press the green coloured key for ”Edit/protect”. OK DR archive TEXT OK Edit/protect 19.08. 3Sat 27.08. 3Sat 28.08. ARD 03.09. ZDF END INFO You can mark additional titles and lock or release them respectively using the green coloured key. A lock symbol appears in front of the bar when the lock is activated. Detail Page Ç/È TEXT P+ P– free capacity 48:42 hrs da capo AVO-Session Basel 2002 Fußball-WM Deutschland-Polen echt wahr! OK Rename OK Parental lock set delete protection END INFO Viewing a locked movie OK Call the DR archive (red coloured key). DR archive 19.08. 3Sat 27.08. 3Sat 28.08. ARD 03.09. ZDF TEXT P+ P– OK Detail Page Ç/È free capacity 48:42 hrs da capo AVO-Session Basel 2002 Fußball-WM Deutschland-Polen ✳✳✳✳✳✳✳✳ OK View OK Edit/protect Delete/copy Sort alphabetically Press the yellow coloured key for ”Set/cancel delete protection.” You can select other titles and set or cancel the delete protection with the yellow coloured key. The symbol appears in front of the bar when the delete protection is activated. END DR archive 19.08. 3Sat 27.08. 3Sat 28.08. ARD 03.09. ZDF INFO MENU Mark the movie and press OK. The system requests you to enter your secret code. After you enter your secret code, all the locked entries are legible in the DR archive and the desired movie may be started by pressing OK. - 46 Select the title for which you want to set/cancel a delete protection. TEXT P+ P– Detail Page Ç/È free capacity 48:42 hrs da capo AVO-Session Basel 2002 Fußball-WM Deutschland-Polen echt wahr! OK View Edit/protect Delete/copy Sort alphabetically OK END INFO MENU Operating modes – Radio Radio Radio menu Radio stations can only be received via DVB. If you do not have any DVB radio reception, you can play a sound signal from an external device using the TV set via the sound/AV inputs. RADIO Use the RADIO button on the remote control or the R on the control ring of the TV set to switch the radio on or off. ) Radio: 1 2 3 4 5 6 7 8 0 8 DLF AUDIO IN AVS AV2 AV1 B5 AKTL BAYERN 1 BR4 KLSK SUNSHINE ROCK ANT ANTENNE DLR DLF S S S S S S S S 18:00 - 18:10 Nachrichten OK Switch to ... ... 9 Select station Screen off/on Numerical OK 9 10 11 12 13 14 15 16 17 18 19 20 HR-INFO MDR INFO MDR FIGA NDR KULT SWR1 SWR2 WDR3 WDR5 OESTER 1 MDR JUMP JAZZ RAD BLUSAT20 S S S S S S S S S S S S Scan stations Previous station Change sorting MENU Call radio menu Radio menu Sound Treble INFO Stations ... END Timer functions In the radio menu, as in TV mode, you can set the sound, search for radio stations and store them (automatically or manually), delete stations from the list, rearrange them or change names and set the switching off and alarm functions. EPG - Programme guide For the DVB radio stations, you can also use the programme guide if the station currently active supplies data. EPG EPG- Call Programme guide END MENU EPG You can see a station list of the radio stations. Digital DVB-T stations are indicated by T , DVB-C stations by C and DVB-S stations by S . Encrypted stations are additionally indicated by . Ask your specialist dealer about decoders or the use of a CI module and a smartcard for the reception of encrypted stations. When time and title are sent by the marked station these data are displayed at the bottom of the station list. When the station list is shown you can switch off the screen with the red coloured key. The LED indicator on the set changes from green to orange. You can switch the screen display back on by using the OK key, red or blue coloured keys, by using RADIO, MENU or END on the remote control or by using R on the control ring of the TV set. Station switching with dark screen: by using – or + on the control ring of the TV set or by using the remote control P– and P+ or by using the numeric buttons. The sound menu can be called in the radio mode using the button. 47 - Operating additional equipment Login and connect equipment You have logged in and connected all connected equipment in the initial startup. If you want to connect other equipment or disconnect equipment, call the connection wizard. MENU Call up the TV menu OK Select “Connections” OK Select the submenu line OK Select “New devices/modifications” and ... OK Call with OK. State what equipment you want to connect. State whether a piece of audio equipment is to be connected (more details as of page 50). The connection wizard then shows you which sockets you should connect this equipment to. Then connect the equipment to these sockets according to the connection diagram. Connecting video/DVD recorders In addition to the connection via the Euro-AV sockets, you also have to connect the antenna (only for terrestrial antenna or cable systems) through the VCR/DVD recorder to the TV set. The antenna signal is then available to the video/DVD recorder and the TV set. Note: Use Euro-AV cables with right-angled plugs as shown. Search for and store the station of the video recorder (if no Euro-AV cable is available). Switch on the test station on the VCR or insert a recorded tape and start playback. In some video recorders the station must be switched on by activating the modulator. Then call the AV selection on the TV set with 0 AV. Select the menu item “VIDEO” in the AV selection and call using OK. To prevent “normal” TV stations being found in the search, pull out the antenna plug from the antenna input of the VCR temporarily (the cable to the antenna system). If you cannot see the test station or playback from the cassette, the VCR is transmitting on a different channel. You then have to search for the station or set it manually. Call the TV menu with the MENU button. Select the “Settings” menu item with . Select the line below using and use to select “Stations”. Select the line below using and select “Manual adjustment” using and call this menu using OK. 5. Enter channel “E30“ under the “Channel“ menu item (“Antenna/cable (analogue)“, select in this menu above if necessary). 6. Start search with the blue coloured key. 7. When the station has been found, change the name if needed, confirm with OK and save with the red coloured key. 8. A list of the stored stations is displayed. 9. Select 0 (VIDEO) here and overwrite this station storage location using the red coloured key. 10. Hide the menu again using the END button. 1. 2. 3. 4. Plug the antenna plug back in. If you now get interference because a TV station is transmitting on the same channel as the VCR station, you have to change the transmitting station on the VCR and search for the VCR station on the TV again. ANT AV1 ENTREE ANTENNE EURO AV2 DECODER AUDIO SORTIE OUT G L EURO AV1 AUDIO/ VIDEO D AERIAL SORTIE ANTENNE R RF OUT - 48 Operating additional equipment Video playback Timer recording with video or DVD recorder There are several ways to see the picture and hear the sound of the VCR, DVD player/recorder or camcorder on your TV: You can programme timer recordings on the TV set. Programming can be done with the EPG programme guide, teletext or manually. Call the “Timer list” menu with the button and press the red coloured key for the “Recording wizard”. Select whether you want to programme the recording via EPG, teletext or manually. You also have the option to programme recordings directly from the EPG programme guide or teletext. Note: Copy-protected programmes are not output to the Euro-AV sockets for legal reasons. When you have connected the Euro-AV socket to a recorder which has Digital Link Plus or a comparable system from a different manufacturer, the timer data of analogue terrestrial stations are transmitted from the TV to the recorder. The recording quality SQ or EQ is transmitted for DVD recorders, in additional to the station, date and time. The recording is then controlled by the recorder and the recorder tuner is used for reception of the station. The recording data are not saved in the timer list of the TV set. You will only find the timer data in the recorder. 1. You can usually use the Euro-AV sockets on the TV set and on the VCR. For camcorders or digital cameras, use the AVS sockets on the right of the TV set. DVD players/recorders and SetTopBoxes may have HDMI or component sockets for video and audio transmission. In this case, use the corresponding sockets on the TV set. When playing back from a video recorder using Euro-AV socket and Digital Link Plus (or a comparable system from another manufacturer), the picture from the VCR is shown at the current channel location. When playing back from another VCR, camcorder or digital camera, use the AV selection AV or the station list (OK) to select the AV socket/the device to which the VCR is connected. Video recorders transmit a switching voltage during playback, which the TV can evaluate (can be activated in the connection wizard or in the “TV menu – Connections – Miscellaneous – Allow switching voltage” - set to “yes”). Then the picture of the video recorder is shown during playback at the current station location. 2. You can use the antenna connection between the VCR and the TV without a Euro-AV socket. The sound is only transmitted in mono. Select the first menu item, e.g. VIDEO, in the AV selection. Calling AV inputs in the AV selection: AV Call AV selection AV selection VIDEO VCR OK DVD AVS VGA HDMI/DVI COMP. IN OK Select AV device/socket (or VIDEO if the video recorder has been connected only via the antenna socket) and use ... OK to call. Now you will see the playback from the connected AV device. Calling AV input via the station list If you want to record from digital stations, the TV tuner is used and the recorder is controlled by the TV set. Then the station is locked during the timer recording. If you have connected a Loewe video recorder with Digital Link to the Euro-AV socket (without Digital Link Plus) and you are using the timer programming of the TV, the TV receiver is always used, for terrestrial stations as well. The TV controls the recording. You have to set the recorder to the AV input (signal source) to which the TV set is connected. Then the station on the TV set is locked during the timer recording. Digital Link must be switched on on the recorder. Read the operating instructions of your Loewe recorder for more information. Use only Euro-AV cables, which are completely wired, otherwise Digital Link/Digital Link Plus will not work. Another advantage of Digital Link is that you can install the recorder in a concealed place (e.g. in a rack). You can control the recorder with the TV set. If you have a Loewe recorder with both systems, you can use all the advantages. The advantages of Digital Link Plus are used for the timer recording; the advantages of Digital Link for concealed installation of the recorder. Call the station list with the OK button in TV mode. In the numeric and alphabetical sorting, you will always find the AV sockets at the top of the list. 49 - Operating additional equipment Assignment of digital audio inputs and outputs Audio input “AUDIO DIGITAL IN” The TV set has a coaxial digital audio input “AUDIO DIGITAL IN” and a coaxial digital audio output “AUDIO DIGITAL OUT”. If you are using an external digital surround amplifier for sound reproduction, you have to feed digital audio signals to the TV, e.g. from the DVD player. Audio output “AUDIO DIGITAL OUT“ The digital audio signal is applied at the “AUDIO DIGITAL OUT” socket of the TV. For example, you can connect an external digital audio amplifier or the Loewe Auro system here. An analogue audio signal from the TV set or another sound source which is received at one of the Euro-AV sockets of the TV set is converted into a digital signal (PCM) and output at the “AUDIO DIGITAL OUT“ socket. Conversion from external analogue AV sources to PCM is not possible if the TV’s loudspeakers are used as a centre channel. In this case, connect your audio amplifier additionally to the TV (AUDIO OUT L/R) with a cinch cable and switch the audio amplifier to analogue audio input. The digital TV sound or the digital sound of a connected auxiliary device is only audible via an external digital audio amplifier (e.g. Loewe Auro system). AV2 AUDIO DIGITAL IN OUT Surround Amplifier DVD MULTICHANNEL AUDIO OUT LEFT REAR CENTER I FL STEREO OUT PCM/MPEG2/AC3/DTS PREOUT AUX-I/O LEFT FRONT DIGITAL AUDIO OUT C FR AUX1 IN AUX OUT AUX 2 L L SR R VIDEO OUT MAINS DIGITAL IN II DIGITAL OUT TO TV-I/O SL OPT OUT DIG OUT RIGHT REAR SUBW. RIGHT FRONT L R AUDIO (CVBS) VIDEO OUT SUB R (Y/C) S-VIDEO OUT Connect the output socket of the DVD player (DIG OUT) to the TV‘s “AUDIO DIGITAL IN” socket with a cinch cable. In the connection wizard, specify that audio transmission is to be digital. Specify that the digital sound is to be assigned for example to the Euro-AV socket 2 to feed the digital sound to the digital audio output of the TV set and via this to the external audio amplifier. Further information about this can be found on page 52. - 50 Operating additional equipment Connecting Loewe DVD Preceiver Auro 2216 PS and Individual Sound loudspeaker system You can play audio signals from the TV or DVD player in cinema quality with these components. The Individual Sound system includes 5 speakers for the front, centre and surround reproduction in addition to the subwoofer illustrated below. The centre signal can be reproduced alternatively by the TV speakers. Connect the cubic socket on the DVD Preceiver to the “Master” cubic socket on the subwoofer. Use the cubic plug cable enclosed with the DVD Preceiver. Plug the white plug (without kink protection) into the cubic socket on the subwoofer. For TV as a centre loudspeaker, connect “AUDIO IN C” on the TV set to “PRE OUT C”on the DVD Preceiver using a cinch cable. Connect the digital audio output of the TV set “AUDIO DIGITAL OUT” to the “DIGITAL IN” input of the Preceiver using a cinch cable. Connect the TV socket “SERVICE“ to the TV-L-Link socket on the Preceiver using the L-Link cable (provided with the Preceiver). Switch on the TV set and the Preceiver. Via the L-Link, the TV recognises whether the Preceiver is connected. Select the “Tremo“ loudspeaker system in the DVD menu of the Preceiver, set the listener/speaker distances and adjust the speaker levels. Please consult the Preceiver manual. If you want to listen to the sound via the TV speakers temporarily, call the Sound menu, select “Sound via“ and then “TV“. If you want to listen to the sound via the Loewe Auro system, select “AURO“ under “Sound via“. Audio cable cinch -> SCART (available in specialised trade) only required for TV as centre loud speaker Loewe Flat-TV AV2-SCART Surround speaker system CENTER COMPONENT IN DIGITAL OUT Digital audio TV -> Auro SERVICE Component Video (available in specialised trade) Loewe Individual Sound ON Power OUT R Surr. OFF L R Front EURO-AV cable C Bass Intensity L Min. Loewe Auro Center to Sat TV Slave L Pb 230V~50/60Hz Six-pole cinch EXT L-LINK Master Pr COMPONENT VIDEO OUT L-Link cable L TV 12V / 15mA SL R R R SR C SR LFE L SL LFE C DIGITAL OUT SL Max. Phase 180 System connector TO TV DIGITAL IN 0 Front Right Center Left FLE L AUX 2 R AUX1 IN AUX OUT Y SR L PREOUT C R Line IN Right Subw. Left Surr. Cubic plug cable 51 - Operating additional equipment Connecting other audio amplifiers or active speakers In the connection wizard, select “HiFi/AV amplifier” under “Equipment selection: audio component”. The connection wizard allows configuration of different audio amplifiers (stereo amplifiers, surround amplifiers, analogue or digital) with different sound formats (Dolby Digital, dts, MPEG and Stereo/PCM). Refer to the operating instructions for the audio amplifier to be connected. Select “Digital“ under “Audio transmission“ for digital audio amplifiers. Connect the digital audio output of the TV AUDIO DIGITAL OUT to the digital audio input of the digital amplifier. Select “Analogue“ for “Sound transmission“ for analogue audio amplifiers. The sound for the analogue amplifier is transmitted via the AUDIO OUT L/R connections of the TV to the audio amplifier. Connect the amplifier with two cinch cables. Specify under “Type of amplifier“ whether the analogue amplifier is a stereo or surround amplifier. If it is a surround amplifier, also specify whether or not the TV speakers are to be used as centre loudspeakers. Connect the centre output of the amplifier to the centre output of the TV using a cinch cable, if necessary. Note: do not use the centre loudspeaker connection on the amplifier; instead use the pre-amplifier centre output. Assign the digital audio input to the socket through which the corresponding picture is transmitted (e.g. AV2 if a DVD player is connected there). Then the digital sound is passed to the digital audio output of the TV set and fed to the external audio amplifier via this. Specify which sound formats can be decoded with your digital amplifier (Dolby Digital, MPEG, dts). Specify under “Type of amplifier“ whether the digital amplifier is a stereo or surround amplifier. If it is a surround amplifier, specify whether or not the TV loudspeakers are to be used as centre loudspeakers. Connect the centre output of the amplifier to the centre output of the TV using a cinch cable, if necessary. Note: do not use the centre loudspeaker connection on the amplifier; instead use the pre-amplifier centre output. AUDIO IN PREOUT FL C C FR AUX1 IN AUX OUT AUX 2 L L SR R L R AUDIO OUT DIGITAL IN DIGITAL OUT SL SUB R If you want to listen to the sound via the TV loudspeakers temporarily, call the Sound menu using the button, select “Sound via“ and then “TV“. AUDIO IN C PREOUT FL C FR AUX1 IN AUX OUT AUX 2 L L SR R DIGITAL IN DIGITAL OUT SL - 52 SUB R OUT AUDIO DIGITAL When connecting active speakers, select “Active speakers” in the connection wizard under “Audio equipment selection”. The sound for the active speakers is transmitted via the AUDIO OUT L/R connections to the active speakers. Make connections to the active speakers using the cinch cables. Make the audio settings on the TV set when active speakers are connected. When using an external audio amplifier, make the audio settings on the audio amplifier. Operating additional equipment HDMI (DVI) connection VGA/XGA connection The HDMI connection (High Definition Multimedia Interface) allows digital picture and sound transmission via a connecting cable, e.g. from Loewe DVD Recorder Centros 2102/2172 HD. The digital picture and sound data are transmitted without data compression and therefore lose none of their quality. In the equipment connected, no analogue/digital conversion is necessary, which might also have lead to losses in quality. DVI signals can be also be reproduced by the HDMI connection using a DVI/HDMI adapter cable. This is possible because HDMI is based on DVI and is downwardly compatible. That means that the digital video signals are transmitted via HDMI - no audio signals are transmitted, though. In addition, both use the same copy protection method HDCP. You can connect a PC or a Set Top Box (STB) and therefore use the TV screen as an output device. Connect the PC/STB to the VGA/XGA socket on the TV using a VGA cable. When connecting to a PC, first set one of the following screen resolutions on your PC. 800x600 60Hz (SVGA) 1024x768 60Hz (XGA). When a Set Top Box is connected, set the following screen resolutions according to the options of the Set Top Box: SDTV: 720x576i (PAL), 720x480i (NTSC), 720x576p, 720x480p. HDTV: 1280x720p, 1920x1080i. Connect the set with an HDMI connection using an HDMI cable (type A, 19-pin) to the HDMI socket of the TV set. Log in the HDMI connection in the connection wizard (TV menu - Connections - New devices/modifications). Select the VGA/XGA connection in the AV selection. AV Call AV selection AVS Select the HDMI connection in the AV selection. AV Call AV selection VGA AV selection HDMI/DVI OK COMP. IN VIDEO VCR DVD AVS AV selection VGA Select VGA socket and use ... OK to call. Select HDMI/DVI socket and use ... Start the connected device. OK to call. Set geometry Set geometry: as described for the VGA/XGA connection. HDMI/DVI OK OK Start playback on the device connected with HDMI connection. The set automatically recognises and sets the best possible format for the video. If transmission occurs via a DVI/HDMI adapter cable, then you can feed in the appropriate analogue audio via the audio input sockets AUDIO IN L/R on the TV set. The sound is reproduced via the TV speakers. If you have connected a digital external audio amplifier, you can select the digital audio signal in the connection wizard (TV menu - Connections - New devices/modifications) and assign it to the HDMI/DVI socket. You can make the other settings for the audio amplifier as described for digital amplifiers on page 52. The digital audio signal of the DVI audio source is fed in at the AUDIO DIGITAL IN socket on the TV. Feed the digital audio signal from the TV AUDIO DIGITAL OUT to the external amplifier. OK COMP. IN VIDEO VCR DVD Call the TV menu using the MENU button, select “Geometry“ using and set: If the picture is not positioned correctly, you can move the picture horizontally and vertically here so that it fills the whole screen. You can also set the phase position so that the picture appears in the best possible quality. Setting colour standard Call the Picture menu using the button. Select “Colour standard“ using and make your selection. The colour standard for a connected PC is RGB. In Set Top Boxes, you usually set Ycc as a colour standard. Other formats such as Ypp or RGB can also be output. Please consult the operating instructions of the device connected. If the wrong standard is selected, you will recognise this by the wrong colours in the display. 53 - Operating additional equipment Sound from PC or Set Top Box Feed the analogue audio signal from the PC or the STB to the sockets AUDIO IN L/R on the TV via a cinch cable. The sound is reproduced via the TV speakers. If you have connected a digital external audio amplifier, you can select the digital audio signal in the connection wizard (TV menu - Connections - New devices/modifications) and assign it to the VGA/XGA socket. You can make the other settings for the audio amplifier as described for digital amplifiers on page 52. The digital audio signal of the Set Top Box is fed in at the AUDIO DIGITAL IN socket on the TV. Feed the digital audio signal from the TV AUDIO DIGITAL OUT to the amplifier. Component video connection If you have a DVD player/recorder with Component OUT connections, you can connect it to the SD/HD-COMPONENT IN sockets of the TV instead of to the Euro-AV sockets. The connecting cable with three cinch plugs each transmits picture information. The playback is of a better quality than via the Euro-AV socket. You need another cinch cable for the analogue sound transmission. Connect the analogue audio outputs of the DVD player to the AUDIO IN L/R sockets on the TV set. The sound is reproduced via the TV speakers. If you want to use the digital sound of the DVD player with a digital audio amplifier connected to the TV, make a connection between AUDIO DIG OUT of the DVD player and AUDIO DIGITAL IN of the TV set. Log in the component/device in the connection wizard: Assign the AUDIO DIG IN input here to the COMP. IN socket, provided a digital audio amplifier is also connected. You can make the other settings for the audio amplifier as described for digital amplifiers on page 52. Set the signal at the component input in the connection wizard: Set to “Automatic“ first. If the signal is not reproduced when playback is started, consult the operating instructions of the DVD device connected to find out what screen resolution is possible (SDTV, HDTV or ProScan). Select the component connection in the AV selection. AV Call AV selection DMI/DVI AV selection COMP. IN OK VIDEO VCR DVD OK Select COMP. IN sockets and use ... OK to call. AVS VGA HDMI/DV Start playback on the connected device. Set geometry and colour standard: as described for the VGA/XGA connection. - 54 Operating additional equipment Operating other Loewe devices with the RC3 remote control Using this remote control, you can operate additional devices from Loewe. TV Use the rotary switch to select VCR, TV or a Set Top Box. DVD STB The following are preset at the factory: Loewe VCRs, Loewe TV VCR sets and for STBs (Set Top Box) in Germany, the common d-box. DVD DVD TV STB First set the switch to the main function TV or STB. VCR EPG END wxyz tuv tuv DVD TV VCR PIP STB Then press the END and EPG buttons simultaneously for at least 5 seconds. The upper left indicator on the remote control will blink twice. Enter the the numbers 988 in sequence. The indicator will again blink two times. Now set the switch to the desired function for the drive buttons: to DVD, VCR or to TV, if the digital recorder is to be operated. Press the # PIP button to complete the setting. The indicator will blink two times. STB VCR EPG END AV jkl Use the driver buttons in the TV and STB position for VCR, DVD or Digital Recorder. You can switch over the six drive buttons ( , , , , , ), both for the TV and for the STB, to control a VCR or DVD player/recorder (the control of the integrated “Digital Recorder Plus” is preset at the factory): TV You can switch over the remote control for other VCRs, DVD players and Set Top Boxes if the infrared code for the device type is listed in the code list or if it is included in the code memory of the RC3. Even if the manufacturer of the device is listed in the code list, it may not be possible to operate that device using the Loewe remote control. Setting the remote control using code entry Search for the code number for your device in the code list (see as of pages 64-68). The list is arranged according to device type – DVD, VCR, STB – and alphabetically according to manufacturer. Next to the manufacturer’s name, you will find one or more code numbers. Press the END and EPG buttons simultaneously for at least 5 seconds. The upper left indicator on the remote control will blink twice. Enter the four numbers in sequence that you found in the code list (e.g. 0539 for Loewe DVD player). def wxyz After each number you enter, the indicator will blink once, after the last number it will blink twice. If the number was incorrect, the indicator will remain lit longer. The code number was not accepted. If the code was accepted with two blinks, you can test the functions of the device you just programmed. If the device cannot be operated or can only be operated poorly, repeat the code entry with the next code from the list. If there are no other codes specified for this manufacturer, try it using the code suggestions from the remote control. Setting the remote control using the suggestions from the remote control Switch the device on that you want to switch over to the remote control. Standby mode is not enough. DVD TV STB VCR EPG END Use the rotary switch if you want to switch over a VCR, DVD device or a Set Top Box. Press the END and EPG buttons simultaneously for at least 5 seconds. The upper left indicator on the remote control will blink twice. wxyz Enter the the numbers 991 in sequence. The indicator will blink once after each number entered. PIP Press the # PIP button to select the first code. wxyz Setting the remote control to operate devices from other manufacturers Use the rotary switch if you want to switch over a VCR, DVD device or a Set Top Box. Point the remote control toward the device you want to switch over to the remote control. Observe that device. PIP Now press the button (Play) or On/Off on the remote control. Wait a moment for the device to react. If the device does not react, then that was not the right code. Press the # PIP button again to call the next code. Press the button EPG (Play) or On/Off again. If the device reacts, press the EPG button to adopt the code. 55 - Operating additional equipment Using the RC3 remote control to operate a DVD recorders or DVD player DVD VCR TV STB Set the rotary switch to “DVD”. Using the RC3 remote control to operate a VCR DVD The infrared code and the functions are preset at the factory for the Loewe DVD recorder Centros 21x2 HD. VCR TV STB Set the rotary switch to “VCR”. The infrared code and the functions for a Loewe VCR are preset at the factory. In the DVD mode, it is possible to operate the Loewe DVD recorders Centros 1102, 1172, 2102HD, 2172HD, and the DVD players Xemix 6122DO, 8122DA and 6222PS. In VCR mode, the following VCRs can be operated: ViewVision 8106H, 8136H, 8176H, 6306H, 6336H, 6376H, 6396H, 4306H, 4376H, 2102M, 2302M, 4206, 4236, 4276. For other Loewe equipment than that listed, please use the original remote control. Functions for the Loewe DVD recorders (Centros 1102, 1172, 2102, 2172) Functions for Loewe VCR (VV 8106, 8136, 8176) TV DVD Change-over switch for operation of TV, VCR, DVD or Set Top Box STB VCR Switch DVD player on/off – in standby Sound off/on Set marker / in menu: highlights title/chapter -Set Marker search menu on -List Repeat REC-MENU Select camera position RADIO Timer recording menu / timer recording list menu on ghi Call AV selection (AV1-AV4,DV,TV) pqrs - 56 jkl mno tuv wxyz AV PIP -M SC DI P+ OK V– V+ P– C- in menu: enter digits / in stop mode (menu off): select programme (TV) Picture in picture (PIP) on/off EPG Status display (TV, DVD-RW) /in menu: cofirm the menu selection in menu: select / adjust ShowView menu on Insert a new chapter marker Press short during playback: Start of current chapter /previous chapter Press short during pause: slow motion back Press long during playback: search back Record Playback Pause /single frame def DVD-AV Main menu on User interface of loaded DVD on /in menu: switch between original and playlist abc Zoom RD SE CA T SV TITLE Close menu Info / menu bar on/off Next chapter / in stop mode (menu off): next programme V–/V+ volume quieter/louder Start of current chapter / previous chapter /in stop mode (menu off): previous programme Audio/Foto Card Reader operation on/off Enter a new title thumbnail / switch between photo and MP3/WMA operation Press short during playback: next chapter Press short during pause: slow motion forward Press long during playback: search forward Stop TV DVD Change-over switch for operating of TV, VCR, DVD or Set Top Box STB VCR Switch recorder on/off – in standby Sound off/on (mute) REC-MENU RADIO P+/P– Select station up/down Reverse play /in menu: select/set V–/V+ volume quieter/louder / at stop: Program up/down on playback: manual tracking in the menu: Select position abc def ghi jkl mno pqrs tuv wxyz AV PIP DVD-AV Call AV selection (TV) VCR menu on /in menu: back EPG Set time display to 0:00:00 Select station directly /in menu: enter digits Set picture format (TV) Status display on/off in the menu: Close menu Status display on/off -M SC DI P+ OK V- on playback: Slow motion forward /in the menu: select/set or to the next menu Call up station list /in menu: call up/confirm V+ PC- RD SE CA T SV Rewind /search backwards Select picture and sound sour Select video and audio input -List -Set Display/close Timer list Display/close ShowView timer Menu Switch to Long Play /Standard Play TITLE Fast forward /search forwards Start playback Start recording Pause (still frame) /frame-by-frame advance Stop tape Operating additional equipment Rotating the TV set Rotate TV Basic adjustment -31 Individual Edition sets are equipped with a Motor Unit at the factory. You can adjust your TV set to suit your sitting position with the remote control. OK OK Setting the range of rotation (basic adjustment) Sound ... Recording Picture OK OK and select Lan and select On-screen displays ... yes OK INFO END Time and date D OK and select OK Activate switch-off position INFO Set switch-off position ... and select “yes” with TV menu Settings Miscellaneous Rotate TV Activate switch-off position no Move up with osition Set switch END Basic adjustme . INFO END and select “Set switch-off position” with TV menu Settings Miscellaneous Rotate TV Set switch-off position 0 INFO OK Basic adjustment . END Activate switch use OK to go down and use the arrow buttons to set the desired switch-off position. The TV set rotates in the process. TV menu Settings Miscellaneous Rotate TV Set switch-off position 0 OK Adopt END OK Move down with END Timer functions OK use OK to save the position set. END Close the menu. INFO END END Proceed Turn your TV with as far to the right as the location of the set allows. This will be the maximum right hand position in future. Confirm with OK. TV menu Settings Miscellaneous Rotate TV Activate switch-off position no Conne ... and confirm with OK. OK Call the menu item “Activate switch-off position” in the TV menu – Settings – Miscellaneous – Rotate TV. END INFO Select the menu line below with “Basic adjustment” with ... Rotate TV Basic adjustment 24 OK You can set the position the TV set is to assume once it is switched off (switchoff position must be activated for this): Settings Recording Sound Channels Parental lock ... Select the menu line below with “Rotate TV” with . osition OK Close the menu. ... TV menu Settings Miscellaneous On-screen displays TV menu Settings Miscellaneous Rotate TV Basic adjustment Connections INFO TV menu Settings Stations TV menu Settings Miscellaneous Rotate TV Activate switch-off position OK END . Select the menu line below with “Miscellaneous” with . nguage OK End the basic adjustment with OK. END INFO Select “Settings” with ections OK OK Call up the TV menu. TV menu Picture Picture adjustment OK OK Setting the position of the TV set when switched off Here you can determine the range of rotation maximum +/- 40 degrees) of the TV set by adjusting the maximum right and left stop. MENU End of basic adjustment Turn your TV with as far to the left as the location of the set allows. This will be the maximum left hand position in future. Rotate the TV set when no menu or PIP is being displayed. Note: Make sure there are no objects in the TV’s area of rotation that might obstruct the rotation or be knocked down due to the rotating motion. END If the TV set is switched off using the blue on/off button on the remote control or by using the indicator field on the set, the set will rotate to the position defined. When it is switched back on, it returns to the position last set manually. 57 - What to do, if ... Problem Possible cause Remedy The “Recording” menu point is not displayed in the TV menu. No video or DVD recorder logged in. Log in the video or DVD recorder in the connection wizard and connect the device. “Connections” cannot be called in the TV menu (deactivated). A time recording is in progress. Wait until the timer recording has ended or delete the timer. The control of the Loewe video recorder and the timer do not work or do not work properly. a) The Digital Link function is not activated or not possible in the recorder. a) Activate Digital Link in the recorder (see operating instructions of the video recorder). b) Euro-AV cable is not connected. b) Connect the Euro-AV cable. c) Recorder is not logged in. c) Log in recorder. a) The device is not logged in to the connection wizard or is connected differently than is shown in the connection diagram. a) In the connection wizard (TV menu – Connections – New devices/modifications), compare the connection diagram with the actual installation and connect as shown, if necessary. b) The AV norm is set incorrectly. b) Set the norm correctly. c) The AV signal is set incorrectly. c) Set the AV signal correctly. General problems with connecting external equipment via an AV input. If “Automatic” is set for AV norm or AV signal, this can lead to errors for signals which do not conform to the norm. Then the norm and the signal are to be set according to the specifications in the operating instructions of the external device. A decoder connection does not function or is faulty. All menus appear in the wrong language. - 58 a) The signal is not decoded because the wrong decoder stations are selected in the connection wizard. a) Follow the instructions in the connection wizard again (TV menu – Connections – New devices/modifications) and select the corresponding decoder station. b) The sound is missing in decoder mode because the wrong decoder sound is assigned in the connection wizard. b) Follow the instructions in the connection wizard again and select the right audio source (decoder, TV or autom.), see instructions of the decoder. Menu language has been set incorrectly. Set your menu language: Press the INFO button in TV mode (index). Select the first index item and call it by using OK. Then select the language and confirm with OK. What to do, if ... Problem Possible cause Remedy Digital Link Plus does not function. a) Euro-AV cable is not fully wired (pin 10 not wired). a) Replace the Euro-AV cable. b) Some recorders can only adopt stations during the initial installation of the TV set. b) Restore the recorder to the as-delivered state (see recorder’s operating instructions). c) All or some of the terrestrial and cable stations are stored on station storage locations ≥ 99. c) Rearrange the terrestrial and cable stations so that they fall between 1 and 99. Various characters are displayed incorrectly in the teletext. The wrong character set is set in the teletext menu. Set the right character set: Teletext menu - Settings Character set: standard or the appropriate character set. No sound via external digital audio amplifier. a) The external digital audio amplifier does not sup- a) Set PCM stereo on the DVD player in the sound selection. For DVB stations, switch language/ port the selected sound format (Dolby Digital, sound selection (green coloured key) to Stereo on dts, MPEG). the TV set in the status display (END). b) TV set and external digital audio amplifier are not connected. b) Connect Digital-Out from the TV set to a Digital-In of the external digital audio amplifier and select the appropriate input to this. Device on mounted motor unit does not rotate. Motor unit and connection for rotating stand control Use related cable to connect socket of motor unit are not connected to each other. to interface of rotating stand control (see assembly instructions for motor unit). Dirt on the inside of the front screen. --- The front screen may only be removed and cleaned by your dealer. 59 - Technical data General data Type Individual Edition Item no. 66435xxx Versions DR+ DVB-T/C CI • Set dimensions without stand (ca. cm WxHxD) Dimensions with stand (ca. cm WxHxD) 81,5x57,9x9,9 81,5x62,8x32,0 Set weight without stand (ca. kg) Set weight with stand (ca. kg) 22,5 28,0 Display Picture diagonal (cm)/picture format Resolution Contrast ratio HD-LCD technology 80/16:9 1366x768 800:1 Angle of viewing horizontally/vertically 170° Power consumption (IEC 62087) in operation (watt) in standby (watt) 100 <3 Ambient temperature (Celsius) 5º – 35º Relative humidity (not condensing) 20 – 80% Barometric pressure 800 – 1114 hPa (0 – 2000 m over NN) ✄ ta ou k. ls oc ce d l an hil 1c ec 00 th r 3 it n a be ith ep i . um d w ke ce e n an se pla od de lea fe e c co P sa Th cret se - 60 Technical data Electrical data Chassis name Power supply Tuner VHF/UHF/ cable Hyperband 8 MHz Station storage locations TV standards Colour standard Sound standard Rated audio power Analogue Teletext Page Memory Connections L 2650 220 V -240V/50- 60 Hz 41 MHz to 860 MHz 1680 B/G, I, L, D/K, M, N DVB-T, DVB-C, DVB-S (1 SECAM, PAL, NTSC, NTSC-V, PAL-V (60Hz) Mono/Stereo/Dual-channel Nicam B/G, I, L, Virtual Dolby 2 x 20 watt TOP/FLOF Level 2.5 3000 Jack 3.5mm Mini-DIN (AVS) Video IN Headphones 32- 2000 ohm Y/C (S-VHS/Hi 8) CVBS (VHS/8 mm) Cinch (yellow) Video IN CVBS (VHS/8 mm) Cinch (white/red) Audio IN L/R IEC socket 75 Ohm/5 V/80 mA Antenna/cable/PIP/DVB-T/C F socket 75 Ohm 13/18 V/350 mA (1 ANT-SAT EURO-AV 1 Video IN Y/C (S-VHS/Hi 8) CVBS (VHS/8 mm) Video OUT CVBS (VHS/8 mm) Y/C (S-VHS/Hi 8) Audio IN L/R Audio OUT L/R EURO-AV 2 Video IN Y/C (S-VHS/Hi 8) CVBS (VHS/8 mm) RGB, YUV Video OUT CVBS Y/C, (only with SVHS Link Plus) Audio IN L/R Audio OUT L/R Cinch Audio IN max. 2Vrms Centre 2 x Cinch Audio IN L/R 2 x Cinch Audio OUT (level adjustable in active loud speakers) L/R Cinch COMPONENT IN: Cb/Pb signal Cinch COMPONENT IN: Cr/Pr signal Cinch COMPONENT IN: Y signal Cinch Digital Audio IN (SPDIF) Digital audio Cinch Digital Audio OUT (SPDIF) Digital audio HDMI/DVI Digital Video/Audio IN type A 19pin Digital video and audio VGA/XGA VGA/XGA IN PC/STB video signal Mini-DIN SERVICE Service/L-Link Mini-DIN CONTROL Rotating stand control (1 Dolby and the double ´D´ symbol are trademarks of Dolby Laboratories Digital Single-Sat tuners and digital Twin-Sat tuners can be retrofitted. Printed in Germany TB/06/04/1.0 Subject to modifications! © by Loewe Opta 2006 61 - Accessories Wall holders and stands Loewe DVD players and recorders Refer to the notes on the installations options on page 6. The DVD players and recorders from Loewe are characterised by form and colour, which match Loewe TV sets, adapted user guidance and technology. A combination of the two devices forms a system which offers many advantages. Digital Satellite Tuner You can have your TV set retrofitted with the digital satellite tuner. By using this tuner, you can receive DVB-S stations. The digital satellite tuner is completely integrated in the TV set (physically and logically) and is operated by the remote control/menu control of the TV. The integrated PIP DVB-T/C tuner is exchanged for the digital sat tuner. Loewe order no. 89361.055 Loewe audio system Auro and the active speaker system Individual Sound Digital Twin Satellite tuner Cube i Rack: For TV set with the Digital Recorder+, you can have it retrofitted with an integrated DVB-S twin sat tuner. The integrated PIP DVB-T/C tuner is exchanged for the DVB-S twin sat tuner. Loewe order no. 89443.080 The Loewe Cube i Rack is designed as an accessory rack to hold two peripheral units such as DVD players and/or DVD recorders as well as the subwoofer of the Individual Sound System. The interplay of a Loewe TV with a Loewe audio system and a Loewe speaker system creates an excellently coordinated home cinema system. Advantages are high operating comfort, attractive design and adapted technology. VESA adapter The VESA adapter offers you the possibility of also using your TV set for other VESA-compatible fastening devices. Loewe order no. 89688.B00 Subject to delivery options. - 62 Service Loewe Austria GmbH Parkring 10 A - 1010 Wien Tel +43 - 1/51 633 - 31 34 Fax +43 - 1/51 633 - 30 32 Email [email protected] Kjaerulff 1 A/S C.F. Tietgens Boulevard 19 DK - 5220 Odense SØ Tel. +45 - 66 13 54 80 Fax +45 - 66 13 54 10 Email [email protected] Loewe Italiana SRL Largo del Perlar, 12 I - 37135 Verona (VR) Tel. +39 - 045 82 51 611 Fax +39 - 045 82 51 622 Email [email protected] Service Center Loewe Petrovsky per., d. 5, str. 3 of. 17 RUS - 107031 Moscow Tel. +7 - 95 - 928 33 58 Fax +7 - 95 - 928 58 79 Email [email protected] International Dynamics Australasia Pty Ltd. 129 Palmer Street AUS - Richmond 3121, Victoria Tel. +61 - 3 - 94 29 08 22 Fax +61 - 3 - 94 29 08 33 Email [email protected] Gaplasa S.A. Conde de Torroja, 25 E - 28022 Madrid Tel. +34 - 917 48 29 60 Fax +34 - 913 29 16 75 Email [email protected] PL Trading (pz 2004) Ltd. 27, Aliat Hanoar St. ISR - Givataiim 53401 Tel. +972 - 3 - 57 27 155 Fax +972 - 3 - 57 27 150 Email [email protected] Kjaerulff 1 AB Ridbanegatan 4, Box 9076 S - 200 39 Malmö Tel. +46 - 4 06 79 74 00 Fax +46 - 4 06 79 74 01 Email [email protected] Loewe Opta Benelux NV/SA Uilenbaan 84 B–2160 Antwerpen Tel. +32 - 3 - 2 70 99 30 Fax +32 - 3 - 2 71 01 08 Email [email protected] Loewe Opta France S.A. 13 rue du Dépôt, Parc del l‘Europe, BP 10010 F - 67014 Strasbourg Cédex Tel. +33 - 3- 88 79 72 50 Fax +33 - 3- 88 79 72 59 Email [email protected] Mirage Holdings Ltd Flamingo Complex, Cannon Road M - Qormi Tel. +356 - 22 - 79 40 00 Fax +356 - 21 - 44 59 83 Email [email protected] Jadran Trgovsko Podjetje Partizanska cesta 69 SL - 6210 Sezana Tel. +386 - 57 31 04 40 Fax +386 - 57 31 04 42 Email [email protected] Telion AG Rütistrasse 26 CH - 8952 Schlieren Tel. +41 - 44 732 15 11 Fax +41 - 44 730 15 02 Email [email protected] Kjaerulff 1 OY Artturinkatu 2 FIN - 20200 Turku Tel. +358 - 2 284 1600 Fax +358 - 2 284 1601 Email [email protected] SOMARA S.A. 377, Rue Mustapha El Maani MA - 20000 Casablanca Tel. +212 - 22 22 03 08 Fax +212 - 22 26 00 06 Email [email protected] Enkay Elektronik Servis Müdürlügü Alemdag Cad: Site Yolu No.: 10 Ümraniye/ Istanbul Tel. +90 - 216 634 44 44 Fax +90 - 216 643 39 88 Email [email protected] HADJIKYRIAKOS & SONS LTD. Prodromou 121, P.O Box 21587 CY - 1511 Nicosia, Cyprus Tel. +357 - 22 87 21 11 Fax +357 - 22 66 33 91 Email [email protected] LinnSight Ltd. PO Box 8465 UK - KA 7 2YF Prestwick Tel. +44 - 12 92 - 47 15 57 Fax +44 - 12 92 - 47 15 54 Email [email protected] CableCom AS Østre Kullerød 5 N - 3214 Sandefjord Tel. +47 - 33 48 33 48 Fax +47 - 33 44 60 44 Email [email protected] THE SOUNDLAB (PTY) LTD P.O. Box 31952, Kylami 1684 Republic of South Africa Tel. +27 - 1 14 66 47 00 Fax +27 - 1 14 66 42 85 Email [email protected] K+B EXPERT SPOL. S R.O. U Expertu 91 CZ - 25069 Klicany u Prahy Tel: +42 - 2 72 12 21 11 (222) Fax: +42 - 2 72 12 21 99 (239) Email [email protected] SIBA Engineering S.A. 6, Kifisou Av., GR - 122 42 Aegaleo Tel. +30 - 210 - 5913793 Fax +30 - 210 - 5317755 Email [email protected] Loewe Opta GmbH, Customer Care Center Industriestraße 11 D - 96317 Kronach Tel. +49 1801–22256393 Fax +49 9261–99500 Email [email protected] Basys Magyarorszagi KFT Epitok utja 2–4 H - 2040 Budaörs Tel. +36 - 23 41 56 37 (121) Fax +36 - 23 41 51 82 Email [email protected] Vídeoacustica Comercio e Representacoes de Equipamentos Electronicos S.A. Estrada Circunvalacao, Quinta do Paizinho, Arm. 5 P - 2795-632 Carnaxide Tel. +351 - 2 14 24 17 70 Fax +351 - 2 14 18 80 93 Email [email protected] DSV TRADING SA Plac Kaszubski 8 PL - 81-350 Gdynia Tel. +48 - 58 - 6 61 28 00 Fax +48 - 58 - 6 61 44 70 Email [email protected] © by Loewe Opta 63 Codelist RC3 / Lista de códigos RC3 Loewe DVD-Player DVD-Recorder Centros 11x2 DVD-Recorder Centros 21x2 STB VCR 0539 0741 1463 1127 0866 DVD 3DLAB A-Trend Acoustic Solutions AEG Aiwa Akai 0790 0788 0690 AKI Akira Alba 0717 0699 All-Tel Amitech Amstrad Apex Digital Audiosonic AWA Black Diamond Blaupunkt Blue Sky 0699 0695 Boman Brain Wave Brandt Bush 0699 0713 0818 C-Tech Cambridge Audio Cambridge Soundworks CAT Celestial Centrex Centrum cineULTRA Classic Clatronic Clayton Coby Conia Crown Cybercom CyberHome Cytron Daewoo Daewoo International Dansai Dantax - 64 0788 0641 0716 0713 0713 0723 0713 0672 0651 0690 0689 0695 0831 0672 0770 0651 0714 0716 0651 0770 0705 0770 0539 0714 0730 0770 0695 0705 0718 0699 0695 0790 0770 0713 0672 0690 0730 0713 0717 0651 0783 0770 0551 0717 0723 0768 0696 0696 0699 0672 1004 0713 0699 0730 0788 0713 0730 0672 0690 0831 0816 0705 0714 0699 0783 0723 DEC Decca Denon Denver Denzel Diamond Digihome digiRED Digitrex DiK Dinamic DiViDo DK digital DMTECH Dragon Dual 0699 0818 0770 0490 0634 0699 0788 0665 0651 0768 0723 0713 0717 0672 0831 0788 0705 0831 0783 0790 0831 0665 0651 0713 0730 0783 0790 0831 E-Boda 0723 Eclipse 0723 Electrohome 0770 Elin 0770 Elta 0690 0770 0788 0790 Emerson 0591 0705 Enzer 0665 Ferguson 0651 Finlux 0741 0770 0783 Firstline 0651 Funai 0695 GE 0717 Global Solutions 0768 Global Sphere 0768 Go Video 0783 GoldStar 0591 0741 Goodmans 0651 1004 0790 0690 0783 0723 0818 Graetz 0665 Grandin 0716 Grundig 0539 0695 0651 0775 0705 0790 0713 0670 0723 Grunkel 0770 H&B 0818 0713 Haaz 0768 Hanseatic 0741 HCM 0788 HDT 0705 HE 0730 Henß 0713 Hitachi 0664 0665 0573 Hiteker 0672 Home Electronics 0730 Hyundai 0783 Ingelen 0788 ISP 0695 Jeken 0699 JMB 0695 JVC 0623 0539 0503 1901 1940 Karcher 0783 Kendo Kenwood Kiiro Kingavon Kiss Koda Koss Lawson Lecson Lenco Lenoxx Lexia LG Lifetec Limit Loewe LogicLab Logix Lumatron Luxman Luxor Magnavox Magnex Manhattan Marantz Mark Matsui MBO MDS Medion Memorex Metz MiCO Microboss Micromaxx Micromedia Micromega Microsoft Microstar Minax Minoka Mitsubishi Mizuda Monyka Mustek Mx Onda NAD Naiko Neufunk Nordmende Omni Onkyo Optimus Orava Orion Oritron P&B 0699 0534 0490 0737 0718 0770 0818 0665 0818 0651 0705 0716 0768 0696 0699 0651 0770 0818 0690 0699 0591 0741 1906 0651 0716 0768 0539 1922 0768 0705 0783 0705 0573 1004 0503 0818 0723 0705 0539 0713 0651 0695 0690 0730 0699 0651 0783 0716 0831 0831 0571 0713 0723 0718 0695 0503 0539 0539 0522 0831 0713 0770 0713 0818 0665 0730 0651 0723 0741 0770 0665 0831 0690 0699 0627 0503 0571 0818 0695 0651 0818 Pacific Palladium Palsonic Panasonic Panda Philips Phonotrend Pioneer Pointer Powerpoint Proline Proscan Prosonic Provision Radionette Raite Rank Arena RCA REC Red Star Reoc Revoy Roadstar 0699 Rotel Rowa Saba Sabaki Salora Samsung Sansui 0695 Sanyo Scan ScanMagic Schaub Lorenz Schneider 0651 Scientific Labs Scott SEG Shanghai Sharp Sherwood Shinco Silva SilvaSchneider Singer Skymaster Slim Art SM Electronic Smart Sonashi Sony Soundmaster Soundmax Soundwave Standard Starmedia Sunwood 0768 0790 0713 0831 0695 0689 0672 0490 1908 0783 0539 0646 0503 1914 0699 0571 0631 1900 1902 0770 0718 0651 0672 0790 1004 0522 0699 0699 0741 0665 0718 0522 0651 0689 0490 0770 0788 0768 0699 0690 0689 0713 0818 0623 1004 0651 0768 0741 0573 0490 0716 0768 0723 0770 0670 0695 0790 0705 0730 0788 0770 0783 0705 0790 0788 0768 0718 0651 0672 0665 0713 0768 0672 0630 0695 0717 0741 0633 0717 0788 0831 0690 0716 0723 0730 0768 0770 0730 0768 0690 0718 0705 0713 0716 0533 0573 1903 1904 0768 0768 0783 0651 0768 0818 0788 Codelist RC3 / Lista de códigos RC3 Supervision 0730 0768 SVA 0672 Synn 0768 Tandberg 0713 Tatung 0770 Teac 0717 0741 0571 0768 0591 0790 Technics 0490 1908 Technika 0770 Techwood 0713 Tensai 0690 0651 Tevion 0651 0768 Theta Digital 0571 Thomson 0551 0522 Tokai 0665 0788 Tokiwa 0705 0716 Toshiba 0503 Umax 0690 United 0788 0730 0790 Universum 0741 0713 0591 Venturer 0790 Vieta 0705 Voxson 0730 0831 Walkvision 0717 Welkin 0831 Wesder 0699 Wharfedale 0696 0723 Windy Sam 0573 XBox 0522 XLogic 0770 0768 XMS 0788 0689 Yamada 1004 Yamaha 0490 0539 0646 Yamakawa 0665 0710 0765 Yelo 0718 Yukai 0730 Zenith 0503 0591 0741 VCR Adyson 0072 Aiwa0307 0000 0209 0348 0352 0037 0041 Akai 0106 0315 0041 0352 0240 Akashi 0072 Akiba 0072 Akura 0072 0041 Alba0278 0072 0209 0352 0000 0315 0348 0081 Allorgan 0240 Allstar 0081 Amstrad 0000 0278 0072 Anitech 0072 Ansonic 0000 Aristona 0081 ASA 0037 0081 Asuka 0072 0037 0081 0000 0038 Audiosonic 0278 AVP 0352 0000 AWA 0037 0278 0642 0043 Baird 0106 0278 0104 0041 0000 Basic Line 0278 0209 0072 Bestar 0278 Black Diamond 0642 0278 Black Panther 0278 Blaupunkt 1562 0226 0081 Blue Sky 0037 0209 0348 0072 0352 0278 0000 Bondstec 0072 Brandt 0041 0320 Brandt Electronique 0041 Brinkmann 0209 0348 Bush0072 0278 0315 0209 0352 0000 0348 0081 Carena 0209 0081 Carrefour 0045 Casio 0000 Cathay 0278 CGE 0041 0000 Cimline 0072 0209 Clatronic 0072 0000 Combitech 0352 Condor 0278 Crown 0278 0072 Cyrus 0081 Daewoo 0278 0642 0209 0348 0352 0045 Dansai 0072 0278 Daytron 0278 de Graaf 0042 0081 0104 0048 Decca 0000 0041 0081 0067 0348 0209 Deitron 0278 Denko 0072 Diamant 0037 Domland 0209 Dual 0041 0081 0278 0000 Dumont 0000 0081 0104 Elbe 0278 0038 Elcatech 0072 Elin 0240 Elsay 0072 Elta 0072 0278 Emerson 0072 0045 0000 ESC 0278 0240 Etzuko 0072 Fast 0897 Ferguson 0041 0320 0000 0278 Fidelity 0000 0072 0240 Finlandia 0104 0081 0042 0000 0048 0384 Finlux 0000 0081 0104 0042 Firstline 0072 0209 0348 0043 0037 0045 0042 0278 Fisher 0047 0104 0038 Flint 0209 Frontech 0072 Fujitsu 0000 Funai 0000 Galaxi 0000 Galaxis 0278 GE 0320 GEC 0081 General Technic 0348 Genexxa 0104 Goldhand 0072 GoldStar 0037 0000 Goodmans 0000 0072 0240 0278 0037 0081 0348 0209 0352 0642 Graetz 0041 0104 0240 Granada 0104 0048 0081 0240 0037 0226 0042 0000 Grandin 0072 0037 0000 0278 0209 Grundig 0081 0347 0226 0320 0348 0072 Haaz 0348 0209 Hanimex 0352 Hanseatic 0037 0209 0278 0081 0038 Harwood 0072 HCM 0072 Hinari 0072 0209 0352 0041 0278 0240 Hisawa 0209 0352 Hischito 0045 Hitachi 0042 0041 0000 0240 0081 0104 0384 Hornyphone 0081 Hypson 0072 0209 0278 0352 Imperial 0000 0240 Ingersoll 0209 0240 Inno Hit 0240 0278 0072 Interbuy 0037 0072 Interfunk 0081 0104 Internal 0278 International 0278 0037 Intervision 0000 0278 0037 0209 0348 Irradio 0072 0037 0081 ITT 0106 0041 0384 0104 0240 ITT Nokia 0048 ITV 0278 0037 JMB 0209 0352 Joyce 0000 JVC 0041 0067 0384 Kaisui 0072 Kambrook 0037 Karcher 0278 Kendo 0106 0209 0315 0348 0072 0037 Kenwood 0041 0038 KIC 0000 Kimari 0047 Kneissel Kolster Korpel Kuba Kuba Electronic Kuwa Kyoto Lenco Leyco LG Lifetec Loewe 0081 Logik Lumatron Luxor 0106 Magnavox Manesth Marantz Mark Matsui 0209 Mediator Medion Melectronic Memorex 0104 Memphis Metz 1562 Micormay Micromaxx Migros Mitsubishi Multitec Multitech Murphy Myryad NAD National NEC 0041 Neckermann Nesco Neufunk Nikkai Nokia 0104 0352 0209 0348 0037 0209 0348 0072 0047 0047 0226 0072 0278 0072 0037 0000 0278 0209 0348 1562 0226 0866 0037 0240 0072 0106 0209 0278 0043 0072 0104 0047 0048 0081 0072 0045 0081 0209 0081 0038 0209 0278 0348 0037 0240 0352 0000 0081 0209 0348 0352 0000 0037 0038 0000 0037 0048 0047 0072 0347 0081 0226 0037 0348 0209 0000 0043 0067 0081 0037 0000 0072 0104 0000 0081 0104 1562 0226 0038 0067 0104 0037 0041 0081 0072 0000 0352 0209 0072 0278 0106 0315 0041 0278 0240 0048 0042 0081 0041 0384 0320 0067 0209 0348 0048 0106 0081 0104 Nordmende NU-TEC Oceanic 0000 0041 Okano 0315 0209 0348 0072 0278 Orbit 0072 Orion 0209 0352 0348 Orson 0000 Osaki 0000 0037 0072 Osume 0072 Otake 0209 Otto Versand 0081 65 - Codelist RC3 / Lista de códigos RC3 Palladium 0072 0315 0037 0240 Palsonic Panasonic Pathe Cinema Pathe Marconi Perdio Philco Philips Phoenix Phonola Pioneer 0067 Portland Prinz Profitronic Proline Prosco Prosonic 0209 Protech Provision Pye Quasar Quelle Radialva 0037 0072 Radiola Rank Reoc 0209 Rex RFT Roadstar 0240 0072 Royal Saba 0041 0320 Saisho Salora 0043 Samsung Sansui 0041 0067 0106 Sanyo 0104 0047 Saville 0352 SBR Scan Sonic Schaub Lorenz 0041 0104 0041 0348 0072 1562 0000 0038 0081 0081 0081 0000 0278 0081 0348 0041 0037 0384 0209 0106 0240 0072 0048 0278 0000 Schneider 0072 0000 0037 0081 0240 0042 Seaway SEG 0072 0240 0278 0642 SEI Sei-Sinudyne Seleco 0041 0384 Sentra Setron Sharp 0048 0037 Shintom 0072 Shivaki Siemens 0037 0104 0081 0320 Siera Silva - 66 0209 0432 0000 0226 0043 0041 0209 0072 0384 0278 0081 0042 0278 0000 0240 0320 0278 0000 0081 0278 0081 0278 0081 0048 0081 0041 0278 0384 0072 0278 0072 0278 0348 0104 0432 0348 0067 0240 0081 0240 0106 0315 0278 0897 0278 0081 0081 0081 0037 0072 0072 0569 0104 0037 0347 0081 0037 Silver Singer Sinudyne Smaragd Sonitron Sonneclair Sonoko Sonolor Sontec Sony Soundwave 0037 Ssangyong Standard Starlite Stern Sunkai 0209 Sunstar Suntronic Sunwood Supra Symphonic T+A Taisho Tandberg Tashiko 0000 0048 0240 Tatung 0000 0041 0081 0209 Teac 0072 0041 0000 0037 TEC Tech Line TechniSat Teleavia Telefunken 0041 0320 Teletech 0072 Tenosal Tensai 0000 Tevion Thomson 0320 0041 0067 Thorn 0041 Thorn-Ferguson Tokai 0072 0037 Tokiwa Topline Toshiba 0045 0041 0384 Towada Tredex Uher Ultravox Unitech United Quick Star Universum 0000 0081 0106 0348 Victor Watson 0081 0352 Weltblick Yamaha 0081 0037 0032 0209 0037 0348 0037 0000 0081 0048 0348 0278 0081 0278 0348 0384 0278 0037 0348 0384 0104 0041 0043 0037 0240 0209 0278 0278 0045 0209 0348 0047 0072 0278 0048 0278 0106 0348 0072 0278 0104 0278 0278 0000 0000 0072 0240 0072 0226 0209 0278 0037 0043 0352 0642 0307 0072 0072 0209 0041 0278 0000 0072 0072 0209 0278 0037 0320 0104 0072 0348 0081 0072 0278 0240 0278 0240 0278 0037 0104 0067 0642 0037 0041 Yamishi Yokan Yoko ZX 0072 0278 0072 0037 0072 0240 0209 SAT /STB) @sat ABsat ADB Adcom AGS Akai Akena Alba Allsat Alltech Alpha Altai Amitronica Ampere Amstrad 0847 0882 0885 Anglo Ankaro AntSat Apollo Arcon 1205 Armstrong Asat ASLF AssCom Astacom Aston Astra Astro 0133 0668 0123 1323 0668 0455 0200 1017 0668 0396 0713 0742 0396 0863 0501 0795 1017 1043 0834 0132 0668 0607 0173 0501 0658 1113 1099 1100 Athena Atlanta Aurora Austar 0863 0642 0497 0879 Avalon Axiel 0668 Axis 1111 Beko Bentley Walker Blaupunkt Blue Sky 0713 Boca 0132 Boston 0132 0710 Broco BskyB 0847 BT 0668 Bubu Sat Cambridge 1300 0710 0642 0200 0710 0200 0668 0713 1043 0713 0200 0396 0713 0132 0132 1113 0713 0713 1083 0455 1075 0200 0200 0713 0853 0710 1129 0713 0607 0200 0668 0871 0879 1176 0396 0710 0834 0455 1017 0173 0885 0713 0668 0713 1175 0710 0713 0501 Canal Satellite Canal+ Cherokee Chess 0157 CityCom 1176 Clemens Kamphus Cobra Colombia Columbia Columbus Comag Condor Connexions Conrad 0607 Conrad Electronic Cryptovision Cyrus D-box Daeryung Daewoo Delfa Deltasat DGTEC Digatron Digenius Digiality Digipro DigiQuest Diskoverer Diskovery Diseqc Distratel Distrisat DMT DNT DREAM multimedia.TV DStv Echostar Einhell Elap Elsat Elta Emme Esse Engel EP Sat Eurieult Eurocrypt Europa Europhon Eurosky Eurostar Fenner Ferguson 0123 0710 0605 0713 0115 0607 0834 0668 0573 0115 0607 0455 1127 1114 1296 0605 0668 0084 0885 0200 0642 0610 1169 0871 1086 1200 0454 0668 0132 0713 1129 0167 0396 0511 0713 0668 1017 0084 0885 0863 0607 0501 0299 0607 0132 0299 0114 0607 0668 0157 0605 0853 0853 1323 1085 0299 0396 0396 0132 0132 0668 0132 0607 0396 0501 0713 0795 0200 0723 0396 0713 0863 1075 1242 1294 0299 0607 1105 0863 0157 0710 0710 1205 0200 1075 0396 1237 0879 0853 0713 0453 0501 0710 0713 0200 0871 0713 0455 0882 0455 0200 0607 0115 0501 0115 0713 0455 Codelist RC3 / Lista de códigos RC3 Fidelity Finlandia Finlux Flair Mate Force Fortec Star Foxtel 0573 1017 0879 0720 0455 0795 0871 0501 Fracarro Freecom Freesat FTEmaximal Fuba 0396 0173 Fugionkyo Galaxis 1111 1101 0853 0115 0879 Garnet GF GF Star GOD Digital Goldbox Goldvision Gooding Goodmans Gradiente Granada Grandin Grundig 0173 0847 0571 0750 0879 0713 0573 0115 0834 0863 0834 1284 1150 1291 0885 0853 1297 0605 1099 0132 Hanseatic Hänsel & Gretel Hauppauge HDT Heliocom Helium Hirschmann 0396 0882 1113 0173 0573 1085 0299 0710 0607 Hitachi HNE 0742 Houston 0668 Humax 1176 Huth 0132 0607 1017 Hyundai 1011 1159 ID Digital 1176 Imex Ingelen 0396 International Interstar 1105 Intervision 0628 Invideo IRTE Italtel ITT Nokia 0573 0455 JOK JVC 0501 0455 0455 0713 1101 1083 0497 1176 0668 0173 0882 0863 0299 1105 1176 1075 1043 1043 0200 0853 1017 0571 0455 0887 0455 0084 1435 0501 1330 1100 0607 1294 1011 0607 0607 1111 0501 0668 0455 0132 0396 0863 1075 1075 0863 0084 0882 0132 1017 0607 0871 0609 0871 0723 0710 0571 K-SAT Kamm Kaon KaTelco Kathrein 0658 0249 1221 0200 0713 0123 0115 Kathrein Eurostar Kiton Klap Konig Koscom Kreiling 0658 Kreiselmeyer Kyostar L&S Electronic Labgear LaSAT 0607 0115 0132 Lenco 0713 Lenson Lexus LG Lifesat 0605 0299 Logix Lorenzen 0299 1294 0607 Luxor M&B1 Manata 0710 Manhattan 1083 0455 Marantz Maspro 0750 Matsui Max MB Mediabox Mediacom MediaSat Medion Medison Mega Metronic 0713 1215 Metz Micro Micro electronic Micro Technology Micromaxx Microtec Minerva Mitsubishi Morgan’s Motorola Multichoice Multitec Myryad Mysat Netgem 1057 0668 1323 0668 0834 0249 0157 0115 1043 1017 0742 0573 0668 0710 0834 0713 0173 0571 0710 0501 0713 0299 0084 0885 0607 0501 0200 0713 0642 0713 0713 1300 1111 0173 0742 0710 0115 0114 0710 0607 1043 0114 0173 0132 1043 1296 0299 0607 0501 0200 1075 0713 1075 0132 0501 0605 0713 0668 1017 0200 0571 0173 0607 0605 0853 1206 0853 1043 0713 0200 1205 0173 0713 0713 0713 0299 0713 0571 0455 0132 0856 0879 0157 0200 0713 1322 Neuhaus Neusat Nikko Nokia 0501 0713 0834 0713 0713 0723 1023 1114 0751 1127 0853 0573 1223 0455 1310 Nordmende Nova OctalTV Okano OnDigital 0751 0329 0241 0867 Optex Optus 0879 Orbitech 1099 1100 0200 0501 Origo Ouralis Oxford Pace 0455 0847 0887 1175 0867 0123 1323 0791 0720 0497 0200 0853 0710 Packsat Palcom Palladium 0571 Palsat Panasat 0879 Panasonic 0847 1104 0455 Panda 0455 0607 0173 Patriot Philips 0200 1114 0853 0455 0710 0668 0571 0173 0133 Phonotrend 0863 1017 Pioneer 0329 0853 Planet 0871 Polytron Praxis Preisner 0132 0396 1101 Premiere 0853 1114 1127 0723 1176 1195 1100 0249 0658 Primacom Profile 0668 Promax Prosat Prosonic Pye Pyxis Quadral 0628 0668 0710 Quelle 0607 0742 Radiola Radix 0396 1113 RFT Roadstar Rover 0628 Saba 0710 0885 0115 Sabre Sagem 0820 1114 Samsung 0863 1243 1343 0853 1017 1293 0607 0834 0200 0723 1723 1312 0455 0879 1294 0668 0133 0834 0853 0157 0497 1205 0668 0241 0795 1423 0710 0299 0501 0501 0615 1320 0834 0668 0750 1336 1200 0352 0396 0396 0511 1113 1111 1435 1111 0710 0455 0628 0742 0571 0834 1323 0115 0200 0882 0200 0713 0713 0607 0455 1253 1206 1292 SAT Sat Control Sat Partner Sat Team Satcom Satec Satline Satstation Schneider Schwaiger SCS Seemann SEG Seleco Septimo Siemens Skantin Skinsat SKR Sky SKY+ Skymaster Skymax SkySat SL SM Electronic Smart 0605 0713 0710 0668 0157 0605 0157 0607 1111 0132 0115 0605 0742 0114 1205 0847 0856 0887 0713 0605 0157 1085 1075 0157 0605 0132 0157 0713 1075 0132 0299 1101 0396 1113 0115 0282 0847 0853 Sony SR Starland Strong 0879 0853 1105 1159 Sunsat Sunstar Tantec Tatung Teac Tecatel TechniSat 0200 1099 1100 0501 Technosat Technowelt 0607 Techsan Techwood Telasat 0605 0115 Teleciel Telecom Telefunken Teleka 0396 0750 0501 0607 Telesat 0605 Telestar 0501 1099 1100 0200 Teletech Televes 0455 0501 0501 1300 0501 0713 0607 0834 0628 1083 1206 0885 1075 0299 0396 1087 0871 0885 0173 0713 0501 0713 1014 1175 1200 0628 0200 0713 0742 1200 1085 0882 0713 0455 0132 0713 1300 0713 0132 0455 0455 1322 1200 1195 1322 1206 0885 1017 0114 0607 1043 0713 0710 0834 0607 0114 0157 0114 0132 67 - Codelist RC3 / Lista de códigos RC3 Thomson 0455 0713 12910820 Thorn Tokai Tonna 0455 0668 Topfield Toshiba TPS Triasat Triax 0501 0115 08530114 Turnsat Twinner UEC Uher Unisat Universum 0173 0853 0115 0607 0668 0710 1046 0455 0200 0501 0713 0834 1206 0455 0820 1253 0501 0200 0396 0713 1296 1291 0132 0713 0132 0713 0879 0157 0200 0571 0607 0299 0115 0742 1087 Van Hunen 0299 Variosat 0173 Ventana 0200 Vestel 0742 VH-Sat 0299 Viasat 1323 1023 0820 Visionic 1105 Visiosat 0710 0713 Wetekom 0157 0605 0501 Wewa 0455 Wisi 0173 0396 0299 0455 0501 0607 0834 Worldsat 0710 0114 0123 0668 XCOM 0123 0668 XSat 0668 0713 0123 Xtreme 1300 YES 0887 Zehnder 1075 0742 0114 0115 0419 Zenith 0856 Zeta Technology 0200 Zinwell 1176 Cable Box (STB) Austar BT Canal Plus Comcrypt Decsat Filmnet France Telecom General Instruments Jerrold Kabelvision Macab Melita MNet Mr Zapp Noos - 68 0276 0003 0443 0443 0423 0443 0817 0276 0003 0276 0003 0817 0003 0443 0817 0817 NTL Cabletell Ono Optus Pace Philips PVP Stereo Visual Sagem Tele+1 Telepiu Tudi United Cable Visiopass 0276 1068 0276 1060 1068 1060 0817 0286 0003 0817 0443 0443 0286 0003 0817 69 -