1
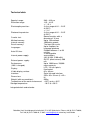
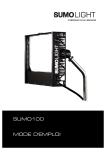
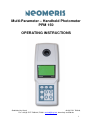
Multi-Parameter – Handheld Photometer
PPM 150
OPERATING INSTRUCTIONS
Gebrüder Heyl Vertriebsgesellschaft mbH, D-31135 Hildesheim, Phone +49 (0) 5121 7609-0,
Fax +49 (0) 5121 7609-44, E-Mail: [email protected], www.heyl-vertrieb.de
1
Contents
Introduction
5
Technical Data
Scope of delivery
Things to know
6
7
9
Operating the photometer
Keyboard
Energy-saving function
11
12
Switch on
Method names
Performing measurements
Reaction times
Help text
12
12
13
15
15
Functions
Menu
History
Logger / Memory
Erase memory
Help
16
16
17
18
19
Favorites
Date and Language
Time
Off-Time
Sound
Light
20
22
22
23
23
24
Setup
Gebrüder Heyl Vertriebsgesellschaft mbH, D-31135 Hildesheim, Phone +49 (0) 5121 7609-0,
Fax +49 (0) 5121 7609-44, E-Mail: [email protected], www.heyl-vertrieb.de
2
Tips and possible sources of error
Cuvettes
Filling volumes
Cleanliness / Dryness
Blank
Rinsing the cuvettes
Scratched cuvettes
Light protection
Times
Dosage of liquid reagents
Dosage of solid reagents with spoons
Reagent tablets
Powder packs
Air bubbles
25
25
25
25
25
26
26
26
26
26
26
26
27
Messages in the photometer display
Battery
Below measuring range
Measuring range exceeded
Light protection
Improving accuracy
28
28
28
28
28
Information and safety instructions
29
Operating the Software
Introduction
Database
30
31
Measurements
Gebrüder Heyl Vertriebsgesellschaft mbH, D-31135 Hildesheim, Phone +49 (0) 5121 7609-0,
Fax +49 (0) 5121 7609-44, E-Mail: [email protected], www.heyl-vertrieb.de
3
New results
Display of results from History
Display of results from Memory
Open measurements
Save measurements
Export data
Print data
Locations
Data
32
32
32
32
33
33
34
35
36
Substances – definition of calibration curves
Name
Method
Maximal extinction
Maximal concentration
Diode
Symbol
Measuring range
Unit
Limit
Time
Custom
Calibration points
37
37
37
37
37
37
38
38
38
38
38
38
Preferences
Profiles
39
40
40
Help
Program
Connect
Program
41
41
Gebrüder Heyl Vertriebsgesellschaft mbH, D-31135 Hildesheim, Phone +49 (0) 5121 7609-0,
Fax +49 (0) 5121 7609-44, E-Mail: [email protected], www.heyl-vertrieb.de
4
Multi-parameter- hand photometer
Introduction
The microprocessor-controlled NEOMERIS PHOTOMETER PPM 150 offers complete
solutions for the examination of your water and wastewater. This unit disposes of a substantial
user guidance to simplify its handling to an utmost extent.
It operates with the latest LED (Light Emitting Diode) technology. Its measuring range reaches
from 380 up to 810 nm with nine different diodes. An excellent reproducibility and a small slit
width guarantee precise measuring results. Light emitting diodes emit a stable light and
consume only little energy, so that this unit can also be used for a longer period of time. Its
advanced optical design and its additional interference filter improving its precision have been
developed especially for the NEOMERIS PHOTOMETER PPM 150. The unit is equipped with
a large graphic LCD display with a resolution of 128 x 64 pixels.
Gebrüder Heyl Vertriebsgesellschaft mbH, D-31135 Hildesheim, Phone +49 (0) 5121 7609-0,
Fax +49 (0) 5121 7609-44, E-Mail: [email protected], www.heyl-vertrieb.de
5
Technical data
Spectral range:
Extinction range:
Electro optic precision:
Photometric precision:
Cuvette slot:
Method memory:
Internal memory:
Result memory:
Languages:
Auto-Off time:
Internal power supply:
External power supply:
Performance
(100 % charged):
Display:
Visible display surface:
Interface:
Dimensions:
Weight (with accumulators):
Temperature of the work environment:
Storage temperature:
380 – 810 nm
-0.5 – 4.0 E
+/- 1.5 %
(in the range of 0.1 – 2.0 E
at 20°C)
+/- 3 %
(in the range of 0.1 – 2.0 E
at 20°C)
Round cuvettes with a
diameter of 16 mm
Up to 150 methods
1000 data records
The latest 50 results
Up to 6 options for
language guidance
Elegible between 1 to 30
minutes
4 rechargeable
accumulators
(AA, Ni-MH, 2100 mAh)
9V DC (direct current) 300
mA
Up to 1000 hours/ 20,000
measurements
LCD, 128 x 64 pixels,
illuminated
62 x 40 mm
Serial infrared interface
255 x 93 x 54 mm (L x W x
H)
560 g
+10°C up to + 40°C
- 10°C to + 50°C
Integrated clock and calendar
Gebrüder Heyl Vertriebsgesellschaft mbH, D-31135 Hildesheim, Phone +49 (0) 5121 7609-0,
Fax +49 (0) 5121 7609-44, E-Mail: [email protected], www.heyl-vertrieb.de
6
Scope of delivery
1
1
1
4
1
1
NEOMERIS Photometer PPM 150
Cover for the cuvette slot
Power adapter
Accumulators (AA, Ni-MH, 2100 mAh), inside the unit
IrDA adapter
Operating Instructions for the NEOMERIS Photometer PPM 150
and Software on CD-ROM
1 Cleaning brush
10 Photometer cuvettes (for volumes of 10 ml)
2 Reaction vessels (for volumes of 20 ml) A, B
1 Funnel
1 Cuvette stand
2 Syringe 5 ml
1 IrDA / USB cable
Gebrüder Heyl Vertriebsgesellschaft mbH, D-31135 Hildesheim, Phone +49 (0) 5121 7609-0,
Fax +49 (0) 5121 7609-44, E-Mail: [email protected], www.heyl-vertrieb.de
7
OPTIONAL: Aluminium case with different levels
Gebrüder Heyl Vertriebsgesellschaft mbH, D-31135 Hildesheim, Phone +49 (0) 5121 7609-0,
Fax +49 (0) 5121 7609-44, E-Mail: [email protected], www.heyl-vertrieb.de
8
Things to know
The NEOMERIS PHOTOMETER PPM 150 operates with a combined light emitting diode
(LED) and filter technology. This guarantees the best possible precision of the nine
available wavelengths of 380 nm, 430 nm, 470 nm, 500 nm, 520 nm, 560 nm, 610 nm, 700
nm and 810 nm.
The NEOMERIS PHOTOMETER PPM can measure extinctions ranging from -0.5 E up to
4.0 E. For your measurements we would recommend not to consider extinctions below 0.1
and above 2.0, as within these ranges the precision is not as high as within the range of 0.1
to 2.0.
The electro-optic precision for extinctions between 0.1 and 2.0 amounts to +/- 1.5 %. The
test is performed with a grey filter.
The photometric precision for extinctions between 0.1 and 2.0 amounts to +/- 3.0 %. The
test is performed with color filters.
The reproducibility of the measured extinctions is as follows:
–0.5 to –0.1 E: +/– 0.005 E
–0.1 to –2.5 E: +/– 0.002 E
>2.5 E:
+/– 0.005 E
The cuvette slot is suitable for commercially available 16 mm round cuvettes. During
measurements the slot must be covered with a light protection cap. The photodiode and the
light emitting diodes are sealed with glass and are watertight. Nevertheless, attention
should be paid that water does not penetrate directly into the cuvette slot.
The upper and the lower parts of the housing are equipped with seals thus avoiding that
water or dust can penetrate into the unit from there.
The software for the NEOMERIS PHOTOMETER PPM 150 can be operated with Windows
98 or a later version, but the computer must dispose of an infrared interface.
In the NEOMERIS PHOTOMETER PPM 150 up to 150 methods can be stored with the
respective help texts in up to six languages. With the function “Favorites” each user can
select the curves he personally uses most frequently. This selection can be changed at any
time.
Gebrüder Heyl Vertriebsgesellschaft mbH, D-31135 Hildesheim, Phone +49 (0) 5121 7609-0,
Fax +49 (0) 5121 7609-44, E-Mail: [email protected], www.heyl-vertrieb.de
9
For documentation purposes the NEOMERIS PHOTOMETER PPM 150 disposes of two
kinds of data memories. On the one hand there is a normal memory, to which you can
transfer the measured values by pressing the MEM key. This memory can save 1000
measured values.
The results are saved in the memory indicating the respective curve, method, result, time,
date and place (optional). Therewith the results are GLP-approved, i.e. by means of the
software they can be transferred to an invariable file on the computer.
The second memory is the history function. In the history function the last fifty values
measured with the photometer are saved. From the history memory results can also be filed
in the memory at a later time. The history memory is continuously busy – if the 51st
measurement is made, the oldest value is erased, the second oldest value moves up to
rank no. 1 and the latest value becomes number 50.
On delivery the NEOMERIS PHOTOMETER PPM 150 is equipped with four rechargeable
accumulators (AA Ni-MH, 2100 mAh), as-delivered condition: uncharged. Before the first
usage the accumulators must be charged by means of the accompanying charger. When
the power pack/charger is applied, the accumulators are charged and the unit operates with
mains current. When the accumulators are charged, you can perform up to 20.000
measurements. The following functions consume a lot of energy: powered background light,
links to the computer, and performance of measurements.
Even if the accumulators are completely empty, the stored data and the program of the
NEOMERIS PHOTOMETER PPM 150 remain saved.
Gebrüder Heyl Vertriebsgesellschaft mbH, D-31135 Hildesheim, Phone +49 (0) 5121 7609-0,
Fax +49 (0) 5121 7609-44, E-Mail: [email protected], www.heyl-vertrieb.de
10
Operating the photometer
The NEOMERIS PHOTOMETER PPM 150 keyboard
•
Switching on – the NEOMERIS PHOTOMETER PPM 150 is switched on by
pressing any of the keys.
•
Switching off –the photometer is switched off by pressing ESC and ENTER
together.
•
ESC key – (Escape) similar to the computer you go one step back in the menu by
pressing the ESC key.
•
ENTER key – like on the computer it is used to confirm a selection, mainly used in
the Setup Menu.
•
MENU key – to call various menus, e.g. setup, memory and help.
•
HELP key – to display brief operating instructions of each method.
•
MEM key – to save the measured values.
•
Arrow keys and - to move within the saved methods or help texts.
•
0.0 key – to measure the blank value
•
mg/l key – analytical results
Gebrüder Heyl Vertriebsgesellschaft mbH, D-31135 Hildesheim, Phone +49 (0) 5121 7609-0,
Fax +49 (0) 5121 7609-44, E-Mail: [email protected], www.heyl-vertrieb.de
11
Energy-saving function
Some time after the last keystroke the photometer will switch off automatically. This is
announced by acoustic signals (if the sound was not switched off). The period of time, after
which the photometer will be switched off automatically, is at your option (to be selected in
the setup menu under OFF-Time).
Switching the NEOMERIS PHOTOMETER PPM
The photometer is switched on by pressing any of the keys. When it is switched on, the
display shows:
NEOMERIS
Photometer
PPM 150
Photometer
The serial number also appears on a label on the back of the unit.
Thereafter the unit immediately jumps to the last selected method. The following may
appear on the display:
Date
Time
Copper
Cu2+
+
Blank test
or
Date
Time
Absorbance 560
560 nm
Blank test
By means of the arrow keys or you can scroll through the alphabetically sorted menu
of the saved methods.
Method names
Approx. 100 methods are saved in the NEOMERIS PHOTOMETER PPM 150, whereby
some of the parameters exist several times. This is the reason why we used abbreviations
to distinguish the methods pertaining to the various reagents.
Gebrüder Heyl Vertriebsgesellschaft mbH, D-31135 Hildesheim, Phone +49 (0) 5121 7609-0,
Fax +49 (0) 5121 7609-44, E-Mail: [email protected], www.heyl-vertrieb.de
12
Measuring ranges
Many products dispose of several measuring ranges, which are marked with high/ hi,
medium, low / lo and Uhi = ultrahigh.
Test types
Some methods are destined for cuvette tests. These types are marked with a K before the
extension indicating the reagent family (+, p or v).
Further additions
Some methods are marked with an asterisk * after the article numbers of the respective
reagents. This asterisk means that additional articles are required to carry out this method.
All further article numbers can be found in the operating instructions of the respective test.
Some parameters (e.g. chlorine) are marked with the extension tot or t. This means that
the total chlorine will be determined and not the free chlorine.
The indications 10 ml or 25 ml refer to the sample volumes to be used for this test – they
must strictly be observed, as the calibration curves were determined with these volumes
and also the reagents were adapted accordingly.
The names of some parameters are too long to fit into the available fields and have been
reasonably abbreviated. For example Ox scavenger for oxygen scavenger.
Performing measurements
Use the arrow keys to select the method you would like to work with. Just to make sure that
you have selected the correct method for the present reagents you can display the article
number and the measuring range in the lower part of the display by pressing the HELP key
once:
Date
Time
Sulfide
S2Sulfide
Range:
p
p 70098* AQ
0.008 – 1.0 mg/l
The exact denomination of the method to be used is also indicated in the operating
instructions of the test.
Gebrüder Heyl Vertriebsgesellschaft mbH, D-31135 Hildesheim, Phone +49 (0) 5121 7609-0,
Fax +49 (0) 5121 7609-44, E-Mail: [email protected], www.heyl-vertrieb.de
13
The test is carried out according to the description in the operating instructions: First of all
place the cuvette with the blank in the cuvette slot, close the cuvette slot with the covering
cap and measure the blank value by pressing the 0.0 key. After receipt of the confirmation
from the photometer the sample is placed in the cuvette slot, the cuvette slot is closed with
the covering cap and the result is determined by pressing the mg/l key.
In the event that you should press a wrong key by mistake, the photometer will blow a beep
signal.
Measuring the blank value:
Date
Time
Sulfide
Date
p
S2-
Time
Sulfide
0.00
Press the 0.0 key
Measuring the blank value
p
mg/l
Blank value measured
Determining the result:
Date
Time
Sulfide
0,00
Date
p
mg/l
Blank value measured
Time
Sulfide
Press the mg/l key
X,YZ
p
mg/l
Measured value measured
After you have determined the result, you can directly save it by pressing the MEM key. The
memory has capacity to store up to 1000 measured values with the associated information.
You may carry out further measurements with the same method or select the next method
with the arrow keys or .
Gebrüder Heyl Vertriebsgesellschaft mbH, D-31135 Hildesheim, Phone +49 (0) 5121 7609-0,
Fax +49 (0) 5121 7609-44, E-Mail: [email protected], www.heyl-vertrieb.de
14
Reaction times
For some of the methods the reaction time is deposited in the database. This reaction time
automatically starts when pressing the mg/l key. Please observe that tests with several
reagents might possibly require a reaction time after addition of more than one reagent. The
automatically started reaction time is always started after addition of the last reagent. If any
reaction times should already be required before, of course, these times have to be
considered as well. These reaction times can be found in the respective test descriptions of
each method.
When a reaction time is started, it is displayed in seconds by a blinking LED in the lowerright corner (if the help text is switched on). Furthermore, the reaction time is plotted as a
line on the display.
Date
Time
Nickel
Date
Time
p
Ni2+
Nickel
p
Press the mg/l key
3 minutes reaction
time
180 s
3 minutes reaction
time
180 s
Counting down the reaction time is not always meaningful, e.g. for serial measurements.
The reaction time can be bypassed by pressing the mg/l key twice or by pressing the ESC
key. In this case the result will be measured immediately.
Each user has the option to save the reaction times (please see the software description)
together with his curves.
Help text / brief operating instructions
The brief operating instructions can be displayed by means of the help function of the
photometer. Select the method you would like to work with. When pressing the HELP key
once, the method name and the article number appear. When pressing the HELP key
twice, the help text appears.
Gebrüder Heyl Vertriebsgesellschaft mbH, D-31135 Hildesheim, Phone +49 (0) 5121 7609-0,
Fax +49 (0) 5121 7609-44, E-Mail: [email protected], www.heyl-vertrieb.de
15
First stroke HELP
Second stroke HELP
Date
Time
Sulfide
S2Sulfide
AQ
Range:
p
p 70098*
0.008 – 1.0 mg/l
Date
Time
Sulfide
S2-
p
10 ml sample
Put it into a cuvette
When you press the arrow keys or you can move forward and backward in the help
text.
When you press the ESC key you leave the help menu.
Functions
Menu
When you press the MENU key, the following is displayed:
History View
Memory View
Erase memory
Help
Setup
In this menu you will find five setup functions.
Menu
The History function
History View
Memory View
Erase memory
Help
Setup
Gebrüder Heyl Vertriebsgesellschaft mbH, D-31135 Hildesheim, Phone +49 (0) 5121 7609-0,
Fax +49 (0) 5121 7609-44, E-Mail: [email protected], www.heyl-vertrieb.de
16
The function History can be selected by pressing the ENTER key. The last 50 measured
values will be displayed. The display starts with the oldest value, which is marked as no. 1.
With the arrow keys or you can scroll through the results.
In order to avoid any confusion with other modes, the History function is indicated by
negative view of date and time on the display.
Date
Time
Phosphate o v
Date
This
display
changes
every
second
Phosph o v 70229
AQ
1.000 mg/l
History
Time
1.000 mg/l
No: X
History
X
No:
In this display you may still decide whether you would like to transfer a result to the memory
at a later date. When the result appears on the display, press the MEM key. You will be
asked for the storage location – this input is optional. You may either select a location you
have previously defined by means of the software or leave the storage location blank by
pressing the ENTER key. When you have entered the location / pressed the ENTER key,
the unit will automatically jump to the normal method map.
On delivery no storage locations are saved in the database of the unit.
Menu
The Memory function
History View
Memory View
Erase memory
Help
Setup
The function Memory can be selected by pressing the ENTER key. With the memory
function up to 1000 saved results can be displayed (when pressing the MEM key). Just as
the history function the memory function is also indicated on the display.
Gebrüder Heyl Vertriebsgesellschaft mbH, D-31135 Hildesheim, Phone +49 (0) 5121 7609-0,
Fax +49 (0) 5121 7609-44, E-Mail: [email protected], www.heyl-vertrieb.de
17
Date
Time
Phosphate o v
Date
This display
changes every
second Time
Phosph o v 70229 AQ
1.000 mg/l
1.000 mg/l
Location Heyl; Hildesheim
Location Heyl; Hildesheim
Memory
Memory
No: X / Y
No: X / Y
All saved values are numbered according to the following pattern: Number X of Y values (in
the memory). The memory has capacity for up to 1000 measured values (together with all
details shown in the graph above). You may transfer data from the memory to the computer
at any time and then erase the memory.
Menu
The Erase Memory function
History View
Memory View
Erase memory
Help
Setup
The function Erase memory can be selected by pressing the ENTER key. With this
function all stored data will be erased. You should make sure that all data have previously
been transferred to a file in the computer, as after deletion of the memory these data will no
longer exist!
If your memory contains more than 500 results, you have the option to erase the first
(oldest) 500 results. If you decide to erase only parts of your memory, results 1 to 500 will
be erased and the results starting with 501 will be moved to the front and renumbered. The
former result 501 becomes the new number 1, the result, which had the number 502 before
deletion becomes number 2, and so on.
Gebrüder Heyl Vertriebsgesellschaft mbH, D-31135 Hildesheim, Phone +49 (0) 5121 7609-0,
Fax +49 (0) 5121 7609-44, E-Mail: [email protected], www.heyl-vertrieb.de
18
Data are erased by pressing the ENTER key. Thereafter the photometer asks for
confirmation and if you are sure that you want to erase all data, press the ENTER key
again. Then you will get the message that the memory is empty.
Date
Time
----
Memory is empty
If you are not sure or want to save the stored data, you may leave this function by pressing
the ESC key and all stored data will be preserved.
Menu
The Help function
History View
Memory View
Erase memory
Help
Setup
The function Help can be selected by pressing the ENTER key. With this function you can
display the complete help text for a parameter (on the whole display, not only in the two
lower rows of the display like in the normal view). With the arrow keys or you can scroll
through the text.
The help text refers to the last selected parameter. The method name appears in the upper
line and the other six lines refer to the analysis. To leave the help function and return to the
methods, press the ESC key.
Gebrüder Heyl Vertriebsgesellschaft mbH, D-31135 Hildesheim, Phone +49 (0) 5121 7609-0,
Fax +49 (0) 5121 7609-44, E-Mail: [email protected], www.heyl-vertrieb.de
19
Menu
The Setup function
History View
Memory View
Erase memory
Help
Setup
The function Setup can be selected by pressing the ENTER key. In the Setup menu you
have the option to set up various parameters like e.g. time, date, language and favorites.
When you have selected the setup menu, the following display appears:
Setup MENU
Selected:
Date:
Time:
OFF time:
Sound:
Light:
PWR / BAT X%
X/Y
DD-MM-YYYY
HH :MM :SS
X
0/1/2
On / Off
With the arrow keys or the functions can be selected and when pressing the ENTER
key the selected function is activated.
All information appearing in the upper line cannot be changed. The left display in the upper
line informs you, where you presently are in the device software and the right display
informs you about the electric charge of the photometer. It either appears PWR for mains
operation / charging the accumulators or BAT X % indicating the state of charge of the
accumulators. Below 35 % the figure of a battery appears between the date and the time
and reminds you in all modes to charge the accumulators soon. If the accumulators are
nearly empty the display further shows the message “Battery“.
The accumulators are only charged, if the power pack is connected and the photometer is
switched off. When the photometer is switched on, it is operated by mains current.
Gebrüder Heyl Vertriebsgesellschaft mbH, D-31135 Hildesheim, Phone +49 (0) 5121 7609-0,
Fax +49 (0) 5121 7609-44, E-Mail: [email protected], www.heyl-vertrieb.de
20
Setup – Selected
Favorites
Setup MENU
Selected :
Date:
Time:
OFF Time:
Sound:
Light:
PWR / BAT X%
X/Y
DD-MM-YYYY
HH:MM: SS
X
0/1/2
On / Off
This function shows the number of methods (X) selected from all available methods (Y). On
delivery the display shows 95/95.
If you confirm with ENTER, you come to an alphabetic list of all (95) parameters. A cross
marks each of these parameters. In order to establish a favourite list with your most
frequently used parameters, select the parameters (with the arrow keys or ) you do not
need and remove the crosses by pressing the 0.0 keys.
Setup MENU PWR / BAT X %
[X] Absorbance 610
[X] Absorbance 700
[X] Absorbance 810
[ ] Alka-m
p
[X] Alka-p
p
[ ] Aluminium
+
If you have deactivated all redundant methods this way, your selection must be confirmed
by pressing the ENTER key. Afterwards the NEOMERIS PHOTOMETER PPM 150
automatically jumps back to the method display. When scrolling through the methods, you
will observe that only those marked by a cross are displayed. In the setup menu under
Selected you see e.g. 18 / 95. You can change your personal selection according to the
above described procedure at any time. In order to display all available methods again,
activate all deactivated curves by pressing the 0.0 keys.
Gebrüder Heyl Vertriebsgesellschaft mbH, D-31135 Hildesheim, Phone +49 (0) 5121 7609-0,
Fax +49 (0) 5121 7609-44, E-Mail: [email protected], www.heyl-vertrieb.de
21
Setup – Date
Language
Setup MENU
Selected:
Date:
Time:
OFF Time:
Sound:
Light:
PWR / BAT X %
X/Y
DD-MM-YYYY
HH:MM: SS
X
0/1/2
On / Off
When selecting Date you can set up the date. The format is Day – Month – Year (01-122005). The digit to be changed will be highlighted. In the above figure the month would
have to be changed now with the arrow keys or . If you have reached the respective
digit, confirm it by pressing the ENTER key. The display will move to the next digit.
After having confirmed the year the display will automatically jump to the language.
Setup MENU
Selected:
Language: :
Time:
OFF Time:
Sound:
Light:
PWR / BAT X %
X/Y
German
HH: MM: SS
X
0/1/2
On / Off
With the arrow keys or you can scroll through the languages available in the
NEOMERIS PHOTOMETER PPM 150. Confirm your desired language with ENTER.
Thereafter the photometer will automatically jump back to the methods.
Setup – Time
Setup MENU
Selected:
Date:
Time:
OFF Time:
Sound:
Light:
PWR / BAT X %
X/Y
DD-MM-YYYY
HH: MM: SS
X
0/1/2
On / Off
Gebrüder Heyl Vertriebsgesellschaft mbH, D-31135 Hildesheim, Phone +49 (0) 5121 7609-0,
Fax +49 (0) 5121 7609-44, E-Mail: [email protected], www.heyl-vertrieb.de
22
When selecting Time you can set up the time. The format is Hour–Minute–Second
(12:05:33). The digit to be changed is always highlighted. In the above figure the hour
would now be changed with the arrow keys or . If you have reached the right digit,
confirm it by pressing the ENTER key. The display will move to the next digit of the time.
After confirmation of the seconds the photometer will automatically jump back to the
method display.
Setup – OFF Time
Setup MENU
Selected:
Date:
Time:
OFF Time:
Sound:
Light:
PWR / BAT X %
X/Y
DD-MM-YYYY
HH:MM: SS
X
0/1/2
On / Off
The OFF time defines the energy-saving function of the photometer, which is indicated in
minutes. Here you have the option to determine, after which period of time after your last
action (key press) on the NEOMERIS PHOTOMETER PPM 150 the photometer shall be
switched off automatically.
This period of time can be selected within a range of 1 to 59 minutes. If you enter 0, the unit
will not be switched off automatically.
With the ENTER key you can access the input field and with the arrow keys or you can
change the minutes. After confirmation of the adjusted OFF time with ENTER the
photometer will automatically jump back to the method display.
Setup – Sound
Setup MENU
Selected:
Date:
Time:
OFF Time:
Sound:
Light:
PWR / BAT X %
X/Y
DD-MM-YYYY
HH:MM: SS
X
0/1/2
On / Off
Gebrüder Heyl Vertriebsgesellschaft mbH, D-31135 Hildesheim, Phone +49 (0) 5121 7609-0,
Fax +49 (0) 5121 7609-44, E-Mail: [email protected], www.heyl-vertrieb.de
23
The NEOMERIS PHOTOMETER PPM 150 has the option to accompany various actions
with sounds (for example: key strokes, the last seconds before the automatic switch off,
measuring errors). The sound can be selected by means of the function Sound and the
arrow keys or . Option 0 is dumb, option 1 confirms that a function is carried out and
option 2 confirms the functions as well as each keystroke with a beep. The selected sound
has to be confirmed with ENTER. Thereafter the NEOMERIS PHOTOMETER PPM 150 will
jump back to the methods.
Setup – Light
Setup MENU
Selected:
Date:
Time:
OFF Time:
Sound:
Light:
PWR / BAT X %
X/Y
DD-MM-YYYY
HH:MM: SS
X
0/1/2
On / Off
With this function you have the option to select whether the display of the NEOMERIS
PHOTOMETER PPM 150 shall permanently be illuminated (On) or not (Off). If you select
Off, the display will only be illuminated from behind for approx. 3 seconds when a results is
displayed and thereafter will darken again. If you select On, the background light will
permanently be illuminated. Please take into consideration that the light consumes much
energy.
If you connect the power pack to charge the accumulators, the light will permanently be
illuminated.
Gebrüder Heyl Vertriebsgesellschaft mbH, D-31135 Hildesheim, Phone +49 (0) 5121 7609-0,
Fax +49 (0) 5121 7609-44, E-Mail: [email protected], www.heyl-vertrieb.de
24
Some tips / possible sources of error
• Photometer cuvettes
The provided photometer cuvettes have a maximum volume of 10 ml. As the sample
volumes of some tests are higher, these tests have to be carried out in the provided test
glasses and a part of the reacted sample has to be poured into the photometer cuvette
only for measuring purposes. If you need further cuvettes for your measurements, you
can order a refill package (5 units) with the article number 37561.
• Filling volume of the cuvettes
In order to achieve an unimpeded transmission of radiation through the blank and the
test sample a minimum volume of 4 ml has to be observed in the cuvette. As a
precaution we would recommend to fill the cuvette with the blank at least up to the half.
The exact volumes for test samples are always indicated in the test description.
• Cleanliness / dryness
Before each measurement the outside of the photometer cuvettes should be wiped
clean and dry with a soft tissue (e.g. face tissue or soft tissue). Already a fingerprint can
falsify the result. Fingerprints can be removed with a tissue wetted with alcohol.
• Blank value
Before each measurement with a newly adjusted parameter a blank calibration has to
be performed – in this way e.g. an inherent color of the water sample can be
compensated. After each change in method or if the unit is switched on again, a blank
calibration is required. Except as otherwise described, an empty cuvette with at least 5
ml of the water sample to be analyzed is used to determine the blank value.
Strongly colored or turbid water samples have to be pretreated (e.g. by filtration).
• Rinsing / cleaning the cuvettes
All cuvettes, glass units and other auxiliaries used for an analysis have to be cleaned
thoroughly after usage. Already slight residues of dyes or reagents may lead to falsified
results during the next analysis.
Rinse the cuvettes with the water sample to be analyzed before each measurement. If
possible, you should rinse the cuvettes with distilled water after each usage (DIYsuperstore / gas station / drugstore).
Do not use any detergents, as the active ingredients may lead to wrongly positive
results in some analyses. Discolorations of glass can be removed by rinsing it shortly
with diluted sodium hydroxide solution using a brush for test glasses. Do not leave the
sodium hydroxide solution in the cuvettes for a longer time, as sodium hydroxide
solution may etch glass.
Gebrüder Heyl Vertriebsgesellschaft mbH, D-31135 Hildesheim, Phone +49 (0) 5121 7609-0,
Fax +49 (0) 5121 7609-44, E-Mail: [email protected], www.heyl-vertrieb.de
25
• Scratched / contaminated cuvettes
Strongly contaminated or scratched cuvettes must no longer be applied.
• Light protection
The light protection cap has to be put on the cuvette slot before every measurement, as
otherwise it could be falsified by invading light.
• Times
In order to achieve an exact result the reaction times indicated in the instructions for use
must strictly be observed.
• Dosage of liquid reagents
Liquid reagents are reproducibly dosed, if the reagent bottle is held vertically over the
opening of the test vessel to add the reagents drop wise.
• Dosage of solid reagents with spoons
One spoon means a level spoonful of reagent, i.e. that the solid matter on the spoon
exactly reaches the rim of the spoon. A heaped spoonful may lead to a wrong result.
The indicated number of possible tests was also calculated for level spoonfuls of
reagents.
• Reagent tablets
The reagent tablets must be put into the test vessel directly from the foil without
touching them by hand – on the one hand this is for safety reasons, as you are handling
hazardous materials and on the other hand residues on your skin could falsify the
results.
The tablets are added to the sample by ripping open one side of the foil. Do not press
them out like common pain relievers. When you rip open one side of the foil, you avoid
that the tablets crumble, thus assuring that the correct dosage of the reagent is added.
• Powder packages
The content of one powder package is exactly sufficient to analyze the respective
parameter. It is important to use all the powder. Nothing should be left in the package.
Gebrüder Heyl Vertriebsgesellschaft mbH, D-31135 Hildesheim, Phone +49 (0) 5121 7609-0,
Fax +49 (0) 5121 7609-44, E-Mail: [email protected], www.heyl-vertrieb.de
26
1 . T a p th e p a c k
o n a h a rd s u rfa c e
to c o lle c t th e
p o w d e re d re a g e n t
in th e b o tto m .
2 . T e a r (o r c u t u s in g a
p a ir o f s c is s o rs ) a c r o s s
fro m A to B h o ld in g th e
p a c k a w a y fro m y o u r
fa c e .
3 . U s in g 2 h a n d s ,
p u s h b o th s id e s
to w a rd e a c h o t h e r to
fo rm a s p o u t.
4 . P o u r th e p a c k c o n te n t
in to th e s a m p le c e ll
a n d c o n tin u e th e
p ro c e d u re a c c o rd in g
to th e H A C H in s tru c tio n s .
• Air bubbles
Air bubbles sticking to the inner walls of the cuvettes when filling them with water
samples may lead to measuring errors. Air bubbles can be removed by careful swaying.
If this is ineffective, the cuvette can carefully be pushed on a solid base. The bubbles
will escape upward.
Gebrüder Heyl Vertriebsgesellschaft mbH, D-31135 Hildesheim, Phone +49 (0) 5121 7609-0,
Fax +49 (0) 5121 7609-44, E-Mail: [email protected], www.heyl-vertrieb.de
27
Messages in the photometer display
The NEOMERIS PHOTOMETER PPM 150 communicates with you by means of texts
appearing in the display. It recognizes measuring errors and communicates them to you. All
messages are accompanied by an acoustic signal.
Battery
If the energy of the accumulators is nearly exhausted, the message
“Battery“ will appear on the display Now the accumulators have to be
charged. If this message is ignored for a longer period of time, the unit stop
certain functions (background light, measurements).
below
measuring
range
unterschritten
Measuring
range
exceeded
Light
protection
Improving
accuracy
For this measurement the stipulated minimum extinction was not
reached. The result is below the lower limit of the measuring range.
For this measurement the stipulated maximum extinction was
exceeded; the result clearly exceeds the indicated measuring range.
In order to detect the effective sample concentration, dilute your
sample, e.g. at the ratio of 1:10, repeat the test and then multiply the
achieved result with the dilution factor, which in this example is 10.
The light protection cap must be put on for every measurement.
Invading light may falsify the results.
Every displayed result is the average value of several
measurements. If any outliers occur during measurements, a new
measurement will be started. In this case the display will show
“Improving
accuracy“.
This
photometer-controlled
new
measurement can e.g. be observed, when extinction values above
1.5 were measured.
Gebrüder Heyl Vertriebsgesellschaft mbH, D-31135 Hildesheim, Phone +49 (0) 5121 7609-0,
Fax +49 (0) 5121 7609-44, E-Mail: [email protected], www.heyl-vertrieb.de
28
Information and safety instructions
Please observe that chemical tests, which also contain hazardous materials.
The hazard symbols and the R and S phrases on the labels of the reagents provide
information about the hazardous materials and their respective risks. Dangerous
components of the tests are named on the labels. The safety instructions on the
labels must strictly be observed.
Gebr. Heyl Vertriebsgesellschaft mbH provides you with safety data sheets
indicating the risks and safety instructions as well as the dangerous components of
each test kits on request.
We recommend to wear safety goggles and to keep safety gloves ready when
handling chemical tests.
Never fill chemicals into beverage bottles! Neither store nor transport water samples
or collected waste in beverage bottles. Vessels containing sample or waste must
always be marked or labelled accordingly.
Do not swallow any chemicals.
Store the reagent set in such a way that it does not come into contact with foodstuff.
Reagent bottles must always be closed and stored in such a way that they are
inaccessible to children.
Do not eat, drink or smoke when working with the test kit.
If reagents come into touch with skin or eyes, immediately rinse with copious
amounts of water.
Children and adolescents are only allowed to use the test kit, if an adult is present.
In general used test solutions are not hazardous to water and can be disposed in the
domestic waste water system.
The reagents used in the NEOMERIS PHTOMETER PPM 150 test systems have been
developed in terms of environmental compatibility. The test solutions used to perform the
tests can be disposed in the local waste water system.
The reagents used in the NEOMERIS PHOTOMETER PPM 150 test systems distinguish
themselves by a high analytical purity and sensitivity. The strict limits of the Drinking Water
Ordinance are kept. In order to receive reproducible measuring results, the following
instructions must be observed:
•
•
Close every reagent bottle directly after usage in order to avoid that you mix up the
caps.
The temperature of the water sample should range between 15°C and 25°C.
Gebrüder Heyl Vertriebsgesellschaft mbH, D-31135 Hildesheim, Phone +49 (0) 5121 7609-0,
Fax +49 (0) 5121 7609-44, E-Mail: [email protected], www.heyl-vertrieb.de
29
SOFTWARE
The NEOMERIS PHOTOMETER PPM 150 software is supplied together with the
photometer. The used computer must support Windows 98 or higher. The user interface of
the NEOMERIS PHOTOMETER PPM 150 was adapted to the Windows interfaces. The
software language is English.
Enabling the communication between the NEOMERIS PHOTOMETER PPM 150 and a
computer the NEOMERIS PHOTOMETER PPM 150 disposes of an infrared interface. You
might have to install this interface on your computer first.
Enabling the communication between the NEOMERIS PHOTOMETER PPM 150 and
a computer you must switch the photometer to the setup mode!
First of all you have to install the software on your computer. There
are two files on the CD-ROM. If you click on the setup symbol, an
automatic installation program is started. All data are written into a
directory called NEOMERIS Photometer PPM 150.
After installation you may either establish a link to the program on your desktop or start
directly it from the directory.
If you double-click on this symbol, the installed software is opened. The following
image appears on your screen:
Gebrüder Heyl Vertriebsgesellschaft mbH, D-31135 Hildesheim, Phone +49 (0) 5121 7609-0,
Fax +49 (0) 5121 7609-44, E-Mail: [email protected], www.heyl-vertrieb.de
30
The icons are segmented in five functional groups:
Database Measurements
Locations Data
Program
1. Database
All data, which are important to operate the photometer, are saved in an access database
(*.mdb).
With the functions OPEN and SAVE you can switch between different databases.
With one of these functions you should establish a backup copy of your
database, before you modify the software or the saved parameters.
The database you are currently working in is displayed in the lower part of the program
window. All changes are automatically saved in the displayed database. In order to display
changed in the photometer, you initially have to establish a connection between the
interface of the photometer and the computer and transfer the new data. The interfaces on
the computer and the NEOMERIS PHOTOMETER PPM 150 should have visual contact.
The last used database is saved in the system files of the computer and when the software
is opened again, it automatically accesses this database.
The database Photom_data.mdb, which should be stored in the same register as the file
LEDPhotom.exe, is only needed for installation and the first use.
2. Measurements
The main window of the software shows a report (in tabular form) of the measured values,
which may either originate from the “History“ or the “Memory“. The results may also be
opened in the file. This main group with the respective icons is destined to administer and
process measured values.
Gebrüder Heyl Vertriebsgesellschaft mbH, D-31135 Hildesheim, Phone +49 (0) 5121 7609-0,
Fax +49 (0) 5121 7609-44, E-Mail: [email protected], www.heyl-vertrieb.de
31
2.1
New results
Deletes the content of the report / the table with the measured values from the
screen. Before the data disappear, you will be asked, whether you would like to
save any changes – you have the options to either save all selected data in a file,
print them out or delete them all.
2.2
Display of results from the History function
(The symbol with the blue H) Display of results from the History function of the
photometer. This function requires an active connection to the computer.
In the History function the last measured 50 values are automatically displayed. If
you decide to save a value in the memory only after measurement, you can do so
later using the History function. No values can be deleted from the History function.
2.3
Display of results from the Memory
(The symbol with the blue L) With this function results from the memory of the
photometer can be displayed. For this purpose an active connection between
the photometer and the computer is required.
The memory has capacity for 1000 results. These results are saved together with the
parameters, the applied calibration curve, the location (option), time and date. The
saved values are numbered consecutively, whereby storage location 1 contains the
oldest and storage location 999 the latest result.
If all storage locations are occupied, you are automatically requested to transfer or
delete the data.
In order to distinguish the memory mode from the measurement mode on the display
of the photometer the date and time indications in the memory mode are displayed in
negative form (light text on dark background).
2.4
Opening measurements
With this function all saved measurements can be opened.
Gebrüder Heyl Vertriebsgesellschaft mbH, D-31135 Hildesheim, Phone +49 (0) 5121 7609-0,
Fax +49 (0) 5121 7609-44, E-Mail: [email protected], www.heyl-vertrieb.de
32
2.5
Saving
2.6
measurements
With this function the results and the respective data can be saved in a register file of
the software. You can choose the file name option.
2.7
Exporting data
With this function data displayed in a report on the screen (e.g. History content) can
be exported to an Excel file. When you click on this icon, all data will automatically be
transferred to Excel.
Gebrüder Heyl Vertriebsgesellschaft mbH, D-31135 Hildesheim, Phone +49 (0) 5121 7609-0,
Fax +49 (0) 5121 7609-44, E-Mail: [email protected], www.heyl-vertrieb.de
33
2.8
Printing data
Prints all data displayed on the screen. Data will automatically be transferred
into the format shown below (Printing data 1):
Reports displayed in the main window show the results with all pertaining data (like e.g.
time and date). None of these fields can be modified. The user has the option to enter an
additional comment in the field “Comment“. All data listed in this report (Printing data 2) are
automatically linked with the name of the unit, the serial number and the date of data
transfer. Also these data cannot be modified.
Therefore all files with the extension .cmf are unchangeable original files and can be used
e.g. for documentation purposes.
Printing data 1
Printing data 2
Gebrüder Heyl Vertriebsgesellschaft mbH, D-31135 Hildesheim, Phone +49 (0) 5121 7609-0,
Fax +49 (0) 5121 7609-44, E-Mail: [email protected], www.heyl-vertrieb.de
34
3. Locations
When a result is stored, the NEOMERIS PHOTOMETER PPM 150always asks for
the location, where the measurement was performed. By means of this function
locations can be defined for the memory function and finally be transferred to the
photometer. The field “Location” is optional and can be left blank. On delivery no locations
are saved in the NEOMERIS PHOTOMETER PPM 150Photometer PPM 150 or in the
software.
Add Location
Edit Location
Erase Location
Program Locations
In order to enter a location you must open the window in the top left corner by clicking on
the location symbol.
With the Add Location / Ort hinzufügen symbol you get access to the first line. Enter the
desired name of the location. For any further location you always have to click on the “Add
location” symbol again.
Gebrüder Heyl Vertriebsgesellschaft mbH, D-31135 Hildesheim, Phone +49 (0) 5121 7609-0,
Fax +49 (0) 5121 7609-44, E-Mail: [email protected], www.heyl-vertrieb.de
35
If all locations have been added, save them with “Save”. With the symbol Program
Locations / Orte programmieren you may send the locations to the photometer (if there is
an active connection between the computer and the NEOMERIS) and add them when
saving your data.
If you wish to change the name of a location, click on the respective location and then on
the Edit / Bearbeiten symbol. Now the location to be changed is displayed in the input
window and can be changed. If you wish to delete a location, click on the corresponding
line and afterwards on the Erase / Löschen symbol.
It is recommended to save every modification.
4. Data
This is the most important group of functions enabling you to establish, add or change
curves and texts. In this database the curve data of all parameters, the help texts and the
messages are saved in all languages.
4.1
Substances
Here all parameters of an analysis can be defined or processed. Each analysis
is described by several parameters. The field length of all available fields is
stipulated (analogous to Access).
In order to establish a new method of analysis please click on the “Substances” symbol. A
list with all methods available in the selected file (please see item 1. Database) is displayed.
Now you have the option to add a new method or to modify a method you have already
established.
In order to establish a new method, first of all please click on the symbol „Add a method”.
Various fields with the parameters to be defined are displayed. For every analysis the
following parameters have to be defined:
Gebrüder Heyl Vertriebsgesellschaft mbH, D-31135 Hildesheim, Phone +49 (0) 5121 7609-0,
Fax +49 (0) 5121 7609-44, E-Mail: [email protected], www.heyl-vertrieb.de
36
Name
Text, 15 digits
Name of the analysis (e.g. Ammonium plus 5). This name can be translated
into each available language. Each name should only be assigned once,
because the photometer always displays the methods in alphabetic order.
Method
Text, 21 digits
This field is optional. Here you may enter the catalogue numbers of the
reagents or the like. The method is always saved together with the measuring
results (for the History display and the Memory). When you press the HELP
key, the method will also be displayed in the main menu at the bottom of the
display.
Max Extinction
Figure
This indication is used to display the scale (y-axis) of the curve graph
correctly. This value should be higher than the highest extinction value of the
analysis. This indication has no affect on the accuracy of the measurement.
Max concentration
Figure
This indication is used to display the scale (x-axis) of the curve graph
correctly. The value should be higher than the highest measured
concentration. This value has no affect on the accuracy of the measurements,
but on the display of the measuring results on the photometer. The higher the
value, the less decimal places will be displayed.
Diode
The diode is selected by clicking on the list of the available diodes.
Symbol
Text, 8 digits
The chemical symbol for the parameter (Cl2) or an abbreviation for the
parameter (CSB). In order to display exponents or superscripts, press the < or
> key before entering the respective number.
Gebrüder Heyl Vertriebsgesellschaft mbH, D-31135 Hildesheim, Phone +49 (0) 5121 7609-0,
Fax +49 (0) 5121 7609-44, E-Mail: [email protected], www.heyl-vertrieb.de
37
Range
Text, 14 digits
This indication is optional. Here you may enter information about the
measuring range of the analysis. The measuring range is always saved
together with the measuring results (for the History display and the memory).
When you push the HELP key, the measuring range will also be displayed in
the main menu at the bottom of the display.
Unit
Text, 5 digits
The unit of the analysis, e.g. mg/l or %. This unit is displayed with the results
on the photometer display.
Limit
Figure
Optional field, presently not used.
Time
Figure
The last reaction time of the respective analysis in seconds. When the
respective method is applied, pressing the mg/l key automatically starts the
reaction time. If the time is set to 0 s, the reaction time is not automatically
started – in the help text you have the option to indicate a reaction time.
Customer
This field is automatically highlighted. Thus customer-specific curves can be
distinguished from the curves already set by default. Only customer-specific
curves can be changed or erased.
After having completed the above-mentioned fields, it is recommended to save them first.
With the symbol „Edit method“ you now can enter the details of the calibration curve.
For this purpose it is recommendable to previously prepare a dilution series from standard
solutions / solutions with known concentrations and to treat them with your reagents. As a
result you will receive pairs of variates for the extinction at a certain wavelength /
concentration.
Calibration points
For one curve up to 11 calibration points can be saved. They can either be
entered by positioning the cursor or numerically (right mouse button).
After having placed all calibration points you must save them.
Now you may establish a help text in the form of brief operating instructions or information
you consider being of importance for each method.
Gebrüder Heyl Vertriebsgesellschaft mbH, D-31135 Hildesheim, Phone +49 (0) 5121 7609-0,
Fax +49 (0) 5121 7609-44, E-Mail: [email protected], www.heyl-vertrieb.de
38
Help
After having defined and saved all above-mentioned parameters you may also
enter a help text for the analysis. The help function disposes of maximum 12
steps with two fields each, whereby each field comprises 21 digits. For each of
these steps you may enter a specific time (in seconds). In the software this
help text is displayed in the bottom-left corner of the “Substances“ window. In
order to enter a help text / brief operating instructions for a parameter; open
the help window by clicking on the green-shaded question mark.
Add Help
Edit Help
Delete Help
Program Help
With the symbol „Add Help / Hilfetext hinzufügen“ you get access to the first print line. Enter
the desired help text. To get access to further lines you always have to click on the symbol
“Add help text” again.
If the complete help text was entered, save the text with Save. With the button „Program
Help/ Hilfe programmieren“ you can (if there is any connection between the computer and
the NEOMERIS PHOTOMATER MMP 150) send the actual help text to the photometer.
If you would like to change a help text, click on the respective line and than on the symbol
“Edit / Bearbeiten”. The print line to be changed appears now in the input window and can
be changed. If you would like to erase a text, click on the respective line and afterwards on
Erase / Löschen.
It is recommended to save every modification.
Gebrüder Heyl Vertriebsgesellschaft mbH, D-31135 Hildesheim, Phone +49 (0) 5121 7609-0,
Fax +49 (0) 5121 7609-44, E-Mail: [email protected], www.heyl-vertrieb.de
39
4.2
Preferences
With Preferences you have the option to select a working language for data
processing. The following data may be changed to different languages:
Parameter name, help text and messages.
The standard language is English. This means that all data are initially saved in
English, when a new analysis is established. Thereafter the above-mentioned
parameters can be saved in another language.
All untranslated fields automatically show the English text. In the database these
data are displayed in red and marked as follows: “Not translated“.
The above-described actions can only be performed for the curves established by
you.
4.3
Profiles
By means of this function analyses with one language can specifically be
selected and transferred to the photometer. The above-described actions can
only be performed for the curves established by you.
5. Program
The photometer disposes of an infrared interface. The transmitter / receiver are located at
the headpiece of the photometer. Please read the operating instructions of your unit to get
more information about the location of the infrared interface on your computer and how to
connect the units to this interface.
In order to save energy, the connection to your computer is not active. An active connection
to your computer is established, when you call the software on the computer and switch the
photometer to the setup mode. The distance between the computer and the photometer
should not exceed 20 cm and the transmitter and the receiver must have visual contact.
This connection enables an exchange of data between the computer and the photometer
(e.g. reading the memory or transferring a new calibration curve).
Gebrüder Heyl Vertriebsgesellschaft mbH, D-31135 Hildesheim, Phone +49 (0) 5121 7609-0,
Fax +49 (0) 5121 7609-44, E-Mail: [email protected], www.heyl-vertrieb.de
40
The software supports these actions:
1.1
Connect
If the software is open and the photometer is in the setup mode, the
connection between these two units is activated automatically. The
photometer confirms the connection with the following message on the
display: “Connected with the PC“. Immediately afterwards all icons of the
software related to the data transfer are activated (colored).
In the event that the automatic connection will not be established quickly enough,
it can also be established by using the icon “Connect“.
1.2
Program all
With this function all customer-specific data of the software can be sent to
the photometer. With the function “Profiles” either all data or only parts of it
can be selected and afterwards be sent to the photometer.
1.3
Erase all
With this function all customer-specific data can be erased from the photometer.
Gebr. Heyl Vertriebsgesellschaft für innovative Wasseraufbereitung mbH
Montoirestraße 6 . D-31135 Hildesheim
Telefon: +49 (0) 5121 7609-0 . Fax: +49 (0) 5121 7609-44
e-mail [email protected] .
Internet http://www.heyl-vertrieb.de
MA2010_0316
Gebrüder Heyl Vertriebsgesellschaft mbH, D-31135 Hildesheim, Phone +49 (0) 5121 7609-0,
Fax +49 (0) 5121 7609-44, E-Mail: [email protected], www.heyl-vertrieb.de
41