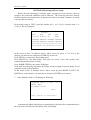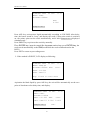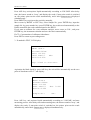
1
™
OET-100 PHOTOMETER
USER’S
MANUAL
This Manual contains SHARE-SUN OET CO., Ltd reserved information. All rights
reserved. Unauthorized copying of this manual or parts of it is prohibited.
Ver2004.7.1 English
BEIJING SHARE-SUN OET. Co., Ltd.
Room 1021,Jade Apartment No.38 Fuxing Road Haidian District Beijing
100039 P.R.China
Tel:+86-10-88202878 88202879
Fax:+86-10-88202909
E-mail:[email protected]
http: www.sjoet.com.cn
BT260 User’s manual
1. Instruction
According to the requirements and characteristics of China & international market,
BEIJING SHARE-SUN OET. Co., Ltd designed OET-100 PHTOMETER. To meet the
requirements of customers, the design of OET-100 PHTOMETER not only incorporates
the advantages of the diverse bio-chemistry products on the current market, but also
considers the suggestions of many experts. OET-100 PHTOMETER is based on
advanced electronic optical technology. The aim of our product is to make the hardware
reliable and the software simple and convenient. OET-100 PHTOMETER was highly
praised by many customers during its probation period in hospitals.
We use Chinese or English display system completely for OET-100 PHTOMETER . It
has prompting for each operation, which is more convenient for the users. Even the
first-time users can learn the operations of OET-100 PHTOMETER quickly.
OET-100 PHTOMETER can print summary report list, keep at most 1000 tests, 100
samples and each sample has 256 tests.
OET-100 PHTOMETER has big EEPROM. The user can set up 96 tests in 6 different
sub-divisions as: assay1, assay2, assay3, assay4, assay5, assay6. Each test has at most 6
different standard calibrator。
The kinetic measuring time of OET-100 PHTOMETER can last for 66 minutes, which is
very useful for research and pharmacy analysis.
If special fitting(include in standard accessory) is applied, OET-100 PHTOMETER can
be used to measure coagulation time .The method of coagulation time measurement is
absorbance, and we use the half of absorbance increment as the criterion of coagulating
process.
1
BT260 User’s manual
−
−
−
−
−
−
−
−
−
−
introduction - warranty information, Technical Service
section 1 - general safety-warnings
section 2 –installation
section 3 –description of the instrument.
section 4 –set or modify parameters
section 5 – measuring and save result
section 6 – calibration
section 7 – print report list
section 8 – self check
section 9 –communication protocol
This manual is considered as a part of the instrument; it has to be at the operator, user,
and maintenance technician’s hand at any time. For accurate installation, use and
maintenance please read the following instructions carefully.
In particular carefully read Section 1 “GENERAL SAFETY WARNINGS”, describing
the suitable operating procedures in order to avoid damages to the instrument and
people.
In case of breakdowns or any troubles with the instrument, refer to the local Technical
Service or manufacture.
0.2. WARRANTY
Each provided instrument is completely tested, and guaranteed for twelve months
from delivery.
The warranty is for all mechanical and electrical parts. It is granted only for a
proper installation, use and maintenance in compliance to the given instructions
contained in this manual.
The warranty does not include any responsibility for direct or indirect to people
and material damages, caused by improper use and maintenance of the
instrument.
All parts that are subject to deterioration, because of their specific use, are
excluded from the warranty.
Due to a misuse of the instrument the above mentioned warranty does not include
(if requested) the travel and labor-hour expenses as well as all the
accommodation expenses.
0.2.1
Asking for service
When asking for service, refer to this manual indicating also the data reported on
the identification label of the instrument.
Only qualified Technicians with suitable instrumentation and original spare parts
are entitled to fix the instrument, ordinary maintenance should be carried out by
2
BT260 User’s manual
the user, as described in this manual.
0.2.2
Ordering spare parts
Parts that are subject to deterioration or that are defective and need to be replaced
have to be requested as shown below.
When ordering spare parts, the following details are to be mentioned:
−
customer’s purchase order
−
name and version of the instrument
−
instrument code number
−
part code number
−
part description
−
requested quantity
−
name and company address to deliver the ordered goods
Replacing the parts with ORIGINAL SPARE PARTS guarantees effective and
lasting instrument life.
3
BT260 User’s manual
SECTION1
GENERAL SAFETY-WARNINGS
1.1 GENERAL SAFETY WARNINGS
In this manual the following symbols stand for danger or warning:
General DANGER symbol. Indicates that not following relative
instructions and warnings is a serious safety risk.
Indicates ELECTRICAL VOLTAGE, which could cause death upon
contact. Covers with this symbol can be removed and replaced by
qualified people and only after electrical power disconnection.
Indicates that the instrument uses reagents and other DANGEROUS
CHEMICAL SUBSTANCES, corrosive, irritating or noxious, which
could cause health damages.
Indicates that the instrument handles potentially infectious samples
(e.g. body fluids such as urine), which could cause INFECTION/
CONTAMINATION. Always observe the general safety standard
rules for the presence of these biological substances.
Wear
protective goggles, gloves and clothing.
Indicates that not following the correct instructions could cause
damage to the instrument and/or its proper functioning.
Indicates important information concerning the instrument or a
section of the document that is important to read with particular
attention.
1.2. INSTRUMENT WORKING CONDITIONS
The instrument is intended to be used in the following working conditions:
−
use as In Vitro Diagnostic (IVD) medical device as specified in
the technical data
−
use of the chemical reagents and accessories supplied and/or
declared to be compatible with the instrument
−
working at a specific temperature and humidity level according
to the details given in this manual
−
do not power the instrument in a potentially explosive or fire
hazardous environment
The instrument has to be used as described in this manual. Any other use has to be
regarded as improper.
1.3. INTENDED USE OF THE INSTRUMENT
The instrument has to be used for the expected purpose and in perfect technical
4
BT260 User’s manual
conditions, by qualified personnel, in working conditions and following
maintenance operations described in this manual.
This manual contains instructions for qualified operators.
−
Qualified Users have to make sure that the environment
conditions are suitable, the installation is correct, the use and
maintenance are proper, according to the general safety rules as
well as to particular precautions described in the manual
(although he is not entitled to repair the instrument).
−
Qualified Technicians are entitled to service and fix the
instrument with original spare parts, according to the instructions
received.
Modifications of the instrument are not allowed. The user is liable for any improper
modifications and for the consequences deriving from them.
For extraordinary maintenance, ask for licensed service centers. The maintenance will be
carried out by Specialized Technicians, that will be able to fix the instrument using original
spare parts.
5
BT260 User’s manual
SECTION 2 INSTALLATION
When installing and setting up the instrument, follow the warring and
general rules described in Section 2.
Please note that this OET-100 PHTOMETER has to be installed by qualified and trained
technicians. The system is menu driven. For right operation please follow all displayed
instructions!
Proceed as follows to install the instrument:
1. The instrument is packed with a paper box.
2. Check if there are damages on the packing, the instrument or the accessories and
verify completeness of the equipment and accessories.
3. Take the instrument carefully, please do the step for two persons, remove the package
4. Check the band of instrument’s back, to confirm the model of instruments on packing
list. Make sure that the electrical power source is the require one as indicated on the
label back of the instrument power socket. Then beginning installation.
ATTENTION
Working beyond the tolerance limits will cause the apparatus to function
incorrectly and the instrument may be damaged.
5. The instrument must be placed on the workplace which no less than 50X80cm. The
environment must be as free as possible from dust, mechanical vibrations, loud noises
and electrical interference. Avoid proximity to brush–type motors, flickering fluorescent
lights and electrical contacts that regularly open and close. Avoid placing the instrument
in direct sunlight or in front of a source of heat or drafts.
6. Confirmed the above progress, then to installation.
7. Remove the left of front-cover, Make sure the peristaltic tubing into the peristaltic
pump by connecting its free end to the waste adapter, ensuring that it is well inserted
8. Make sure the cuvette is good installation.
9. Make sure the print paper was good installation.
11. Connect the power cord.
10. Make sure all components are fixed correctly.
6
BT260 User’s manual
Section 3 DESCRIPTION OF THE INSTRUMENT
3.1 Description of the keyboard
The keyboard has been designed with the minimum number of keys, in such a way that
none of them as a direct relationship with the instrument functions. Users handle the
program’s menus and data by typing in the keyboard.
The front side of instrument with its function:
1. LCD display. To display measuring result, user information. The screen is 240X128
dot LCD.
2. Keyboard
The keyboard has been designed with the minimum number of keys, in
such a way that none of them as a direct relationship with the instrument functions.
Users handle the program’s menus and data by typing in the keyboard to enter
parameter or selection options (please see the following picture)
8
9
•
↑
PRINT
打印
6
7
←
ENTER
确认
→
3
4
5
↓
0
1
2
ZERO
调零
EXIT
返回
PAPER FEED
走纸
● :Decimal, for enter decimal
Enter : to enter ,confirm and select
Zero :
set the zero point of absorbance.
EXIT : Is used to quit one job and go to the preceding one in the program.
Print : for manual print confirmation
←→↑↓: Cursor, move the cursor on the display to Left/Right/Up/Down. If a choice is
made, the selection will be displayed inversely.
7
BT260 User’s manual
There are a yellow button in front of the unit, press the key, the pump will rotate and
aspirate.
3 Printer: the inner printer located in the right of the unit, it can print 42 ASC code per
line.
4 Measure components: It’s installed at the unit left side. Open the cover, you can see
the peristaltic pump, tubing, cuvette.
Rear view, the structure of the OET-100 PHTOMETER as following:
1 power switch: power on and power off
2 power socket: insert the power cord and connect the electronic.
3 Fuse socket: Fuse socket and power socket was complete parts, the fuse socket was
underside, move it, you can change the fuse.
4 RS232 communication port: connect with computer, transport the data
5 printer port: connect the outer printer.
There a line aeration pore set on the unit both side, when then unit running, do not
blocked the pore.
The unit inner structure included power supply, CPU, controller, driver, measure circuit
and temperature control parts.
1. Power: It’s provide +5V for logic circuit、print、LCD display, +/-5V for the
simulation circuit, +/-9.5V for PELTIER and step motor, 12V for the lamp.
2. CPU: CPU system included 8K EEPROM, 32K SRAM, I/O, real time clock etc.
3. Driver circuit: drive PELTIER and step motor.
4. Measure circuit: Measure circuit consist of photo sensor, pre amplifier, 1/8
multiplexer, A/D converter. Changed the optic signal to electric signal and digital
signal for CPU system.
5. Temperature control system: temperature controller consist of PELTIER, NTC
temperature sensor and control circuit.
The characters of BT-260 as following:
1. hermetic solid-state optical system, stable performance with low contamination of
dust and dampness, longer life time of hard membrane filters than soft ones.
2. Light split after the cuvette, corresponding every wavelength, there are
independent amplifier . Switch between different wavelength completed by electric
multiplexer, no mechanical movement, useful for bichromatic measurement.
8
BT260 User’s manual
3. Dedicated touch-input keyboard, optional Menu and instruction step by step. It can
checking the status of the unit.
4. 240X128 dot matrix LCD with back-lit, can display ASC code and curve
simultaneously, readable even if in the dim light.
5. Show the real time.
6. 58mm thermal printer, high speed and lower noise, optional external printer.
7. Measure methods: End point method, Fixed time method, Kinetic method and
coagulation time method.
8. Light source: halogen lamp12V/ 20W.
9. Optical system: 340, 405, 505, 546, 578, 630nm, precision: +/-3nm.
10. Absorbance range:0.0000—2.5000ABS
11. After 10 minutes warm up, the drift<0.003Abs/hr
12. cuvette:10mm, 33ul, when the aspiration volume ≥500ul, the carry over <1.0%
13. temperature control: 25、30、32、37±0.1°C.
14. precision: when Abs.=0.5000,CV<0.1%; when Abs.=2.0000,CV<1%.
15. 96 different analysis can be set in.
16. power supply: 110/220V±10%, 50/60Hz, <80VA
17.RS232: standard serial port.
9
BT260 User’s manual
SECTION 4 Set or modify parameters
According the requirements of second chapter, installed the unit and switch on power.
Switch on power, the unit will test the printer. If one outer printer is connected and
power on, the unit will select the outer printer, so inner printer stop. Otherwise, the inner
printer will ready. If all the outer and inner printer are not ready, LCD display:
PRINTER ERROR!,PRESS ENTER
CONTINUE,OTHER KEY RETRY
If press the enter key, the unit will continue the operating, but not printed. If press other
key, the unit will be test the printer again.
If printer is ready, LCD display the main menu:
OET-100 PHTOMETER
BEIJING SHARESUN OET
Press ASP. key wash microcell
Other keys continue
s/n:01A330
2004 03/12 12:30:22
After the following, press the ASP. key, the peristaltic pump wash the cuvette and tubing,
press again the key, the peristaltic pump stop.
On this menu, picture press any other key enter the main menu:
TEST CALIB PARAM REPOR CHECK
ASSAY1 ASSAY2 ASSAY3
ASSAY4 ASSAY5 ASSAY6
Press R/L key select function
Press number key select assay
Press ASP. key wash microcell
TEST : running the selected analysis.
CALIB : set the calibrator of selected analysis.
PARAM : set the parameters of selected analysis.
REPOR : print or delete the save in results .
CHECK : check the status of unit.
10
BT260 User’s manual
In this menu, press paper feed key, the printer will feed paper automatically.
In this menu, press ASP. key, the peristaltic pump aspiration liquid begin, press the
aspiration key again, the peristaltic pump stop . Use this function, it can washing the
cuvette and tubing.
Press Right/Left cursor key, move the cursor to select different function. If
TEST/CALIB./PARAM. is selected, press number key1 or 2,3,4,5,6, can enter different
assay 1or 2,3,4,5,6.
If by moving Right/Left cursor key, the PARAM. is selected, and number key 1 or
2,3,4,5,6 is pressed, the LCD display:
ASSAY1
ALT
AST
ALP
GGT
T.BILI D.BILI TP
ALB
XXXXXX XXXXXX XXXXXX XXXXXX
XXXXXX XXXXXX XXXXXX XXXXXX
Press R/L/U/D key select test
Press ASP. key wash microcell
There are sixteen analysis in every assay. All the name and parameters can modify.
On this Menu, press cursor key ↑、↓、←、→, select different analysis.
If no outer printer in connected and inner printer is ready, press print key, the inner
printer will print out the display .
Press PAPER FEED key, the print feed paper.
Selected the analysis to be modified, press enter key to modify. The LCD display:
Parameters of 02 AST
METH :KINET. FILTER1: 340nm
FACT :1746.0 FILTER2: BLANK
TEMP :37
M.TIME:60
N.MIN: 0.000 T.FACT: 01
N.MAX:40.00 INI.ABS:1000
DELAY: 60
L.LIMIT:300
UNIT :U/L
VOLUME:500
Press U/D key move cursor to select the parameter to be modified, press enter key to
modify it.
Select the name of analysis, press ENTER key, the LCD display virtual keyboard
AST
!”#$%&’()*+-./0123456
789:;<=>?@ABCDEFGHIJKLM
NOPQRSTUVWXYZ[\]^_`abcd
Efghijklmnopqrstuvwxyz
[
]
ENTER
Press R/L/U/D select character
11
BT260 User’s manual
Move R/L/U/D cursor key to select the character to be set, and then press ENTER key
set in. The selected character displayed in [
], 6 character can be input for one
analysis. If all the character for one analysis is input and displayed in [
], move
cursor to ENTER, and press ENTER key return to pre-menu. If press EXIT key, unit can
return pre-menu too, but the selected characters can’t input.
Select METH, press ENTER key, you can modify the method of analysis.
By number key, can modify the method:
0=ABS.(ABSORBANCE), 1=(END.PT)END POINT, 2=FIX.T.(FIX TIME),
3=KINET.(KINETIC) 4=COGU.(COAGULATION TIME).
When one proper method selected, press ENTER key input.
Select FILTER1, press ENTER key, you can modify the main measuring filter .
By number key, can modify the main filter:
0=340nm 1=405nm 2=505nm 3=546nm 4=578nm 5=630nm .
When one proper filter selected, press ENTER key input.
Select FACT, press ENTER key, you can modify the factor.
By number and decimal key modify the factor.
When one proper factor selected, press ENTER key input.
z If METH ABS. is selected, the factor is useless.
z If METH. END.PT is selected, the factor is determined by calibration automatically,
and
Result = FACT × Abs. if one calibrator
Or result =f(Abs), for multi-calibrator, f(Abs) is a function determined
by calibration.
z If METH. FIX.T. is selected, the factor is determined by calibration automatically,
and the results=FACT. ×| (Abs1-Abs2) |.
z If METH. KINET.is selected, the factor is determined by the manual of reagent kit,
and the result = FACT ×|(d Abs/dt) |.
z If METH. COAGU. is selected, the factor is useless.
Select FILTER2, press ENTER key, you can modify the secondary filter .
By number key, can modify the secondary filter:
0=340nm 1=405nm 2=505nm 3=546nm 4=578nm 5=630nm ,
6=Blank.
Here, blank means no secondary filter. Secondary filter is set for the bichromatic
measuring. For Abs. & End.pt. measuring, if a secondary filter is set, the result is
calculate with (Abs1-Abs2), Abs1 is absorbance at filter1, Abs2 is absorbance at filter2.
When one proper filter selected, press ENTER key input.
Select TEMP, press ENTER key, you can modify the temperature of cuvette.
By number key, can modify the secondary filter:
0=25°C, 1=30°C, 2=32°C, 3=37°C
When one proper temperature selected, press ENTER key input.
Select M.TIME, press ENTER key, you can modify the measuring time.
12
BT260 User’s manual
By number key, can modify the measuring time.
When one proper measuring time is set, press ENTER key input.
The unit of measuring tine is second:
If method is ABS. or END.PT. , measuring time is useless.
If method is FIX.T, measuring time is the interval between the first measuring point and
the second measuring point.
If method is KINET., measuring time is the number of measuring point.
If method is COAG., measuring time is measuring period of coagulation process.
The maximum of measuring time is 60, and the minimum is 5.
Select N.MIN, press ENTER key, you can modify the minimum value of reference.
By number key, can modify the minimum value of reference.
When one proper minimum value of reference is set, press ENTER key input.
If the result is less than this value, a flag ‘L’ print on the end of report means LOW.
Select T.FACT, press ENTER key, you can modify the measuring time factor.
By number key, can modify the measuring time factor.
When one proper measuring time factor is set, press ENTER key input.
If method is ABS. or END.PT. , measuring time factor is useless.
If method is FIX.T, measuring time= M.TIME×T.FACT.
If method is KINET., the interval between two measuring points is T.FACT(second), and
the period of measuring process is M.TIME×T.FACT.
If method is COAG., measuring period of coagulation process is M.TIME×T.FACT.
The minimum of measuring time is 1.
Select N.MAX, press ENTER key, you can modify the maximum value of reference.
By number key, can modify the maximum value of reference.
When one proper maximum value of reference is set, press ENTER key input.
If the result is large compared with this value, a flag ‘H’ print on the end of report means
HIGH.
N.MAX must large compared with N.MIN.
Select INI.ABS, press ENTER key, you can modify the initial absorbance.
By number key, can modify the initial absorbance.
When one proper INI.ABS is set, press ENTER key input.
If METH is KINET., initial absorbance is used to verify the quality of reagent. For other
method, initial absorbance is useless.
For a positive kinetic process, if the maximum absorbance during incubation time is
larger than this value, the instrument recognize the reagent become invalid, and a flag
‘ERROR 1’ is displayed with the result.
For a negative kinetic process, if the minimum absorbance during incubation time is less
than this value, the instrument recognize the reagent become invalid, and a flag ‘ERROR
1’ is displayed with the result.
INI.ABS is expressed in mAbs.
13
BT260 User’s manual
Select DELAY, press ENTER key, you can modify the delay time.
By number key, can modify delay time.
When one proper delay time is set, press ENTER key input.
If method is ABS. or END.PT., DELAY is waiting time for the result.
If method is FIX.T. or KINET. or COAGU., delay is incubation time. When delay time is
end, the measuring process start.
DELAY is expressed in second. The minimum delay time is 5”.
Select L.LIMIT, press ENTER key, you can modify the linear limit.
By number key, can modify linear limit.
When one proper linear limit is set, press ENTER key input.
Linear limit is only useful for kinetic measuring. If the delta absorbance per minute
during incubation time is bigger than this value, the instrument recognize the activity of
serum is to high, and a flag ‘ERROR2’ is displayed with the result. Please check the
sample, and measure the sample again after diluting.
L.LIMIT is expressed in mAbs/minute.
Select UNIT, press ENTER key, you can modify the unit.
By number key, can modify unit.
When one proper unit is set, press ENTER key input.
0=mg/dl, 1=U/l, 2=mmol/l, 3=g/l, 4=umol/l, 5=%, 6=mU/l, 7=mU/ml, 8=ng/dl,
space, for method is ABS./END.PT/FIX.T or KINET.
0=s, 1=%, 2=U, 3=mg/dl, 4=g/l for method is COAGU.
Unit is a symbol print after the result.
9=
Select VOLUME, press ENTER key, you can modify the aspiration volume of pump.
By number key, can modify aspiration volume.
When one proper volume is set, press ENTER key input.
The range of volume is 200-999.
The VOLUME expressed in µl.
Note1: FILTER2 can’t same as FILTER1.
Note2: if method is COAGU., you can’t modify parameters such as FILTER1=405nm,
FILTER2=blank, TEMP.=37°C, INI.ABS, L.LIMIT, VOLUME are useless.
Note3: to ensure the carry over below 1%, aspiration volume must no less than 500.
14
BT260 User’s manual
SECTION5 Measuring and save result
Before the unit measuring, it must be warm- up properly. If you haven’t warm up
properly, the result and calibration will be affected . The warm up time have directly
relation with the room temperature. In summer, the time no less than 5 minutes. In winter,
it no less than 20 minutes.
By moving cursor to TEST, press the number key 1 or 2,3,4,5,6, selected assay 1 or
2,3,4,5,6. The LCD display:
ASSAY1
ALT
AST
ALP
GGT
T.BILI D.BILI TP
ALB
XXXXXX XXXXXX XXXXXX XXXXXX
XXXXXX XXXXXX XXXXXX XXXXXX
Press R/L/U/D key select test
Press ASP. key wash microcell
In this menu it have 16 analysis choice. Move cursor by press ←↑→↓ key to the
analysis you want to test, and press ENTER key to run test.
Press EXIT key, return to the proceeding menu.
Press PRINT key, the inner-printer will print out screen if the outer printer isn’t
connected and inner printer is ready.
Press PAPER FEED key the printer feed paper.
Press ASP. key, the pump aspiration the liquid, and press again to stop the pump. It can
wash the cuvette by this function.
In this menu it have 16 analysis choice. Move cursor by press RIGHT or LEFT, UP,
DOWN key to the analysis you want to test, and press ENTER key to run test.
1. if the method is ABS., LCD display as following:
RUNNING TEST 02 CO2 37.0
METH :ABS.
FILTER1:340nm
ABS.
Asp. blank to auto-zero
Aspiration the blank liquid by press aspiration key, the unit will be automatically set
the zero point of absorbance after delay time, and display:
15
BT260 User’s manual
RUNNING TEST 02 CO2 37.0
METH :ABS.
FILTER1:340nm
ABS.
0.000
Sample No.:
Press ASP. key, unit aspirate liquid automatically according to VOLUME. After delay
time, the buzzer sound as ‘beep’, and display the result, if auto-print switch is switched
on, the printer print out the result automatically, and a label Sample No.: displayed
simultaneously .
Press PRINT key to print out the result by manually.
Press ENTER key, input the sample No. by press number key, press ENTER key, the
result saved automatically to the RAM, meanwhile the result communicated to the
RS232
Press EXIT to return to proceeding menu.
2. If the method is END.PT, LCD display as following:
RUNNING TEST 02 GLU 37.0
METH :END.PT
FILTER1:505nm Abs. Conc.
FACT :22.022
UNIT :mmol/l
Asp. blank to auto-zero
Aspiration the blank liquid by press ASP. key, the unit will be automatically set the zero
point of absorbance after delay time, and display:
RUNNING TEST 02 CO2 37.0
METH :ABS.
FILTER1:340nm
FACT :22.022 ABS. Conc.
UNIT :mmol/l 0.000 0.000
Sample No.:
CAL.
16
BT260 User’s manual
Press ASP. key, unit aspirate liquid automatically according to VOLUME. After delay
time, the buzzer sound as ‘beep’, and display the result, if auto-print switch is switched
on, the printer print out the result automatically, and a label Sample No.: displayed
simultaneously .
Press PRINT key to print out the result by manually.
Move cursor by RIGHT or LEFT key, select Sample No., press ENTER key, input the
sample No. by press number key, press ENTER key, the result saved automatically to the
RAM, meanwhile the result communicated to the RS232.
If you want to calibrate for a one calibrator analysis, move cursor to CAL., and press
ENTER key, the instrument calculate and save the factor automatically.
FACT= Concentration of calibrator/Absorbance
Press EXIT to return to proceeding menu.
3 . If method is FIX.T, LCD display:
RUNNING TEST 03 BUN
METH :FIX.T
FILTER1:340nm
FACT :22.022
UNIT :mmol/l
Abs.
Result:0.000
37.0
Asp. blank to auto-zero
Aspiration the blank liquid by press ASP. key, the unit will be automatically set the zero
point of absorbance after 5”, and display:
RUNNING TEST 03 BUN 37.0
METH :FIX.T
FILTER1:340nm
FACT :22.022
UNIT :mmol/l
Abs. 0.000
Result:0.000
Sample No.:
CAL.
Press ASP. key, unit aspirate liquid automatically according to VOLUME, and start
measuring process. After delay time and measuring time, the buzzer sound as ‘beep’, and
display the result, if auto-print switch is switched on, the printer print out the result
automatically, and a label Sample No.: displayed simultaneously .
17
BT260 User’s manual
Press PRINT key to print out the result by manually.
Move cursor by RIGHT or LEFT key, select Sample No., press ENTER key, input the
sample No. by press number key, press ENTER key, the result saved automatically to the
RAM, meanwhile the result communicated to the RS232.
If you want to calibrate , move cursor to CAL., and press ENTER key, the instrument
calculate and save the factor automatically.
FACT= Concentration of calibrator/∆Absorbance
Press EXIT to return to proceeding menu.
4. If method is KINET, It show as following:
RUNNING TEST 03 ALT
METH :KINET
FILTER1:340nm
FACT :1746
UNIT :U/l
Abs.
Result:0.000
37.0
Asp. blank to auto-zero
Aspiration the blank liquid by press ASP. key, the unit will be automatically set the zero
point of absorbance after 5”, and display:
RUNNING TEST 03 ALT 37.0
METH :KINET
FILTER1:340nm
FACT :1746
UNIT :U/l
Abs. 0.000
Result:0.000
Sample No.:
Press ASP. key, unit aspirate liquid automatically according to VOLUME, and start
measuring process. After delay time and measuring time, the buzzer sound as ‘beep’,
LCD display the result and reaction curve, if auto-print switch is switched on, the printer
print out the result automatically, and a label Sample No.: displayed simultaneously .
Press PRINT key to print out the result by manually.
Press ENTER key to print out screen include reaction curve.
Press EXIT key to delete the reaction curve and ready for the next test, you can start the
next test by press ASP. too if you didn’t want save the result.
Press ENTER key, input the sample No. by press number key, press ENTER key, the
18
BT260 User’s manual
result saved automatically to the RAM, meanwhile the result communicated to the
RS232.
Note1: For a positive kinetic process, if the maximum absorbance during incubation time
is larger than INI.ABS, a flag ‘ERROR 1’ is displayed with the result.
For a negative kinetic process, if the minimum absorbance during incubation
time is less than INI.ABS, a flag ‘ERROR 1’ is displayed with the result.
Note2: If the delta absorbance per minute during incubation time is bigger than L.LIMIT,
a flag ‘ERROR2’ is displayed with the result.
6. If method is COAGU., the LCD display:
RUNNING TEST 09 PT
METH :COAGU.
M.TIME:40
T.FACT:1
UNIT :S
Result:0.000
Sample No.:
37.0
Press ASP. key
For measure coagulation time, must pull out the cuvette and insert the cup adapter
(standard part), and ensure the direction of light hole is same as the light. Put a new
cup(standard part) into the adapter.
Dispense sample serum into cup(pour reagent into cup simultaneously if necessary
according to reagent manual), press ASP. key to start incubation time.
When incubation time over, the buzzer sound ‘beep’, then dispense reagent (or CaCl2,
according to reagent manual), and press ASP. key again, the unit start measuring.
When the measuring time over, LCD display the coagulation curve and result. Then
press ENTER key, inner printer print out screen display if inner printer is ready, press
PRINT key print out result, press ASP. key measure next sample.
If flag ‘Sample No.’ is displayed, press ENTER key input sample No. and save the result
into memory.
Note: the range of sample No is 01-99, when a sample number in this range is inputted,
the result saved into memory with this sample No, and can print out by the report list
function. And the result communicated to the RS232.
19
BT260 User’s manual
SECTION6 Calibration
The instrument could set 96 different analysis, each analysis could be set as multi
standard calibration when necessary.
The multi standard calibration only could be applicable to End point method (End point
concentration method).
In the main menu, move cursor to CAL., press number key 1 or 2, 3, 4, 5, 6 to select
assay1 or assay2, 3, 4, 5, 6, LCD display:
ASSAY1
ALT
AST
ALP
GGT
T.BILI D.BILI TP
ALB
XXXXXX XXXXXX XXXXXX XXXXXX
XXXXXX XXXXXX XXXXXX XXXXXX
Press R/L/U/D key select test
Press ASP. key wash microcell
Press ↑↓← → cursor key to choose the analysis which need to calibrate from the 16
analysis, the chosen item display inversely. Press the EXIT in the keyboard to return to
the proceeding menu.
In this menu, press PRINT key, the internal printer print out screen. If external printer
connected, the internal printer could not work, the external one print out the parameters
of the chosen analysis.
In this menu, press PAPER FEED key, the printer feed paper.
In this menu, press ASP. key, the peristaltic pump start aspirating, press the key again,
the pump stops. The flow cell could be washed by this function.
Select the analysis that need to calibrate, press ENTER to proceed.
1. If analysis method of the item is ABS. , since these analysis do not need to calibrate,
the instrument would display:
20
BT260 User’s manual
Test error, Press any key exit
Press any key to return previous menu.
2. If the chosen method is END.PT, it would display as follows:
Enter STD. CONC. 05 T.BILI
C1=20.00
Method: ENDPT
C2=0.000
Filter1:546nm
C3=0.000
C4=0.000
ENTER
C5=0.000
C6=0.000
Press U/D key select
At this time, press ↑ ↓ cursor key to select calibrator which need to input
concentration, selecting calibration or exit, also could press EXIT in keyboard to return
to previous menu.(Returning to previous menu by pressing EXIT in the keyboard, the
inputted concentration would be lost and not enter RAM)
The selected standard substance concentration display inversely. After selecting, press
ENTER key, cursor would appear behind the input place. Press number key and decimal
point key to input. Press confirm again after finishing input.
Concentration of calibrator contains six digits including decimal point. Please note that
calibrator concentration must increase with the rise of tab, input 0 for the needless
concentration. Such as:
Only four standards, the concentration of these four calibrator are: 1.0, 2.0, 3.0, 4.0,
these data should input as follows:
C1=1.0000
C2=2.0000
C3=3.0000
C4=4.0000
21
BT260 User’s manual
C5=0.0000
C6=0.0000
Only one standard, the data should input as follows when the concentration is 10.0:
C1=10.000
C2=0.0000
C3=0.0000
C4=0.0000
C5=0.0000
C6=0.0000
The wrongly input of calibrator concentration would affect the correct of calibration,
hence, the process should be carried out strictly as the above requests.
In this menu, press PRINT key, internal printer print out the LCD of screen. (The
internal printer would not work if external printer connected).
After input calibrator concentration, press ↑↓move the cursor to ENTER, and press
ENTER key to save the settings into RAM.
If only one calibrator concentration input and others are 0.000, instrument would return
to previous menu automatically. One point calibration is carried out in testing procedure.
If input many standards(such as 4), instrument would display as follows:
Asp. Calibrator 05 T.BILT 37.0
ABS
03 Glu
37.0
con.c
4.000
3.000
2.000
1.000
Abs
ENTER Exit
Press U/D key select
22
BT260 User’s manual
The right & half section in the screen is coordinate, X-axis represent absorbance, Y-axis
represent concentration. In the left of Y-axis, there are concentrations of each calibrator.
Press ↑↓ to choose the calibrator which need to measure, or select exit or confirm.
The bottom of 0.0000 represent blank . The chosen standard substance (or blank) display
inversely. This time, press ASP. key to aspirate the chosen calibrator, after delay delay, in
the left side of screen would show the absorbance of the calibrator.
When calibrating, the blank should be measure first, then aspirate every calibrator. When
aspirating calibrator, it is okay not to make aspiration as the tab sequence, but the
aspirated calibrator concentration should be the chosen one.
After aspirating one calibrator, the cursor would move to next one.
When making modification on one calibrator, move cursor to the calibrator
concentration, press ASP. key to carry through.
After measure calibrator, move cursor to ENTER, presenter key, instrument would make
out the calibration automatically, and the calibration curve would be displayed in the
right side of LCD:
Asp. calibrator 05 T.BILI 37.0
ABS
03 Glu
37.0
+
+
+
+
+
ENTER
Exit
Press U/D key select
Press print key to print out calibration result. Press any key to save result and return to
previous menu.
The + in calibration curve represent each calibrator testing points, the calibration curve
displayed through curve is calculated by least square method:
C=F1×ABS+F2×(ABS×ABS)
The concentration of the substance to be tested is work out as per the above formula.
23
BT260 User’s manual
Note: if the absorbance of the sample to be tested exceeds the range of calibration curve,
the concentration calculated by the above formula would occur error, please retest after
dilution.
If the method is FIXT, instrument display as follows:
Enter STD. CONC. 05 BUN
Method: ENDPT
Filter1:546nm
C=0.000
ENTER
Press U/D key select
For a FIX.T analysis, only one calibrator is permitted.
Press ↑↓ to choose calibrator concentration, or ENTER. The chosen function display
inversely. Select inputting calibrator concentration, press ENTER, the calibrator
concentration could be inputted by number key and decimal point.
Choose ENTER, press ENTER key, unit return to previous menu, and save the inputted
value. The inputted value could not be kept if returning to previous menu by press the
EXIT key in keyboard.
The calibration of a FIX.T analysis would be carried out during testing procedure.
If method is COAGU., LCD display:
Enter STD. CONC. 09 FIB
C1=20.00
S1=
C2=0.000
S2=
C3=0.000
S3=
C4=0.000
S4=
C5=0.000
S5=
C6=0.000
S6=
Press U/D key select ENTER
For a Coagulation time measurement, multi point should be carried out if the % or
24
BT260 User’s manual
concentration used for representing results. First, testing coagulation time of each
calibrator, the coagulation time should be tested several times for more precise value.
Input concentration or % at C1, C2, C3, C4, C5, C6 in sequence, input corresponding
time value at S1, S2, S3, S4, S5, S6. Please note the calibrator concentration or % input
should be made from low to high in sequence. After input, move cursor to ENTER, press
ENTER. The calibration formula is Ln(C(%))=F0-F1*Ln(S).
The S is the tested coagulation time. C is calculated concentration or percentage . F0, F1
are factors gained by calibration.
The result is calculated as:
C(%)=exp(F0-F1*Ln(S))
Note: all the value of C and S can’t less than 1.0.
By press ↑↓ cursor key, you can select the concentration or time want to modify. The
selected one is display inversely , press ENTER key, press number and decimal key
input, and press ENTER key again save in. When all the value are input correctly, move
cursor to ENTER, and press ENTER key, the unit calculate calibration curve
automatically, and display the calibration curve.
Here, press PRINT key the inner printer print out the screen display. Press ENTER key,
return to the previous menu.
25
BT260 User’s manual
SECTION 7
Print report list
In the main menu, move cursor to select REP., and press ENTER key, LCD display:
Print report
Print report
Delete report
Press U/D select function
By press ↑↓key select function, the selected one display inversely.
If Print report is chosen, press ENTER, LCD display:
Print report
Print report
Delete report
Sample No.:
Press number enter sample No.
Input the sample number you need print, press enter key, LCD show the number of
saved results of the entered sample, and print out the report. For example:
REPORT LIST
NAME:
AGE:
SEX:
SAMPLE ID:03
------------------------------TEST RESULT UNIT REFERANCE
ALT 20.00 U/L
0.000-40.00
GGT 4.000 U/L
11.00-50.00 L
GLU 6.800 mmol/l 4.200-6.200 H
-------------------------------Reporter:
Applicant:
If the sample No. entered is 00, all the reports saved in RAM is print out.
If delete report is chosen, press ENTER key, unit display:
Press ENTER delete, others exit.
26
BT260 User’s manual
If you want to delete the results saved in RAM, press ENTER again, the unit delete all
the results and return to main menu. Otherwise, press any other key.
Note1: the unit recognize the results of different sample by sample No. only, delete the
results after print out is very important.
Note2:All the results saved in the ram will be deleted if the instrument switch off ,
Then must print out the report list before switch off power.
27
BT260 User’s manual
SECTION 8 SELF CHECK
The function self check of the unit allows to check the status of unit.
Select CHE. in the main menu, press ENTER, LCD display:
SELF CHECK
+5V=4.995
L12V=12.953
CH1=15667
LOG1=04552
CH2=15003
LOG2=04662
CH3=
LOG3=
CH4=
LOG4=
CH5=
LOG5=
CH6=
LOG6=
T=37
PUMP SET:
PRN: ON 2004 03/13 14:30:44
Press ↑↓key, select item. The follow item display only:
+5V is the voltage of logic power, the range is 4.9000-5.2000
L12V is the voltage of lamp power, the range is 11.800-12.200
CH1 is the output of 340nm amplifier, the range is 10000-19000
LOG1 is the output of 340nm logistic converter, the range is 00300-03000.
CH2 is the output of 405nm amplifier, the range is 10000-19000
LOG2 is the output of 405nm logistic converter, the range is 00300-03000.
CH3 is the output of 505nm amplifier, the range is 10000-19000
LOG3 is the output of 505nm logistic converter, the range is 00300-03000.
CH54is the output of 546nm amplifier, the range is 10000-19000
LOG4 is the output of 546nm logistic converter, the range is 00300-03000.
CH5 is the output of 578nm amplifier, the range is 10000-19000
LOG5 is the output of 578nm logistic converter, the range is 00300-03000.
CH6 is the output of 630nm amplifier, the range is 10000-19000
LOG6 is the output of 630nm logistic converter, the range is 00300-03000.
Move cursor select T= , to adjust the temperature:
Press ENTER key, then press number key 0, 1, 2, 3, can change the temperature setting
of cuvette. 0=25, 1=30, 2=32, 3=37.
Press ENTER key again after a proper temperature selected. The temperature of cuvette
is displayed. You can adjust the temperature of cuvette and displayed temperature by
trimmer driver (Refer to service manual).
Move cursor, select PUMP SET, then you can adjust pump setting.
Pour 1mL distilled water into tube, Press ENTER key, and press ASP. key, the pump
start aspirate water, when the water is over, press ASP. key once again.
Note: pump set is important for pump aspirate selected volume. During test or
calibration, the pump rotate some steps according to pump setting and selected volume
28
BT260 User’s manual
as: rotate steps= select volume(µL)*pump setting/1000.
Move cursor, select PRN , press ENTER key, can switch on or switch off the auto print
function. If PRN is on, the unit print out the result of test automatically.
Move cursor, select the date and time, then you can modify the date and time . If you
want to modify the date or time, press ENTER key, and move cursor to right or left to
select the data you want to modify, then press number key input the new data. When
you modify the date or time, press ENTER key again.
In this menu, press PRINT key, unit print out the screen display if the internal printer is
ready. Press PAPER FEED key, print feed paper.
In this menu press EXIT key, unit return to main menu.
29
BT260 User’s manual
SECTION10 communication protocol
The serial port for the connection to lab-computer is the 9-pins female plug on the
back panel of instrument.
Cover…………..F.GND
5……………….D.GND
2……………….RXD
3………………..TXD
Baud rate :9600.
The data structure is:
GLU--- 2.012
mmol/l H 07(0DH)
Name of item(6) +space(20H) + result(5) + space(20H)+space(20H) + unit(6) +
space(20H) +Flag(1)+sample No(2)+(0DH)
Input sample No during test , unit transmit data to RS232 automatically.
30