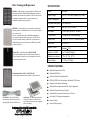
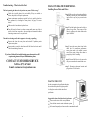
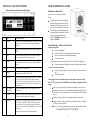
1
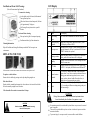
6 Stage
AIR PURIFIER
MA-4000
INSTRUCTION MANUAL
CAUTION:
Read manual carefully for proper installation and
operation.
16
CONTENTS
Specifications......................................................................3
Features.................................................................................3
Introduction........................................................................4
Installation...........................................................................4
Back Cover & Filter Removal........................................5
Placing the Unit..................................................................5
Settings and Adjustments............................6, 7, 8 & 9
Maintenance........................................................................9
Fan Cleaning ………..........................................................10
Replacing the Fuse..........................................................10
Troubleshooting.....................................................11&12
Applications......................................................................13
Filter Cleaning & Replacement.................................14
Warranty Information..................................................15
2
MOUNTAINAIRE THREE YEAR LIMITED WARRANTY
SUNHEAT INTERNATIONAL will repair or replace any defective part or component of
any unit for a full three year period.
The UV bulb is warranted for (1) one year from date of purchase.
The filters and ozone plates are not covered under this warranty. These elements will be
directly impacted by the environment in which the unit is operated and will need to be
replaced periodically.
The obligation of SUNHEAT INTERNATIONAL under this warranty is limited to furnishing at SUNHEAT INTERNATIONAL’s option, a new or rebuilt component or part
which becomes defective during the warranty period from the date of sale. The warranty
does not include the furnishing of any labor involved or connected with such as that required to diagnose the necessity for replacement or repair or to remove or to install any
such part or parts, nor does it include responsibility for any transportation expenses or
any damages or losses incurred in transporting the unit to an authorized servicing dealer.
Warranty service must be performed by a factory authorized servicing dealer. All services will be provided during normal business hours.
Owner’s responsibilities include providing normal care and maintenance, providing proof
of purchase upon request, expenses for delivery to and from the authorized SUNHEAT
INTERNATIONAL servicing dealer. A copy of the original receipt must accompany all
warranty claims.
Warranty is void if the serial number plate is defaced or where the defect is due to damage, product alteration, connecting to an improper electrical supply, act of God, or not
used in accordance with the use and care instructions.
SUNHEAT INTERNATIONAL SHALL NOT BE RESPONSIBLE FOR ANY
INCIDENTAL OR CONSEQUENTIAL DAMAGES.
SUNHEAT Warranty Registration
To activate warranty you must return this card
within 30 days of purchase to:
SUNHEAT International
3724 Arch Ave, Grand Island NE 68803
NAME: ______________________________PHONE: _____________
ADDRESS: ________________________________________________
CITY: _____________________________STATE: ______ZIP: _________
EMAIL ADDRESS: ___________________________________________
DEALER PURCHASED FROM: __________________________________
DEALER’S ADDRESS: _________________________________________
DEALER’S PHONE: __________________________________________
MODEL #: _______________________ SERIAL #: __________________
DATE PURCHASED: __________________________________
CHECK TO RECIEVE INFORMATION ON REPLACMENT FILTERS
15
Filter Cleaning and Replacement
SPECIFICATIONS
Pre-Filter - clean regularly by removing the filter from the unit
and vacuum the filter with the hand held attachment to remove
pet dander, dust, and other large particles. The Pre-filter can also
be cleaned by running it under cool water and then use a
toothbrush to gently remove particulates.
Model
MA-4000
Rated Voltage
USA-AC 120V/60Hz, Europe 230V/50Hz
Power Consumption
40W
Fan Speed (non-grade)
1500-3000 RPM
Air Volume
Max 106 CFM (3 m³/min)
Ion Output
≥ 5 x 106cm3 (or ≥2.5 x 10⁶/cm3)
UV Spectrum
≥ 20ìw/cm2 (at 10cm-distance)
Ozone Plates
2 Pcs, 4 1/2” x 4 1/2” (115mm x115mm)
HEPA Rate
Up to 99.97%
Remote Control
Distance
Sound Level (DB)
Low 35 Med 45 High 50
Product size in inches
9” W x 11” D x 12” H
Gross Weight
11.75 lbs. (5.33 Kgs)
HEPA Filter - clean regularly; once per month is recommended
but it may need to be cleaned more often for environments with pets
or in a rural setting.
To clean, vacuum the filter with the hand held attachment to remove pet dander, dust and other large particles. The HEPA filter
can also be washed by running it under cool water and then use a
toothbrush to gently remove particulates. The HEPA filter should
be replaced each year.
Carbon Filter - cannot be cleaned - DO NOT WASH.
Under normal conditions this filter should be replaced each year.
If heavy chemicals or gases are in the environment the filter may
need to be replaced more often.
33 ft
PRODUCT FEATURES
Washable Permanent Pre-Filter
Titanium Oxide Filter (Ti02) - DO NOT WASH.
Under normal conditions this filter should be replaced each year .
Washable HEPA Filter
Activated Carbon Deodorization Filter
UV Bulb & Ti02 Filter -Photocatalytic Oxidation (PCO) Process
Negative Ion Generation Technology
Adjustable Ozone Generation with Two Plate Configuration
Adjustable Fan Speed Control (5 speed)
Adjustable Ozone Output (5 levels) up to 3,000 sq. ft.
UV-C Bulb - Do not touch bulb with
your hands, use latex gloves whenever
replacing bulb. Lifespan: 8,000 hours.
Ozone Plates - For maximum performance,
ozone plates need to be washed in warm
water. Always allow them to dry completely
before re-installing.
14
Ion Output: 20 KV negative ion generator
Remote Control
Away and Sleep Settings
3
To reduce the risk of electric shock, this equipment has a
grounding type plug that has a third (grounding) pin. This plug will only
fit into a grounding type power outlet. If the plug does not fit into the
outlet, contact qualified personnel to install the proper outlet. Do not
alter the plug in any way.
WARNING! - Do not operate without proper installation. Doing so
may void the warranty.
CAUTION! – Cut off the power when performing maintenance.
If the fuse is blown and needs to be replaced, the current of fuse should
be no more than 1.0 Amp.
The New Mountainaire Whole Home Purification System provides six stages of air
cleaning. The MA-4000 removes odors caused by pets, tobacco and cooking. It’s UV
germicidal bulb and Negative Ion technology suppresses the growth of microorganisms like mold, mildew, bacteria, viruses and germs. The ozone generator system sanitizes up to 3,000 sq. ft. The Mountainaire fits neatly on a counter or desk;
perfect for the home or office.
Compact
Portable
No Duct Work Required
No Chemicals
Low Maintenance
Economical to Operate
User Friendly
No Residual Contamination
INSTALLATION
1) Remove unit from shipping carton.
2) Remove all protective materials.
3) Read Owner’s Manual thoroughly prior to installation.
4) Fully insert cord into the power cord receptacle on the back of the unit.
5) Install Ozone Plates and Filters as shown in the steps on the next page.
4
Uses for your NEW Mountainaire Whole Home Purifier
Ammonia, Household Cleaners
The next time you use ammonia or other household cleaning products that produce a heavy
odor, set your MA-4000 up in a high place in the area you are cleaning. Turn on the unit while
cleaning and when you’re done, use the appropriate ozone setting for the size of the area to
clean the air. Leave the area and in a few hours the harsh odors will be gone.
Cooking Odors
The next time you are cooking fish, onions or any foods that produce a heavy odor, set your
MA-4000 on the counter near the stove or anywhere in the kitchen. Turn on the unit while
cooking and allow it to run until the odors are gone. You’ll be delighted to notice how clean
your home smells, even after cooking.
Closets and Sneakers
To remove odors from sneakers, place them in front of the unit overnight using one of the
five ozone settings. To remove smoky odors from clothes and musty smells from closets set the
MA-4000 on the appropriate ozone setting for the area, close the door and let the cleaning
power of photocatalytics and ozone freshen your entire wardrobe.
Tobacco Odors
To remove odors from tobacco smoke , place the MA-4000 nearest to the area where you
smoke. The carbon filter in the unit will trap the gases while the photocatalytic process destroys
bacteria and germs. Occasionally, after a party or gathering, you may want to place the unit up
high, maybe on a shelf, in the polluted area and set the purifier to the appropriate ozone settings.
In a few hours those odors will be eliminated. Never place the unit where ozone will blow
directly at you or your pets and choose the appropriate setting for the size of the area.
Bedding
Since you cannot take your bed to the dry cleaners, why not sanitize it by removing gases,
contaminates and particulars from the fabrics with your Mountainaire? Set the unit on the bed
and make a tent with your sheets. Let the unit run for a few hours and you will be surprised at
how much cleaner your bedding smells.
Bathroom and Basements
To remove mold, mildew, germs, bacteria and other pollutants from bathrooms and basements,
place the unit in the area overnight. You may choose to use one of the AWAY setting for large
basements, but you will want to use the appropriate settings for the size of your bathroom.
Allow the MA-4000 to sanitize the area from thirty minutes or overnight, depending of the area
and the contaminates in the environment. You will be amazed at the results.
Pet Odors
To remove pet odors from your home, place the MA-4000 near your pet’s litter box or bedding.
The unit will not only collect the pet dander but the carbon filter will trap the gases while the
photocatalytic process destroys bacteria and germs. Occasionally you may want to place the
unit up high, maybe on a shelf, in the area near your pets bedding and/or littler box and set the
purifier to the appropriate PURIFY setting. In a few hours those overpowering smells from pet
urine and feces will be eliminated. Never place the unit where ozone will blow directly at your
pets and please choose the appropriate setting for the size of the area.
Freshen Your Car
To remove the musty odor from your car, run an extension cord out to your car and plug in the
MA-4000. Start the car and let it idle. Turn on the car’s heating and air conditioning system and
set the purifier to it’s lowest ozone setting; let it run for a hour. The next time you turn on your
car’s heating and air conditioning system you will be greeted with a fresh clean sent.
Paint, Carpets and Construction
To remove the smells created by painting, installation for new carpet or other construction projects, place the Mountainaire up as high as possible, turn on the ozone generator to the appropriate setting and leave the area. In a few hours the chemical smells from these home remodeling
projects should be gone.
13
Troubleshooting – What to look for first:
The fan is operating but the unit won't produce any ozone. What's wrong?
BACK COVER & FILTER REMOVAL
Installing Ozone Plates and Filters
Check the air purifier plate(s) for serviceability. If they are cracked or
broken, the plate(s) will require replacement.
Step 1: Make sure the unit is unplugged before
installing, removing any filters or maintaining the unit in any way, to prevent electric
shock.
Ensure maintenance procedures required for the air purifier plate have
been performed (i.e. washing the Ozone plates). See page 5 for more
details.
Make sure the Ozone button is pushed to on.
Step 2: Push the latches down on the back to
remove the pre-filter. Then remove all the
filters by pulling on the white ribbon at the
top of each filter.
You will know the Ozone is on when a strong smell comes out of the air
purifier. Aside from steps above, do not attempt to disassemble without
contacting customer service or your dealer.
The unit has a burning smell, and/or appears to be arcing or sparking.
Remove and clean the ozone plates and reinstall. If problems persist
replace ozone plates.
Ozone produces a smell or odor that smells like bleach or electric smell.
This is normal during Ozone use.
Step 3: Insert the ozone plates found in the
small box. For maximum performance,
ozone plates need to be washed in warm
water before using. Always allow them to
properly dry before installing.
If you have followed the troubleshooting procedures and are still
experiencing issues with your Mountainaire please,
CONTACT CUSTOMER SERVICE
Step 4: Reinstall all filters in the same order
they were removed and reattach back cover.
Toll Free (877) 467-8643
E-mail: [email protected]
Step 5: Determine placement location and
plug unit into 120-volt outlet.
PLACING THE UNIT
In order to maximize the purification function,
the unit should be placed as high as possible.
A ceiling fan can also aid the unit with air
purification.
Suggested locations, listed in order of preference:
Nearest to the source of the worst pollutant.
Near cold-air return in an air circulation system.
In the most frequently used area to achieve maximum benefit.
12
5
SETTINGS AND ADJUSTMENTS
Buttons function and Operation Description
TROUBLESHOOTING GUIDE
Indicators of Operation:
(Operation of the Ozone & Power Indicator
Lamp)
The ozone generator should be operated
when the room is unoccupied. Open the
door and window when you return to the
room if ozone operated for several hours.
#
1
Name
Function & Operation
POWER
Standby mode: Press the POWER button to turn the unit on. Press
again to turn unit off. Unit will operate at default settings for
1,600 sq. ft.
2
LCD Screen
Displays the unit’s working status; FAN, PUFIFY, OZONE and
TIMER.
3
FAN
Press to adjust the fan speed. (Note: the coverage area changes
200 sq. ft. each time the FAN button is pressed).
4
PURIFY
Press to adjust the ozone output - 0 to 5 settings - (Note: the coverage area changes 200 sq. ft. each time you press the PURIFY
button).
5
UV
Press to turn the UV bulb on or off.
6
OZONE
Press to turn the ozone generator on or off (Note: The PURIFY
settings do not work when OZONE is off).
7
AWAY
Air purifier works at maximum settings, 3,000 sq. ft., in AWAY
mode. The purifier will shut off when the timer returns to 0.
Press once for a 0.5 hour run time; Press twice for a 1 hour run
time; Press third time for a 2 hour run time; Press again to return
to manual mode.
8, 9,
10
LED lamps for
Away Mode
Indicates timing mode: Ⅰ means 0.5H;Ⅱ means 1 hour;Ⅲ
means 2 hours.
11
Receiver
Infrared receiver (Note: do not block the receiver, otherwise it
will affect the normal working of the air purifier).
12
Timer Off
Press buttons 3 & 5 at the same time, display will show 0:00 for
timer, press button 4 (PURIFY) within 2 seconds to set timer.
The time increases by 0.5 hour each time you press the button.
When timer runs out, the unit will automatically revert to previous
working status.
(Note: press any button to turn off the timer function)
6
Turn the unit on and check that the small
red/orange lamp is illuminated. The lamp
is located on the front panel; one is
silkscreen ‘POWER’ and the other is
silkscreen ‘OZONE’.
Troubleshooting – What to look for first:
Unit does not operate:
Is the unit plugged in?
Is the power cord fully inserted into the back of the unit?
Are you sure the outlet is functioning normally?
Is the unit turned on?
(The power switch, located on the back of the unit, marked l/O is flipped up)
Is the back grill installed properly to depress the safety switch forward?
Air flow is restricted or reduced:
Is the unit properly placed away from objects that may obstruct air
flow?
Are the filters clean?
I have plugged in the unit, turned the power switch, located on the back of the
unit, to "ON" and pressed the POWER button and nothing is happening. What's
wrong?
Make sure the electrical outlet is capable of providing power to the unit.
Check that the back cover is fully installed and snapped into place. If the
back cover is not fully installed, a safety switch will not allow the unit to
turn on.
Check to see if the proper fuse is installed and that it is serviceable.
Ensure that the fuse cap is completely seated and secured in its receptacle.
See Page 10 for more details.
Be sure the cord is fully plugged into the unit and also into the wall outlet.
Customer Service (877) 467-8643
11
Fan Blade and Front Grill Cleaning:
LCD Display
(Take off front/reinstall grill method)
To remove for cleaning:
As the detail on the left shows, hold bottom of
front grill and pull out.
When latch releases from front panel, lift front
grill approximately 30 degrees.
Pull front grill away from unit in a parallel
motion.
To reinstall after cleaning:
Place top latch of grill in front panel opening.
No
Name
1
Fan working
status
2
HIGH purifying
reminder
Push bottom latch of grill into bottom slot.
Cleaning Information:
Wipe off fan blade and front grill with damp washcloth. The fan requires no
maintenance.
REPLACING THE FUSE
Coverage area
3
Timing reminder
Standby
4
2
FT / HRS
A fuse holder is located on the back of the unit next to the power cord.
To replace or check the fuse:
Remove the fuse holder by pressing on the clip and pulling straight out.
5
Ozone function
reminder
6
Mode
If the fuse is blown:
Replace with the standard replacement fuse. Insert the new fuse into the fuse holder.
Press the assembly straight in until it latches.
LCD display
1 to 5 bars will be illuminated to indicate fan speed.
When the coverage area is more than 2400 sq. ft, the
LCD display will show HIGH.
It displays 1000- 3000 sq. ft. when working; the coverage area changes by 200 sq. ft. each time the FAN and
PURIFY button(s) are pressed.
When the timing function is turned on, the countdown
clock, purified area and timer will be displayed.
Display will read 0000 and the LCD backlight will turn
off at the same time.
Display indicates the square foot covered. When set to
2
“AWAY” the display will flash between HRS and FT .
LCD displays “AREA MUST BE UNOCCUPIED”
when ozone is on. (Note: ozone has obvious effects on
killing germs and removing odors, however, excess
ozone can have adverse health effects, therefore, it
should be used in unoccupied spaces only)
Will display; NORMAL (1~5), HIGH (1~3), AWAY
(1~3) according to different working settings and purified area settings.
120 volt models: Fuse rated at no more than 1.0 Amp.
CAUTION!
During Ozone mode this unit should never be placed where
it can blow directly into the face of any person or pet.
CAUTION!
If the fuse holder cap is not installed correctly,
the unit will not operate.
10
Notes:
For maximum control, the unit should be placed where easy access to the control
panel is possible.
The rear of the unit should always have at least six inches of open area to allow
unrestricted airflow.
To prevent injury, be sure power cord is not accessible to small children.
7
Remote control function and description
Press to turn ozone on and off.
9
OZONE
Note: PURIFY does not work if ozone is off (Note: Ozone
can only be used in an unoccupied space).
Press to turn UV on or off.
10
UV
CAUTION!
Always ensure the room or area is UNOCCUPIED
before operating the above-described Ozone control.
No
1
Name
Function and operation instruction
POWER
Stand by mode: Unit will turn on when the Power button
is pressed. Press Power again to turn unit off.
Press one time: 1200 sq. ft. SLEEP mode.
Press second time: 1000 sq. ft. SLEEP mode.
2
SLEEP
3
FAN UP
To increase the fan speed press FAN UP (Note: Coverage
area changes by 200 sq. ft. each time button is pressed).
4
FAN DOWN
To decrease the fan speed press FAN DOWN (Note: Coverage area changes by 200 sq. ft. each time button is pressed).
5
PURIFY
DOWN
6
PURIFY UP
7
TIMER
8
AWAY
LCD display, UV bulb and ozone generator are off during
SLEEP mode. Press any button to exit SLEEP mode.
To decrease the ozone output, press PURIFY DOWN (Note:
Coverage area changes by 200 sq. ft. each time button is
pressed).
To increase the ozone output press PURIFY UP (Note: Coverage area changes by 200 sq. ft. each time button is pressed).
1)Press TIMER button, clock will display 0:00
2)Press PURIFY UP within 2 seconds to adjust run time. Time
will increase by 0.5H each time the button is pressed; maximum run time 9.5H, minimum run time 0.5H
3)When the time setting is finished, it enters automatic shut off
mode, and back to normal working mode before time setting.
Air purifier works at maximum function on AWAY mode.
Press one time: shut off after 0.5H;Press second time, shut
off after 1hr;Press third time, shut off after 2hr; Press again to
return to manual mode.
8
MAINTENANCE
Periodic maintenance is required to ensure that your Mountainaire Air
Purifier operates properly. A severely polluted environment can foul an air
purifier plate in as little as four weeks or as long as a year. Shown here are
basic maintenance procedures that should be carried out to keep your unit
running at top performance.
Pre-Filter/HEPA Filter Cleaning:
(Turn to page 5 for removal instructions)
You have two options to clean filters:
When filter is visibly dirty, simply remove the pre-filter or HEPA filter
and clean the heavy particulate from the screen with a hand-held vacuum. This method will extend the life of the screen/filter.
When filter is visibly dirty, remove the filter from the unit and wash it in
cool water, brush it gently with a toothbrush to remove particulate. Dry
completely prior to re-installing.
9