1
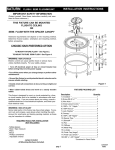
10/8/2012
Pre-Installation Instructions
1. DO NOT USE THIS FIXTURE WITH A DIMMING CIRCUIT. If you presently have dimmer controls, you will
need to remove them, and replace them with regular circuits. If you are unfamiliar with electrical installations, we
recommend you have a qualified electrician do your installation.
2. WARNING: SHUT OFF POWER AT THE CIRCUIT BREAKER OR FUSE PANEL BEFORE REMOVING
THE OLD FIXTURE
3. Remove the existing fixture. Make yourself a sketch of how the current fixture is wired (by wire color) or mark the
wires with masking tape and a pencil so you will know how to reconnect the wires to your new LED fixture.
4. This fixture does not use a mounting bracket to secure it to the electrical box. Instead, it is secured to the box by the
included screws specifically designed to ground the pan to a metal electrical box. For safe operation, use only the 1 ½
inch electrical box screws included in the hardware kit. Screw them into the electrical box until there is about 3/8
inch between the ceiling and the underside of the screw head.
Installation Instructions
1. Before beginning assembly, installation or operation of product, make sure all parts are present. Compare parts with
package contents list on previous page. If any part is missing or damaged, do not attempt to assemble, install or
operate the product. Contact customer service for replacement parts.
2. Open the 3 diffuser latches (figure 1).
3. Install the electrical box screws in the junction box (figure 2).
4. Connect the black and the white wires of the fixture with two wires of the same colors from the junction box with the
wirecaps. Connect the grounding wire of the fixture with the one from the junction box with the wirecap (figure 3).
5. Put the fixture plate across the screw of the lock in figure 2, then rotate fixture plate clockwise and lock it tightly with
the screw lock (figure 4).
6. Securely mount the fixture plate to the junction box firmly (figure 5).
7. Turn the 3 diffuser latches to the right until they are closed (figure 6).
8. Restore power to the electrical box. Turn the light switch on to activate the fixture.
ETi SSL Inc.
The Americas Headquarters
26650 Renaissance PKW, STE 6
Cleveland, OH 44128
Page 2 of 4