1
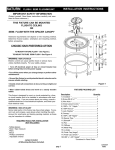
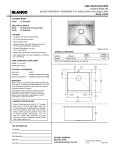
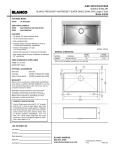
10/8/2012
LED Round Flushmount Items #54074141, 54074142, 54075142 5& 54075141
The product package includes the following components:
1. 1 - Round Flushmount Housing
2. 1 - Round Flushmount Diffuser (shipped as part of flushmount housing)
3. 3 - Wirenuts (in parts bag)
4. 2 – 1 ½” Electrical Box Screws (in parts bag)
5. 1 - Installation Manual
Product Description and Characteristics
LED ceiling light can be directly mounted to the household ceiling and occupies little space. It is energy-saving,
environmentally friendly and practically used for emitting soft and even distribution of light.
IMPORTANT SAFETY INSTRUCTIONS AND WARNINGS:
THIS PRODUCT SHALL BE INSTALLED IN ACCORDANCE WITH THE LATEST U.L. SAFETY, NEC AND/OR
LOCAL AUTHORITY HAVING JURISDICTION. INSTALLATION SHALL BE PERFORMED BY A QUALIFIED
ELECTRICIAN UNDERSTANDING THE CONSTRUCTION AND OPERATION OF THIS PRODUCT AND THE
ELECTRICAL REQUIREMENTS INVOLVED.
DANGER - RISK OF ELECTRIC SHOCK-DISCONNECT POWER TO LIGHT FIXTURE BEFORE
INSTALLATION
Risk of fire or electric shock: Use only on 100-277 VAC, 50/60Hz circuits. Installer shall verify operating voltage at the
luminaries prior to installation. This fixture is designed for indoor use ONLY. This installed fixture may not covered by
any thermal insulation material.
Risk of fire or electric shock: LED Round Flushmount installation requires knowledge of luminaires electrical systems. If
not qualified, do not attempt installation. Contact a qualified electrician.
Risk of fire or electric shock: To prevent wiring damage or abrasion, protect wiring from exposed edges of sheet metal or
other sharp objects that may be present in the fixture.
This device complies with Part 15 of the FCC rules. Operation is subject to the following two conditions: 1) this device
may not cause harmful interference, and 2) this device must accept any interference received, including interference that
may cause undesired operation.
THIS DEVICE IS NOT INTENDED FOR USE WITH EMERGENCY LIGHTING (BATTERY TYPE) SYSTEMS FOR
FLUORESCENT LIGHTING PRODUCTS.
ETi SSL Inc.
The Americas Headquarters
26650 Renaissance PKW, STE 6
Cleveland, OH 44128
Page 1 of 4
10/8/2012
Pre-Installation Instructions
1. DO NOT USE THIS FIXTURE WITH A DIMMING CIRCUIT. If you presently have dimmer controls, you will
need to remove them, and replace them with regular circuits. If you are unfamiliar with electrical installations, we
recommend you have a qualified electrician do your installation.
2. WARNING: SHUT OFF POWER AT THE CIRCUIT BREAKER OR FUSE PANEL BEFORE REMOVING
THE OLD FIXTURE
3. Remove the existing fixture. Make yourself a sketch of how the current fixture is wired (by wire color) or mark the
wires with masking tape and a pencil so you will know how to reconnect the wires to your new LED fixture.
4. This fixture does not use a mounting bracket to secure it to the electrical box. Instead, it is secured to the box by the
included screws specifically designed to ground the pan to a metal electrical box. For safe operation, use only the 1 ½
inch electrical box screws included in the hardware kit. Screw them into the electrical box until there is about 3/8
inch between the ceiling and the underside of the screw head.
Installation Instructions
1. Before beginning assembly, installation or operation of product, make sure all parts are present. Compare parts with
package contents list on previous page. If any part is missing or damaged, do not attempt to assemble, install or
operate the product. Contact customer service for replacement parts.
2. Open the 3 diffuser latches (figure 1).
3. Install the electrical box screws in the junction box (figure 2).
4. Connect the black and the white wires of the fixture with two wires of the same colors from the junction box with the
wirecaps. Connect the grounding wire of the fixture with the one from the junction box with the wirecap (figure 3).
5. Put the fixture plate across the screw of the lock in figure 2, then rotate fixture plate clockwise and lock it tightly with
the screw lock (figure 4).
6. Securely mount the fixture plate to the junction box firmly (figure 5).
7. Turn the 3 diffuser latches to the right until they are closed (figure 6).
8. Restore power to the electrical box. Turn the light switch on to activate the fixture.
ETi SSL Inc.
The Americas Headquarters
26650 Renaissance PKW, STE 6
Cleveland, OH 44128
Page 2 of 4
10/8/2012
Fig. 1
Fig. 2
Fig. 3
Fig. 4
Fig. 6
Fig. 5
ETi SSL Inc.
The Americas Headquarters
26650 Renaissance PKW, STE 6
Cleveland, OH 44128
Page 3 of 4
10/8/2012
Troubleshooting Guide
Minor problems often can be fixed without the help of an electrician. Before doing any work on the fixture, shut off
power supply at the circuit panel to avoid electrical shock.
Problem
Possible Cause
Fixture does not light
Fuse blows or circuit breaker
trips when light is turned on
Corrective Action
Power is off
Check if power supply is on
Bad wire connection
Check wiring
Defective switch
Test or replace switch
Crossed wires or power wire is
grounded out
Check wiring connections
Cleaning Instructions
Your fixture is made from quality materials that will last many years with minimum care. You may want to periodically
clean the diffuser, or interior of fixture using a mild, non-abrasive glass cleaner and a soft cloth. DO NOT use solvents,
or cleaners containing abrasive agents. When cleaning the inside of the fixture, make sure you have the power
turned off, and do not spray liquid cleaner directly onto the LEDs, LED driver or wiring.
Imported by
ETi Solid State Lighting, Inc.
26650 Renaissance PKWY, STE6
Cleveland, OH 44128
Made in China
LIMITED WARRANTY: This product is warranted for a period of 3 years from the date or original purchase against
defects in materials and workmanship. If this product should fail to operate due to defects in material or workmanship,
simply call 1-216-468-0232 within 36 months of purchase. This product will be repaired or replaced, at ETi’s option.
This warranty is expressly limited to repair or replacement of product and liability for direct, incidental, or consequential
damages is hereby expressly excluded. Some states do not allow exclusions of direct, incidental or consequential damages
so the above limitation of exclusion may not apply to you. This warranty gives the consumer specific legal rights, which
vary from state to state. WARRANTY IS VOID IF PRODUCT IS NOT USED FOR THE PURPOSE WHICH THIS
PRODUCT IS MANUFACTURED.
ETi SSL Inc.
The Americas Headquarters
26650 Renaissance PKW, STE 6
Cleveland, OH 44128
Page 4 of 4