1
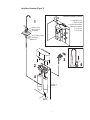
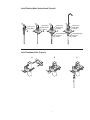
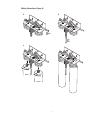
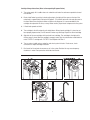
6888931 0701
Installation and
Operating Instructions
AP-DWS1000 Drinking Water Appliance Owner’s Manual
Installation Precautions
•
Do not use with water that is microbiologically
unsafe or of unknown quality without adequate
disinfection before or after the system.
•
Installation must comply with state and local
plumbing codes.
•
•
•
•
•
The filter must be installed with the inlet and
outlet ports as labeled. Make sure not to
reverse connections.
Do not use wicking or sealer for fitting connections
into head of filter. Use Teflon® tape for connections.
Do not use torch or other high temperature
sources near filter or plastic cartridge.
Systems certified for cyst reduction may be
used on disinfected water that may contain
filterable cysts.
•
Do not install near electric wires or water pipes
which will be in the path of drill when selecting
the position to mount bracket.
System must be protected from freezing. Drain
filter when room temperature drops below
40°F (4.4°C).
•
Do not install in direct sunlight.
•
Allow a minimum of 2” (5cm) clear space
under filter to facilitate cartridge change.
•
Mount filter in such a position as to prevent it
from being struck by other items.
•
Do not install on line pressure above 125 psi
(862 kPa).
•
Do not install on hot water line. Maximum
temperature allowed is 100°F (38°C).
Teflon is a registered trademark of E.I. DuPont.
Specifications:
Inlet/Outlet Size: 1/4” Tube with Quick Connect Fittings
Flow Rate: 0.6 gpm (2.3 lpm)
Temperature Range: 40-100°F (4.4-38°C)
Pressure Range: 30-125 psi (207-862 kPa)
Capacity: 625 gallons (2,366 liters)
Weight: 7 lbs (3.2 kg)
Dimensions: 10 7/8”H x 15 3/4”W x 4 1/4”D (28 cm x 40 cm x 11 cm)
Parts Included
Model AP-DWS1000 Drinking Water System
•
•
•
•
•
Drinking water system bracket assembly (includes heads, connections, shutoff meter)
Filter cartridge #1 (AP-DW80)
• Filter cartridge #2 (AP-DW90)
Saddle valve assembly
• Faucet assembly (with blue tubing)
Tubing (yellow)
• Mounting hardware
Installation, Operation and Maintenance Manual
NOTE: Model AP-DWS1000 LF (Less Faucet) does not include tubing to connect filter system to a drinking
water faucet. The filter system’s outlet connection will accept 1/4” plastic or copper tubing.
Tools Required (not included):
• Drill (cordless recommended)
• Phillips head screwdriver
• Adjustable wrench
• Razor knife or tube cutter
• #8 Gauge fastening screws appropriate for mounting surface
If a faucet hole needs to be drilled for faucet:
• Center punch
• File or grinding wheel
• 9/16” Drill bit (suitable for countertop materials or cast iron/stainless steel)
Note: Some state and local plumbing codes may prohibit the use of saddle-type valves and/or drain
connections. The use of saddle-type valves are prohibited in: Alaska, Delaware, Idaho, Kentucky,
Massachusetts, Michigan, Minnesota, New Hampshire, North Dakota, Ohio, Oregon, and South Dakota. Check
your local plumbing codes for any restrictions that apply.
Massachusetts CMR 248 strictly prohibits the use of saddle-type valves. The feedwater connection must
conform to applicable plumbing codes.
1
1. Install Drinking Water System Faucet (Refer to Figure 4, Page 7)
Note: The drinking water system faucet should be located on a flat surface, conveniently located near the
sink, so that it empties into the sink. Most sinks have pre-drilled holes designated for sprayers, soap
dispensers, and other accessories. If your sink does not have an extra hole, then a 9/16” diameter hole must
be drilled.
Warning: Porcelain, enamel, and ceramic sinks require special procedures for drilling holes. Refer to the
special section on porcelain, enamel, and ceramic sinks for detailed instructions.
Instructions for drilling 9/16” diameter hole through countertop or stainless steel sink
A. Locate area to be drilled. Mark center of the hole with center punch.
B. Drill hole with 9/16” drill bit suitable for countertop materials or cast iron/stainless steel.
C. With grinding wheel or file, smooth out any rough edges.
Installing the Faucet
A. Slide the following parts in the order specified up blue tubing and threaded brass stem:
1. Stainless steel bezel
2. Large rubber washer
B. Next, feed blue tubing and faucet stem down through faucet mounting hole.
C. From underneath sink, assemble the black spacer, star washer, and hex nut (as shown Fig.4, Page 7)
onto the threaded brass stem and tighten by hand.
D. With a padded adjustable wrench, turn the faucet base (above the counter) to the right to securely
fasten. Remove piece of plastic tubing from base.
E. Insert faucet neck onto base until seated and align over sink.
2. Mount System
Determine undersink mounting location
Warning: Before drilling holes under your sink, locate any hidden electrical wires or plumbing behind the
mounting surface. Note adjacent appliances (dishwasher, refrigerator, trash compactor, oven) which may
interfere with the system fastening screws.
Note: Be sure to locate the unit where there is a minimum of 2” (5 cm) clearance below the unit to facilitate
cartridge changes.
A. Mark holes on mounting surface using holes on bracket as guides.
B. Drill starter holes into mounting surface.
C. Hang unit onto mounting surface by fastening wood screws through backplate of bracket.
2
3. Install Feedwater Valve (Refer to Figure 5, Page 7)
Warning: Make sure cold water valve is turned off under the sink.
A. Most sinks use 3/8” copper tubing. Connect the saddle valve as shown in Figure 5, Page 7. The back
saddle bracket can be reversed for smaller pipe sizes (7/16” to 1/2”). Tighten screws evenly and
firmly, brackets should be parallel.
B. To pierce soft copper tubing, turn handle to the right several times until it stops. The valve is now
closed. Turning the handle to the left will open the valve.
C. Assemble insert, plastic sleeve and compression nut as shown onto yellow tubing and fasten securely to
saddle valve.
Note: Some states and plumbing codes prohibit the use of saddle valves. Installation must comply with
existing state and local plumbing codes.
4. Making Connections (Refer to Figure 6, Page 8)
Note: Be sure to arrange tubing so there are no sharp bends and leave some “play” in the tubing for ease
of service. Try to keep tubing from the unit to the faucet as short as practical for good flow. If necessary,
refer to the enclosed diagram (Figure 1, Page 5) on the use of “Push In” plastic fittings.
A. Connect yellow 1/4” tubing from saddle valve to the “Push In” fitting on the left side of the bracket
assembly. THE YELLOW TUBE MUST GO UP AND THROUGH THE BASE OF THE BRACKET.
NOTE: Failure to route the tubing through the bracket will not allow protective shroud to be fastened
securely to the bracket.
B. Connect the blue 1/4” tubing from the base of the faucet to the “Push In” fitting attached to the base
of the shutoff meter.
Installing Filter Cartridge & Replacing Filter Cartridges
C. In order to assure proper performance it is essential that “Filter 1” be installed on the left and “Filter 2”
on the right side of the bracket assembly. Use the color/number coded labels to match “Filter 1”
cartridge with “Filter 1” head.
D. Meter should be set at 625 gallons (2366 liters).
5. Test System
A. Open cold water valve under the sink.
B. The system will pressurize. Check for leaks. If any leaks are present, refer to the Troubleshooting Section.
6. Flush Filter
A. Pressing down on the faucet lever will dispense water until you let go. Lifting up on the lever will lock the
faucet open.
B. Run water through the drinking water system faucet for at least five (5) minutes to remove any
trapped air and carbon fines. At this point, the water will run clear. Residual air bubbles in water may
take a week or more to totally go away.
C. The system installation is now complete and ready to serve filtered water.
Enjoy!
3
Special Section
Procedure For Drilling Hole Through Porcelain/Enamel/Ceramic Sinks With Sheet Metal or Cast Iron
Base
Recommended tools:
Variable Speed Drill
Porcelain Cutter Tool Set (9/16” Size)
Plumber’s Putty
Note: It is important to understand this procedure.
1. The glassy layer of porcelain/enamel/ceramic must be scored through to the metal base creating a disk.
2. This disc must be removed while protecting the surrounding decorative coating against chipping
or fracturing.
3. The base metal must be drilled through to complete the hole.
Procedure:
A. Mark center for 9/16” hole.
B. Form a dam of shallow putty around hole location and fill with enough water to lubricate carbide drill bit.
C. Carefully drill pilot hole through porcelain/enamel/ceramic and base metal using a carbide pilot drill.
Always operate drill with light pressure at slow speed (300-400 rpm).
D. Drill porcelain/enamel/ceramic using special 9/16” cutting tool, making certain a complete ring has
been cut through to the sinks metal base.
E. Change to metal cutting drill bit and drill out the center of the ring, making sure not to contact outer
rim of decorative coating. Cut through metal sink base.
Troubleshooting Section
Water leaks from threaded connection:
Tighten fittings or hex nut a bit more until leak stops. If leaks persist, shut off water at the cold water valve,
remove threaded fittings, reapply Teflon® tape around the fitting to the left and screw back into head
assembly or saddle valve.
Water leaks at quick connect fittings:
Push tubing in as far as it will go. If leaking continues, close cold water valve and remove water line by
pushing in on the connector collet while pulling the tubing away. Inspect tubing for cracks. If tubing is
cracked, simply cut that portion away and re-insert tubing into quick connect fitting (see Figure 1).
Water does not flow from the drinking water system faucet:
Check to see if the main water line valve is open, allowing water to flow to the filter. If water still does not
flow from the drinking water system faucet, make sure the filter’s shut-off valve is reset to 625 gallons. Also,
check for crimps or sharp bends in the blue and yellow tubing.
Water appears cloudy or air comes out of the drinking water system faucet:
Flush filter for a full five (5) minutes to remove any carbon fines or trapped air in the filter and water lines.
Note: It may take a week or more for residual air to be completely flushed from the system.
4
Quick Connect Guide (Figure 1)
‘Push-In’ Tubing Connector
(Quick Connect Fittings)
This product is outfitted with user friendly ‘Push In’ connectors. Proper
use of the connectors is shown in the diagrams. It is most important
that the tubing selected for use with these connectors be of high
quality, exact size and roundness, and with no surface nicks or
scratches. If it is necessary to cut the tubing, use a plastic tubing cutter
or sharp razor knife. Make a clean square cut. Should a leak occur at a
‘Push-In’ connector, the cause is usually defective tubing.
To Fix:
To Attach Tubing
1 Tube
2
• Relieve pressure
• Release tubing
• Cut off at least 1/4” from end
• Reattach tubing
• Confirm connection is leak free
To Release Tubing
1
2
Push in grey collet to release tubing.
Pull tubing straight out.
Grey Collet
Push tubing straight in as far as it will go. Tubing is secured in.
AP-DWS1000 Parts List (Figure 2)
6
9
2
7
12 13
10
4
1
5
3
3
1
69968-31
Self-piercing water valve
2
36897-82*
1/4" inlet yellow tubing (price per ft.)
3
55851-02
DW-80 & DW90 Cartridge Set
4
36897-62*
1/4" inlet blue tubing (price per ft.)
5
69888-42
Faucet
6
68841-31
Shroud
7
68871-01
Head
8
85-400201
UTC Shroud Mounting Pin (not shown)
9
68845-31
3/8" NPT x 1/4" tube elbow
10
68873-31
1/4" NPT adaptor x 1/4" tube
11
74-3230404
12
68870-33
Metering valve
13
69804-34
Metering valve screw (need 4 each)
1/4" plug-in elbow
* Must order minimum of 10 ft (3 m).
5
Installation Overview (Figure 3)
1
Standard Installation Overview
6
1. Install DWS Faucet
2. Mount System
1
3. Install Feedwater Valve
4. Making Connections
Stainless Bezel
Rubber Washer
Countertop
5. Test System
6. Flush Filter
2
Plastic Backing Spacer
Star Washer
Hex Nut
3
5
4
3
6
2
4
17" (43.2 cm)
Minimum
FILTER 1
FILTER 2
2" (5 cm)
Minimum
6
Install Drinking Water System Faucet (Figure 4)
Stainless Bezel
Rubber Washer
A
Stainless Bezel
Stainless Bezel
Stainless Bezel
Rubber Washer
Rubber Washer
Rubber Washer
Countertop
Countertop
Countertop
B
C
D
Plastic Backing Spacer
Plastic Backing Spacer
Star Washer
Hex Nut
Star Washer
Hex Nut
Install Feedwater Valve (Figure 5)
A
B
7
C
Making Connections (Figure 6)
B
A
FROM
FEEDWATER
VALVE
FROM
DWS
FAUCET
C
FILTER 1
FILTER 2
8
Cartridge Change Instructions (Refer to Corresponding Diagrams Below)
1. Turn water supply off at saddle valve or at undersink cold water line and remove protective shroud
from bracket.
2. Reset shutoff meter by pushing in knob and turning to the right until the arrow on the top of the
meter body is approximately lined up to 625 gallons. (The shutoff meter will shut water pressure to
the faucet down when the preset number of gallons are dispensed. It is recommended that the
cartridges be replaced at this time, or every twelve months.) Open faucet to depressurize the system.
3. Lift red knob upward and hold.
4. Turn cartridge to the left and gently pull straight down. Discard spent cartridge. If system has not
been properly depressurized, a small amount of water may discharge. Repeat for second cartridge.
5. Align tabs of the new cartridges with head and insert cartridge. Turn cartridge to the right until a
clicking sound is heard. Now the cartridge is properly seated. Use the color/number coded labels to
match “FILTER 1” cartridge with “FILTER 1” head. Repeat with Filter 2.
6. Turn on water at saddle valve or water line and check system for leaks. If leaks occur, check
connections or repeat cartridge installation.
7. Run faucet for five minutes to remove any air in the system. Residual air may cause temporary
cloudiness in water. Place protective shroud back on bracket.
2
4
3
5
7
9
© 2002 CUNO Incorporated
CUNO Incorporated
400 Research Parkway
Meriden, CT 06450 U.S.A.
Toll Free: 1-800-222-7880
Worldwide: 203-237-5541
Fax: 203-238-8701
www.aquapure.com • www.cuno.com