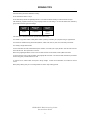
1
IMPORTANT SAFETY INSTRUCTIONS
When using the ironing center, basic precautions should always be followed, including the
following:
•
•
•
•
•
•
Read all instructions.
Use ironing center only for intended use.
Never yank cord to disconnect from outlet; instead grasp plug and pull to disconnect.
To reduce the risk of electrical shock, do not disassemble or attempt to repair the ironing
center, call a qualified serviceperson for examination or repair. Incorrect reassembly or
repair could cause a risk of fire, electrical shock, or injury to persons when the ironing center
is used.
Close supervision is necessary for any appliance being used by or near children.
To reduce the likelihood of circuit overload, do not operate another appliance on the same
circuit.
SAVE THESE INSTRUCTIONS
Congratulations on purchasing your IRON-A-WAY built-in ironing center.
Since 1956, those who demand quality and convenience have sought out
IRON-A-WAY. Each ironing center is handcrafted and utilizes timetested features that insure many, many years of satisfied use. Every
time you open the door and lower the ironing board, you will be pleased
with your decision to include an IRON-A-WAY into your plans.
Demanding more and not being satisfied with less defines our customer.
Thank you for choosing IRON-A-WAY.
PARTS AND FEATURES
Refer to your parts diagram included separately with each ironing center. If replacement diagram is misplaced, please
contact our customer service department.
IRON-A-WAY Built-In Ironing Center
Use and Care Guide
1
IRONING CENTER CARE
Ordering Replacement or Service Parts
Contact our customer service department for replacement or service parts. Refer to your parts diagram for appropriate
part numbers.
Ordering Replacement Cover and Pad
To order a replacement ironing board cover and pad, simply do one of the following:
1.
Complete and mail the enclosed reorder envelope.
2.
Call Customer Service.
3.
Place order on our website.
Installing a Replacement Cover and Pad
Note: Before removing the existing cover and pad, examine how it is installed since this will be helpful when
installing your replacement cover and pad.
1.
Lower the board into the ironing position.
2.
Place the pad on board extending the edges of the pad slightly over the tapered end of the ironing board.
3.
Place the cover on top of pad and extend the edges of the cover approximately 1 ½” over the tapered end of
ironing board and slightly tighten drawstrings at the lower end of the cover to partially secure the cover and pad.
4.
Fold the excess cover and pad material at the back of the ironing board over and around the end of the board.
Note: For all 42” ironing boards, a fold of approximately 6” is necessary to align the first and second sets of eyelets
for lacing.
5.
Place your hand over the tapered end of ironing board to keep cover and pad in place. Then raise the ironing
board back into the cabinet.
6.
While firmly holding with one hand the tapered end of the ironing board, alternately tighten the drawstrings until
the cover fits tight.
7.
Thread the ends of the drawstrings through the eyelets at the lower end of the cover and tie securely.
Note: For lacing the 46” ironing board, use the first and third sets of eyelets.
Installing or Changing the Light Bulb
If electric model includes a built-in spotlight fixture, use a maximum 30-watt light bulb. Recommended bulb is a 30R20
with standard base and a 2 ½” bulb diameter.
Cabinet Touch-ups
Need to touch-up your cabinet following installation?
Touch-up Kits are available by contacting our customer service department. These kits are great for light touch-ups for
slight nicks or marks caused during installation of ironing center.
Irons
The hot iron storage area has been designed to accept the majority of steam/dry irons available at retail, including many
premium models. However, due to manufacturers continuing changing their model numbers and the size and shape of
their irons, it is not possible to include with these instructions a comprehensive list of irons that fit into the hot iron storage
area.
Swivels
If your ironing center includes a swiveling ironing board you may periodically wish to use a Teflon multi-use lubricant
spray so your ironing board keeps turning like new. With the ironing board in an upright position lightly spray lubricant into
the two openings containing the swivel springs. After spraying, lower ironing board and rotate left and right until lubricant
is fully worked into and between the swivel plates.
IRON-A-WAY Built-In Ironing Center
Use and Care Guide
2
IRONING CENTER USE
Position the Ironing Board
1.
Open door as widely as possible.
2.
With one hand, hold the board in an upright position and with the other hand raise the ironing board retainer to
an upright position releasing the ironing board.
3.
With the ironing board released, hold onto the nose of the board, pulling it forward, lowering it to the normal
ironing position.
Adjusting Ironing Board Height
Model A-46 (Without Swivel)
Lowering the Ironing Board.
1.
While standing along side the ironing board, with one hand, hold near the nose of the board and with the
other, hold the back of the board between the sides of the cabinet.
2.
Slightly raise the nose of the ironing board tilting it upward and then slightly raise the back of the ironing
board out of its secured position.
3.
Gently lower the back of the ironing board to the lower position while keeping the nose of the ironing board
in an upward tilting position.
4.
With the back of the ironing board in the lower position, release your hand and place it on the opposite
side of the board across from the hand remaining on the ironing board.
5.
Keeping the board in a slightly tilted position, remove the hand that had first been placed near the nose of
the ironing board and gently push on the double legs under the ironing board. The direction of the push
will be slightly upward and toward the ironing board cabinet. This will allow the leg to release from its
secured position from the bracket located at the bottom of the cabinet.
6.
Gently return the ironing board to a horizontal position.
Returning the Ironing Board to the Upper Position.
1.
Grasping near the nose of the ironing board with one hand and the back of the ironing board between the
sides of the cabinet with the other hand.
2.
Gently lift the back of the ironing board up the side bracket and return it to the upper secured position.
3.
Gently lift the nose of the ironing board to allow the leg underneath the ironing board to return to the
secured position in the bracket located at the bottom of the cabinet.
Models with Swivel Ironing Board
Raising the Ironing Board
1.
Put the ironing board in a straight (horizontal) position.
2.
With one hand, hold the front of the ironing board and with the other, place your thumb on the rear of the
ironing board while grasping the axle rod with your fingers.
3.
To raise, lift the axle rod and slide it to the back of the side bracket by slightly raising the nose of the
ironing board.
4.
Lift the back of the ironing board to the upper level and lock into position.
IRON-A-WAY Built-In Ironing Center
Use and Care Guide
3
Lowering the Ironing Board
1.
To return the ironing board to its regular position, lift the nose of the ironing board and guide it as the
ironing board returns to the lower position.
Swiveling the Ironing Board
1.
If desired, ironing board can be swiveled in either direction by pushing on the nose of the board.
2.
Rotating stops are available at five positions.
3.
Swivel tension can be adjusted by turning the nut on the underside of the board.
4.
When ironing in a swivel position, ironing board must be returned to a straight (horizontal) position before
ironing board can be put in upright position.
Ironing
Note: For Model A-46, remove the electrical cord cover resting on bottom storage shelf to expose bottom end of
electrical wireway. Iron plug and cord will be placed through the opening in the shelf in order for plug to be placed in
outlet.
1.
Plug iron cord into receptacle located at bottom end of electric wireway.
Note: For Model A-46 determine a convenient length (approximately 48”) of electric cord for ironing and
leave this length outside the opening in the bottom storage shelf. Place the remainder of the electric cord
between the bottom end of the electric wireway and the bottom storage shelf and cover this portion of
electric cord by replacing the electric cord cover.
Note: For Model A-42 or Models with optional Electric Cord Wrap determine a convenient length
(approximately 48”) of electric cord for ironing and wrap the remaining length around the electric cord wrap
located underneath the bottom storage shelf.
2.
Depending upon model – to activate power: 1) turn the timer knob past the 5-minute mark; 2) press in on
the on/off rocker switch; 3) depress the timer button.
Note: If non-electric model, plug iron cord into nearby electrical outlet.
3.
Begin ironing after allowing the iron time to reach the desired heat setting.
Note: Model A-46 or models with optional hot iron rest, for added convenience when moving or turning
garment, place iron into cradle located on bottom storage shelf. Hot plate of iron goes toward back of
ironing center cabinet.
4.
When ironing is completed, turn the timer or on/off switch to its off position.
5.
Place iron in hot iron storage compartment in upright position with bottom of iron facing the insulated heat
shield (side wall of ironing center cabinet).
6.
Return ironing board to upright position.
7.
Raise ironing board retainer located on side of cabinet, place ironing board in fully upright position behind
ironing board retainer and return board retainer to horizontal position locking ironing board securely in
upright position.
8.
For electric models, when board is in upright and locked position, the automatic disconnect switch will be
depressed by the ironing board shutting off all electrical current.
Note: Electrical models with timers, the automatic disconnect switch will stop electrical current to the unit
but will not reset the timer knob. This must be done manually.
9.
Close door securely.
IRON-A-WAY Built-In Ironing Center
Use and Care Guide
4
IRONING TIPS
Follow laundering instructions attached to clothing.
Do not overload the washer or dryer.
Do not wash heavy articles with lightweight articles. This causes excessive wrinkling in both the washer and dryer.
After laundering, separate clothes into groups requiring similar iron heat settings. Iron low heat articles first, followed by
groups with successive higher heat settings.
Low Heat
Setting
Acetates
Acrylics
Medium Heat
Setting
Silks
Polyesters
High Heat
Setting
Rayons
Nylons
Cottons
Use steam iron or dampen clothes with sprinkler bottle before ironing.
Iron clothes on right side of fabric unless pattern of fabric (corduroy, embroidery, etc.) requires ironing on opposite side.
Iron sections of clothes that hang off the board (sleeves, collars, bows, ties, etc.) first, then do the body of the article.
Iron clothing in length-wise direction.
Iron the article with unhurried, well-directed rhythmic motions, never with quick or jerky strokes. Give the heat of the iron
time to do the work. Don’t press down on the iron.
When ironing lightweight material, never run the iron back and forth over the article, but lift up after each stroke.
To remove gloss on hems, tucks and seams, sponge lightly with moist cloth. For extreme cases, follow above procedures
and then very gently rub with steel wool on area.
To remove scorch, moisten fabric and expose to strong sunlight. If article can be bleached, use a bleach to remove
scorch.
When putting clothing away, do not crowd garments into closet. Keep clothing spaced.
IRON-A-WAY Built-In Ironing Center
Use and Care Guide
5
WARRANTY
One-Year Limited Warranty from date of purchase is placed on all defective parts returned to factory for replacement,
other than light bulbs, installed units, finished or stained doors, ironing board cover and pad. This warranty does not
include labor for installation of replacement.
Keep this book and your sales slip together for future reference. Write down the following information about your ironing
center to better help you obtain assistance if you ever need it.
Dealer Name
Address
Phone
Model Number
Sales Order Number
Date of Purchase
001101 04/09
IRON-A-WAY Built-In Ironing Center
Use and Care Guide
6