1
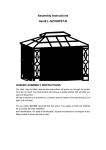
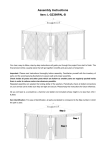
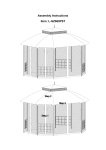
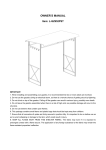
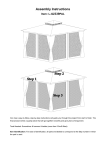
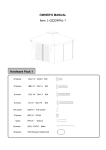
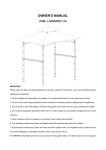
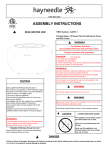
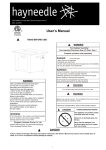
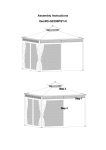
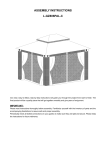
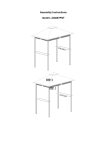
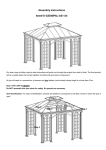
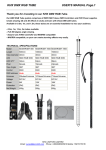
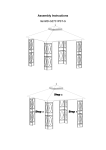
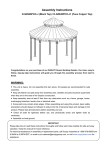
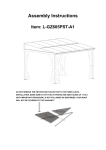
Assembly Instructions
ITEM: L-GZ288PST-4D
IMPORTANT:
Please read and follow all safety statements, warnings, assembly instructions, use & care directions, before
attempting to assemble.
WARNINGS:
1. Assembly Instructions must be followed.
2. Pegs supplied must be used to hold this gazebo in place when upright.
3. Warranty does not cover damage due to extreme weather conditions.
4. Do not use candles, matches or open flames of any kind in or near a tent.
5. Do not cook inside the tent.
6. Build campfires downwind and several meters away from a tent and be sure to fully extinguish campfires
before leaving a campsite or before retiring for the night.
7. Exercise extreme caution when using fuel-powered lanterns or heaters inside a tent and use
battery-operated lanterns whenever possible.
8. Do not refuel lamps, heaters or stoves inside a tent.
9. Extinguish or turn off all lanterns before going to sleep.
10. Do not smoke in a tent.
11. Do not store flammable liquids inside a tent.
12. KEEP ALL FLAME AND HEAT SOURCES AWAY FROM THIS TENT FABRIC. This tent is made of
flame-resistant fabric. It is not fireproof. The fabric will burn if left in continuous contact with a flame source.
Parts List
Panel
A
4
Panel
B
4
Short side support pole
C
2
D
2
E
2
Pole
F
4
Pole
G
2
Pole
H
2
Pole
I
4
Center Connector
J
1
Center Connector
K
1
Top Hook
L
1
Corner Connector 1
M
2
Corner Connector 2
N
2
Center Finial
O
1
Corner Finial
P
4
Big Canopy
Q
1
Small Canopy
R
1
Long side support pole
1
Long side support pole
2
Hardware Pack
AA
M6X15 Bolt
12PCS
BB
M6X32 Bolt
32PCS
CC
M6 Flat Washer
64PCS
DD
M6 Wrench
2PCS
HH
M6 Nut
20PCS
Fig.1: Use Bolt (BB) and Flat Washer (CC) to fix Panel (B) and Panel (A).
Fig.2: Insert Long side support pole (D) into pole (E), attach pole (D) and (E) by using Bolt (AA) and Flat
Washer (CC).
Fig.3: Attach Pole C&D&E to Panel (A) and Panel (B) by using Bolt (BB) and Flat Washer (CC).
Fig.4:Insert Corner connector (M&N) into panel (A) and (B).
Fig.5:Insert Pole (F) into Center Connector (J). (Notes: put the pole end with hole upwards as Fig 5-1 )
Fig.6:Insert end of Pole (F) into Corner Connector (M&N).
Fig.7:Insert Pole (G&H) into Center connector (J).
Fig.8:Fix Pole (G) to Short side Support Pole (C) and Fix Pole (H) to Long side Support Poles (D&E). Put
Big Canopy (Q) onto the Big Top, do not fully spread.
Fig.9:Insert Pole (I) into Center Connector (K).
Fig.10:Fix Pole (I) to Pole (F) by using by Bolt (BB), Flat Washer (CC) and Nut (HH)
Hardware Pack
EE
¢6*180“7”Stake
16 PCS
Fig.11: Put Small Canopy (R) to small top, put Centre Finial (O) to small top connector. Put fully spread Big
Canopy (Q) to the big top, screw Corner Finial (P) into four corner on the big top.
Fig.12: Fix the completely assembled gazebo by Stake (EE).
USE & CARE:
1. This gazebo is not a permanent structure and should be disassembled & stored away after use.
2. Do not repack your gazebo until completely dry.
3. This gazebo must be assembled by two adults or more.
4. This gazebo must not be left erect in windy conditions.
5. Loading limit of the hook is 33 lbs.
6. Loading limit of the ring is 25 lbs.
7. Steel components for garden accessories and furniture are treated with rust inhibiting paint that protects
them from rust. However, due to the nature of steel, surface oxidation (rusting) will occur if this protective
coating is scratched. This is a natural process. To minimize this condition, it is recommended that care be
taken when assembling and handling the product in order to prevent the paint from being scratched. If
scratching or damage occurs, it is recommended that the area be touched-up immediately with rust inhibiting
paint, which is convenient to purchase from your local shop. Surface rust can be removed easily using a very
light application of common cooking oil. If surface oxidation (rusting) occurs and no measures are taken to
correct it, the oxidation may start dripping onto the deck or patio, which may cause damaging stains that may
be difficult to remove.
Limited Warranty:
This limited warranty is extended to the original purchaser and applies to defects in materials and
workmanship of your item provided the item is maintained with care and used only for personal, residential
purposes.
The item is warranted to be free from defects in material or workmanship for a period of one (1) year. We
don't reimburse for transportation or delivery costs, or compensate the individual or any outside party for
assembling or disassembling the product.
Exclusions:
Items used for commercial, contract, or other non-residential purposes, or items damaged due to acts of nature,
vandalism, misuse, or improper assembly are not covered. Corrosion or rusting of hardware is not
covered. Proof of purchase (dated register receipt) is required for warranty claims. Warranty is to the original
purchaser and is non-transferable. Any replacement of warranted items will be in the original style and color, or
a similar style and color if the original is unavailable or has been discontinued. As some states do not allow
exclusions or limitations on an implied warranty, the above exclusions and limitations may not apply. This
warranty gives you specific rights, and you may also have other rights, which vary from state to state.
Maintenance:
Our iron/steel components for garden accessories and patio items are coated with rust inhibiting paint that
protects it from rusting. However, due to the nature of iron, surface oxidation (rusting) will occur once these
protective coatings are scratched. This is a natural process and is not a defect! To minimize this condition, we
recommend care when assembling & handling the product to prevent scratching the paint. Should any
scratching or damage occur, we recommend immediate touch-up with rust inhibiting paint. Surface rust can
also be easily removed with a very light application of common cooking oil. If surface oxidation (rusting) occurs
and if no measure is taken to prevent this, the oxidation may start dripping on to deck or patio and cause
damaging stains, which may be difficult to remove. This can be prevented if measure is taken to keep the
product from oxidizing.
Important: For technical assistance on assembly or replacement parts. Please call Sunjoy Industries at 1(866)
578-6569 from 8:30 AM to 5:30 PM EST Monday to Friday or fax the replacement part form which is in the box
to (740)-283-3549 or Email [email protected] for assistance.
Made in China