1
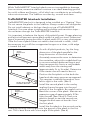
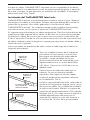
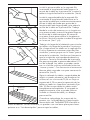
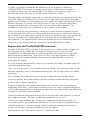
IN S TAL LAT I O N I NS T RUCTI ONS
General description:
TrafficMASTER™ InterLock is a uniquely engineered luxury vinyl plank in a
6in x 36in format with a mechanically locking fastening system. (See 1)
No special
adhesives or
Tongue Side
Groove Side
1
glues are
required. TrafficMASTER InterLock is installed as a “floating” floor so it
can be installed over a wide range of subfloors including wood, concrete,
existing vinyl and vinyl composition tiles, as well as existing ceramic tile.
Since no under pad is required, it may be necessary to “skim coat” over
deeply embossed existing resilient flooring and to smooth out ceramic
grout joints before installing TrafficMASTER InterLock. TrafficMASTER
InterLock must not be installed over carpet of any kind.
Estimating and layout:
TrafficMASTER InterLock is packaged 22.66 square feet per carton.
Determine the required amount of flooring by multiplying the length to
the width of the room. In most cases, it is advisable to add approximately
10% to this total to allow for overage due to cutting and fitting. Divide
this total square footage requirement by the number of square feet in a
carton to determine the number of cartons required.
2
Plan your layout so the long dimension of
the plank is oriented to the long dimension
of the room. Most times it is advisable to
have the long dimension of the plank
oriented parallel to the incoming light
from windows. (See 2) Work from several
cartons at a time to ensure a good balance
of color, shading and texture.
Job site conditions:
TrafficMASTER InterLock is to be installed in climate-controlled indoor
environments only. The job site temperature should be at least 65°F to
85°F for twenty four hours before, during and after the installation.
Minimum temperature should then be maintained at 55°F. TrafficMASTER
InterLock should be protected from direct exposure to sunlight. In new
construction or heavy renovation projects, TrafficMASTER InterLock
should only be installed after the other trades have completed their
work and the area is in a “clean and debris free” condition.
1
While TrafficMASTER™ InterLock planks are not susceptible to damage
from moisture, excessive subfloor moisture is an ideal breeding ground
for mold, mildew and fungus – all of which can contribute to an unhealthy
indoor environment. The subfloor must be dry, smooth and clean.
TrafficMASTER InterLock Installation:
TrafficMASTER InterLock is designed to be installed as a “floating” floor.
Do not secure the planks to the subfloor. Always undercut all doorjambs.
Do not install cabinets or kitchen islands on top of TrafficMASTER
InterLock. Use care when installing wall moldings and transition strips –
do not fasten through the TrafficMASTER InterLock.
It is important to balance the layout of the plank format. Proper planning
and layout will prevent narrow plank widths at wall junctures. Determine
layout to prevent having less than ½ plank width (2in) or very short pieces.
If the first row of planks does not need to be trimmed in width, it will
be necessary to cut off the unsupported tongue so a clean, solid edge
is toward the wall.
As with all plank products, lay the long
dimension of the plank parallel to the
long dimension of the work area.
5/16 in
Expansion
Gap
Ins
tal
l Le
ft
to
Rig
ht
3
5/16 in
Expansion
Gap
Angle End Tongue
Into End Groove
4
5/16 in
Expansion
Gap
Ins
5
tal
l Le
ft
to
Rig
1
ht
2
Accurately measure the room to determine
the centerline, adjust this established line
to accommodate a balanced layout and
then transpose this line to a comfortable
width away from the starting wall
(approximately 2ft to 3ft wide). Determine
if the starter row will need to be cut.
Position the first plank so that both the
head and side seam grooves are exposed.
This requires installing the product from
left to right in the room. (See 3)
Install the second plank in the row by
angling the end tongue into the end
groove of the first plank. Be careful not to
bend the corner of the plank. Maintain an
expansion gap of approximately 5/16in
from the wall. (See 4 and 5) Then cut a
plank to length to start the second row,
stagger the end seam at least 6in from
the first plank.
Install the first plank in the second row by
inserting the long side tongue into the groove of the plank in the first
row. This is best done with a low angle of the plank. (See 6)
2
Install the second plank in the second
row by inserting the short end tongue
into the previously installed plank groove.
Align the plank so the long side tongue
tip is positioned just over the groove lip
of the plank in the first row. Working from
the end seam, with a low angle insert the
long tongue into the groove of the
adjoining plank. Very little force is required
to seat the tongue into the groove. You
will feel the tongue lock into the groove.
(See 7 and 8)
6
Work across the length of the room
installing planks along the wall in the first
row and then aligning the planks in the
second row. It is critical to keep these two
rows straight and square, as they are the
“foundation” for the rest of the installation.
Check squareness and straightness often.
Cut the last plank in the first row to fit
approximately 5/16in short of the end
wall. Planks may be cut with a utility knife
using the “score and snap” technique.
Often times the remainder of this plank
may be used to start the third row. (See 9)
7
8
5
3
1
4
9
5/16 in
Expansion
Gap
2
Continue installing planks, being certain
to maintain a random appearance and
offset end seams by at least 6in. Maintain
a 5/16in expansion space at all fixed
vertical surfaces. (See 10) Check to be
certain all planks are fully engaged. If
slight gapping is noticed, the gap can be
tapped closed by using a scrap of flooring
and a tapping block.
When fitting under door casings, etc. the
flexibility and low angle of connection of
the TrafficMASTER™ InterLock product
become evident. If necessary, a flat pull
bar or “last board puller” may be used to
assist in locking the planks.
10
When fitting around obstacles or into
irregular spaces, TrafficMASTER InterLock can be cut easily and cleanly
using a utility knife with a sharp blade. It is often beneficial to make a
cardboard template of the area and transfer this pattern to the plank.
3
Protect all exposed edges by installing wall molding and/or transition
strips. It is recommended to use proper transitions that are designed
for floating LVT floors that provide adequate expansion of Traffic Master
InterLock Flooring. It is best if transitions are used at doorways, room
changes, level changes or product changes. Use caution to prevent the
fasteners from securing the planks to the subfloor.
Like with all floor coverings, close your curtains or blinds where extreme
sunlight hits the floor. A combination of heat and sunlight can cause
most home furnishings fading, discoloration or thermal expansion.
Prolonged direct sunlight can result in discoloration and excessive
temperatures may cause floor to expansion (which may cause buckling)
or delamination.
Repairing TrafficMASTER InterLock:
Although TrafficMASTER InterLock is tough, it is not indestructible. We
suggest you keep several planks from the original installation to be used
when replacing a damaged plank. If the damaged plank is along the
perimeter of the room, the easiest technique is to just disconnect the
planks until the damaged plank is removed. Replace the plank and
reassemble the planks.
If its impractical to just disconnect and reassemble the planks the
following procedure should be used:
Using a straight edge and a sharp utility knife, cut out the center of the
damaged plank leaving approximately a 1in strip attached to the
surrounding planks.
Carefully cut back from the corners of the plank to the inside edge.
Remove the plank edges by wiggling the cut plank out from the tongue
and groove of the surrounding planks.
Prepare the replacement plank by placing the face of the plank down
and folding back and removing the groove strip on both the long and
end profile. Using the decorative surface of the tongue end as a guide,
cut away this over-hanging profile using a sharp utility knife.
Position the replacement plank by engaging the tongue of the long
side into the groove of the adjoining plank. “Hinge” the prepared
replacement plank into position.
Apply a thin application of “super glue” (cyanoacrylate glues) into all
four seams of the replacement plank. Do not get the glue on the
surface of the flooring. Place weights on the replaced plank for at least
15 minutes until the adhesive secures the planks.
For more information call: 1-800-835-2656.
4
IN STRUCCIO NE S DE I NS TAL ACIÓ N
Descripción general:
TrafficMASTER™ InterLock es una tabla de lujo de 15,24cm x 91,44cm hecha de
vinilo, con un diseño exclusivo que permite que fijarla mediante un sistema de
sujeción mecánica.
(Ver 1) No se
Lado con ranura
Lado con lengüeta
1
necesitan adhesivos
o pegamentos adicionales. TrafficMASTER InterLock se instala como piso
“flotante” por lo que se puede usar sobre una amplia variedad de contrapisos
incluyendo madera, concreto, vinilo existente y losas con composición de vinilo
además de losas de cerámica ya existentes. Debido a que no se necesita una
almohadilla como base, los pisos con detalles en relieve pueden requerir una
capa de enlucido para emparejar las uniones de lechada antes de instalar el
TrafficMASTER InterLock. TrafficMASTER InterLock no se debe instalar sobre
ningún tipo de alfombra.
Estimación y diseño:
Cada caja de TrafficMASTER InterLock contiene 2,10 metros cuadrados de tablas.
Multiplica el largo de la habitación por el ancho de la misma para determinar
qué cantidad de tablas requerirás. En la mayoría de los casos, se recomienda
añadir aproximadamente 10% al total para compensar el material que se pierde
al cortar y ajustar las tablas. Divide el total de pies cuadrados necesarios entre
los pies cuadrados contenidos en una caja
para saber cuántas cajas necesitarás.
2
Planifica el diseño, de modo que el largo de la
tabla esté orientado a lo largo de la habitación.
La mayoría de las veces se recomienda que se
oriente el largo de la tabla paralelo a la luz
entrante de la ventana. (Ver 2) Trabaja con
varias cajas a la vez para garantizar un buen
balance de color, sombras y textura.
Condiciones del lugar de trabajo:
TrafficMASTER InterLock se debe instalar únicamente en ambientes interiores
con control de clima. La temperatura del lugar de trabajo debe ser de, al menos,
65°F a 85°F por veinticuatro horas antes, durante y después de la instalación. La
temperatura mínima se debe mantener en 55ºF. El TrafficMASTER InterLock no
debe exponerse a la luz directa del sol. En nuevas construcciones o proyectos
donde la renovación haya sido extensa, se debe instalar TrafficMASTER InterLock
únicamente después de que se hayan completado otros trabajos y una vez que
la zona esté “limpia y sin escombros”.
Español
5
Aunque las tablas TrafficMASTER™ InterLock no son susceptibles a los daños
por humedad, la humedad excesiva del contrapiso puede propiciar la aparición
de moho y hongos, lo que generaría un ambiente no saludable. El contrapiso
debe estar seco, liso y limpio.
Instalación del TrafficMASTER InterLock:
TrafficMASTER InterLock está diseñado para instalarse como un piso “flotante”.
No asegures las tablas al contrapiso. Siempre corta por debajo del nivel de las
jambas de las puertas. No instales gabinetes o islas de cocina sobre
TrafficMASTER InterLock. Ten cuidado cuando instales molduras para pared y
tiras de transición; no las sujetes a través del TrafficMASTER InterLock.
Es importante que distribuyas las tablas parejamente. Planifica la distribución de
modo que el lado angosto de las tablas no dé hacia las uniones de las paredes.
Distribuye las tablas de manera que ninguna sea muy corta o mida menos de
5,08 cm de ancho Cuando no sea necesario reducir el ancho de la primera hilera
de tablas, deberás cortar la lengüeta sin apoyo para que haya un borde sólido y
limpio de cara a la pared.
Como con todos los productos de tabla, coloca el lado largo de la tabla a lo
largo del área trabajo.
Toma las medidas exactas de la habitación
para ubicar la línea central; usa esta línea
para lograr una distribución adecuada de
las tablas y luego trasládala hasta una
distancia conveniente de la pared de inicio
(aproximadamente a un ancho de 60,96cm
a 91,44cm). Determina si la fila de inicio se
deberá cortar.
Espacio de
expansión
de 0,79cm
Ins
a d talar
ere de
cha izq
u
ierd
a
3
Coloca la primera tabla de modo que la
cabeza y las ranuras laterales queden
expuestas. Para lograr lo anterior, debes
instalar el producto de izquierda a derecha
en la habitación. (Ver 3)
Espacio de
expansión
de 0,79cm
4
Instala la segunda tabla de la fila colocando el
extremo con lengüeta en ángulo con la ranura
de la primera tabla. Ten cuidado de no doblar
la esquina de la tabla. Mantén un espacio de
expansión de aproximadamente 0,79cm desde
la pared. (Ver 4 y 5) Luego corta una tabla a la
medida deseada para comenzar con la
segunda fila, alterna la unión del extremo a
un mínimo de 15,24cm de la primera tabla.
Insertar lengüeta
en la ranura de
manera inclinada
Espacio de
expansión
de 0,79 cm
Ins
a d talar
ere de
cha izq
u
ierd
1
a
2
5
6
Español
Instala la primera tabla en la segunda fila
insertando la lengüeta del lado largo en la
ranura de la tabla en la primera fila. Insertar la
tabla en ángulo facilitará la instalación. (Ver 6)
Instala la segunda tabla de la segunda fila
insertando la lengüeta del lado corto en la
ranura de la tabla que instalaste anteriormente.
Alinea la tabla de modo que punta de la
lengüeta del lado largo quede justo sobre la
ranura de la tabla en la primera fila. Trabaja
desde la unión del extremo, en un ángulo no
muy pronunciado, inserta la lengüeta larga en
la ranura de la tabla contigua. Se necesita
muy poca fuerza para colocar la lengüeta en
la ranura. Sentirás cuando se trabe la lengüeta
en la ranura. (Ver 7 y 8).
6
7
Trabaja a lo largo de la habitación para instalar
las tablas a lo largo de la pared en la primera
fila y luego alinea las tablas en la segunda fila.
Es muy importante mantener estas dos filas
simétricas y rectas ya que son la “base” para el
resto de la instalación. Verifica con frecuencia
que la instalación esté quedando derecha y
simétrica. Corta la última tabla de la primera
fila para que quede a aproximadamente 0,79
cm de la pared. Las tablas se pueden cortar
con un cuchillo multiuso utilizando la técnica
“marcar y cortar”. Con frecuencia el remanente
de esta tabla se puede usar para comenzar la
tercera fila. (Ver 9)
8
5
3
1
4
9
Espacio de
expansión
de 0,79 cm
2
Sigue instalando las tablas, asegurándote de
seguir un patrón aleatorio y de escalonar las
uniones en un mínimo de 15,24 cm Deja un
espacio de 0,79 cm para la expansión de las
tablas en todas las superficies verticales fijas.
(Ver 10) Revisa que todas las tablas estén
completamente acopladas. Si se queda un
pequeño espacio, este se puede rellenar
usando un recorte de tabla y un bloque
para martillar.
Cuando se coloca bajo los marcos de las
puertas, etc. la flexibilidad y el bajo ángulo
10
de conexión del TrafficMASTER InterLock se
hacen evidentes. De ser necesario, se pueden usar una barra plana para hacer
palanca o un “last board puller” para encajar las tablas.
Español
7
Cuando se coloque alrededor de obstáculos o en espacios irregulares,
TrafficMASTER™ InterLock se puede cortar limpia y fácilmente usando un
cuchillo multiuso con una hoja afilada. Con frecuencia es bueno hacer una
plantilla de cartón del área y transferir este modelo a la tabla.
Protege todos los bordes expuestos instalando molduras para pared y/o tiras de
transición. Se recomienda usar las transiciones adecuadas que están diseñadas
para pisos LTV flotantes que proporcionan la expansión adecuada del piso Traffic
Master InterLock. Es mejor si las transiciones se usan en umbrales de puerta,
cambios de habitación, variaciones de nivel o cambios de productos. Ten
cuidado en evitar que los sujetadores fijen las tablas al contrapiso.
Cierre las cortinas o las persianas cuando la luz solar extrema impacte el piso.
La combinación de calor y luz solar puede ocasionar que el color de la mayoría
del mobiliario y la decoración interior se atenúe o decolore o presente expansión
térmica. La exposición prolongada a la luz directa del sol puede producir
decoloración y las temperaturas excesivas pueden causar la expansión del piso
(lo que a su vez puede provocar torceduras o pérdida del laminado).
Reparación del TrafficMASTER InterLock:
Aunque TrafficMASTER InterLock es resistente no es indestructible. Sugerimos
que guardes varias tablas de la instalación original para usarlas cuando
reemplaces una tabla dañada. Si la tabla dañada se encuentra a lo largo del
perímetro de la habitación, la técnica más fácil será desconectar las tablas
hasta que quitar la tabla dañada. Reemplaza la tabla dañada y vuelve a
ensamblar las tablas.
Si no es práctico desconectar y volver a ensamblar las tablas, se debe seguir el
siguiente procedimiento:
Con una vara de medir y un cuchillo multiuso afilado, corta el centro de la tabla
dañada, dejando una tira de aproximadamente 2,54 cm plg unida a las tablas
contiguas.
Con cuidado, corta desde las esquinas de la tabla hasta el borde interior.
Quita los bordes de la tabla desencajando la tabla cortada desde la lengüeta
y ranura de las tablas contiguas.
Prepara la tabla de reemplazo colocando la cara de la misma hacia abajo y
plegando hacia atrás y quitando la tira de ranura a lo largo y extremo del perfil.
Usa el lado decorado de la lengüeta para guiarte; corta este perfil que sobresale
usando un cuchillo multiuso afilado.
Coloca la tabla de reemplazo encajando la lengüeta del lado largo en la ranura
de la tabla contigua. “Encaja” la tabla de reemplazo en su sitio.
Coloca una capa delgada de “super glue” (pegamento de cianocrilato) en
las cuatro uniones de la tabla de reemplazo. Evita ensuciar con pegamento la
superficie del piso. Coloca un peso sobre la tabla de reemplazo durante al
menos 15 minutos hasta que el adhesivo fije las tablas.
Para obtener más información, llama al: 1-800-835-2656.
8
Español