Transcript
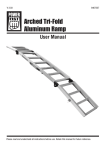
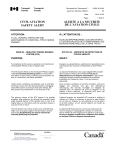
DIRECTIONS FOR USE
1
PREPARATION
Run your taping knife over the corner area and
remove any high spots. Fold over and remove
tear strip from both sides of ARCH-STICK.
Using ARCH-STICK as a ruler, cut to length.
For a perfect straight-to-curve transition, leave
tear strip intact in straight areas.
2
INSTALLATION
With a 4”or 5” taping knife, apply a smooth,
liberal coat of compound to corner.
Press ARCH-STICK firmly into compound to
form a uniform curve. Wipe down tight and
smooth with a 4”or 5” taping knife. Let dry
for several hours or overnight. For high volume
applications, use BIG-STICK300 Rolling Tool for
fast installation and squaring up corner beads.
Available at straitflex.com.
HELPFUL HINTS
Use push pins to Position Arch-Stick.
3
FILL COAT
Apply a fill coat of compound feathering the
compound beyond the previous coat. (Fill coat
can be applied immediately after STEP 2, if
desired.) Lightweight compound used in this
step makes sanding much easier. Let dry for
several hours or overnight.
4
FINISH COAT
Apply finish coat. Let dry for several hours or
overnight.
5
SANDING
Sand lightly: 100-150 grit sandpaper (with finish
coat of all-purpose compound) or 120-200
grit sandpaper (with finish coat of lightweight
compound). ARCH-STICK will not fuzz-up like
other paper-faced arched products.