1
OPERATOR’S MANUAL
9.6V Cordless
Rotary Tool Set
Model # 2301
Table Of Contents
SECTION
PAGE
Specifications . . . . . . . . . . . . . . . . . . . . . . . . . . . . . . . . . . . . . . . . . . . . . . . . . . . . 3
Rules for Safe Operation . . . . . . . . . . . . . . . . . . . . . . . . . . . . . . . . . . . . . . . . . . . . 4
General Instructions for All Power Tools . . . . . . . . . . . . . . . . . . . . . . . . . . . . . . 5–8
Specific Safety Instructions . . . . . . . . . . . . . . . . . . . . . . . . . . . . . . . . . . . . . . . 9–11
Charging Ppocedure . . . . . . . . . . . . . . . . . . . . . . . . . . . . . . . . . . . . . . . . . . . 11–12
Operating the Cordless Rotary Tool . . . . . . . . . . . . . . . . . . . . . . . . . . . . . . . 13–14
Using the Rotary Tool . . . . . . . . . . . . . . . . . . . . . . . . . . . . . . . . . . . . . . . . . . . . . 15
Operating Speeds & Accessories . . . . . . . . . . . . . . . . . . . . . . . . . . . . . . . . . . . . 16
Maintenance . . . . . . . . . . . . . . . . . . . . . . . . . . . . . . . . . . . . . . . . . . . . . . . . . . . . 17
Warranty . . . . . . . . . . . . . . . . . . . . . . . . . . . . . . . . . . . . . . . . . . . . . . . . . . . . . . . 18
2
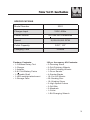
SPECIFICATIONS
Model Number
2301
Charger Input
120V~60Hz
Power Source
9 6 Volt Ni-Cd Batteries
Speed
5,000-25,000 RPM
Collet Capacity
3/32", 1/8"
Charging Time
3 hours
Package Contents:
• 1–Cordless Rotary Tool
• 1–Charger
• 1–Adapter
• 2–9 6 Volt Battery Packs
• 1–Flexable Shaft
• 1–LED worklight attachment
• 1–Storage Case
100 pc. Accessory Kit Contents:
• 2–Dressing Stone
• 2–Felt Polishing Wheels
• 2–Cloth Polishing Wheels
• 1–Drum Sander
• 4–Sander Bands
• 10–Cut-Off Wheels
• 60–Sanding Disc
• 10–Grinding Stone
• 2–High Speed Cutters
• 3–Drill Bits
• 2–Mandrels
• 1–Collet
• 1–Bit Changing Wrench
3
Rules For Safe Operation
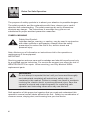
The purpose of safety symbols is to attract your attention to possible dangers.
The safety symbols, and the explanations with them, deserve your careful
attention and understanding. The safety warnings do not by themselves
eliminate any danger. The instructions or warnings they give are not
substitutes for proper accident prevention measures.
Symbol Meaning
Safety Alert Symbol:
Indicates danger, warning, or caution, may be used in conjunction with other symbols or pictographs. Always follow the safety
precautions to reduce the risk of fire, electric shock and
personal injury.
Note: Advises you of information or instructions vital to the operation or
maintenance of the equipment
IMPORTANT
Servicing requires extreme care and knowledge and should be performed only
by a qualified service technician. For service we suggest you return the tool to
WEN PRODUCTS for repair. When servicing, use only identical WEN®
replacement parts.
WARNING
Do not attempt to operate this tool until you have read thoroughly
and understand completely all instructions, safety rules, etc…
contained in this manual. Failure to comply can result in accidents
involving fire, electric shock, or serious personal injury. Save this
operator’s manual and review frequently for continuing safe
operation and instructing others who may use this tool.
Safe operation of this power tool requires that you read and understand this
operator’s manual and all labels affixed to the tool. Safety is a combination of
common sense, staying alert, and knowing how your tool works.
4
General Instructions For All Power Tools
READ ALL INSTRUCTIONS!!!
• Know your power tool. Read the operator’s manual carefully. Learn the application and limitations as well as specific potential hazards related to this tool.
• Keep guards in place and in working order. Never operate the tool with any
guard or cover removed. Make sure all guards are operating properly before
each use.
• Remove adjusting keys & wrenches. Form a habit of checking to see keys and
adjusting wrenches are removed from tool before turning it on.
• Keep work area clean. Cluttered work areas and workbenches invite accidents.
• Do not use in dangerous environments. Do not use power tools near gasoline
or other flammable liquids, in damp or wet locations or expose them to rain.
Keep work area well lighted.
• Keep children and visitors away. All visitors should wear ANSI-Z87.1 approved
safety glasses and be kept a safe distance from work area.
• Make workshop childproof with padlocks, master switches, or by removing
starter keys.
• Don’t force the tool. It will do the job better and safer at the rate for which it was
designed.
• Use the right tool. Do not force the tool or attachment to do a job for which it
was not designed.
• Wear proper apparel. Do not wear loose clothing, neckties, or jewelry that can
get caught in the tool’s moving parts and cause personal injury. Non-slip footwear is recommended when working outdoors. Wear protective hair covering
to contain long hair.
• Always wear ANSI-Z87.1 approved safety glasses with side shields. Everyday
eyeglasses have only impact-resistant lenses; they are NOT safety glasses.
• Secure work. Use clamps or a vise to hold work when practical. It’s safer than
using your hand and it frees both hands to operate the tool.
5
General Instructions For All Power Tools
• Do not overreach. Keep proper footing and balance at all times.
• Maintain tools with care. Keep tools sharp and clean for best and safest
performance. Follow instructions for lubricating and changing accessories.
• Disconnect all tools. When not in use, before servicing, or when changing
attachments, blades, bits, cutters, etc, all tools should be disconnected from
power source.
• Reduce the risk of unintentional starting. Be sure switch is off when plugging in.
• Use recommended accessories. Consult the operator’s manual for
recommended accessories. The use of improper accessories may cause
risk of injury.
• Never stand on tool. Serious injury could occur if the tool is tipped or if the drill
is unintentionally contacted.
• Never leave tool running unattended. Turn power off. Don’t leave tool until it
comes to a complete stop.
• Check damaged parts. Before further use of the tool, a guard or other part that
is damaged should be carefully checked to determine that it will operate properly and perform its intended function. Check for alignment of moving parts,
binding or moving parts, breakage of parts, mounting and any other conditions
that may affect its operation. A guard or other part that is damaged must be
properly repaired or replaced by an authorized service center to avoid risk of
personal injury.
• Protect your hearing. Wear hearing protection during extended periods of
operation.
• Keep tools dry, clean, and free from oil and grease. Always use a clean cloth
when cleaning. Never use brake fluids, gasoline, petroleum-based products, or
any solvents to clean tool.
• PROTECT YOUR LUNGS. Wear a face or dust mask if the operation is dusty.
• Guard against electrical shock by preventing body contact with grounded
surfaces. For example: pipes, radiators, ranges, and refrigerator enclosures.
6
General Instructions For All Power Tools
WARNING: Some dust created by power sanding, sawing, grinding,
drilling, and other construction activities contains chemicals known
to cause cancer, birth defects or other reproductive harm. Some
examples of these chemicals are:
• Lead from lead-based paints
• Crystalline silica from bricks and cement and other
masonry products
• Arsenic and chromium from chemically treated lumber
Your risk from these exposures varies, depending on how often you do this
type of work. To reduce your exposure to these chemicals, work in a well
ventilated area, and work with approved safety equipment, such as those
dust mask that are specially designed to filter out microscopic particles.
• Inspect tool cords and extension cords periodically and, if damaged, have
repaired by a qualified service technician. Stay constantly aware of cord
location and keep it away from the rotating wheel.
• Never use in an explosive atmosphere. Normal sparking of the motor could
ignite fumes.
• Use only outdoor extension cords with approved ground connection that are
intended for use outdoors and so marked.
• Avoid awkward operations and hand positions where a sudden slip could cause
your hand to move into the drill. ALWAYS make sure you have good balance.
• Allow the motor to come up to full speed before starting a cut to avoid binding or
stalling
• Do not use tool if switch does not turn it on and off. Have defective switches
replaced by an authorized service center.
• Replacement parts. All repairs, whether electrical or mechanical, should be
made by a qualified service technician at an authorized service center.
• Keep hands away from working area. Do not hand hold pieces so small that
your fingers go under the tool. Do not reach underneath work or in tool path
with your hands and fingers for any reason.
• Before using the tool, be sure all adjustments are secure.
7
General Instructions For All Power Tools
WARNING: when servicing use only identical WEN® replacement
parts. Use of any other parts may create a hazard or cause
product damage.
• Do not remove jammed cut-off pieces until tool rotation has stopped.
• Never start the tool when the accessory is in contact with the work piece.
• Never touch the rotating portion of the tool or other moving parts during use.
• Before changing the setup, removing covers, guards or blades, unplug the tool
and remove the switch key.
• Always turn off tool before disconnecting it to avoid accidental starting when
reconnecting to a power source.
DO NOT OPERATE THIS TOOL WHILE UNDER THE INFLUENCE OF DRUGS,
ALCOHOL OR ANY MEDICATION THAT MAY IMPAIR YOUR JUDGMENT OR
CONTROL!
• Stay alert and exercise control. Watch what you are doing and use common
sense. DO NOT operate tool when you are tired. DO NOT RUSH!
• Make sure work area has ample lighting to see the work and that no obstructions will interfere with safe operation BEFORE performing any work using this
tool.
• Save these instructions. Refer to them frequently and use them to instruct
other users. If you loan someone this tool, loan them these instructions also.
• Don’t abuse cord. Never carry tool by the cord or yank it to disconnect from
receptacle. Keep cord from heat, oil, and sharp edges.
8
Specific Instructions For The Cordless Rotary Tool
SAVE THESE INSTRUCTIONS!
I. Safety Instructions for Battery Charger
• Before using charger, read all instructions and cautionary markings on
(1) charger, (2) battery pack, and (3) product using battery pack.
• DANGER: 120 volts present at charging terminal. Do not probe with conductive
objects. Danger of electrical shock or electrocution.
• DANGER: If battery pack case is cracked or damaged, do not insert into
charger. Danger of electric shock or electrocution.
• The charger and battery pack are designed to work together. Do not attempt to
charge the battery pack with any other charger.
• Do not expose charger to rain, sleet or snow. Do not allow any liquid to get
inside of charger. Electric shock may result.
• Do not immerse charger in water or any other liquid.
• Pull the plug from the power outlet rather than yanking on the cord. This will
reduce the risk of damage to the electrical plug and cord.
• Do not operate charger with damaged cord or plug; have them replaced by an
authorized repair shop before using.
• Do not operate charger if it has been dropped, received a sharp blow or is
damaged in any way. Have the unit checked by an authorized repair center.
• Do not block ventilation vents located on top of the charger by placing an object
on the vents. Do not place the charger on a soft surface that may block the
ventilation vents located on the bottom of the unit. Place the charger away from
any heat source.
• Unplug the charger before attempting any cleaning. This will reduce the risk of
electrical shock.
• The charger operates on standard household current (120Volts). Do not attempt
to use it on any other voltage.
9
Specific Instructions For The Cordless Rotary Tool
II. Safety Instructions for Battery Packs
The battery pack is not fully charged out of the carton. First read the safety instructions below. Then follow charging procedure.
• Do not incinerate the battery pack even if it is severely damaged or no longer
holds a charge. The battery pack can explode in a fire.
• Under severe conditions, a small leakage of liquid from the battery pack is normal. This does not indicate a failure. However, if the case is cracked or the seal
is broken and this leakage gets on your skin:
a) Wash quickly with soap and water.
b) Neutralize with a mild acid such as lemon juice or vinegar.
c) If battery liquid gets into your eyes, flush them for a minimum of 10 minutes
and seek immediate medical attention.
Note: The liquid is a 25-35% solution of potassium hydroxide.
• Never attempt to open the battery pack for any reason. If the plastic housing of
the battery pack breaks or cracks, immediately stop its use and do not attempt
to recharge.
• NOTE: The batteries in the battery pack are nickel-cadmium type. Cadmium is
considered to be a toxic material by the Environmental Protection Agency. Do
not discard the batteries in any manner. Exchange old battery packs for recycling when purchasing new ones.
• Use only battery packs produced by the original manufacturer.
III. Safety Instructions for Rotary Tool
• The Cordless Rotary Tool is a high-speed power tool. It serves as a carver, a
grinder, polisher, sander, cutter, power brush, drill and more.
• Your Cordless Rotary Tool has a small, powerful electric motor, is comfortable in
the hand, and is made to accept a large variety of accessories including abrasive wheels, drill bits, wire brushes, polishers, engraving cutters, router bits, and
cutting wheels. Accessories come in a variety of shapes and permit you to do a
number of different jobs. As you become familiar with the range of accessories
and their uses, you will learn just how versatile your Cordless Rotary Tool is.
You’ll see dozens of uses you hadn’t thought of before now.
10
Specific Instructions For The Cordless Rotary Tool &
Charging Procedure
• The real secret of the Cordless Rotary Tool is its speed. To understand the advantages of its high speed, you have to know that the standard portable electric
drill runs at speeds up to 2,800 revolutions per minute. The typical electric drill
is a low-speed, high torque tool; the Cordless Rotary Tool is just the opposite—
a high-speed, low torque tool. The chief difference to the user is that in the
high-speed tools, the speed combined with the accessory mounted in the collet
does the work. You don’t apply pressure to the tool, but simply hold and guide it.
In the low speed tools, you not only guide the tool, but also apply pressure to it,
as you do, for example, when drilling a hole.
• It is this high speed, along with its compact size and wide variety of special accessories and attachments that makes your Cordless Rotary Tool different from
other power tools. The speed enables it to do jobs low speed tools cannot do,
such as cutting hardened steel, engraving glass, etc.
• Getting the most out of your Cordless Rotary Tool is a matter of learning how to
let this speed work for you.
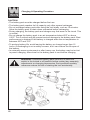
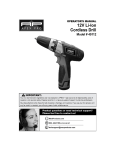
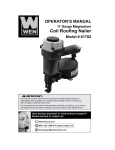
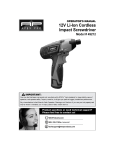
Charging Procedure
The charger is ready to use without adjustment and is easy to operate.
• Plug the charger into an appropriate 120Volt outlet.
• Carefully insert the battery pack into the charging base. Make sure the battery
pack is fully seated in the charger. The green indicator light will come on indicating the charging process has started.
• Normal charging takes about 3 hours.
• Unplug the charger, remove the battery pack and insert into the rotary tool.
➌
➊
Figure
1. Charger
2. Adapter
3. Battery Packet
➋
11
Charging & Operating Procedure
Caution
• The battery pack must be charged before first use.
• The battery pack reaches its full capacity only after several recharges.
• Do not recharge battery pack after using the tool briefly, such as 15 minutes.
Allow the battery pack to drain down somewhat before recharging.
• During charging, the battery pack and charger may feel warm to the touch. This
is normal.
• Do not charge the battery pack in an air temperature below 40ºF or above
105ºF. This is critical and will prevent serious damage to the battery pack. Best
performance is obtained if the battery is charged when the air temperature is
between 65ºF and 75ºF.
• To prolong battery life, avoid leaving the battery on charge longer than 12
hours. Overcharging is not a safety concern, but it can reduce the life span of
the battery.
• In extremely warm environment or after heavy use, the battery may be too hot
to permit charging. Allow time for the battery pack to cool before charging.
WARNING: Disconnect battery pack from tool or place the
switch in the locked or off position before making any assembly,
adjustments or changing accessories. Such preventive safety
measures reduce the risk of starting the tool accidentally.
12
Operating Procedure
WARNING: Always be sure
the tool is in the Zero position
before changing accessories,
changing collets or servicing
your cordless rotary tool.
COLLET—To loosen, first press shaft lock button and rotate the shaft by hand
until the lock engages the shaft preventing further rotation.
CAUTION: Do not engage lock while the Rotary Tool is running.
With the shaft lock engaged use the collet wrench to loosen the collet nut if
necessary. Change accessories by inserting the new one into the collet as far as
possible to minimize run out and inbalance. With the shaft lock engaged, finger
tighten the collet nut until the accessory shank is gripped by the collet. Avoid
excessive tightening of the collet nut.
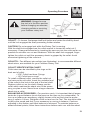
COLLETS—Two different size collets (see illustration), to accommodate different
shank sizes, are available for your Cordless Rotary Tool.
COLLET IDENTIFICATION CHART
Collet sizes can be identified by the rings on the
back end of collet.
• 3/32” Collet has three (3)rings.
• 1/8” Collet has no rings.
To install a different collet, remove the collet nut
and remove the old collet. Insert the unslotted end
of the collet in the hole in the end of the tool shaft.
Replace collet nut on the shaft. Always use the
collet which matches the shank size of the accessory you plan to use. Never force a larger diameter
shank into a collet.
BALANCING ACCESSORIES—For precision work, it is important that all accessories be in good balance (much the same as the tires on your automobile). To
true up or balance an accessory, slightly loosen collet nut and give the accessory or collet a 1/4 turn. Retighten collet nut and run the Tool. You should be able
to tell by the sound and feel if your accessory is running in balance. Continue
adjusting in this fashion until best balance is achieved. To maintain balance on
abrasive wheel points, follow these instructions before each use: with the wheel
13
Operating Procedure
point secured in the collet, turn on the Cordless Rotary Tool and run the 415
Dressing Stone lightly against the revolving wheel point. This removes high spots
and turns up the wheel point to ensure good balance.
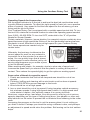
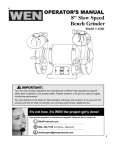
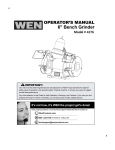
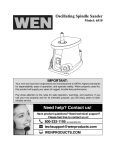
Battery Pack Installation/Removal
• To install battery, insert charged battery in the
handle and secure with release button.
• To remove battery, press the release buttons,
located below the drill handle and gently pull the
battery pack out.
1. Cordless Rotary Tool
2. Battery Pack
3. Release Button
USING THE CORDLESS ROTARY TOOL
• The first step in learning to use the Cordless Rotary Tool is to get the “feel” of it.
Hold it in your hand and feel its weight and balance. Feel the taper of the housing. This taper permits the tool to be grasped much like a pen or pencil.
• When you turn on the tool for the first time, hold it away from your face. Accessories can be damaged during handing, and can fly apart as they come up to
speed. This is not common, but it does happen.
• Practice on scrap materials first to see how the Cordless Rotary Tool cuts. Keep
in mind that the work is done by the speed of the tool and by the accessory in
the collet. You should not lean on or push the tool into the work.
• Instead, lower the spinning accessory lightly to the work and allow it to touch
the area you want to cut (or sand or etch, etc.). Concentrate on guiding the tool
over the work using very little pressure from your hand. Allow the accessory to
do the work.
• Usually, it is best to make a series of passes with the tool rather than attempt to
do all the work in one pass. To make a cut, for example, pass the tool back and
forth over the work.
• Cut a little material on each pass until you reach the desired depth. For most
work, the deft, gentle touch is best. With it, you have the best control, are less
likely to make errors, and will get the most efficient work out of the accessory.
14
Using the Cordless Rotary Tool
Operating Speeds for Accessories
Set the speed indicator to fit the job to achieve the best job results when working with different materials. To select the right speed for each job, use a practice
piece of material. Vary speed to find the best speed for the accessory you are
using and the job to be done.
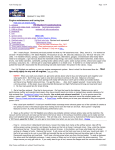
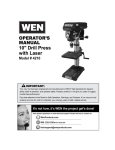
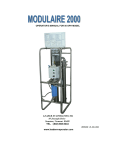
Your Cordless Rotary Tool is equipped with a variable speed control dial. To turn
the tool ON, rotate dial to desired number to select the operating speed needed
from 5,000—25,000 RPM. To turn tool OFF, rotate dial to the “0” off position.
Needs for Slower Speeds
Certain materials, however, (some plastics, for example) require a relatively slow
speed because at high speed the friction of the tool generates heat and causes
the plastic to melt. Most work is done at high speed on your Cordless Rotary
Tool. Lower speeds are needed only for
certain tasks.
The speed of
rotary tool is
controlled by
Ultimately, the best way to determine the
rotating this
correct speed for work on any material is
dial to desired
to practice for a few minutes on a piece of
setting on
scrap. You can quickly learn that a slower
dial.
or faster speed is more effective just by observing what happens as you make a pass
or two at different speed.
When working with plastic, for example, start at a slow rate of speed and
increase the speed until you observe that the plastic is melting at the point of
contact. Then reduce the speed slightly to get the optimum working speed.
Some rules of thumb in regard to speed:
1. P
lastic and materials that melt at low temperatures should be cut at low
speeds.
2. P
olishing, buffing and cleaning with a wire brush must be done at speeds
below 15,000 RPM to prevent damage to the brush.
3. W
ood should be cut at high speed.
4. Iron or steel should be cut at top speed if using tungsten carbide accessory,
but at slower speeds if using high-speed steel cutters. If a high-speed steel
cutter starts to chatter—this normally means it is running too slow.
Aluminum, copper alloys, lead alloys, zinc alloys and tin may be cut at various
speeds, depending on the type of cutting being done. Use paraffin or other suitable lubricant on the cutter to prevent the cut material from adhering to the cutter
teeth.
Increasing the pressure on the tool is not the answer when it is not cutting as
you think it should. Perhaps you should be using a different cutter, and perhaps
an adjustment in speed would solve the problem. But leaning on the tool seldom
helps.
15
Operating Instructions
Flexible Extension
Some work may require more precise control of the tool. For that purpose a
slender flexible extension has been provided. To attach the flexible extension,
remove the collar from the body of the tool. Pull the drive wire out of the flexible
extension 2” to 3”. Remove the collet nut and collet from the rotary tool. Thread
the end of the drive wire thru the collet nut and the collet. Insert the collet in the
hole in the end of the tool shaft. Replace the collet nut on the shaft and tighten
with the collet wrench. Avoid over tightening of the collet nut. Attach the end of
the flexible extension to the tool by using the end of the flexible casing to replace
the collar of the tool shaft. To attach accessories to the flexible extension spindle
insert the “L” bar into the hole in the side of the spindle to keep it from turning
and use the collet wrench to loosen the collet nut.
Light Collar
Some work may require additional illumination for which a special light collar is
provided. To attach the light collar to the tool, remove existing collar from the tool
and attach the light collar. To activate the light collar turn the small on/off switch
located on the light collar.
16
Maintenance
Service
WARNING: NO USER SERVICEABLE PARTS INSIDE. Preventive
maintenance performed by unauthorized personnel may result in misplacing
of internal wires and components, which could cause serious hazard. Disconnect
tool and/or charger from power source before servicing.
Cleaning
WARNING: To avoid accidents, always disconnect the tool and/
or charger from the power supply before cleaning. The tool may be
cleaned most effectively with compressed dry air. Always wear safety goggles
when cleaning tools with compressed air.
Ventilation openings and switch levers must be kept clean and free
of foreign matter. Do not attempt to clean by inserting pointed objects
through opening.
CAUTION: Certain cleaning agents and solvents damage plastic parts. Some of
these are: gasoline, carbon tetrachloride, chlorinated cleaning solvents, ammonia
and household detergents that contain ammonia.
17
WARRANTY
WEN Products is committed to build tools that are dependable for years. Our warranties
are consistent with this commitment and our dedication to quality
LIMITED WARRANTY OF WEN CONSUMER POWER TOOLS PRODUCTS FOR HOME
USE
GREAT LAKES TECHNOLOGIES, LLC ("Seller") warrants to the original purchaser only,
that all WEN consumer power tools will be free from defects in material or workmanship
for a period of one year from date of purchase. Ninety days for all WEN products, if the
tool is used for professional use.
SELLER'S SOLE OBLIGATION AND YOUR EXCLUSIVE REMEDY under this Limited
Warranty and, to the extent permitted by law, any warranty or condition implied by law,
shall be the repair or replacement of parts, without charge, which are defective in material
or workmanship and which have not been misused, carelessly handled, or misrepaired by
persons other than Seller or Authorized Service Center. To make a claim under this Limited Warranty, you must return the complete power tool product; transportation prepaid,
to Great Lakes Technologies, LLC – 501 Davis Road – Elgin, IL. 60123 with a copy of the
original receipt which is
legible and clearly defines Date of Purchase including month and year and Place of
Purchase.
THIS LIMITED WARRANTY DOES NOT APPLY TO ACCESSORY ITEMS SUCH AS
CIRCULAR SAW BLADES, DRILL BITS, ROUTER BITS, JIGSAW BLADES, SANDING
BELTS, GRINDING WHEELS AND OTHER RELATED ITEMS.
ANY IMPLIED WARRANTIES SHALL BE LIMITED IN DURATION TO ONE YEAR FROM
DATE OF PURCHASE. SOME STATES IN THE U.S., SOME CANADIAN PROVINCES
DO NOT ALLOW LIMITATIONS ON HOW LONG AN IMPLIED WARRANTY LASTS, SO
THE ABOVE LIMITATION MAY NOT APPLY TO YOU.
IN NO EVENT SHALL SELLER BE LIABLE FOR ANY INCIDENTAL OR CONSEQUENTIAL DAMAGES (INCLUDING BUT NOT LIMITED TO LIABILITY FOR LOSS OF
PROFITS) ARISING FROM THE SALE OR USE OF THIS PRODUCT. SOME STATES
IN THE U.S. AND SOME CANADIAN PROVINCES DO NOT ALLOW THE EXCLUSION
OR LIMITATION OF INCIDENTAL OR CONSEQUENTIAL DAMAGES, SO THE ABOVE
LIMITATION OR EXCLUSION MAY NOT APPLY TO YOU.
THIS LIMITED WARRANTY GIVES YOU SPECIFIC LEGAL RIGHTS, AND YOU MAY
ALSO HAVE OTHER RIGHTS WHICH VARY FROM STATE TO STATE IN THE U.S.,
PROVINCE TO PROVINCE IN CANADA AND FROM COUNTRY TO COUNTRY.
THIS LIMITED WARRANTY APPLIES ONLY TO PORTABLE ELECTRIC TOOLS,
BENCH POWER TOOLS, OUTDOOR POWER EQUIPMENT AND PNUMATIC TOOLS
SOLD WITHIN THE UNITED STATES OF AMERICA, CANADA AND THE COMMONWEALTH OF PUERTO RICO. FOR WARRANTY COVERAGE WITHIN OTHER COUNTRIES, CONTACT THE WEN CUSTOMER SUPPORT.