1
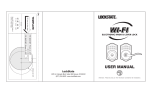
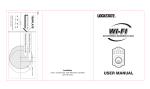
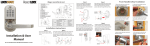
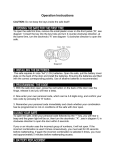
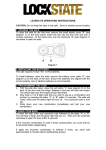
www.LockState.com
OPERATING INSTRUCTION for LockState Safe LS-52-EN
CAUTION: Do not keep the keys in the safe.
Thank you for purchasing the Lockstate LS-52-EN wall safe. This safe will retrofit
easily between existing standard wall studs. This easy quick-start guide will help
you through the installation and programming process.
1. OPENING THE SAFE FOR THE FIRST TIME
To open the safe for the first time, remove the small central sticker on the front
panel that has a picture of a key on it (see “Z” in diagram 2 below). This will
reveal a keyhole underneath. Insert the key into the lock and turn it counterclockwise, at the same time, turn the doorknob clockwise and pull the safe door
open.
2. INSTALLING THE BATTERIES
The safe requires 4 size “AA”(1.5V) batteries. The battery compartment (see
diagram 1) is located on the back of the door. Remove the battery cover and
install the batteries into the compartment, ensuring the batteries are fitted with
the correct corresponding polarity. Once the batteries are installed, close the
battery compartment.
3. PROGRAMMING THE CODE
A. Press the red button “X” (see diagram 1) on the back of the door near the
hinge, release it and you will hear two beeps.
B. Now enter a code (3 to 8 digits) that you wish to use as a combination, and
confirm by pressing the “B” button within 15 seconds. If you wait too long before
pressing the “B” button you will need to start over.
C. Write down your new combination immediately and test your new
combination to ensure that it has been programmed.
4. INSTALLING YOUR SAFE
A. To install your safe in an existing wall, select the location on the wall where
you want to mount the safe. In the selected space, locate the studs between
which the safe will be mounted. The studs have to be 16" on center and have a
minimum of 14 1/4" open space between them for this safe to fit easily.
B. Draw a line with a pencil between the studs marking where you want the
bottom of the safe and drill a hole a little above this line (the hole will create a
space where you can insert your saw).
C. Cut along the line between the studs with your saw. If you hit any obstructions,
stop immediately and check the cut to make sure you have not caused any
unintended damage.
D. Measure 20 7/8 inches from the bottom line upward and draw a vertical line
straight up on both sides of the bottom cut.
E. Draw a straight line that connects the tops of the two vertical lines. To ensure
that you have traced the lines at the proper distance, hold the safe up to the wall
aligned with the traced lines and the bottom cut line. The trace should be outline
the back of the safe (not including the front flange).
F. Cut along all the lines you have just traced and remove the rectangular wall
cutout that results.
G. Straighten and place the safe in the hole positioned at the height you want.
H. At each of the four holes on the sides of the safe wall, drill a hole for the bolt
anchors. Place the bolt anchors in the drilled holes and insert one bolt in each
bolt anchor, securing the safe.
5. USING YOUR SAFE
To open the safe, enter your combination code and confirm by pressing the “A”
button. You will hear a beep and the green light will light up. Within 5 seconds,
open the door using the knob.
If an incorrect combination is used 3 times consecutively, you must wait for 20
seconds before reattempting to open the safe. If again, after the 20 second wait,
an incorrect combination is entered 3 times consecutively, you must wait
approximately 5 minutes before reattempting access.
6. BATTERY REPLACEMENT WARNING
If the batteries are low, the red light (on the left) will warn you immediately upon
an access attempt. To test the batteries, simply input your combination to open
the door. If the batteries are low, the red light will light up. If there is no red light
when accessing the safe then the batteries are in good condition.
7. REPLACING THE BATTERIES
The safe requires 4 size “AA” (1.5V) batteries. Open the safe, then open the
battery cover plate (see “Y” in diagram 1) on the back of the door and replace the
old batteries. **Upon replacing the batteries you must reprogram your
combination using Step 3 above. Use of alkaline batteries is recommended.
8. OVERRIDE INSTRUCTION TO OPEN THE SAFE
Your safe comes with a manual override system. If you forget or misplace your
combination, remove the small central sticker on the front panel with the key
picture on it (see “Z” in diagram 2). Insert the key into the keyhole and turn
it counter-clockwise, then turn the knob clockwise (towards the right). This will
manually open your safe.