1
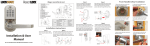
LockState RL 4000
User Guide
Table of Contents
Section 1: General Overview
1. Foreword ..…………………………………………….
2. Important Information ..………………………………
3. Software Installation .………………………………….
3
3
4
Section 2: Initial Lock Setup – Manual Management
1. Adding Lock to Code Generation Software ………….
2. Setting Up Your Lock ….…………………………….
6
7
Section 3: Initial Lock & User Setup – Software Managment
1. Lock Setup ……………………………………………
8
2. User Setup – Issuing Permanent Codes & iButtons …..
11
3. Remote User Code Generation ……………………….
14
Section 3: Advanced Access Control Management
1. Time Shift Setting ……………………………………
2. Time Lock Operation Setting ………………………. …
3. Activation/Expiration Setting ………………………. …
4. Audit Trail ……………………………………………..
5. Exception Date Setting ……………………………... …
6. Mission Management ………………………………. …
7. Copy Lock Setting ………………………………….. …
8. History ……………………………………………… …
18
19
21
22
23
24
26
26
2
Section 1: General Overview
1. Foreword
About This Manual
This manual is designed for users of ResortLock software. All installation, setup, operational
information, procedures, screen captures, and other relevant materials are contained in this manual.
Safety Warnings and Cautions
When handling a print circuit board (PCB), to guard against possible static discharges, touch a
grounded object BEFORE touching the board. Static shock could cost unexpected damage of the
board.
Design Change Disclaimer
Due to design changes and product improvements, information in this manual is subject to change
without notice. LockState assumes no responsibility for any errors that may appear in this manual.
Reproduction Disclaimer
Neither this manual nor any part of it may be reproduced, photocopied, or electronically transmitted
in any way without the written permission of LockState.
Technical Support
When you experience any difficulty installing or operating the ResortLock software, please contact
LockState at 1-888-924-5625.
2. Important information
Manufacture Default Code Setting:
1. Default Setting for Login User Name / Password is: dallas / ibutton
2. Operator Password: The default operator password is 00000000 (8 digit Zeros)
3. System Password (Facility Code): The default System password is 000000 (6 digit Zeros)
LED and Audio Indicator:
1. Program Mode: LED indicating GREEN, audio end with two beeps (Successful)
2. Program Mode: LED indicating Red, audio end with one beep (Fail)
3. Key Access Mode: LED indicating GREEN, audio end with two beeps (Valid Access)
4. Key Access Mode: LED indicating Red, audio end with one beep (Fail)
5. Unlock Mode: LED flashing GREEN, lock is in unlock mode
6. Lock Mode: LED flashing RED, lock is in lock mode
Important Keys:
1. DS1982/DS1990- User Key (Default key-fob color from UCA: red, yellow, black, orange)
2. DS1994/DS1904- It contains an on board real time clock to reset the lock internal clock.
(Default key-fob color: Green)
3. DS1977- Program Key. (Default key-fob color: Purple)
4. DS1996- Firmware Upgrade Key (Default key-fob color: Blue)
3
3. Software Installation
To Download Software, go to http://resortlocks.com/E4-iKPAD.ZIP
Once downloaded, unzip and select “SETUP” file. Follow instructions to install.
After installed, open “Eternity4-ikpad” icon on your desktop.
Operating System
ResortLock software is comparable with Microsoft Windows 98/2000/XP/Vista. All software must
be installed using Windows administrator account, but all levels of Windows users can use the
program. Failure to install the applications may result in error messages and an incomplete
installation.
Step 1: Install 1-Wire USB Driver First
This driver will allow use of the iWire (the connector for the iButton)
1.
Download driver from http://resortlock.com/Downloads/1-wire.zip
2.
Select 1-Wire USB Driver Installation, the Setup Wizard will guide you through the steps.
3.
Select Next. The License Agreement screen displays.
4.
Select I Agree, then Next. 1-Wire USB Driver Warning screen displays.
5.
Select Next. The Select Installation Folder screen displays. Check everyone or just me.
6.
Select Next. The Confirm Installation screen displays, then select Next to start installation.
7.
Select Finish. The 1-Wire USB Driver Installation is complete.
8.
Plug the 1-Wire into the USB adapter and then the USB adapter into your computer.
Step 2: Install the ResortLock Software
1. Download software from http://resortlock.com/Downloads/RL4000-Software.zip.
2. Once downloaded, unzip the zip file (right click on zip folder, select “Extract All”). Then
follow instructions for extracting.
3. Open unzipped folder and double click on SETUP.EXE file.
4. The Auto installer will guide you through the steps and create the shortcut –“ikeypadlock
Management” on your desktop.
Step 3: Running ResortLock Software
1. Make sure you have plugged in the iWire to the USB adaptor and the USB adaptor into
your computer before starting the software.
2. Double Click on “Eternity4-ikpad” icon on your desktop.
3. Login – User Name: dallas, Password: ibutton
4
Default User Name and Password can be modified but can’t be deleted.
4. Change System Password
The default system password is 000000(6 Zeros). It is mandatory to change and remember the
facility system password when the user is ready to use this software. It is highly recommended that
the system password need to be changed from the default setting for security purpose.
5
Section 2: Initial Lock Setup – Skip if you have
Software Management Package (with iWire)
Step 1 Adding Lock to Code Generation Software
1. Lock Setting
Before you can generate remote codes, you will need to add your lock to the software. Select
“Lock Setting” by clicking on the Lock Setting Icon. You can get to the Lock Setting screen
either by clicking the lock icon in the upper menu or the side menu.
6
2. Add New Lock
a. First, click on the “Add” button to input information from your lock.
b. Next, enter the information for your lock:
Enter the 16-digit serial number shown on the back of your lock.
For Lock Status, keep it as the default option.
For Lock Type, select “Access Code”.
Enter a lock name, such as “Vacation Rental”.
For Lock Location, enter the address where the lock is located.
c. Hit the “Save” Button to save your lock information.
d. The information should now display in the field below. Lock Setting is now complete.
7
Step 2: Setting Up Your Lock
1. Master Code
Before you can issue new permanent codes on your lock or set the time on your lock, you’ll need to
set your master code on the lock. Your lock will not work unless you set up a new master code.
The master code will allow you to program your lock. It will not be used to unlock your door.
Again, it is just for programming purposes. Your master code can be anywhere from 1-6 digits.
The default code master code is 123456. If you ever have to reset your lock, it will go back to the
default master code.
Your New Master Code:__________________ (3-6 digits)
To set your new master code to the lock, enter the following into the lock:
# 123456 # 11 # Your Master Code # Your Master Code Again #
* Press each button slowly, not too fast. After every time you press # you will hear 2 quick beeps
and see 2 quick green flashes and then a flashing red light.
* If done incorrectly, you’ll hear a long beep and see a solid red light and will need to start this
step over.
* If done correctly, after the last # you press you’ll hear 2 quick beeps and see 2 quick green
flashes and then the keypad light will go out.
* You have now set your new 3-6 digit master code. You are allowed to have multiple numbers like
33433 as your code. Make sure you wrote it down.
* If you lose or forget your master code you will have to reset the lock and start over. To do this,
press the reset button on the back of your lock with a pin or small screw driver. The reset button is
located just below the battery compartment.
2. Setting the Time & Date
This sets the time zone that the lock will be located in so that the codes you issue will be in sync
with the lock.
Enter the following into the lock to set the time zone. Please note that the time is code is in
military or 24 hour time format.
# Master Code # 88 # YYMMDDHHMM #
Example: If the date and time is 05/30/2008 at 3:32PM, you would enter:
# Master Code # 88 # 0805301532 #
* If done correctly you’ll hear 2 quick beeps and see 2 quick green flashes and then the keypad light
will go out. If done incorrectly you’ll hear a long beep, see the red light, and will need to start this
step over again.
3. Other Functions
For other functionality like setting permanent codes, adding iButtons, auto lock/unlock and
more, please see Appendix A: Quick Operation Guide for more info.
8
Section 3: Initial Lock & User Setup – Software
Users
1. Lock Setup
First you’ll need to add your lock’s information, such as the serial number, name & address, to the
software. This will synchronize the software to the lock and is necessary before remote access
codes can be generated. To do this, we’ll be using the iButton. This information will be taken from
the lock by touching the iButton programming key to the lock. But before we can do that, we first
need to send the lock on a “mission” to get that information. Here is how to do that…
Step 1: Select New Lock Setup Mission from the menu.
The following screen will then appear.
9
Step 2: Connect the iButton
Snap the iButton program key (purple key) into the iWire blue dot receptor. Use good force until
the iButton snaps into place.
Step 3: Issue Key
Select Daylight Saving if it is daylight savings time.
Select Classroom mode to leave the lock open after it is unlocked.
Select Storehouse mode if you want the lock to remain open after it is unlocked. (User can
always lock the door by hitting the “Lock” button on the inside of the door.
This mission will accomplish the following:
Retrieve the lock’s serial number
Initialize the lock back to the manufacture default setting.
Sets the system password, and real time to the lock.
Set Daylight Saving enable or disable
Set Lock Mode to normal open or normal close
Set LED Blinking or idle
Step 4: Retrieve Serial Number From Lock
1. Before touching the iButton to the lock receptor, reset the lock by pressing the reset button
(small button just below batteries) with a pin or small screw driver for one second.
2. After depressing the button you will hear two beeps and see a solid green light on the front of
the lock.
3. While the led is solid green, touch the program key to the iButton reader on the lock (two
beeps). Now the lock information is retrieved from the lock.
10
Step 5: Import Lock Information Back into Software
1. Snap the program key back onto the USB blue dot receptor
2. Click the “Read Key” icon on the menu bar
3. The new lock id number will appear in the retrieve window. Now click the Add Lock icon. (If
the lock already exists in the system, the “exist in database” will show “True”, and you can't
add the same lock to the system).
4. Type in a lock name, location, status, and lock type, then click the save button. You are now
ready to use the lock management software. If you have more locks, you can add them by
following the same steps.
2. User Setup – Issuing Permanent Codes and iButtons
This section will show you how to create new user codes and then program them into the
lock. To set up new iButton and permanent code users, do the following:
Step 1 – Add Codes/iButtons to RL Management Software
1. Go to the Setting Menu and Select Key Setting Screen.
11
2. Add User Information:
To add/edit ibutton /keycode user, click the
screen will pop up:
button in the upper menu, and following
Select either iButton User (to add iButton) or Key Code User (to add code) depending upon the
type of access you want to provide.
To Add iButton User:
Click ok and snap the user iButton key into the encoder (black iButton).
Click on the empty field of “Serial ID”, the iButton key ID will be detected by the system
and be automatically entered.
To Add Keycode User:
1. Check the Key Code User and click ok.
2. Type in user code under Key Code field.
3. Enter the remaining User profile information as follow:
First name: Input the first name of the key owner.
Last name: Input the last name of the key owner.
Status: Active or Inactive (reserve for future use) User. We suggest not deleting any
existing user for security reason. User can change the key status from Active to Inactive for
a lost key or left employee.
Department: User can either select the pre-input Department name from the pull down list,
or input a new name in the field. The new name will be saved to the Department list once
the data saved.
Title, address: Can be entered as the key owner profile; photo of the owner can be
uploaded to the program.
4. After input all the users, click the
Button and all user keys/codes will be stored.
Step 2: Assign iButtons & User Codes to Lock
Now that we’ve set up our users in the software, now we need to transfer this information over to
the lock.
12
1. Go to the Mission Management Menu and Select the
menu.
2. Select the Lock Name from lock list
3. Change the time shift if needed (see Section 3: Advanced Access Control Management, #1 for
more information on setting up time shifts)
4. Check the selected box for each code or iButton you want to assign to the lock
5. Snap programming key into iWire.
6. Hit “Issue Key”
7. Complete the mission by touching the programming key to the lock reader, wait till hear a
double beep.
13
3. Remote User Code Generation
1. Click on the “Remote Code” icon to enter the code generation screen.
2. Click in Lock Name field to select your lock. The lock select window will pop-up.
14
3. Select your lock from the list.
Highlight your lock and then hit the “Select” button. If your lock does not appear
automatically, hit the “Query” button and your lock will appear.
4. Fill in Guest Information.
Fill in the Guest First, and last name. For “Code Type” specify whether the code is a one
time service code (to be used only once and then locked out) or temporary code. If
temporary, then fill out length of stay information.
5. Select the starting date and ending date that you want to provide access to the property.
15
6. Click on “Select Check In/Out Time” to change access times.
You can create up to 4 pre-determined check-in/out times. To set the check in/out times, select the
group you want to change and click “Modify”. Make the changes to the Check In/Out times and
then click “Save”. To finish the process, select the group you want to use and hit “Select.”
7. Finally, select the “Create Code” button to generate your temporary code.
16
The 8 digits numerical Access Code will be generated by the software. If the remote code duration
time is more than 30 days, then the access code will be 10 digits.
Your guest will then enter the access code followed by the # key to unlock the door.
Up to 4 Access Code can be created during one overlapping period.
Sub-Access Codes
Your guest can enter a sub-access code (shorter code) during their stay. Here are the steps to set the
sub-access code :
Press the “*” key till a solid green light appears on the iButton reader.
Enter the Access code followed by the # key on the lock keypad. The green light
will be flashing.
While the light is flashing, punch in a desired code (1 to 6 digits) followed by the
“#” key. Up to 10 sub-access codes could add to each lock.
Wait till green light stop blinking or enter “#” to exit the setting. punch in the subaccess code you just assigned followed by “#” key to unlock the door.
One Time Service code
Up to 16 one time service codes can be generated within the same time window.
17
Section 3: Advanced Access Control Management
1. Time Shift Setting
This function is used to restrict certain users/personnel from entering the facility or area during offhours. For example, you could set up a user so that they can only gain access Monday – Friday
from 8AM to 6PM. To set up a Time Shift Schedule:
1. Go to the
window within the Setting Menu.
2. In the Time Shift Setting window that appears, you will notice there are 16 Time Shift Groups
in total and up to 7 settings in each group. The first group is No Limit. This is a default setting
for each new key and it cannot be modified.
3. To add or modify each Shift Setting in a time group, do the following steps:
i. Select the group number from the left side window (Time Shift 2 in this example),
ii. Click on Add or Modify or Delete button to edit the settings in the right side window.
iii. Set the Begin, End Time, and Day of the week.
iv. Hit Save – Now you have set one day’s schedule within the Time Shift. To set the shift for
more days, repeat steps ii & iii above.
Here is the example for Time Shift Grou :
This company wants to set the Group 2 Shift to access from Monday to Friday 8:00am to 7:00pm,
and no access on Saturday and Sunday.
4. Now assign Time Shift Groups to each user you have set up. This is done in the Lock Key
Assignment Menu. For more information, review Section 2, #2: User Setup: Issuing Permanent
Codes and iButtons.
18
2. Time Lock Operation Setting
This function is used to set the lock itself to automatically unlocked, locked, storehouse mode, or
classroom mode at specific time. For example, if you wanted the lock to be unlocked during
business hours on Monday through Friday, that can be done in the Timed Operation Setting section.
Step 1: Create Time Operation Setting in Software
1. Go to the
window within the Setting Menu.
2. You will notice there are 16 Timed Operation Groups in total, and up to 16 settings in each
group. The first setting by default is No Limit Classroom Mode (The lock will stay at Passage
mode all the time.) The second setting by default is No Limit Storehouse Mode (the lock will
stay locked mode all the time).
3. To set up a new Lock Status group, select a lock group (like Lock Status 3)
4. Click the
to add a new setting for the group.
5. Select the Begin Time. Then select the Lock Status and the days of the week you want this
status to apply. There are four lock statuses the user can choose:
•
•
•
•
Storehouse Mode: In this mode, the Lock will lock back in few seconds (0.1-25.5 seconds).
Classroom Mode: In this mode, the lock will be in the unlock mode until next valid key
touch the reader.
Lock Mode: In this mode, the lock will automatically lock at the setting time.
Unlock Mode: In this mode, the lock will automatically unlock at the setting time.
Here is the example for Lock Status :
This company wants to set the lock to unlock mode Monday to Friday 8:00am to 5:00pm
19
Step 2: Transfer Lock Operation Settings to Lock
1. Go to the
screen within the Setting Menu.
2. Click on “Modify”. Then click “Lock Status”.
3. Select the Lock Operation Group you created in Step 1 above. Then hit “Select”.
4. Now hit “Save” in the upper menu of the Lock Setting window.
5. Final Step – to transfer this information to your lock, simply re-issue any key in the Lock Key
Assignment Menu. When you issue a key, the Lock Operation Setting information will be
automatically transferred to the lock. To review how to issue keys, see Section 2, #2: User
Setup.
20
3. Activation/Expiration Setting
This function is used to set the activation date and expiration date of valid keys.
1. Select the
window within the Setting Menu.
2. The first group is a default setting as No Limit setting. The rest of groups can be set an
activation date and expiration date.
3. Select the Group that you want to modify, like Group 2. Then hit Modify in the upper menu to
change settings.
4. Modify Activation Date & Time along with the Expiration Date & Time.
5. Hit SAVE in the upper menu to save the settings.
6. Now assign Time Shift Groups to each user you have set up. To do this, review Section 2, #2:
User Setup: Issuing Permanent Codes and iButtons.
21
4. Audit Trial
Click “Mission Management” on the main screen toolbars and select the “Get Audit Trail” Icon.
1.
2.
3.
4.
5.
Snap the program key to the encoder and click on “Issue Key” button.
A “Write Get Audit Trail key OK” message will pop up. Click OK to close the screen.
Unplug the program key and touch the lock’s ibutton reader, you will hear a long series
of chirps followed by two beeps.
Snap the program key back to the encoder and click “Read key” button. The read key
screen will pop up and then audit trail records will roll up on the screen.
Click ‘Save Data” button, the audit trail records will be saved in Database.
22
5. Exception Date Setting
This function is used to set restrict access during periods such as holidays, facility shutdowns,
vacations.
1. Select the
window from the Settings Menu.
2. The first group set as No Limit default setting. The holidays can be set as a single day or
multiple days. The selected user iButton keys or codes will be restricted from access.
3. Select the Group you want to modify, like Group 2.
4. Click the Modify button in the upper menu.
5. Make modifications to the start and end times for this exception setting.
6. Click Save in the upper menu to chance your exception dates.
7. Now assign Time Shift Groups to each user you have set up. To do this, review Section 2, #2:
User Setup: Issuing Permanent Codes and iButtons
23
6. Mission Management
Mission management allows you to perform several different tasks with your lock, like issue Lock
Operation Schedules, check settings, change lock time, etc. Each tab within the Mission
Management window is described below.
Set Parameter Key
This mission will set lock parameters, such as LED “Blink”, lock passing time, adjust lock time,
and enable “Daylight Saving”.
Set Time Key
This step uses the DS1904 or DS1994 key to set the real time of the lock
Tip: Other than DS1904/1994 real time key, the DS1977 program key can also set the time of the
lock. But program key will cause time delay since programming the mission key and programming
the lock will take time. We recommend use DS 1904/1994 real time key if the programming
process takes more than 3 minutes.
Get Information Key
The Get Information mission is a useful tool to retrieve the existing lock information, such as: Key
list, lock time, Time Setting and lock ID, Batteries voltage, etc.
Lockout Key
Set Lockout key to selected locks, the lock will be put in Lockout mode (lock or unlock) and will
forbid all the assigned keys/codes to operate the lock. Apply the Lockout key (any Lockout Key)
again to release the Lockout Mode. There are two Lockout Modes:
Lockout and Open: Apply to the door, lock will stay unlock and lockout all the users.
Lockout and Close: Apply to the door, lock will stay lock and lockout all the users.
Multiple locks can be selected in one key. Use DS1977 for this type of key.
24
One-Off key/One-Off Code
These are two types of One Time Users: one time service key (DS-1977) or codes (up to 10)
One-Off Key
Step1: Select locks from Lock List.
Step2: Issue key.
This key will immediately work on the selected lock one time only. (No need set up on the lock)
One-Off Code
Entering 10 One-off codes in the list, use DS1977 key to issue a programming key and assign the
codes to each lock.
Use *Code# to open lock.
25
System Code Key
System code key will override the system code of the current programmed locks in the event of
losing or forgetting your system code. Re-initialize all the locks would be required without the
System code Key.
7. Copy Lock Setting
This is a very useful tool when multiple locks have identical setting such as key list and/or
timetable. After you enroll all the locks and users into the system, set timetable and assign
keys/codes to one lock, then use this lock as model lock.
Step1: Select Model
Lock from lock list
Step2: Select “Same Key
List” or/and “Same Time
Table” to be copied
Step3: Select the lock
from the list
Click on the field of “Select Model Lock”, and select the lock from the pop up screen. Check the
“Selected” boxes and issue the program key. Complete the mission by touching the programming
key to each selected lock reader, wait till hear a double beep.
8. History
Lock Audit History
Click “History” and choose “Lock Audit History” from drop down menu, the following screen will
pop up:
26
Here’s how to view the saved data:
1. On “Query By” give the time window of the audit records, and check the key words.
2. On “Order By” check the key words of the records order.
3. Click “Query” button, the records will show on the screen.
4. Click “Export” to save a copy of the audit trail and records the information to an Excel file.
Access Code history
All the remote temporary codes and one time service codes will be saved for future reference
Operator Log
When select “Operator Log”, the following screen will show:
Use the same method to manage the operator log and audit the operators’ activity.
27