Transcript
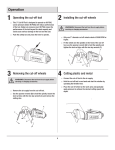
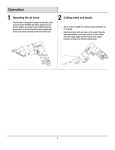
Operation
1 Operating the die grinder
□□ This Die Grinder is designed to operate on 90 PSIG.
Lower pressure (below 90 PSIG) will reduce performance
of the tool. Higher air pressure (over 90 PSIG) raises the
performance of the tool beyond its rated capacity and
could cause serious damage to the tool and the user.
□□ Press the lever and push the safety bar to operate the tool.
2 Installing the mounted points
WARNING: Disconnect the tool from the air supply before
servicing or changing accessories.
□□ Only use 1/4” ANSI standard mounted stones or carbide
burrs rated at or above 20000 RPM.
□□ Push the shaft of the stone or burr fully into the inside of
the collet.
□□ Hold the die grinder spindle with the angle double ended
spanner wrench (B) and tighten the collet nut with the
double ended spanner wrench (C). Install the mounted
point.
C
A
B
3 Removing the mounted points
WARNING: Disconnect the tool from the air supply before
servicing or changing accessories.
□□ Hold the die grinder spindle with the angle double ended
spanner wrench (B) and loosen the collet nut with the
double ended spanner wrench (C).
□□ Remove the accessory from the die grinder.
C
A
B
6
4 Grinding and deburring
□□ Connect the die grinder to the air supply.
□□ Hold the die grinder in one hand and start the rotation by
operating the throttle lever.
□□ Place the stone or burr on the work area and gradually
apply pressure to achieve the desired amount of material
removal.