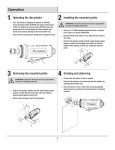
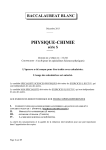
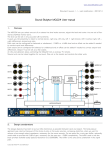
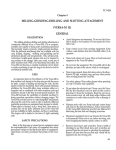
1
CXMT 135; EX; UK
Artikel-Nr.: 4419179
Grinding and Engraving Tool
Ident-Nr.:
01018
Komponenten / Ersatzteile
Position
Artikel-Nr.
Beschreibung
1
441917001006
nut
2
441917001008
fix pin
5
441917001011
screw 2,9 x 16
16
441917001002
carbon brush (pair)
21
441917001003
electronic
24
441917001
switch DZKA3 6A 250V 5E4
901
441917001004
rotor with stator
CXMT 135 User Guide
18/9/08
12:12 pm
Page 2
Operating Instructions Multi Tool
WARNING! PLEASE READ THESE INSTRUCTIONS
BEFORE OPERATING THIS UNIT
KEEP THIS MANUAL FOR FUTURE REFERENCE
EH-Art.-No.: 44.191.79
l.-Nr: 01018
CXMT
135
CXMT 135 User Guide
18/9/08
12:12 pm
Page 3
Caution! - Read the operating instructions to reduce
the risk of injury
Always wear PPE (Personal Protective Clothing).
Wear eye protection!
Wear Ear Protection!
Beware of electrical voltage
2
CXMT 135 User Guide
18/9/08
12:12 pm
Page 4
Helpline No: UK 0870 725 2949 / IRE 189 094 6244
3
CXMT 135 User Guide
18/9/08
12:12 pm
Page 5
1
2
4
3
CXMT 135 User Guide
18/9/08
12:12 pm
Page 6
4
5
6
7
8
9
5
CXMT 135 User Guide
6
18/9/08
12:12 pm
Page 7
10
11
12
13
14
15
CXMT 135 User Guide
18/9/08
12:12 pm
Page 8
! Important!
When using the equipment, a few safety precautions
must be observed to avoid injuries and damage.
Please read the complete operating instructions and
safety regulations with due care. Keep this manual in
a safe place, so that the information is available at all
times. If you give the equipment to any other person,
hand over these operating instructions and safety
regulations as well. We cannot accept any liability for
damage or accidents which arise due to a failure to
follow these instructions and the safety instructions.
1. Safety instructions
and household applications. Use the tool and
accessories only for those applications described.
The machine is to be used only for its prescribed
purpose. Any other use is deemed to be a case of
misuse. The user / operator and not the manufacturer
will be liable for any damage or injuries of any kind
caused as a result of this.
Please note that our equipment has not been
designed for use in commercial, trade or industrial
applications. Our warranty will be voided if the
machine is used in commercial, trade or industrial
businesses or for equivalent purposes.
The corresponding safety information can be found
in the enclosed booklet.
5. Technical data
! CAUTION!
Operating voltage of the drive unit:
Read all safety regulations and instructions.
Any errors made in following the safety regulations
and instructions may result in an electric shock, fire
and/or serious injury.
Keep all safety regulations and instructions
in a safe place for future use.
Power input:
2. Items supplied (Fig. 1/2)
1
2
3
4
5
6
7
8
9
10
11
12
13
14
15
Case
Grinding wheels
Grinding belts
Flap wheel/diamond cutting wheel/grinding
heads/clamping spindles
Cutters/diamond-tipped cutters/sleeves
Felt polishers/grinding wheels/arbors
Bristle brushes/wire brushes/bits/collet chuck
key/whetstone
Drive unit
Grinding pins
Polishing wheels/polishing paste/
grinding wheels
Diamond-tipped cutters
Cutting-off wheels
Flexible shaft
Table clamp
Telescopic stand rod
3. Layout (Fig. 3)
1 ON/OFF switch
2 Speed controller
3 Collet chuck nut
4 Locking knob for collet chuck
5 Cover
4. Proper use
The Grinding and Engraving Set is designed to
perform drilling, grinding, deburring, polishing,
engraving, cutting, milling and cleaning jobs on
wood, metal and plastic in model-making, workshop
Idle speed n0:
230V ~ 50 Hz
135 W
10,000 - 35,000 rpm
Clamping range:
3.2 mm
Weight of tool (without packing):
0.61 kg
Sound pressure level LpA:
70.1 dB
Sound power level LWA:
83.1 dB
Vibration ahv:
Totally insulated
< 2,5 m/s2
II /ww
6. Before starting the equipment
6.1. Taking out the accessories (Fig. 4)
!Before you take out the accessories, you must
remove the two transportation braces. To do so, pull
each transportation brace (a) out of the guide. Then
tilt the accessory holder (b) forwards.
6.2. Inserting the various tools (Fig. 3)
Before inserting a tool (and before each tool change)
switch of the drive unit and pull the power plug.
1. Press the locking knob (4) and turn the collet chuck
until the bolt locks into place.
2. Undo the collet chuck nut (3).
3. Insert the required tool into the sleeve and tighten the
collet chuck nut (3).
6.3. Installing the flexible shaft (Figs. 3/5)
• Unscrew the cover (5) from the front of the equipment.
• Undo the collet chuck nut (3).
• Insert the internal schaft (a) of the flexible shaft into
the collet chuck (3).
• Tighten the collet chuck nut (3).
• Now tighten the ring (b) on the multi-tool.
6.4 Using the stand (Fig. 6)
• Fit the stand to a workbench
• The stand is adjustable in height and can be adjusted
7
CXMT 135 User Guide
•
18/9/08
12:12 pm
Page 9
as shown in Fig. 6.
The multi-tool can now be attached to the stand.
7. Using the tool for the first time
•
•
Make sure that the drive unit is switched off.
Check that the mains voltage specified on the rating
plate of the power supply unit is the same as your
mains supply. Only then should you insert the plug of
the power supply unit into a socket-outlet.
7.1. ON/OFF switch (Fig. 3)
Switch on the drive unit with the power switch (1).
7.2. Speed selector (Fig. 3)
The required speed can be set with the speed control (2).
The correct speed depends on the tool used and the
type of material being processed.
7.3 Directions for use
• With small milling cutters/grinding pins: Use a
high speed.
• With large milling cutters / grinding pins: Use a
low speed.
• Precision work / engraving: Hold the drive unit
like a pen.
• Rough work: Hold the drive unit like a hammer.
7.4 Tips
• Exert only moderate pressure on the workpiece
and allow it to be processed at uniform speed.
• You will not finish your work sooner by exerting
heavy pressure. On the contrary, heavy pressure
will cause the drive unit to slow down or stop and
will overload the motor.
• For your own safety, use a vise or screw clamp to
secure small workpieces.
8. Accessories
8.1. Accessories (Fig. 7/Fig. 1; Item 2-3)
1 Grinding wheel
2 Grinding belt (small)
3 Grinding belt (large)
8.2. Accessories (Fig. 8/Fig. 1; Item 12)
1 Cutting wheel (large)
2 Cutting wheel (small)
8.3. Accessories (Fig. 9/Fig. 1; Item 11)
1 Diamond-tipped cutter (cylindrical, large)
2 Diamond-tipped cutter (cylindrical, small)
3 Diamond-tipped cutter (pointed)
4 Diamond-tipped cutter (ball-shaped)
8.4. Accessories (Fig. 10/Fig. 1; Item 10)
1 Grinding wheel
2 Felt polishing wheel
3 Emery wheel
4 Fabric polishing wheel
5 Polishing paste
8
8.5. Accessories (Fig. 11/Fig. 1; Item 9)
1-5 Grinding pins
8.6. Accessories (Fig. 12/Fig. 1; Item 4)
1 Diamond cutting wheel
2 Clamping spindle for diamond cutting wheel
3 Grinding head for grinding belts (small)
4 Grinding head for grinding belts (large)
5 Flap wheel
8.7. Accessories (Fig. 13/Fig. 1; Item 5)
1 Sleeve
2 Cutter
3 Diamond-tipped cutter (ball-shaped)
8.8. Accessories (Fig. 14/Fig. 1; Item 6)
1 Arbor for felt wheels
2 Arbor for grinding wheels
3 Felt polishing wheel
4 Felt polishing wheel
5 Grinding wheel
8.9. Accessories (Fig. 15/Fig. 1; Item 7)
1 Wire brush
2 Wire brush
3 Bristle brush
4 Wire brush
5 Whetstone
6 Collet chuck
7 HSS bits
8 Bristle brush
8.10. Description of the accessories:
Cutting disks:
For cutting metal and plastic.
Insert the cutting wheel onto the clamping spindle.
Grinding pins:
In various grinding head shapes.
For grinding and deburring metal and plastic.
HSS bits:
For drilling work on non-ferrous metals, wood, plastic
and printed circuit-boards.
Grinding wheels:
For cleaning and sharpening blades and tools. Insert
the grinding wheel onto the clamping spindle.
Grinding paper:
For grinding and deburring wood and plastic.
Polishing wheels/polishing pins/emery wheels:
For polishing brass, tin, copper, etc. Also for use with
polishing pastes.
Whetstone:
For sharpening tools.
CXMT 135 User Guide
18/9/08
12:12 pm
Page 10
Wire brushes:
For cleaning stone, metal, aluminium, etc.
Grinding belts:
For grinding wood and plastic.
Diamond-tipped cutters:
For cutting and engraving ceramic, glass and other
hard materials.
Diamond cutting wheel:
For cutting, separating, grinding and deburring materials,
such as concrete, stone, china, ceramic, etc.
Flap wheel:
For grinding metal, wood and plastic. For straight surfaces
and contoured surfaces.
Sleeves:
Various sizes for mounting different accessory tools.
Cutters:
For cutting plastic, wood and soft metal.
Bristle brushes:
For cleaning and polishing metal surfaces (i.e. cutlery,
jewelry, etc.) Also for use with polishing pastes.
9.3 Maintenance
• There are no parts inside the equipment which require
additional maintenance.
9.4 Ordering replacement parts:
Please quote the following data when ordering
replacement parts:
• Type of machine
• Article number of the machine
• Identification number of the machine
• Replacement part number of the part required
For our latest prices and information please go to
www.isc-gmbh.info
10. Disposal and recycling
The unit is supplied in packaging to prevent it being
damaged in transit. This packaging is raw material and
can therefore be reused or can be returned to the raw
material system.
The unit and its accessories are made of various
types of material, such as metal and plastic.
Defective components must be disposed of as
special waste. Ask your dealer or your local council.
Collet chuck key:
For mounting accessory tools.
9. Cleaning, maintenance and ordering
of spare parts
Always pull out the mains power plug before starting
any cleaning work.
9.1 Cleaning
• Keep all safety devices, air vents and the motor
housing free of dirt and dust as far as possible.
• Wipe the equipment with a clean cloth or blow it with
compressed air at low pressure. (Ensure the air is
always directed away from you, and not towards
another person or animal.)
• We recommend that you clean the device
immediately each time you have finished using it.
• Clean the equipment regularly with a moist cloth
and some soft soap. Do not use cleaning agents
or solvents; these could attack the plastic parts of
the equipment. Ensure that no water can seep into
the device.
9.2 Carbon brushes
• In case of excessive sparking, have the carbon
brushes checked only by a qualified electrician.
Important! The carbon brushes should not be rep
laced by anyone but a qualified electrician.
9
CXMT 135 User Guide
10
18/9/08
12:12 pm
Page 11
CXMT 135 User Guide
18/9/08
12:12 pm
Page 12
11
CXMT 135 User Guide
18/9/08
12:12 pm
Page 1