Transcript
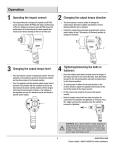
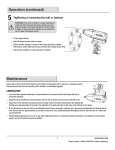
Operation
1 Operating the impact driver
2 Changing the rotation direction
□□ This Impact Driver has a two-step trigger that delivers
higher speed with increased trigger pressure. The speed is
controlled by the amount of switch trigger depression.
□□ The direction of the bit rotation is reversible.
□□ Control the rotation direction by moving the side-mounted
switch to Forward or Reverse as required for the operation.
□□ To turn the impact driver ON, depress the switch trigger.
□□ To turn the impact driver OFF, release the switch trigger.
3 Installing and removing the bits
4 Driving or removing screws
□□ Place the rotation direction switch in the correct position
(forward or reverse) for the operation.
NOTE: It is normal for there to be some play in the installed
bit. Use only impact quality bits with a locking groove.
□□ Hold the impact driver with one hand.
WARNING: Ensure the bit is secured in the coupler before
using the impact driver. Failure to do so could cause serious
personal injury.
□□ Place the bit on the screw head and slowly depress the
switch trigger. Start the bit slowly for more control.
□□ As the screw is driven, impacting will begin.
To install the bits:
□□ Remove the air supply from the impact driver.
□□ Pull back the ball retainer (37) and insert the bit. Release
the sleeve and the bit locks in place.
□□ Pull on the bit to ensure it is secured in the coupler.
To remove the bits:
□□ Remove the air supply from the impact driver.
□□ With the nose of the tool pointed away from you, pull back
the ball retainer (37).
□□ Remove the bit.
6HUSKYTOOLS.COM
Please contact 1-888-43-HUSKY for further assistance.