Transcript
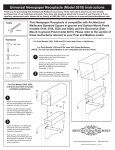
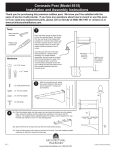
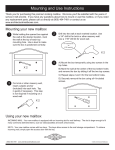
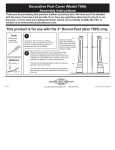
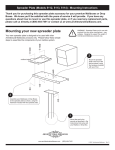
4” Square Mailbox Post (Models 5105, 5106, 5525 and 5526)
Assembly Instructions
Thank you for purchasing this premium mailbox post. We know you'll be satisfied with the
years of service it will provide. If you have any questions about how to assemble or install this
product, or if you need any replacement parts, please call us directly at (800) 464-7491 or
contact us at www.architecturalmailboxes.com.
Assembly Instructions
IMPORTANT! Some mailbox installations are regulated by the United States Postal Service. There are
often height and placement restrictions. Refer to the instructions included with the mailbox BEFORE
INSTALLING THIS POST to ensure proper installation. The installation instructions included on this
sheet provide guidance on how to install the post only and do not cover specific mailbox installation.
Tools
Two Crescent or Open End Wrenches
(not included)
IMPORTANT! If unfamiliar with how to properly form and pour concrete,
consult a qualified mason or carpenter for assistance.
For In-ground Posts (items 5105 and 5525):
Dig a hole deep enough to allow proper mailbox
installation according to the instructions included with
the mailbox. The final height and placement of the
mailbox is often dictated by the United States Postal
Service, which will be described in the instructions that
came with your mailbox. If your mailbox did not come
with installation instructions, contact your local Post
Office for installation details BEFORE CONTINUING.
- or -
Hardware
Pour concrete (at least 1 cubic foot recommended)
completely around the post. Allow concrete to set
before use.
x 4, hex bolts
x 8, washers
x 4, nuts
For Surface Mount Posts (items 5106 and 5526):
Attach the mailbox to the post
3 using the 4 bolt sets included
with the post, as shown below.
Be sure to use the washers.
x4
Mailbox
Bottom
Post
J-Bolts and Concrete Anchors are not included for this
installation.
The final height and placement of the mailbox is often
dictated by the United States Postal Service, which will
be described in the instructions that came with your
mailbox. If your mailbox did not come with installation
instructions, contact your local Post Office for installation details BEFORE CONTINUING.
For a new concrete pad, pour the concrete in your
desired form and insert j-bolts into the wet concrete in
the correct 4” x 10” bolt pattern. Allow concrete to set
before attaching the post. For an existing concrete pad,
install concrete anchors in the correct 4” x 10” bolt
pattern and attach the post to the anchors.
R
Rev. I
© 2009, Architectural Mailboxes
www.architecturalmailboxes.com
(800) 464-7491