1
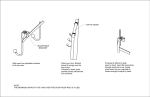
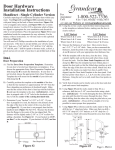
truding spindle and screw the remaining knob onto the spindle,
snugly to hold plates in place.
For
Assistance
Call:
1-800-522-7336
8 am - 5 pm, Monday - Friday, MST
or visit our Website at:
www.nostalgicwarehouse.com
Installation Instructions
Interior Passage Sets
Use a ruler to make sure that the plates are parallel to the edge of the
door. Give the knobs a bit of a wiggle to align them and keep them
from binding against the plates. Screw the top screw(s) into one door
plate, then the bottom screw(s), and again check your alignment. Follow with the plate on the other side.
Now, unscrew the doorknobs about 1/2
turn or just until they turn freely. If all is
still aligned and the knobs turn easily,
screw in any remaining wood screws.
FOR ROUNDPLATES:
We have provided two lengths of machine screws to mate the backplates.
Choose the shorter machine screws for
1 3/8” thick doors or the longer screws for 1 3/4” thick doors. If you
need a different length than those provided, call 1-800-522-7336 for
technical assistance.
Unwrap all components, laying them within easy reach. You will need
a screwdriver, ruler, and nail polish or threadlock.
Door Preparation:
(If door is pre-drilled, skip this step) Choose a location for the doorknob to install, approx. 36”-38” from the floor, or centered in a pleasing location. Using a hole saw, drill a 2 1/8” hole through the door,
with a centered backset of 2 3/8”.
Edge bore a 1” hole into the door,
approximately 3 3/4” deep, centered as shown. Insert latch into the
bored hole and, keeping it perpendicular to the floor, use a sharp awl
or razor knife to scribe a line around
faceplate. Remove the latch and
use a chisel to cut an approx. 3/16”
deep mortise, so that the latch face
will lie flush with the door edge.
Install the Latch:
Install latch into the door with the rounded
part of the latch tongue facing the door
jamb. Tighten screws securely.
FOR LONGPLATES:
Gently back the set screws out of each
doorknob approx. 1/2 way, or until they do
not protrude through the spindle hole. To
be sure that the spindle is centered in the latch, unscrew one knob
approx. 1/4” - 1/2”, depending on the thickness of door. Remove the
other knob completely.
You should now have one doorknob still on the spindle and one loose
doorknob. Holding the knob which is on the spindle, slip the spindle
through one of the door plates and guide the spindle through the
square hole in the door latch. Slide the other door plate onto the pro-
Loosen set screws and remove both doorknobs from the spindle. Center the spindle in door latch. Slide the threaded backplate over the
spindle on the outside (most visible) side of the door. Slide its mate
(with screwholes) onto the other
side. Screw the backplates together,
snugly but not too tight. Screw one
doorknob onto the spindle, keeping
the spindle centered. Now screw on
the second knob, bringing it up snugly, allowing the backplates to align
themselves. Tighten the backplate
screws. Now, unscrew the doorknobs
about 1/2 turn or just until they turn
freely.
Finishing the Knob Installation:
Screw in all set screws carefully, making sure that they tighten against
the flat part of the spindle (a slight wiggle can help to set them in
place). Try the doorset, making sure that everything works smoothly.
Lastly, remove each set screw, one at a time, and coat threads with
fingernail polish or threadlock. Replace each.
Installing the Strike:
Placing the strike in the correct position is very important for proper
doorset function. Using a small piece of carbon paper, close the door
so that the latch rubs the black carbon onto the door jamb. Repeat
until a black smear is clearly visible, showing the path of the latch
tongue. Center the strike over the black mark. Mortise for strike similarly to the procedure used for the latch face. Use a drill to cut the hole
for the latch tongue. Install strike.
PK 107
Interior Privacy Sets (split spindle)
Unwrap all components, laying them within easy reach. You will need
a screwdriver, ruler, and nail polish or threadlock.
FOR ROUNDPLATES:
We have provided two lengths of machine screws to mate the backplates. Choose the shorter machine screws for 1 3/8” thick doors or the
longer screws for 1 3/4” thick doors. If you have any trouble tightening the plates together, give us a call at the number on reverse side.
Prepare door and install strike as shown on reverse page, under Door
Preparation. Install the privacy latch with the privacy button hole towards the side of the door that you wish to lock. The tongue of the
latch should be facing the door jamb side of the door. If it is not, call
1-800-522-7336 for technical assistance.
Prepare the Knobs:
If the doorknobs are on a solid spindle, remove this spindle and discard it. You will only be using the split spindle for this installation. You
may need to back the set screws out of each doorknob approx. 1/2
way.
Placement of the Spindle:
Tighten the split spindle gently, but snugly. Then unscrew one half of
the spindle 2 full turns, leaving a gap of approx. 1/8”. Insert the spindle
into the latch, with the stop-pin on the non-locking side of the door.
FOR LONGPLATES:
Be sure that the privacy holes are closest to the edge of door. Slide
one door plate onto the side of the spindle without the stop pin.
Screw on one of the door knobs until it rests loosely against the door
plate (do not tighten as it will pull the latch out of alignment). Slide
the other door plate onto the protruding spindle (the side with the
stop pin) and screw the remaining knob onto the spindle, snugly to
hold plates in place. Check to see that the privacy mechanism lines
up with the holes on the plates. If it does not, back up a few steps and
try again. Screw the privacy button through the plate on the locking
side and into the latch.
Use a ruler to be sure that everything is straight. Give the knobs a bit
of a wiggle to align them and keep them from binding against the
plates. Screw the top screw(s) into one door plate, then the bottom
screw(s), and again check your
alignment. Follow with the plate
on the other side. Now, unscrew
the knobs about 1/2 turn or just
until they turn freely. If all is still
aligned and the door knobs turn
easily, screw in any remaining
wood screws. See Finishing the
Knob Installation in next column.
Slide the threaded backplate over the spindle on the non-locking side
of the door. Slide its mate (with screwholes) onto the other side. The
privacy holes should be closest to the latch side of door. Screw the
backplates together, snugly but not too tight. Screw the first doorknob onto the spindle on the locking side of the door. Now screw on
the second knob, bringing it up snugly, allowing the plates to align
themselves. Screw the privacy button though the plate on the locking side and into the latch. Tighten the backplate screws. Now, unscrew the knobs about 1/2 turn or just until they turn freely.
Finishing the Knob Installation:
Next, tighten all set screws,
making sure that they are
straight against the flat part of
the spindle (a slight wiggle can
help to set them in place). Try
the doorset, making sure that
everything works smoothly.
Lastly, remove each set screw
and coat their threads with
fingernail polish or threadlock.
Replace each.
Using the Doorlock:
To lock the door, push in the privacy button. To unlock the door, simply turn the inside doorknob. To gain emergency access from the
non-locking side of the door… insert a small, blunt instrument (the
enclosed Allen wrench works well) into the emergency hole located
next to the doorknob. Pushing gently will disengage lock.
Single Dummy (For individual mounting)
Mount the steel dummy backplate to the door with dummy spindle
protruding through the center hole. Place the brass backplate over
the protruding spindle. Screw the doorknob onto the spindle, tightening into place. Align and tighten the allen set screws to lay flat
against the dummy spindle.
Double Dummy (For back-to-back mounting)
Option 1: Install as 2 single dummies as shown above.
Option 2: Drill hole through door approx.1/2” in diameter. Place long
spindle through hole. Place the brass backplates over the protruding
spindle ends. Screw the doorknobs onto the spindle, tightening into
place. Align and tighten the allen set screws to lay flat against the
spindle.
PK 107