1
model 665RP
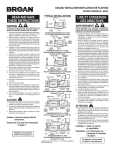
prepare the unit
install the unit
Page For best results, choose a
location which allows fan
to be vented outside with
the shortest possible duct
run and the fewest number of elbows.
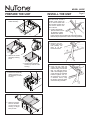
1. Remove the lamp
holder assembly.
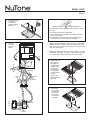
1. Position unit between
joists and extend mounting brackets. Position
brackets such that the
bottom edge of housing will be flush with finished ceiling.
Mark the top of keyhole slot on all four mounting brackets.
2. Remove unit temporarily, and pound
nails partially into
joists at all four
marked locations.
2. Remove the heater
assembly retaining
screw.
3. Rotate heater assembly
and lift it up and out of the
housing.
4. Remove fan assembly
retaining screws. Lift
fan assembly out of the
housing.
5. Slide the 4 hanger
bars into the slots
on each end of the
housing - 2 hanger
bars per side.
3. Hang unit from nails and
check if unit will be flush with
finished ceiling. Pound nails
tight. For wide joist centers: A #8 x 3/8 self-tapping screw
can be used to join extended
brackets together and create a rigid mount. To ensure
a noise-free mount, crimp
the bracket channels tightly
around mounting brackets.