1
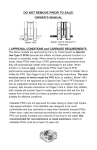
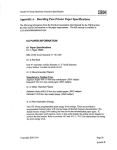
INSTRUCTION MANUAL
Model
Name:
Model
Name:PACTRIO
PacTrio
Manufactured for: Phoenix Manufacturing Inc.
90%
Less energy consumption
1
BEFORE USING YOUR NEW BRISA COOLER:
Please read this guide. It will help you to operate your new PACTRIO cooler/heater in the safest and
most effective way. Keep this book and your sales receipt in a safe place for future reference.
IMPORTANT SAFETY INSTRUCTIONS:
Read all instructions in this guide before using your PACTRIO. This product is intended for indoor
residential use only, not for industrial or other commercial applications. Use only with electrical wiring
that is in good working order and that meets applicable codes and ordinances. If you have any
questions whether your wiring is adequate, consult a qualified electrician.
While using your PACTRIO , you should follow the IMPORTANT SAFETY INSTRUCTIONS listed
below. As part of those instructions we have used the word “WARNING” to indicate a hazard which, if
not avoided, could result in injury or death.
IMPORTANT INSTRUCTIONS:
When using electrical appliances, basic precautions should always be followed to reduce the risk of fire,
electric shock, and injury to persons, including the following:
1. Read all instructions before using this PACTRIO.
2. Use this PACTRIO only as described in this manual. Any other use not recommended by the
manufacturer may cause electrical shock, fire, or injury to persons.
3. Do not operate the PACTRIO with a damaged power cord or after the system malfunctions or has
been dropped in any manner.
4. This appliance is not intended for use by persons (including children) with reduced physical, sensory
or mental capabilities, or lack of experience and knowledge , unless they have been given supervision
or instruction concerning use of the appliance by a person responsible for their safety.
5. Do not place the PACTRIO on a small, unlevel, uneven or any surface which might allow fan to tip or
fall.
6. For proper operation, PACTRIO should be placed on a smooth, non-combustible surface.
7. Always unplug PACTRIO when not in use.
8. Do not operate PACTRIO with any safety devices removed.
9. Do not run power cord under carpeting. Do not cover cord with throw rugs, runners or the like.
Arrange cord away from traffic area where it will not be tripped over.
10. Avoid the use of extension cords due to risk of fire. If an extension cord must be used, the cord
must be a minimum 14AWG and rated not less than 1875 watts.
11. Do not insert or allow any object to enter any openings on the PACTRIO. Doing so may cause
electric shock and/or fire hazard.
12. This product is intended for indoor residential use only, not for industrial or other commercial
applications. The warranty on this product is void if the product is ever used for other than private
household purposes.
13. Do not attempt to manually adjust the horizontal louvers as it may damage the unit.
14. Do not block air openings or place unit on a soft surface such as a bed or sofa.
15. The unit should be connected to a 120 V, 60 Hz, 15- or 20-amp fused, 3-prong grounded outlet.
16. The use of a time-delay fuse or time-delay circuit breaker is recommended.
1
IMPORTANT INSTRUCTIONS CONTD.:
17. The water level should not exceed the MAX line. Ensure the water level is above the MINIMUM
required when using cooler or humidifier.
18. After adding water into the unit, Do NOT lean or tip over to keep water from over flowing. Do NOT
move abruptly to keep water from spilling.
19. If unit falls down with water in it, immediately unplug and wait 24 HOURS before attempting to use.
!
WARNING
SHOCK HAZARD
Use your PacTrio only in dry environments. This unit is not intended for use in a bathroom,
laundry area, or similar location, near sinks, washing machines, swimming pools or other
sources of water. Never locate fan where it may fall into a bathtub or other water receptacle.
Do NOT use in damp environments such as flooded basements.
!
WARNING
FIRE HAZARD
Do NOT use near combustible materials or flammable gasses or sources of heart. Do NOT use in
areas where gasoline, paint or flammable materials are used or stored. To prevent a possible fire,
do not block air intakes or exhaust in any manner. Do NOT insert or allow foreign objects to enter
any intakes or exhaust opening as this may cause an electric shock, fire, or damage the unit.
SAVE THESE INSTRUCTIONS
2
COOLER/
HUMIDIFIER
SLEEP
NATURAL
FAN
HEATER
8H
6H
HI
4H
MED
2H
1H
LOW
HI
ON/OFF
CLEAN
FILTER
OSCILLATION
SPEED
TIMER
1 COOLER / HUMIDIFIER MODE
2 HEAT / FAN MODE
Recirculates and filters the water located at the base to generate cool air
3 ON / OFF MODE
Will turn the entire unit on or off
4 CLEAN FILTER MODE
Indicator will show a light and beep every 100 hours of operation while being used
as a COOLER/HUMIDIFIER. This is to indicate that the honey comb filter located
at the rear of the unit needs to be taken out and rinsed, then place back into the
unit. Press and hold the COOLER/HUMIDIFIER button down to reset the CLEAN
FILTER MODE
5 VERTICAL AIR FLOW
OSCILLATION
6 HORIZONTAL AIR FLOW
OSCILLATION
7 SPEED MODES
Press this key to begin continuous air flow oscillation up and down; press again to
fix air flow angle in place
FAN Mode: will operate turbine as a fan only
HEATER Mode: will operate as a heater on a low speed setting
HI Mode: will operate as a heater on a high speed setting
Press this button multiple times to alternate from FAN to HEATER to HI
Press this key to begin continuous air flow oscillation right and left; press again to
fix air flow angle in place
LOW Mode: will operate fan turbine at low speed
MED Mode: will operate fan turbine at medium speed
HI Mode: will operate fan turbine at high speed
NATURAL Mode: will operate fan to mimic a natural breeze by alternately
increasing and decreasing the speed
SLEEP Mode: will operate the fan at LOW speed after two 30 minute periods of
HIGH and MEDIUM speed
8 TIMER
Allows you to toggle and set a specific time duration for operation (1-8 hours of
preset use)
9 REMOTE CONTROL
Receives operation signal from remote control
10 MAIN POWER SWITCH
Located on the side of the unit.
Once unit is plugged in, press
switch to (l) to power ON. Press
to (O) to power off
3
10
41°F - 109°F
RH<95% (77°F)
REMOTE CONTROL:
Control Panel
1
2
5
6
3
7
4
Remote Control Panel
1 ON / OFF
MODE Instruction Will turn the entire unit on or off
3. Operating
Press this key to begin continuous air flow oscillation up and down; press again to
2 VERTICAL AIR FLOW
•
Functional
keys
fix
air flow angle in place
OSCILLATION
ON/OFF
: Plug
the
appliance,
turn on air
theflow
main
power,right
theand
buzzer
Pressinthis
key
to begin continuous
oscillation
left; press again to
3 HORIZONTAL 1)
AIR
FLOW
will
sound
and
enter
into
the
standby
mode.
Other
keys
are
invalid
except
the
fix
air
flow
angle
in
place
OSCILLATION
ON/OFF key.
LOW Mode: will operate fan turbine at low speed
4 SPEED MODES
MED Mode: will operate fan turbine at medium speed
Press again to activate
thewill
appliance.
It turbine
will blow
heat
when the PTC is
HI Mode:
operate fan
at high
speed
behind wind outlet.NATURAL
While the
PTCwill
is operate
not at the
wind
outlet,
it blows
wind.
Mode:
fan to
mimic
a natural
breezecool
by alternately
increasing and decreasing the speed
SLEEP
Mode:
will operate
theoff.
fanExit
at LOW
speed aftermode.
two 30Under
minute periods of
time and the
appliance
shuts
to stand-by
HIGH and MEDIUM speed
Press a third
heating function, the appliance shuts off 5 seconds later.
5 COOLER / HUMIDIFIER MODE Recirculates and filters the water located at the base to generate cool air
FAN this
Mode:
willto
operate
turbine
as a fan
onlywind mode. The
6 HEAT / COOLER
2)MODE
Speed
: Press
key
set wind
speed
and
HEATER
Mode:
will
operate
as
a
heater
on a low Alternate
speed setting
corresponding wind speed indicator will light accordingly.
order:
HI Mode: will operate as a heater on a high speed setting
low-medium-high-natural.
Sleep
mode.
Press this -button
multiple
times to alternate from FAN to HEATER to HI
7 TIMER
Normal mode
High
Medium
Low
Allows you to toggle and set a specific time duration for operation (1-8 hours of
preset use)
SPECIFICATIONS:
3
• Rated voltage/frequency: 120V/60Hz
• Power: 70W in cooling function, 800W in low heat, 1200W in hi heat
• Rotation speed: High - 1350 RPM Medium - 1150 RPM Low - 950 RPM
• Timer: 1-8 hours
• Air flow: 153 cfm
• Noise: >55dB
• EER: > 9.0
• Evaporation capacity: .26 gal/hour
• Water tank capacity: 1.6 gal
• Net weight: 17.6 lb
• Dimension: 11 in. x 13.6 in. x 27.1 in.
4
OPERATING INSTRUCTIONS:
FUNCTIONAL KEYS
a) ON/OFF: Plug in the appliance and press the MAIN POWER switch on the side of the unit to (l). Listen
for two beeps to indicate that the unit is powered on. Press the control panel ON/OFF key to activate
the appliance. Other keys will not function until the ON/OFF key is switched on. Once activated, the
unit enters fan mode. Pressing the ON/OFF key a second time immediately shuts the appliance off
in FAN mode. In HEATING modes, there is a 5 second delay until the appliance shuts off. To remove
power to the unit, press the MAIN POWER switch to (O).
b) SPEED MODE: Press this key to set air speed and mode. The corresponding air speed indicator will
light accordingly. Press the key multiple times to sequence speeds and modes from LOW to MEDIUM
to HIGH to NATURAL to SLEEP.
NATURAL MODE: Recurring sequence of 5 second intervals of LOW to MEDIUM to HIGH fan speed.
SLEEP MODE: Sequence of 30 minutes HIGH fan speed, 30 minutes MEDIUM fan speed, then
continual LOW speed, or if TIMER is set, continual LOW speed until timer setting expires.
c) TIMER MODE: Press this key multiple times to sequence TIMER in ascending hour amounts as
follows: 1 > 2 > 4 > 6 > 8 > exit. The controls begin the countdown once the hour amount is selected.
The selected hour amount is indicated by one of 5 LED lights. The TIMER an be set only when the
ON/OFF key is pressed to ON.
d) HORIZONTAL AIR FLOW OSCILLATION: When this key is first pressed, air flow continuously
oscillated left and right across a 60° to 135° angle path. Press the key again to lock the air flow angle
at any position between the two extremes. Press again to resume continuous oscillation.
e) VERTICAL AIR FLOW OSCILLATION: When this key is first pressed, air flow continuously oscillates
up and down across a 70° to 135° angle path. Press the key again to lock the air flow angle at any
position between the two extremes. Press again to resume continuous oscillation.
f) COOLER/HUMIDIFIER KEY: Press this key to activate the COOLER/HUMIDIFIER mode. The LED
indicator key for the mode will light when the key is pressed. Press the key again to turn the mode off.
To avoid water pump damage, always keep the water higher than the minimum level. If the water level
drops to less than minimum level, the unit will automatically stop and beep to alert.
g) HEATING KEY: Press this key repeatedly to sequence unit operation from FAN only to LOW HEAT to
HIGH HEAT. Press again to exit heating mode.
5
OPERATING INSTRUCTIONS contd. :
NOTICE
• Add water before starting the COOLER/HUMIDIFIER mode. Turn the water tank knob
counterclockwise 90° and pull out water tank drawer.
• Pay attention to the minimum level line when adding water. Always keep water level higher than
minimum level line, or noisy operation and water pump damage may result.
• When adding water, do NOT over fill above MAX level line.
• Always use clean water.
• After adding the water, close and lock the water tank drawer.
NOTE: In initial use, there may be some odor and minor discoloration of water. This is normal and
poses no harm to the unit or your health.
COOLING BOTTLE INSERTS: When used correctly, the water bottle inserts will absorb heat in the
water. As a result, the water temperature will drop, causing the air flow from the unit to be cooler than
the surrounding air temperature.
To use inserts:
1. Place the cooling bottle inserts in the freezer until completely frozen.
2. Place one of the inserts into the water tank and lock the tank. The cooling effect of the insert can
last up to 4 hours.
3. There are two cooling bottle inserts to provide continual use. One is active in the unit while the other
is being frozen in a freezer.
WARNING: DO NOT OPEN THE COOLING BOTTLE INSERTS OR ATTEMPT TO SWALLOW
THE CONTENTS, WHICH CAN BE HARMFUL IF INGESTED.
6
OPERATING INSTRUCTIONS - REMOTE CONTROL:
1. Open the battery cover on the back of the remote control and install the battery. Insert a coin or
equivalent tool in the cover slot. Turn the cover to the OPEN position to open and remove it. Replace
the cover and turn to the CLOSE position to secure it in place.
2. Aim at the receiver window on the unit control panel. The effective remote control distance is within
20 feet.
3. There are 7 keys on the remote control; they function the same as those of the control panel on the
unit.
! WARNING
1. Do NOT attempt to repair the unit yourself. Do NOT attempt to disassemble or replace the parts by
yourself.
2. Do NOT attempt to manually adjust the horizontal louvers as it may damage the unit.
3. Do NOT touch or handle the power cord with wet hands.
4. Do NOT insert any foreign objects into the unit in an attempt to dislodge a foreign object.
5. Do NOT spray any flammable product into the unit.
6. Avoid prolonged direct exposure to the air output. Always use in a well ventilated area.
7. Do NOT attempt to unplug the unit by pulling on the power cord.
8. Make sure the plug is clean and completely inserted in the power outlet.
9. If a bad smell or noise occurs, IMMEDIATELY stop using and unplug.
10. In a case of power cord damage take the unit to a qualified service dealer for cord repair before
further use of the unit.
11. Keep the power cord clean and dry. Do NOT attempt to plug in if cord is wet or frayed.
12. The water level should NOT exceed the MAX line, ensure the water level is above the MINIMUM
required when using cooler or humidifier.
13. After adding water into the unit, Do NOT lean or tip over to keep the water from overflowing. Do
NOT move abruptly to keep water from spilling.
14. If the unit falls over with water in it, immediately unplug and wait 24 HOURS before attempting to
use.
15. Unplug unit when not in use.
7
MAINTENANCE:
WARNING: Do NOT attempt to service or clean unit while the unit is plugged in. ALWAYS disconnect
the power cord before attempting to clean filters, water tank or surface area of unit.
OUTER FILTER: Periodically check the filter at least once a month. To check, carefully un-clip the outer
filter, remove it, and use a soft brush to clean it free of dust. You may also rinse the filter clean beneath a
faucet. If cleaning with water, thoroughly dry the filter before clipping it back into place.
INNER FILTER: Occasionally you may need to clean the INNER FILTER if it becomes extremely dirty.
Turn the retention knob to remove the INNER FILTER (see below), and rinse it clean beneath a faucet.
Allow it to dry completely before placing it back into the unit.
SPONGE INSERT IN TANK DRAWER: Occasionally check the noise dampening sponge insert in the
water tank drawer. If dirty, rinse clean under a faucet and replace into position in drawer.
SURFACE CLEANING: Clean the unit surface with a damp cloth. Do NOT use abrasive materials when
cleaning as they may scratch the surface. Do NOT use corrosive detergent or solvent to clean surfaces.
Do NOT pour water directly onto the unit.
NOTICE: Do NOT run the unit unless all of the filters are correctly in place.
STORAGE:
1. Unplug the power cord and pack the unit in it’s original box to prevent heavy dust build-up.
2. Make sure the outer filter, filter and water tank are dry before storing.
3. Keep the unit in a dry and well ventilated place.
8
Limited Warranty:
Phoenix Manufacturing, Inc. (PMI) extends this limited warranty to the original purchaser of this
evaporative cooler when installed and used under normal conditions. It does not cover damages
incurred through accident, neglect, or abuse by the owner. Also, we do not authorize any person or
representative to assume for PMI any other or different liability in connection with this product.
Terms and Condiditions: For 1 year from original date of purchase, PMI iwll replace/exchange (at the
sole discretion of PMI) any original component of the cooler that fails due to any defect in material or
factory workmanship only.
What this Warranty does not cover:
PMI is not responsible for any replacement of Media pads. These are components that eventually
will need to be replaced. PMI is not responsible for any consequential damage resulting from any
malfunction.
PMI does not pay the cost of a service call to service or diagnose the cause of trouble.
PMI does not pay the cost of labor to repair any part or installation of a replacement part.
PMI does not pay the freight / postage on any exchange or replacement part.
To obtain service under this warranty:
Please write our Warranty Dept., PMI, 3655 E. Roeser Rd., Phoenix, AZ. 85040.
Include your name, phone number, address & zip code, the dealer involved, the model & serial nmber
of your evaporative cooler and a copy of your proof of purchase, along with the description of the
problem part. Or call 1-800-325-6952.