1
MODELS 741BR • 741SN • 741WH • 741BRFL • 741WHFL
®
Page 3
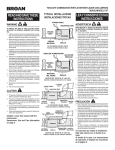
INSTALL THE HOUSING
(continued)
CONNECT THE WIRING
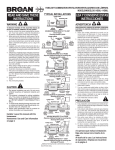
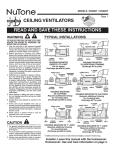
SCHEMATIC WIRING DIAGRAM
Existing Construction
LIGHT
SWITCH
RED
BLU
WHT
LIGHT
(WHITE)
VENT
SWITCH
BLK
BLK
WHT
VENT
(BLACK)
BLK
WHT
LINE WHT
IN
GRD
GRD
UNIT
SWITCH BOX
BLACK
RED
WHITE
GROUND
(bare)
BLUE
DUAL CONTROL
(purchase separately)
4. Place housing in opening so that its bottom edge is flush
with finished ceiling. Nail to joist through keyhole on both
sides. To ensure a noise-free installation, drive another
nail through the top hole of each mounting bracket.
SWITCH BOX
WHITE
RECEPTACLE
(LIGHT)
BLACK
RECEPTACLE
(FAN)
LIGHT
FAN
WIRING
PLATE
ADDITIONAL
MOUNTING
HOLES
1. Wire unit following diagram
above. Run electrical cable as
direct as possible to unit. Do not
allow cable to touch sides or top of unit after installation is
complete.
5. Additional mounting holes are provided for installations
where access from above is inconvenient or not possible.
Nail or screw housing directly to joists or framing.
ATTACH THE GRILLE PAN AND
GLASS SHADE
INSTALL THE DUCTWORK
1. Locate the grille pan
over the fan housing
and connect the wiring
harness plug into white
receptacle in the fan
housing.
2. Insert rod through center hole of grille pan.
Use washer between
collar on rod and pan.
FLUSH
NOTE: The duct connector
has a counter-balanced
damper flap. The flap will be
"open" approx. 1" when duct connector is attached to housing. This design permits insulation to be in direct contact with
fan/light housing per UL (Underwriters Laboratories) standards. The slightest backdraft, however, will close the damper
flap, preventing air from entering unit or finished space.
1. Snap the damper/duct connector onto housing. Make sure
that tabs on the connector lock into slots in housing. Top
of damper/duct connector should be flush with top of housing.
2. Connect 4” round duct to damper/duct connector and extend duct to outside through a roof or wall cap. Check
damper to make sure that it opens freely. Tape all duct
connections to make them secure and air tight.
120 VAC
LINE IN
GRILLE
PAN
WASHER
GRILLE
SCREW
COLLAR
ROD
3. Thread rod onto grille screw in housing, until pan is tight
against ceiling.
MODELS
741BR
741SN
741WH
MODELS
741BRFL
741WHFL
4. Install bulbs. (see "Bulb Replacement" chart on next page for proper
bulbs for your model).
5. Place glass shade over mounting
rod and align shade onto grille pan.
Secure glass shade to grille pan with
finial cap and finial nut as shown.
6. Restore electrical power and check operation of the unit.