1
INSTALL THE HOUSING
INSTALACIÓN DE LA CUBIERTA
Existing Construction
Construcción existente
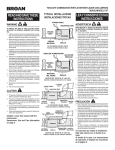
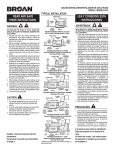
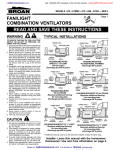
1. Choose the location for your fan in the ceiling or wall.
For best possible performance, use the shortest possible
duct run and a minimum number of elbows.
2. In attic or behind wall, position mounting brackets against
joist. Trace outline of housing on ceiling or wall material.
3. Set housing aside and cut ceiling or wall opening slightly
larger than marked.
4. Place housing in opening so that its bottom edge is flush
with finished ceiling or wall. Nail to joist through keyhole
on both sides. To ensure a noise-free installation, drive
another nail through the top hole of each mounting
bracket.
5. Additional mounting holes are provided for installations
where access from above is inconvenient or not possible.
Nail or screw housing directly to joists, studs or framing.
1. Seleccione la ubicación del ventilador en el cielo raso o pared.
Para obtener el mejor rendimiento posible, utilice un tramo de
conductos lo más corto posible y un número mínimo de codos.
2. En el entretecho o detrás de la pared, coloque las abrazaderas
de montaje contra la vigueta. Trace el perímetro de la cubierta
en el material del techo o pared.
3. Coloque la cubierta a un lado y haga una abertura en el techo o
pared ligeramente más grande que el perímetro marcado.
4. Coloque la cubierta en la abertura de manera que su borde
inferior quede al ras del cielo raso o pared terminado. Clave la
cubierta en la vigueta a través del orificio en forma de cerradura,
en ambos lados. Para asegurar un montaje sin ruido, coloque
otro clavo en el orificio superior de cada aleta de montaje.
5. En la cubierta se pueden encontrar orificios de montaje adicionales para aquellas instalaciones en las que es inconveniente o
imposible el acceso desde arriba. Clave o atornille la cubierta
directamente en las viguetas, montantes o el armazón.
INSTALL THE DUCTWORK
INSTALACIÓN DEL SISTEMA DE
CONDUCTOS
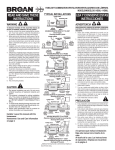
1. Snap the damper/duct connector onto housing. Make
sure that tabs on the connector lock into slots in housing.
Top of damper/duct connector should be flush with top
of housing.
2. Connect 4” round duct to damper/duct connector and
extend duct to outside through a roof or wall cap. Check
damper to make sure that it opens freely. Tape all duct
connections to make them secure and air tight.
CONNECT THE WIRING
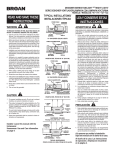
1. Wire unit following diagram. Run electrical cable as direct
as possible to unit. Do not allow cable to touch sides or
top of unit after installation is complete.
ADDITIONAL MOUNTING HOLES
ORIFICIOS DE MONTAJE ADICIONALES
CONEXIÓN ELÉCTRICA
1. Conecte la unidad de acuerdo con este diagrama. Extienda el
cable eléctrico a la unidad tan directamente como sea posible.
No permita que el cable toque los costados ni la parte superior
de la unidad después de que la instalación esté terminada.
ATTACH THE GRILLE
1. Squeeze grille springs together and insert springs into
slots in motor plate.
NOTE: If desired, rotate grille 90o and move springs to
optional tabs.
2. Push grille against ceiling or wall.
BLK
FLUSH
AL RAS
CONEXIÓN DE LA REJILLA
1. Apriete los resortes de la rejilla y métalos en la place del motor.
NOTA: Si lo desea, haga girar la rejilla 90o y mueva los resortes
a las orejetas opcionales.
2. Presione la rejilla contra el cielo raso o pared.
BLK
NEG
ON / OFF
SWITCH
M
BLK
LINE WHT
IN
GRD
1. Conecte a presión el conector del regulador de tiro/conducto
en la cubierta. Asegúrese de que las aletas del conector queden
fijas en las ranuras de la cubierta. La parte superior del conector
del regulador de tiro/conducto debe quedar al ras de la parte
superior de la cubierta.
2. Conecte el conducto redondo de 4” (10.2 cm) en el conector
del regulador de tiro/conducto y extienda el conducto hasta
el exterior a través de una tapa de techo o de pared. Revise
el regulador de tiro para asegurarse de que abre libremente.
Coloque cinta en todas las conexiones de los conductos para
asegurarlas y hacerlas herméticas.
WHT
GRD
SWITCH BOX
UNIT
WHT
SPRING TABS
OPTIONAL TABS
OREJETAS
OREJETAS
DEL RESORTES
OPCIONALES
SLOT IN MOTOR PLATE
RANURA EN EL PLACA DEL MOTOR
NEG
INTERRUPTOR
ENCENDIDO/
APAGADO
NEG
LÍNEA
B
LC
DE
ENTRADA TRA
M
BLC
TRA
UNIDAD
CAJA DE
INTERRUPTOR
BLACK
WHITE
ON / OFF SWITCH
(purchase separately)
SWITCH BOX
GRILLE SPRING
RESORTE DE LA
REJILLA
RECEPTACLE
GROUND
(bare)
INTERRUPTOR
ENCENDIDO /
APAGADO
(se vende por
separado)
CAJA DE INTERRUPTOR
WIRING
PLATE
NEGRO
BLANCO
TIERRA
(desnudo)
PLACA
DE CONEXIONES
120 VAC
LINE IN
LÍNEA DE ENTRADA
DE 120 VCA
3
BLC
RECEPTÁCULO